
整合servlet
1.继承HttpServlet
2.添加@WebServlet注解
@WebServlet(name="FirstServlet",urlPatterns="/firstServlet")
public class FirstServlet extends HttpServlet{

    @Override
    protected void doGet(HttpServletRequest req, HttpServletResponse resp) throws ServletException, IOException {
        System.out.println("doGet");
        // 解决json中文乱码
        resp.setContentType("text/json;charset=UTF-8");
        resp.setCharacterEncoding("UTF-8");
        PrintWriter out = resp.getWriter();
        String str ="{\"name\":\"欧女士\",\"sex\":\"30岁啦\"}";
        out.println(str);
        out.flush();
        out.close();
    }

    @Override
    protected void doPost(HttpServletRequest req, HttpServletResponse resp) throws ServletException, IOException {
        System.out.println("doPost");
    }

}
3.在启动类添加@ServletComponentScan
@SpringBootApplication
@ServletComponentScan
public class AppMain {
    public static void main(String[] args) {
        SpringApplication.run(AppMain.class, args);
    }
}
浏览器访问

整合filter
1.实现Filter
2.添加注解 @WebFilter(filterName=“FirstFilter”,urlPatterns={".do",".jsp","/first"})
新建FirstFilter过滤器
@WebFilter(filterName="FirstFilter",urlPatterns={"*.xx","/firstFilter"})
public class FirstFilter implements Filter{
    @Override
    public void destroy() {
    }
    @Override
    public void doFilter(ServletRequest arg0, ServletResponse arg1, FilterChain arg2)
            throws IOException, ServletException {
        System.out.println("==="+arg0.getParameter("sign"));
/*        if("no".equals(arg0.getParameter("sign"))){
            return;
        }*/
        arg2.doFilter(arg0, arg1);
    }
    @Override
    public void init(FilterConfig arg0) throws ServletException {
    }
}
新建HelloController
@RestController
public class HelloController {
    @GetMapping("/firstFilter")
    public String firstFilter(String sign){
        System.out.println("---"+sign);
        return "firstFilter";
    }
}
3.启动类添加 @ServletComponentScan
浏览器访问

整合listener
1.实现 ServletContextListener
2.添加WebListenter注解
新建FirstListener 监听器
@WebListener
public class FirstListener implements ServletContextListener{
    @Override
    public void contextDestroyed(ServletContextEvent arg0) {

    }
    @Override
    public void contextInitialized(ServletContextEvent arg0) {
        System.out.println("---contextInitialized---");
    }

}
3.启动类添加 @ServletComponentScan
访问静态资源
访问静态资源springboot有两种方式
第一种
在/resources下建static文件夹,名字一定要命名为static。如图
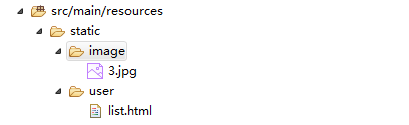
新建list.html文件
<!DOCTYPE html>
<html>
<head>
<meta charset="UTF-8">
<title>用户列表</title>
</head>
<body>
用户列表界面<br/>
<img alt="图片" src="/image/3.jpg">
</body>
</html>
浏览器访问,如图

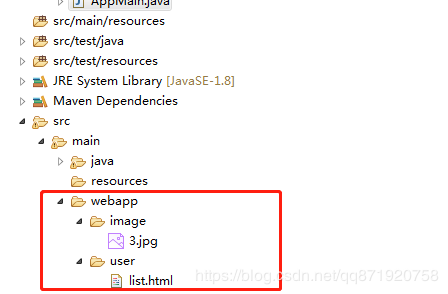
第二种
在src/main/webapp ,在main下建文件夹webapp,如图
文件上传
1.新建fileUpload.html
<!DOCTYPE html>
<html>
<head>
<meta charset="UTF-8">
<title>文件上传</title>
</head>
<body>
  <form action="/helloFileUpdate" method="post" enctype="multipart/form-data">
      上传文件:<input type="file" name="filename"><br/>
      <input type="submit" value="提交">
  </form>
</body>
</html>
2.新建HelloController
@RestController
public class HelloController {

    @RequestMapping("/helloFileUpdate")
    public Object helloFileUpdate(MultipartFile filename){
        System.out.println("文件名称"+filename.getOriginalFilename());
        Map<String,Object> retMap = new HashMap<String,Object>();
        try {
            filename.transferTo(new File("D:\\upload\\"+filename.getOriginalFilename()));
            retMap.put("sign", "ok");
            retMap.put("mes", "文件上传成功");
        } catch (IllegalStateException | IOException e) {
            e.printStackTrace();
            retMap.put("sign", "ok");
            retMap.put("mes", "文件上传失败");
        }
        return retMap;
    }
}
3.配置上传文件大小等
编辑application.yml文件,添加如下配置
spring:
 http:
  multipart:
   maxFileSize: 1MB
   maxRequestSize: 5MB
注:maxFileSize表示单个上传文件的大小,maxRequestSize表示多个文件一共的大小
异步上传文件
很多时候我们是异步上传图片的,选择后就上传然后进行浏览
1.新建fileUploadAjax.html
<!DOCTYPE html> <html> <head> <meta charset="UTF-8"> <title>文件上传</title> <script src="/plug/jquery/jquery-1.11.3.min.js"></script> </head> <body> <form action="" method="post" enctype="multipart/form-data" id="resource"> 上传文件:<input type="file" name="filename" id="filename"><br/> 标 题:<input type="text" name="title" id="title"><br/> 备 注:<input type="text" name="remark" id="remark"><br/> <input onclick="subResource()" type="button" value="提交"><br/> <img alt="没有上传图片" src="D:/upload/1.png" id="img1"> </form> </body> <script type="text/javascript"> function subResource(){ //$("form").serialize() 与new FormData 区别 var formData = new FormData($("#resource")[0]) $.ajax({ url: "/helloFileUpdate", type: 'POST', data: formData, async: false, cache: false, contentType: false, processData: false, success: function (data) { $("#img1").attr("src",data.filePath); }, error: function (data) { alert(data) } }); } </script> </html>
注:("form").serialize()和newFormData(("form").serialize()和 new FormData(("form").serialize()和newFormData((‘#uploadForm‘)[0])都是序列化表单,实现表单的异步提交,但是二者有区别:首先,前者,只能序列化表单中的数据 ,比如文本框等input select等的数据,但是对于文件,比如文件上传,无法实现,那么这时候,FormData就上场了
2.新建HelloController
@RestController
public class HelloController {

    @RequestMapping("/helloFileUpdate")
    public Object helloFileUpdate(MultipartFile filename,String remark,String title){
        System.out.println("文件名称"+filename.getOriginalFilename()+" remark="+remark+" title="+title);
        Map<String,Object> retMap = new HashMap<String,Object>();
        try {
            File file = new File("D:\\upload\\"+filename.getOriginalFilename());
            filename.transferTo(file);
            retMap.put("sign", "ok");
            retMap.put("filePath", file.getAbsolutePath());
            retMap.put("mes", "文件上传成功");
        } catch (IllegalStateException | IOException e) {
            e.printStackTrace();
            retMap.put("sign", "ok");
            retMap.put("mes", "文件上传失败");
        }
        return retMap;
    }
}
多文件上传
只要把接收参数 MultipartFile filename 修改为 MultipartFile[] filename 数组即可

 浙公网安备 33010602011771号