

这篇博客会比较长,因为大部分内容是我写的上位机技术手册,很详细,有耐心的同学应该还是能收获不少的,源代码开放于Google code,欢迎大家checkout:
http://dian-matrix.googlecode.com/svn/trunk/
废话不多少,开始介绍:
1. 概述
为使用户更为方便的生成汉字和绘制自己的图形,我们为《电子台签》开发了一款跨平台的上位机软件。
本软件可以自动生成常用汉字字模,也可以方便的绘制直线,最终能将这些图像信息通过串口发送至下位机。
本软件使用QT框架编程实现,并考虑了Windows和Unix系统的区别,是一个跨平台的软件项目。此外,我们使用QSerialDevice这个第三方库来封装对串口的操作。
在软件的工程搭建上,我们采用了工程文件和源文件分离的管理方式,将工程文件从源文件目录中分离出来,单独构成目录。并且,提供了vs2008工程以及bat文件脚本以方便Windows下的开发和调试。
在软件构架上,我们尽力遵循“低耦合,高内聚”的编程原则,将各个功能模块独立成类,方便维护和扩展。
2. 总体设计
上位机最重要的功能就是方便的构造显示数据,因此,其设计都是围绕数据的处理和显示来进行的,总体的框架如下:

图 1 总体框架
从图中我们看到,数据的来源有两个,一个是字模的生成,一个是绘图。
因为我们的产品是“电子台签”,所以我们的用户最常用的功能必然是汉字显示。因此,我们提供了一个汉字库,程序可以方便的从该库里面获取字模信息,并更改点阵数据。
另一方面,绘图(绘制直线)也能更改点阵数据。使点阵的生成更灵活。
所有数据的更改都会立即被显示出来,方便查看。
而数据最终可以通过串口下载发送到单片机中,在电子台签上显示。
3. 模块设计
3.1. 模块概述
根据总体设计的思想,构建如下的功能模块:
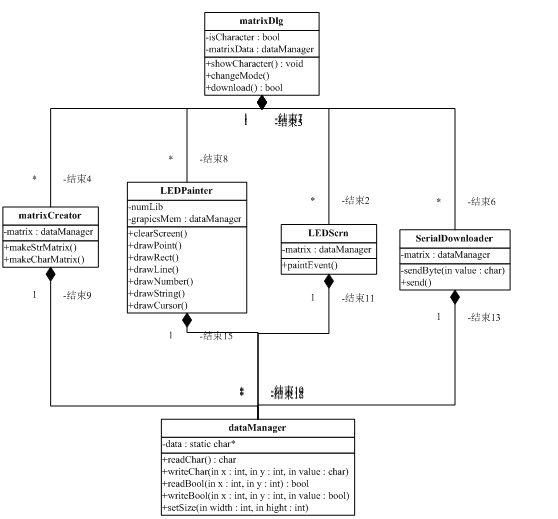
图 2 模块划分
其中,DataManager即负责数据的管理,包括数据按位读写,按字节读写等功能。
MatrixDlg负责整个系统的管理和操作,也是软件的用户接口。
MatrixCreator和LEDPainter进行数据的写操作,构造点阵数据。
LEDScrn则负责将数据显示到MatrixDlg上。
SerialDownloader是软件的下载模块,负责将数据串行发送到计算机串口。
3.2. 数据管理模块
DataManager是数据的管理模块,负责为数据的读写提供接口。
DataManager中的数据按字节存储,又包含按位读写操作,字节与位之间的转换算法较为负责,另一方面,这种对数据的管理操作很常见,因此我们将着重介绍这个类的设计方法。
该类含有以下接口:
/*
 *      DataManager(int width= 8, int height= 16)
 *          constructor
 *          create a data manager with width and height (default is 8 x 16).
 *      unsigned long getLength()
 *          get length of this data container.
 *      void writeChar(int x, int y, unsigned char cValue)
 *          write a unsigned char data to the position (x, y) in matrix.
 *          note that the data location is description by char count.
 *      void writeBool(int x, int y, bool bValue)
 *          write a bool data to the (x, y) in matrix.
 *          note that the data location is description by bool count.
 *      unsigned char readChar(int x, int y) const
 *          read a char data from (x, y)
 *      bool readBool(int x, int y) const
 *          read a char bool from (x, y)
 *      void clearAll()
 *          Set all data to 0.
 */
这些接口中,包含了对数据的按位、按字节读写接口,可以方便的绘图(类位图形式),也可以方便的进行数据传输(字节传输)。
其底层是使用char型数组存储的,因此按位的操作算法较为复杂,包含各种对字节中位的操作,下面以readBool为例说明位与字节的转换算法。
函数原型如下:
{
    int chCount= x/8;               // switch to the x-index of char
    int restBit= x%8;

    // current char = matrixData[chChount][y]
    char curChar= *(matrixData + (dataWidth*y + chCount));

    // current bit is at (1000 0000 >> restBit)
    // current bit larger than 0, return true.
    return curChar & (0x80 >> restBit) ? true : false;
}
该函数首先计算出x,y坐标对应的字节位置(int chCount= x/8;)和余位(int
restBit= x%8;),接着读取对应字节,然后取出该字节中正确的位。
最后一部,取出正确的位,是该函数的重点。
若字节中的数据如下:abcdefgh,则当restBit为3时,需取出d。那么先使1000 0000右移3位(0x80 >> restBit)成为:0001 0000,接着和当前的字节做与操作curChar & (0x80 >> restBit),成为:000d 0000,返回值则取决于d的值了。
该算法的优势在于使用移位和与操作来获取正确的位,效率很高,可以移植到单片机程序中。
其他函数比较简单,不再累述。
3.3. 字模生成模块
MatrixCreator是字模生成模块,调用HZK16文件的字模构造点阵内容。
该类依赖于上文说到的DataManager类。
接口如下:
/*
 *  bool makeStrMatrix16(char const *wstr, unsigned int const wideCharLength, DataManager *data);
 *      input a string and get the string's matrix data to data.
 *  bool makeCharMatrix16(unsigned char const word[], char *wordData);
 *      input a char array (2 char a chinese word) word and get the char's matrix data to wordData.
 */
一般来说,该类对外的接口只需要makeStrMatrix16就够了,该函数的作用是将一个字符串转换为字模的点阵数据,算法比较简单,不做累述,下面介绍makeCharMatrix16的算法。
函数原型如下:
bool MatrixCreator::makeCharMatrix16(unsigned char const word[], char *wordData)
{
    // get the word's zone/bit code
    unsigned char zoneCode= word[0] - 0xa0;
    unsigned char bitCode = word[1] - 0xa0;
    long offset = (94*(zoneCode-1) + (bitCode-1))*32;

    std::ifstream infile(matrixLibPath.c_str());
    if (!infile.is_open())
    {
        return false;
    }

    // get 32 byte data from position 'offset'.
    infile.seekg(offset, std::ios_base::beg);
    if (!infile.good())
    {
        infile.close();
        return false;
    }
    infile.read(wordData, 32);
    infile.close();
    return true;
}
最重要的一点,是需要弄清楚HZK16文件的字模储存格式。
HZK16是依靠汉字的区位码来定位汉字字模的,函数首先取出汉字的区位码:
    // get the word's zone/bit code
    unsigned char zoneCode= word[0] - 0xa0;
    unsigned char bitCode = word[1] - 0xa0;
然后计算出该汉字在HZK16文件中的偏移量:
long offset = (94*(zoneCode-1) + (bitCode-1))*32;
接着,打开文件,读出该偏移量后32字节的内容,即为字模信息:
    // get 32 byte data from position 'offset'.
    infile.seekg(offset, std::ios_base::beg);
    if (!infile.good())
    {
        infile.close();
        return false;
    }
    infile.read(wordData, 32);
LedPainter是软件的绘图模块,通过对点阵数据的操作绘制各种图形。
接口如下:
    // must initial with graphics memory pointer.
    LedPainter(DataManager *);

    // clear the screen, make all led off.
    void ClearScreen();
    // draw point using method.
    void DrawPoint(GraphVector const, enum PaintMethod);
    void DrawPoint(int const, int const, enum PaintMethod);
    // using the paint method to draw a rect/line at top-left, button-right area.
    void DrawRect(GraphVector const, GraphVector const, enum PaintMethod);
    void DrawLine(GraphVector const, GraphVector const, enum PaintMethod);
    // draw a number place it's top-left conner on specific location.
    void DrawNumber(GraphVector const, byte const, enum PaintMethod method = PM_COPY);
    // draw a number(time) string on specific location (top-left).
    void DrawString(GraphVector const, byte const[], byte, enum PaintMethod method = PM_COPY);
    // draw a cursor on specific location using NOT method.
    void DrawCursor(GraphVector, byte size = 3, enum PaintMethod method = PM_XOR);
该函数具备各种图形的绘制功能,并且一般都含有异或和直接绘制两种模式。
该模块的函数较为简单,不做累述,想了解其实现,请直接查看其源码。
3.5. 显示模块
LEDScrn是显示模块,该模块的作用很简洁明了,就是将点阵数据呈现到对话框上。
其接口只有2个:
    QLEDScrn(DataManager *data, QWidget *parent= 0);
    void paintEvent(QPaintEvent *event);
初始化时指定显示的数据,之后在需要绘制图像时,QT框架会自动调用重载函数paintEvent。
下面以该模块为例,简要介绍一下QT框架的图形绘制。
QT中,简单的图形绘制可以使用QPainter实现,初始化时指定其parent。接着可以使用setBrush和setPen设置刷子(背景)和钢笔(前景)。
QPainter的绘制可以是基于直角坐标系的。默认的坐标原点在其父窗口的左上角。X轴正方向向右,y轴正方向向下,单位为像素。
值得注意的是,QPainter可以通过translate来移动坐标原点,如translate(3,4)可以将坐标原点向右移动3个单位,向下移动4个单位。
除了这些基本的设置外,还有很多其他的设置,详情请参考QT的官方文档。
QPainter除了设置,当然还有绘制的功能,QPainter提供大量的绘图函数方便图形的绘制,具体情况不做详述,下面请看本软件中的显示函数来体会:
void QLEDScrn::paintEvent(QPaintEvent * /*event*/)
{
    QPainter painter(this);

    float xSpace= (float)width()/LED_MATRIX_X_COUNT;
    float ySpace= (float)height()/LED_MATRIX_Y_COUNT;
    float const scale= 6.0;
    QRect rect(xSpace/scale, ySpace/scale, xSpace-xSpace/scale, ySpace-ySpace/scale);

    // draw black background
    painter.setBrush(Qt::SolidPattern);
    painter.drawRect(QRect(0, 0, width() - 1, height() - 1));

    for (int x= 0; x < LED_MATRIX_X_COUNT; x++)
    {
        for (int y= 0; y < LED_MATRIX_Y_COUNT; y++)
        {
            painter.save();
            painter.translate(x*xSpace, y*ySpace);

            if (matrixData->readBool(x, y))
            {
                painter.setPen(Qt::red);
                painter.setBrush(Qt::red);
            }
            else
            {
                painter.setPen(QPen(Qt::red, 0, Qt::DotLine));
            }

            painter.drawEllipse(rect);      // draw ellipse use specific style

            painter.restore();
        }
    }
}
该函数的作用是按位遍历点阵数据,为1则绘制一个红色小圆盘,否则绘制红色虚线圈。函数循环中,使用painter.save();和painter.restore();来保存和恢复原点、颜色等信息。为循环内部的坐标、颜色变化提供方便。
3.6. 串口下载模块
SerialDownloader是串口下载模块,该模块可以将软件中的点阵数据通过第三方的串口操作库发送到计算机的串口。
其接口如下:
/*
 *  bool openDevice(const QString &dn);
 *      Open the serial device according to device name 'dn'.
 *  bool sendBytes(QByteArray ba);
 *      Send QByteArray data to serial.
 *  void close(void);
 *      Close serial device.
 */
该模块实际上是对第三方库qserialdevice的封装。实现很简单,在初始化串口设备时,可以指定串口的波特率、数据长度、验证模式、停止位等配置:
    if (serialPort->isOpen())
    {
        if (!serialPort->setBaudRate(AbstractSerial::BaudRate9600)) {
            return false;
        };
        if (!serialPort->setDataBits(AbstractSerial::DataBits8)) {
            return false;
        }
        if (!serialPort->setParity(AbstractSerial::ParityNone)) {
            return false;
        }
        if (!serialPort->setStopBits(AbstractSerial::StopBits1)) {
            return false;
        }
        if (!serialPort->setFlowControl(AbstractSerial::FlowControlOff)) {
            return false;
        }
    }   // if (serialPort->isOpen())
    else
        return false;
通过串口名称(Windows下为COMn,Unix下为/dev/ttySn)打开串口:
    serialPort->setDeviceName(dn);
    if (serialPort->open(AbstractSerial::WriteOnly))
        return true;
然后可以通过写串口发送数据:
    if (ba.length() == serialPort->write(ba))
        return true;
3.7. 对话框模块
MatrixDlg是对话框模块,该模块是本软件的用户接口,也是整个软件的控制者,它组合了以上各个模块,完成用户指定的功能。
接口函数如下:
void comitContents();
void startDownload();
void changeSerial();
界面如下:

图 3 软件界面
点阵显示区是绘图模块的父窗口,绘图模块的更新将显示于该区。
【提交】对应comitContents函数,负责将汉字输入框中的汉字转换成点阵后设置到点阵数据中;
【下载】对应startDownload函数,负责将点阵数据由串口发送出去;
设备名称后的下拉框内容的更改将触发changeSerial函数,更改指定的串口设备。
【画线】功能暂未实现。
该类中函数的算法也比较简单,可以直接通过源代码了解其实现,这里不再累述。
4. 附录一 实际显示效果
4.1. Windows 7下的效果
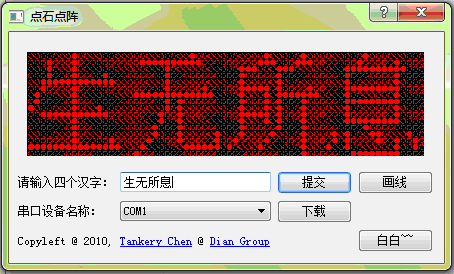
图 4 Windows 7下的显示效果
4.2. Ubuntu 10.10下的效果
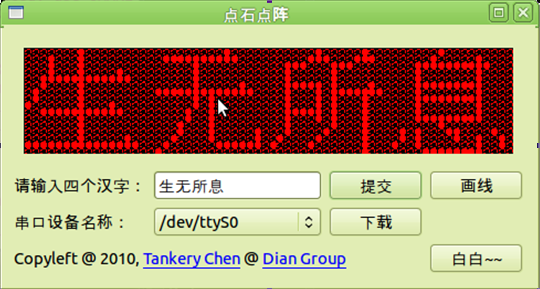
图 5 Ubuntu 10.10 下的显示效果
