

TabLayout的使用,轻松实现带标题头的ViewPager
实现ViewPager+TabLayout实现带标题头的ViewPager
Google在2015的IO大会上,给我们带来了更加详细的Material Design设计规范,同时,也给我们带来了全新的Android Design Support Library,在这个support库里面,Google给我们提供了更加规范的MD设计风格的控件。最重要的是,Android Design Support Library的兼容性更广,直接可以向下兼容到Android 2.2。这不得不说是一个良心之作。
使用方法很简单,只需要添加一句依赖
compile 'com.android.support:design:24.2.0'
Tab滑动切换View并不是一个新的概念,但是Google却是第一次在support库中提供了完整的支持,
而且,Design library的TabLayout 既实现了固定的选项卡 - view的宽度平均分配,
也实现了可滚动的选项卡 - view宽度不固定同时可以横向滚动。选项卡可以在程序中动态添加,
但大部分时间我们都不会这样用,通常滑动布局都会和ViewPager配合起来使用,所以,我们需要ViewPager来帮忙:
通过一句话setupWithViewPager,我们就把ViewPager和TabLayout结合了起来。
import android.os.Bundle;
import android.support.design.widget.TabLayout;
import android.support.v4.app.Fragment;
import android.support.v4.app.FragmentActivity;
import android.support.v4.view.ViewPager;

import java.util.ArrayList;
import java.util.List;

/**
 *  标题头与ViewPager的结合
 */
public class MainActivity extends FragmentActivity {

    /**
     * 显示标题的
     */
    private TabLayout title;

    /**
     * 显示内容的ViewPager,来实现与标题的对应
     */
    private ViewPager viewPager;

    private List<String> titleList;//标题头的数据

    private List<Fragment> fragmentList;//ViewPager显示的Fragment

    @Override
    protected void onCreate(Bundle savedInstanceState) {
        super.onCreate(savedInstanceState);
        setContentView(R.layout.activity_main);
        title = (TabLayout) findViewById(R.id.tl_title);
        viewPager = (ViewPager) findViewById(R.id.viewPager);
        initData();
        title.setupWithViewPager(viewPager);//将标题头TabLayout与ViewPager绑定 如果报错 和下面的换下位置
        viewPager.setAdapter(new MyAdapter(getSupportFragmentManager(),titleList,fragmentList));
    }

    /**
     * 初始化数据
     */
    private void initData() {
        //设置标题头数据
        titleList = new ArrayList<String>();
        titleList.add("推荐1");
        titleList.add("排行22");
        titleList.add("歌单333");
        titleList.add("电台4444");
        titleList.add("糗事55555");
        titleList.add("百科666666");
        //设置Fragment数据
        fragmentList = new ArrayList<Fragment>();
        for (String title : titleList) {
            MyFragment myFragment = new MyFragment();
            Bundle bundle = new Bundle();
            bundle.putString("键",title);
            myFragment.setArguments(bundle);
            fragmentList.add(myFragment);
        }
    }
}
适配器MyAdapter:
import android.support.v4.app.Fragment;
import android.support.v4.app.FragmentManager;
import android.support.v4.app.FragmentPagerAdapter;

import java.util.List;

/**
 * ViewPager的适配器
 */
public class MyAdapter extends FragmentPagerAdapter {

    private List<String> titleList;//标题头的数据

    private List<Fragment> fragmentList;//ViewPager显示的Fragment


    public MyAdapter(FragmentManager fm, List<String> titleList, List<Fragment> fragmentList) {
        super(fm);
        this.titleList = titleList;
        this.fragmentList = fragmentList;
    }

    @Override
    public Fragment getItem(int position) {
        return fragmentList.get(position);
    }

    @Override
    public int getCount() {
        return fragmentList.size();
    }


    /**
     * 将标题头显示的数据与ViewPager进行绑定
     */
    @Override
    public CharSequence getPageTitle(int position) {
        return titleList.get(position);
    }
}
ViewPager显示的布局MyFragment
import android.os.Bundle;
import android.support.annotation.Nullable;
import android.support.v4.app.Fragment;
import android.view.LayoutInflater;
import android.view.View;
import android.view.ViewGroup;
import android.widget.TextView;

/**
 * ViewPager每个页面的碎片
 */
public class MyFragment extends Fragment {

    @Nullable
    @Override
    public View onCreateView(LayoutInflater inflater, @Nullable ViewGroup container, @Nullable Bundle savedInstanceState) {
        View view = inflater.inflate(R.layout.fragment_layout, container, false);
        TextView textView = (TextView) view.findViewById(R.id.textView);
        String value = getArguments().getString("键","默认");
        textView.setText(value);
        return view;
    }
}
activity_main.xml
<?xml version="1.0" encoding="utf-8"?>
<LinearLayout xmlns:android="http://schemas.android.com/apk/res/android"
    xmlns:tools="http://schemas.android.com/tools"
    xmlns:app="http://schemas.android.com/apk/res-auto"
    android:layout_width="match_parent"
    android:layout_height="match_parent"
    android:orientation="vertical">

    <!--  标题头的设置
        app:tableIndicatorColor = "#0000ff" 设置下划线的颜色
        app:tabTextColor="#000000"        设置文本颜色
        app:tabSelectedTextColor="#0000ff" 设置选中的文本的颜色
        app:tabMode="scrollable"
            模式1: scrollable 当标题头长度超过屏宽时,可以横向滚动
            模式2: fixed 填充,宽度平均分配,标题头不能滚动
               -->
    <android.support.design.widget.TabLayout
        android:id="@+id/tl_title"
        android:layout_height="wrap_content"
        android:layout_width="match_parent"
        android:background="#ffffff"
        app:tabIndicatorColor="#0000ff"
        app:tabTextColor="#000000"
        app:tabSelectedTextColor="#0000ff"
        app:tabMode="scrollable">
    </android.support.design.widget.TabLayout>

    <!--利用ViewPager来显示与标题对应的内容-->
    <android.support.v4.view.ViewPager
        android:id="@+id/viewPager"
        android:layout_width="match_parent"
        android:layout_height="match_parent"></android.support.v4.view.ViewPager>


</LinearLayout>
Fragment显示的布局,fragment_layout.xml
<?xml version="1.0" encoding="utf-8"?>
<LinearLayout xmlns:android="http://schemas.android.com/apk/res/android"
    android:orientation="vertical" android:layout_width="match_parent"
    android:layout_height="match_parent">

    <FrameLayout
        android:id="@+id/frameLayout"
        android:layout_width="match_parent"
        android:layout_height="match_parent">

        <TextView
            android:id="@+id/textView"
            android:textSize="50sp"
            android:text="显示的内容"
            android:gravity="center"
            android:layout_width="match_parent"
            android:layout_height="match_parent" />

    </FrameLayout>

</LinearLayout>
效果图: 下面的蓝色线条还可以跟着滑动


改变文本大小: 对应大中小
app:tabTextAppearance="@android:style/TextAppearance.Holo.Large"
<style name="TextAppearance.Holo.Large" parent="TextAppearance.Large" />

<style name="TextAppearance.Holo.Medium" parent="TextAppearance.Medium" />

<style name="TextAppearance.Holo.Small" parent="TextAppearance.Small" />
也可以:
style="@style/MyCustomTabLayout"  //为Tablayout设置样式

<style name="MyCustomTabLayout" parent="Widget.Design.TabLayout">
        <item name="tabTextAppearance">@style/MyCustomTabTextAppearance</item>
    </style>

    <!--设置字体大小-->
    <style name="MyCustomTabTextAppearance" parent="TextAppearance.Design.Tab">
        <item name="android:textSize">25sp</item>
        <item name="textAllCaps">false</item>
    </style>
但有时候我们的tab需要是图片加文字的,那就只能这样搞了:
public class MainActivity extends AppCompa

    private TabLayout tabLayout;
    private ViewPager viewPager;


    @Override
    protected void onCreate(Bundle savedInstanceState) {
        super.onCreate(savedInstanceState);
        setContentView(R.layout.activity_main3);

        //数据源
        String[] titles = {"第一个","第二个","第三个"};
        int[] imgs = {R.drawable.selector_tab_image, R.drawable.selector_tab_image, R.drawable.selector_tab_image};


        tabLayout = (TabLayout ) findViewById(R.id.tl_title);
        viewPager = (ViewPager) findViewById(R.id.viewPager);
        MyAdapter myAdapter = new MyAdapter(getSupportFragmentManager());
        viewPager.setAdapter(myAdapter);
        tabLayout.setupWithViewPager(viewPager);//与ViewPager关联

        //设置数据 并先选择第一个tab
        for (int i = 0; i < myAdapter.getCount(); i++) {
            TabLayout.Tab tab = tabLayout.getTabAt(i);//获得每一个tab
            tab.setCustomView(R.layout.tab_item);//给每一个tab设置view
            if (i == 0) {
                // 设置第一个tab的item是被选择的样式
                tab.getCustomView().findViewById(R.id.tab_text).setSelected(true);
                tab.getCustomView().findViewById(R.id.tab_img).setSelected(true);
            }
            //动态的为每个Tab设置文本与内容
            TextView textView = (TextView) tab.getCustomView().findViewById(R.id.tab_text);
            textView.setText(titles[i]);//设置tab上的文字
            ImageView imageView = (ImageView) tab.getCustomView().findViewById(R.id.tab_img);
            imageView.setImageResource(imgs[i]);//设置tab上的图像

        }

        //Tab选择的监听
        tabLayout.setOnTabSelectedListener(new TabLayout.OnTabSelectedListener() {
            @Override
            public void onTabSelected(TabLayout.Tab tab) {
                //显示现在选择的
                tab.getCustomView().findViewById(R.id.tab_text).setSelected(true);
                tab.getCustomView().findViewById(R.id.tab_img).setSelected(true);
                viewPager.setCurrentItem(tab.getPosition());
            }

            @Override
            public void onTabUnselected(TabLayout.Tab tab) {
                //隐藏之前选择的
                tab.getCustomView().findViewById(R.id.tab_text).setSelected(false);
                tab.getCustomView().findViewById(R.id.tab_img).setSelected(false);
            }

            @Override
            public void onTabReselected(TabLayout.Tab tab) {
                //再次选择
            }
        });

    }


    /**
     * ViewPager的适配器, 因为Tab为自定义了  所以这里不需要重写getPageTitle()方法
     */
    public class MyAdapter extends FragmentPagerAdapter {

        private List<Fragment> fragmentList;//ViewPager显示的Fragment

        public MyAdapter(FragmentManager fm) {
            super(fm);
            //设置Fragment数据
            fragmentList = new ArrayList<>();
            MyFragment myFragment1 = new MyFragment();
            fragmentList.add(myFragment1);
            MyFragment myFragment2 = new MyFragment();
            fragmentList.add(myFragment2);
            MyFragment myFragment3 = new MyFragment();
            fragmentList.add(myFragment3);
        }

        @Override
        public Fragment getItem(int position) {
            return fragmentList.get(position);
        }

        @Override
        public int getCount() {
            return fragmentList.size();
        }

    }
}
布局文件:
<?xml version="1.0" encoding="utf-8"?>
<LinearLayout xmlns:android="http://schemas.android.com/apk/res/android"
    xmlns:app="http://schemas.android.com/apk/res-auto"
    android:orientation="vertical"
    android:layout_width="match_parent"
    android:layout_height="match_parent">

    <!--tabIndicatorHeight 设置指示器的高度  不需要设置为0就行了-->
    <android.support.design.widget.TabLayout
        android:id="@+id/tl_title"
        android:layout_height="80dp"
        android:layout_width="match_parent"
        android:background="#ffffff"
        app:tabIndicatorColor="#0000ff"
        app:tabIndicatorHeight="5dp"
        app:tabMode="fixed">
    </android.support.design.widget.TabLayout>


    <android.support.v4.view.ViewPager
        android:id="@+id/viewPager"
        android:layout_width="match_parent"
        android:layout_height="match_parent"/>

</LinearLayout>
Tab的item布局:
<?xml version="1.0" encoding="utf-8"?>
<LinearLayout xmlns:android="http://schemas.android.com/apk/res/android"
    android:layout_width="wrap_content"
    android:layout_height="wrap_content"
    android:gravity="center"
    android:orientation="vertical">

    <!--文本与图片大小都是可控的-->
    <ImageView
        android:id="@+id/tab_img"
        android:layout_width="30dp"
        android:layout_height="30dp"
        android:scaleType="fitXY"
        android:src="@drawable/selector_tab_image" />

    <TextView
        android:id="@+id/tab_text"
        android:layout_width="wrap_content"
        android:layout_height="wrap_content"
        android:text="我是文本"
        android:textSize="15sp"
        android:textColor="@color/selector_tab_text" />
</LinearLayout>
图片与文本的选择器:
<?xml version="1.0" encoding="utf-8"?>
<selector xmlns:android="http://schemas.android.com/apk/res/android">
    <item android:drawable="@mipmap/ic_launcher" android:state_selected="true" />
    <item android:drawable="@drawable/b10399_4" android:state_selected="false" />
</selector>


<?xml version="1.0" encoding="utf-8"?>
<selector xmlns:android="http://schemas.android.com/apk/res/android">
    <item android:color="#F00" android:state_selected="true" />
    <item android:color="#0FF" android:state_selected="false" />
</selector>
效果如下: 滑动ViewPager时 TabLayout可以跟着联动 如果不需要指示器设置高度为0就噢了

TabLayout单独使用,另一种添加标题头的实现:
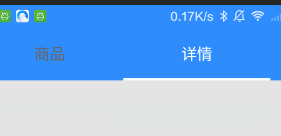
    //添加标题头
        TabLayout.Tab tab1 = tabLayout.newTab().setText("商品");
        tabLayout.addTab(tab1,true);//true 被选中状态
        TabLayout.Tab tab2 = tabLayout.newTab().setText("详情");
        tabLayout.addTab(tab2);
        //设置选中监听
        tabLayout.addOnTabSelectedListener(new TabLayout.OnTabSelectedListener() {
            @Override
            public void onTabSelected(TabLayout.Tab tab) {
                ToastUtils.showToast("选中的:" + tab.getText().toString());
            }

            @Override
            public void onTabUnselected(TabLayout.Tab tab) {

            }

            @Override
            public void onTabReselected(TabLayout.Tab tab) {

            }
        });
效果如下:
不绑定ViewPager 单独设置tabLayout的Item
binding.tabLayout.removeAllTabs()
        val newTab = binding.tabLayout.newTab()
        newTab.setCustomView(R.layout.publish_item_tshirts_tab)
        newTab.customView?.findViewById<TextView>(R.id.tvTabTitle)?.text = "正面"
        val antiTabItem = binding.tabLayout.newTab()
        antiTabItem.setCustomView(R.layout.publish_item_tshirts_tab)
        antiTabItem.customView?.findViewById<TextView>(R.id.tvTabTitle)?.text = "反面"
        binding.tabLayout.addTab(newTab, true)
        binding.tabLayout.addTab(antiTabItem, false)
        binding.tabLayout.clearOnTabSelectedListeners()

 浙公网安备 33010602011771号