

各布局中的常用方法
LinearLayout 线性布局
-
android:id - 为控件指定相应的ID -
android:text - 指定控件当中显示的文字,需要注意的是,这里尽量使用string.xml -
android:gravity - 指定控件的基本位置,比如说居中,居右等位置 -
android:textSize - 指定控件当中字体的大小 -
android:background - 指定控件所用的背景色,RGB命名法 -
android:width - 指定控件的宽度 -
android:height - 指定控件的高度 -
android:padding - 指定控件的内边距,也就是说控件当中的内容 -
android:sigleLine - 如果设置为真的话,则将控件的内容显示在一行当中 -
padding内边距指的是当前布局与包含的组件之间的边距layout_margin外边距指的是与其他组件之间的边距。
gravity 控制当前控件内容显示区域
layout_gravity 当前控件在父元素的位置
Layout_weightSum
Layout_weight 额外空间分配(权重)
android:visibility="invisible"
控制布局是否显示
显示 visible
不显示,但占空间 invisible
隐藏 gone
TableLayout 表格布局:(有权重的属性)

TableRow     一行
android:collapseColumns:隐藏指定的列

android:shrinkColumns:收缩指定的列以适合屏幕,不会挤出屏幕

android:stretchColumns:尽量把指定的列填充空白部分

android:layout_column:控件放在指定的列

android:layout_span:该控件所跨越的列数
RelativeLayout(相对布局)
作用
|
|
android:layout_above
|
将组件放在指定ID组件的上方
|
android:layout_below
|
将组件放在指定ID组件的下方
|
android:layout_toLeftOf
|
将组件放在指定ID组件的左方
|
android:layout_toRightOf
|
将组件放在指定ID组件的右方
|
作用
|
|
android:layout_alignBaseline
|
将该组件放在指定ID组件进行中心线对齐
|
android:layout_alignTop
|
将该组件放在指定ID组件进行顶部对齐
|
android:layout_alignBottom
|
将该组件放在指定ID组件进行底部对齐
|
android:layout_alignLeft
|
将该组件放在指定ID组件进行左边缘对齐
|
android:layout_alignRight
|
将该组件放在指定ID组件进行右边缘对齐
|
作用
|
|
android:layout_alignParentTop
|
该组件与父组件进行顶部对齐
|
android:layout_alignParentBottom
|
该组件与父组件进行底部对齐
|
android:layout_alignParentLeft
|
该组件与父组件进行左边缘对齐
|
android:layout_alignParentRight
|
该组件与父组件进行右边缘对齐
|
作用
|
|
android:layout_centerHorizontal
|
将该组件放置在水平方向中央的位置
|
android:layout_centerVertical
|
将该组件放置在垂直方向的中央的位置
|
anroid:layout_centerInParent
|
将该组件放置在父组件的水平中央及垂直中央的位置
|
AbsoluteLayout 绝对布局/FrameLayout 帧布局
AbsoluteLayout
android:layout_x 指定控件在父布局的x轴坐标
android:layout_y 指定控件在父布局的y轴坐标
FrameLayout
帧布局每次添加的控件都显示在最上面,最后显示在界面上的是最后添加的一个控件
GridLayout网格布局 (没有权重的属性)
android4.0以上版本出现的GridLayout布局
首先它与LinearLayout布局一样,也分为水平和垂直两种方式,默认是水平布局,一个控件挨着一个控件从左到右依次排列,但是通过指定android:columnCount设置列数的属性后,控件会自动换行进行排列。另一方面,对于GridLayout布局中的子控件,默认按照wrap_content的方式设置其显示,这只需要在GridLayout布局中显式声明即可。
其次,若要指定某控件显示在固定的行或列,只需设置该子控件的android:layout_row和android:layout_column属性即可,但是需要注意:android:layout_row=”0”表示从第一行开始,android:layout_column=”0”表示从第一列开始,这与编程语言中一维数组的赋值情况类似。
最后,如果需要设置某控件跨越多行或多列,只需将该子控件的android:layout_rowSpan或者layout_columnSpan属性设置为数值,再设置其layout_gravity属性为fill即可,前一个设置表明该控件跨越的行数或列数,后一个设置表明该控件填满所跨越的整行或整列。
constraintLayout约束布局的使用
首先添加依赖
//约束布局的使用
compile 'com.android.support.constraint:constraint-layout:1.0.2'
1.对比线性布局 如下:
<?xml version="1.0" encoding="utf-8"?>
<android.support.constraint.ConstraintLayout xmlns:android="http://schemas.android.com/apk/res/android"
    xmlns:app="http://schemas.android.com/apk/res-auto"
    android:background="#ffcccc"
    android:layout_width="match_parent"
    android:layout_height="wrap_content">

    <!--约束布局的使用
        在当控件有自己设置的宽度,例如warp_content、固定值时,我们为控件添加的都是约束“Constraint”,
        这个约束有点像橡皮筋一样会拉这个控件,但是并不会改变控件的尺寸

        android:layout_width="0dp" 代表填充约束的空间(类似填充父布局) 如果写个固定的值,结果就是固定的 如果写的wrap_content   会在0的基础上 再加上 一定的宽度(不知道包裹有多宽)

        app:layout_constraintLeft_toRightOf="@id/tv1" 代表自己的左边约束  在 tv1 的右边
        app:layout_constraintRight_toRightOf="parent" 代表自己的右边约束  在 父布局的右边

        app:layout_constraintTop_toBottomOf="@id/tv3" 代表自己的顶部约束  在tv3的底部
        app:layout_constraintBottom_toBottomOf="parent" 代表自己的底部约束 在父布局的底部(底部对齐)

        app:layout_constraintBaseline_toBaselineOf="@id/tv3" 代表自己的基线与tv3的基线对齐

        依次类推  还有 下对上 上对下  等等...
        -->

    <TextView
        android:id="@+id/tv1"
        android:layout_width="150dp"
        android:layout_height="100dp"
        android:background="#ff0000"
        android:text="我的id = tv1"
        android:gravity="center"
        android:textColor="#000000"
        app:layout_constraintLeft_toLeftOf="parent"
        app:layout_constraintTop_toTopOf="parent"/>

    <TextView
        android:id="@+id/tv2"
        android:layout_width="0dp"
        android:layout_height="wrap_content"
        android:background="#ffff00"
        android:text="我是新闻头条内卡减肥了卡经十东路卡房间啊了可见阿里家乐福佳得乐激发了数据罚款的减肥"
        app:layout_constraintLeft_toRightOf="@id/tv1"
        app:layout_constraintRight_toRightOf="parent"/>

    <TextView
        android:id="@+id/tv3"
        android:layout_width="wrap_content"
        android:layout_height="wrap_content"
        android:textColor="#000000"
        android:text="2017-8-20"
        app:layout_constraintLeft_toLeftOf="@id/tv2"
        app:layout_constraintTop_toBottomOf="@id/tv2"/>

    <TextView
        android:id="@+id/tv4"
        android:layout_width="0dp"
        android:layout_height="wrap_content"
        android:textColor="#000000"
        android:layout_marginLeft="20dp"
        android:text="在你右边与你基线对齐"
        app:layout_constraintLeft_toRightOf="@id/tv3"
        app:layout_constraintBaseline_toBaselineOf="@id/tv3"/>

    <TextView
        android:id="@+id/tv5"
        android:layout_width="wrap_content"
        android:layout_height="wrap_content"
        android:textColor="#000000"
        android:text="2017-8-20暗示的发的顺丰到付"
        app:layout_constraintBottom_toBottomOf="parent"
        app:layout_constraintLeft_toLeftOf="@id/tv2"/>

</android.support.constraint.ConstraintLayout>
效果图:可见 完全可以替代相对布局
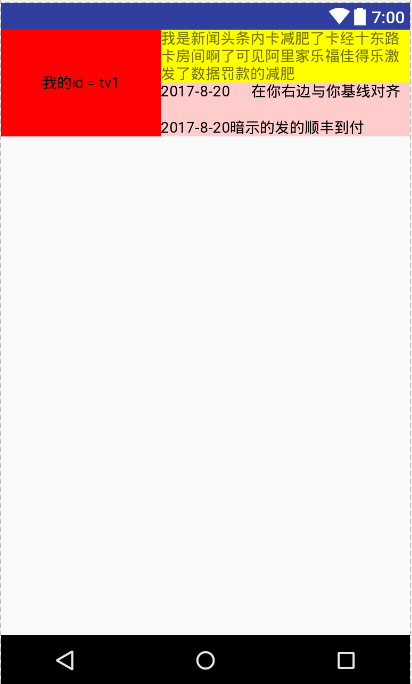
上面有说宽度设置为0的时候,看下下面的效果图就知道为嘛要设置为0了:

可见:当你左边有约束,右边也有约束时,如果想填充约束的布局,宽度应该设置为0。 高度 同理
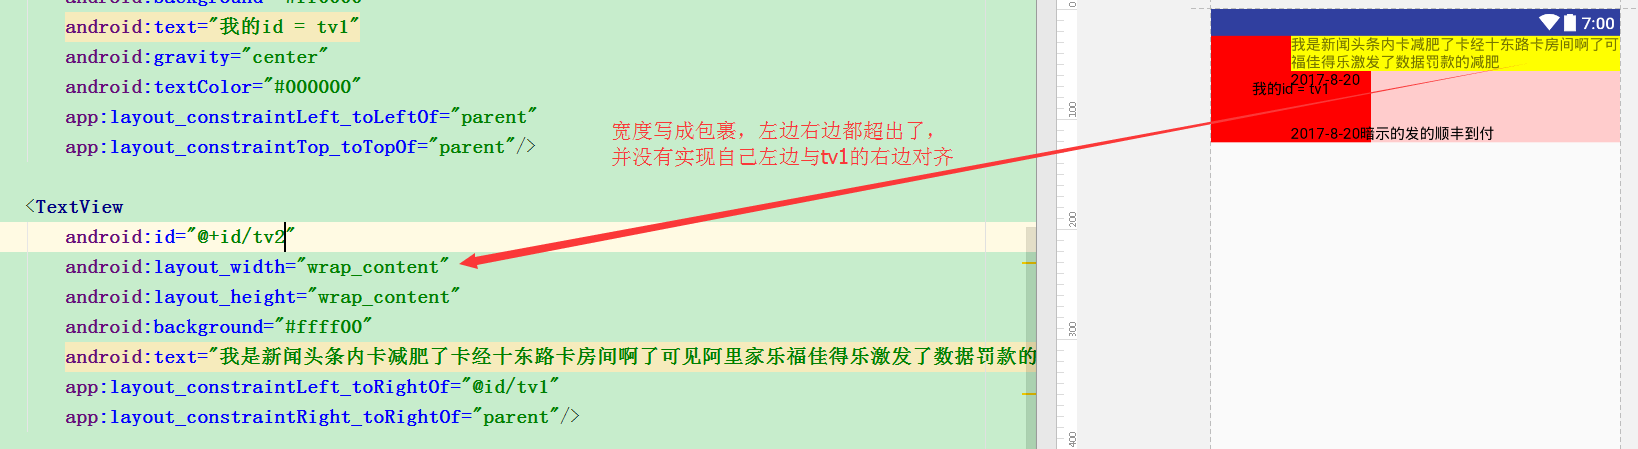
2.宽高按照比例设置
<?xml version="1.0" encoding="utf-8"?>
<android.support.constraint.ConstraintLayout xmlns:android="http://schemas.android.com/apk/res/android"
    xmlns:app="http://schemas.android.com/apk/res-auto"
    android:background="#ffcccc"
    android:layout_width="match_parent"
    android:layout_height="wrap_content">

    <!--约束布局对宽高比例的设置(需要宽确定  或者  高确定)
        app:layout_constraintDimensionRatio="2:1" 代表 宽:高 = 2:1
        app:layout_constraintDimensionRatio="H,2:1" 代表 宽:高 = 2:1
        app:layout_constraintDimensionRatio="W,2:1" 代表 高:宽 = 2:1
        -->

    <!--确定宽度-->
    <TextView
        android:id="@+id/tv1"
        android:layout_width="100dp"
        android:layout_height="0dp"
        android:background="#ff0000"
        android:gravity="center"
        android:text="我可以设置宽高比"
        app:layout_constraintDimensionRatio="2:1"
        app:layout_constraintLeft_toLeftOf="parent"
        app:layout_constraintRight_toRightOf="parent" />

    <!--宽度填充整个父布局-->
    <TextView
        android:id="@+id/tv2"
        android:layout_width="0dp"
        android:layout_height="0dp"
        android:background="#ff0000"
        android:gravity="center"
        android:text="我可以设置宽高比"
        android:layout_marginTop="10dp"
        app:layout_constraintDimensionRatio="2:1"
        app:layout_constraintLeft_toLeftOf="parent"
        app:layout_constraintRight_toRightOf="parent"
        app:layout_constraintTop_toBottomOf="@id/tv1"/>

    <!--宽度固定了,所以 比例就失效了-->
    <TextView
        android:id="@+id/tv3"
        android:layout_width="50dp"
        android:layout_height="50dp"
        android:background="#ff0000"
        android:gravity="center"
        android:text="我宽度与高度固定了"
        android:layout_marginTop="10dp"
        app:layout_constraintDimensionRatio="2:1"
        app:layout_constraintLeft_toLeftOf="parent"
        app:layout_constraintRight_toRightOf="parent"
        app:layout_constraintTop_toBottomOf="@id/tv2"/>

</android.support.constraint.ConstraintLayout>
效果图: 666 以后再也不用在代码里设置宽高比了
3.线性布局权重的使用:
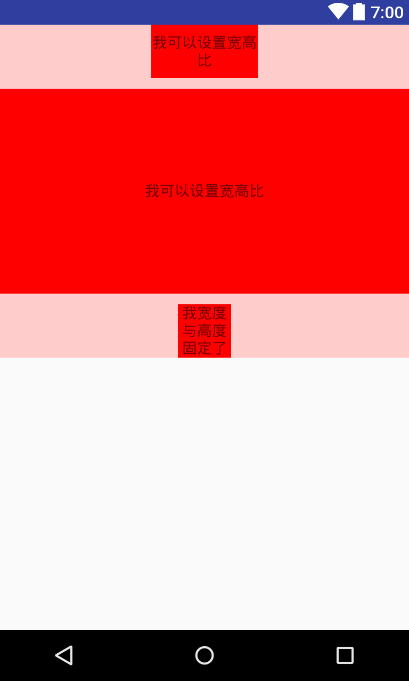
<?xml version="1.0" encoding="utf-8"?>
<android.support.constraint.ConstraintLayout xmlns:android="http://schemas.android.com/apk/res/android"
    xmlns:app="http://schemas.android.com/apk/res-auto"
    xmlns:tools="http://schemas.android.com/tools"
    android:background="#ffcccc"
    android:layout_weight="1"
    android:layout_width="match_parent"
    android:layout_height="match_parent">

    <!--约束布局 权重的设置
        app:layout_constraintHorizontal_weight="1" 宽度 权重的设置
        app:layout_constraintVertical_weight="" 高度 权重的设置

        layout_constraintHorizontal_chainStyle 的使用
        -->

    <!--注意这里逆天的功能
        @id/tv2   这个tv2 我还没定义就能使用了  不过需要写个“+”-->
    <TextView
        android:id="@+id/tv1"
        android:layout_width="0dp"
        android:layout_height="wrap_content"
        android:background="#ff0000"
        android:gravity="center"
        android:text="tab1"
        app:layout_constraintLeft_toLeftOf="parent"
        app:layout_constraintRight_toLeftOf="@+id/tv2"
        app:layout_constraintHorizontal_weight="1"/>

    <TextView
        android:id="@+id/tv2"
        android:layout_width="0dp"
        android:layout_height="wrap_content"
        android:background="#ffff00"
        android:gravity="center"
        android:text="tab2"
        app:layout_constraintLeft_toRightOf="@+id/tv1"
        app:layout_constraintRight_toLeftOf="@+id/tv3"
        app:layout_constraintHorizontal_weight="1"/>

    <TextView
        android:id="@+id/tv3"
        android:layout_width="0dp"
        android:layout_height="wrap_content"
        android:background="#ff0000"
        android:gravity="center"
        android:text="tab3"
        app:layout_constraintLeft_toRightOf="@+id/tv2"
        app:layout_constraintRight_toRightOf="parent"
        app:layout_constraintHorizontal_weight="1" />

    <!--约束布局的嵌套-->
    <android.support.constraint.ConstraintLayout
        android:layout_width="0dp"
        android:layout_height="0dp"
        android:background="#cccccc"
        app:layout_constraintTop_toBottomOf="@id/tv1"
        app:layout_constraintBottom_toBottomOf="parent"
        app:layout_constraintLeft_toLeftOf="parent"
        app:layout_constraintRight_toRightOf="parent">

        <TextView
            android:id="@+id/tv01"
            android:layout_width="0dp"
            android:layout_height="0dp"
            android:text="我的第一层"
            android:gravity="center"
            android:background="#00ffff"
            app:layout_constraintVertical_weight="1"
            app:layout_constraintLeft_toLeftOf="parent"
            app:layout_constraintRight_toRightOf="parent"
            app:layout_constraintTop_toTopOf="parent"
            app:layout_constraintBottom_toTopOf="@+id/tv02"/>
        <TextView
            android:id="@+id/tv02"
            android:layout_width="0dp"
            android:layout_height="0dp"
            android:text="我的第二层"
            android:gravity="center"
            android:background="#ff0000"
            app:layout_constraintVertical_weight="1"
            app:layout_constraintLeft_toLeftOf="parent"
            app:layout_constraintRight_toRightOf="parent"
            app:layout_constraintTop_toBottomOf="@id/tv01"
            app:layout_constraintBottom_toTopOf="@+id/tv03"/>
        <TextView
            android:id="@+id/tv03"
            android:layout_width="0dp"
            android:layout_height="0dp"
            android:text="我的第三层"
            android:gravity="center"
            android:background="#00ffff"
            app:layout_constraintVertical_weight="1"
            app:layout_constraintLeft_toLeftOf="parent"
            app:layout_constraintRight_toRightOf="parent"
            app:layout_constraintTop_toBottomOf="@id/tv02"
            app:layout_constraintBottom_toBottomOf="parent"/>

    </android.support.constraint.ConstraintLayout>

</android.support.constraint.ConstraintLayout>
效果图:可见 可以代替线性布局了
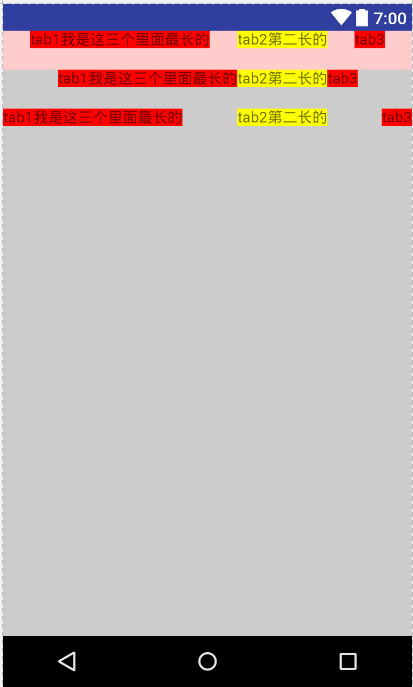
为权重设置样式:
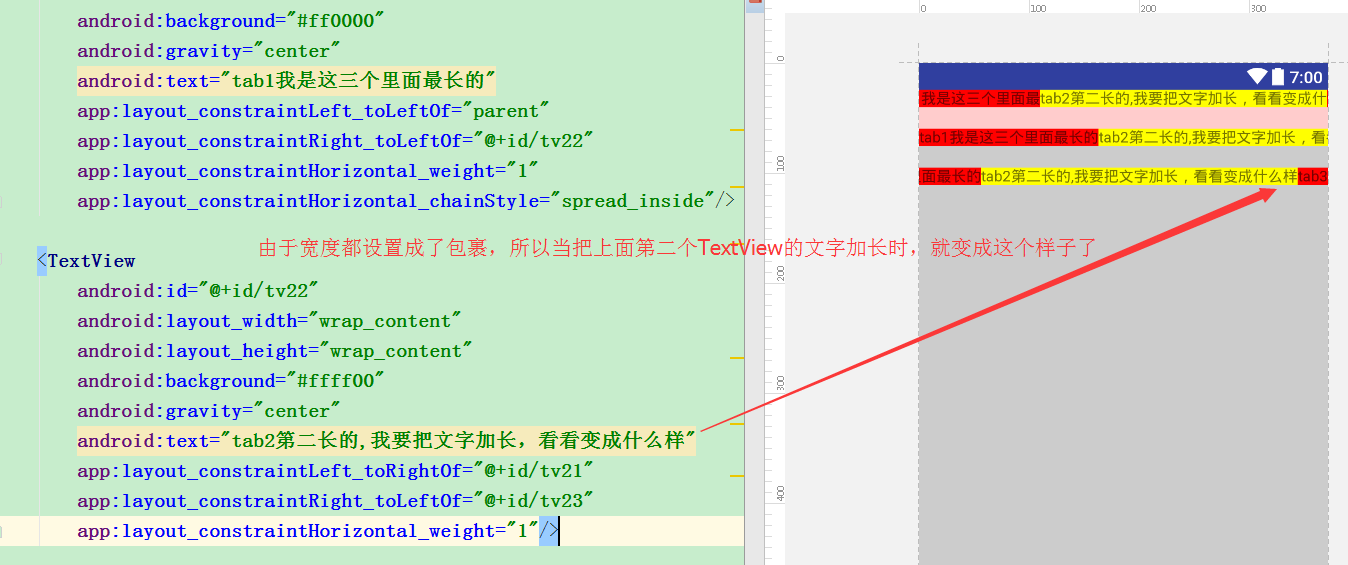
<?xml version="1.0" encoding="utf-8"?>
<android.support.constraint.ConstraintLayout xmlns:android="http://schemas.android.com/apk/res/android"
    xmlns:app="http://schemas.android.com/apk/res-auto"
    android:background="#ffcccc"
    android:layout_width="match_parent"
    android:layout_height="match_parent">

    <!--约束布局 权重的设置
        app:layout_constraintHorizontal_weight="1" 宽度 权重的设置
        app:layout_constraintVertical_weight="" 高度 权重的设置

        当宽度不需要填满父布局时,你可能需要用到的效果
        layout_constraintHorizontal_chainStyle 约束样式的使用
        app:layout_constraintHorizontal_chainStyle="spread" 默认样式
                                                    spread  扩展
                                                    packed  挤满
                                                    spread_inside 在里面

        -->

    <!--注意这里逆天的功能
        @id/tv2   这个tv2 我还没定义就能使用了  不过需要写个“+”-->
    <TextView
        android:id="@+id/tv1"
        android:layout_width="wrap_content"
        android:layout_height="wrap_content"
        android:background="#ff0000"
        android:gravity="center"
        android:text="tab1我是这三个里面最长的"
        app:layout_constraintLeft_toLeftOf="parent"
        app:layout_constraintRight_toLeftOf="@+id/tv2"
        app:layout_constraintHorizontal_weight="1"
        app:layout_constraintHorizontal_chainStyle="spread"/>

    <TextView
        android:id="@+id/tv2"
        android:layout_width="wrap_content"
        android:layout_height="wrap_content"
        android:background="#ffff00"
        android:gravity="center"
        android:text="tab2第二长的"
        app:layout_constraintLeft_toRightOf="@+id/tv1"
        app:layout_constraintRight_toLeftOf="@+id/tv3"
        app:layout_constraintHorizontal_weight="1"
        app:layout_constraintHorizontal_chainStyle="spread"/>

    <TextView
        android:id="@+id/tv3"
        android:layout_width="wrap_content"
        android:layout_height="wrap_content"
        android:background="#ff0000"
        android:gravity="center"
        android:text="tab3"
        app:layout_constraintLeft_toRightOf="@+id/tv2"
        app:layout_constraintRight_toRightOf="parent"
        app:layout_constraintHorizontal_weight="1"
        app:layout_constraintHorizontal_chainStyle="spread"/>

    <!--约束布局的嵌套
        app:layout_constraintHorizontal_chainStyle="packed" 的效果-->
    <android.support.constraint.ConstraintLayout
        android:layout_width="0dp"
        android:layout_height="0dp"
        android:background="#cccccc"
        android:layout_marginTop="20dp"
        app:layout_constraintTop_toBottomOf="@id/tv1"
        app:layout_constraintBottom_toBottomOf="parent"
        app:layout_constraintLeft_toLeftOf="parent"
        app:layout_constraintRight_toRightOf="parent">

        <TextView
            android:id="@+id/tv11"
            android:layout_width="wrap_content"
            android:layout_height="wrap_content"
            android:background="#ff0000"
            android:gravity="center"
            android:text="tab1我是这三个里面最长的"
            app:layout_constraintLeft_toLeftOf="parent"
            app:layout_constraintRight_toLeftOf="@+id/tv12"
            app:layout_constraintHorizontal_weight="1"
            app:layout_constraintHorizontal_chainStyle="packed"/>

        <!--当为layout_constraintHorizontal_chainStyle设置不同的样式时,
            它会以第一个为准,所以下面的可以不用设置了(有默认样式)-->
        <TextView
            android:id="@+id/tv12"
            android:layout_width="wrap_content"
            android:layout_height="wrap_content"
            android:background="#ffff00"
            android:gravity="center"
            android:text="tab2第二长的"
            app:layout_constraintLeft_toRightOf="@+id/tv11"
            app:layout_constraintRight_toLeftOf="@+id/tv13"
            app:layout_constraintHorizontal_weight="1"/>

        <TextView
            android:id="@+id/tv13"
            android:layout_width="wrap_content"
            android:layout_height="wrap_content"
            android:background="#ff0000"
            android:gravity="center"
            android:text="tab3"
            app:layout_constraintLeft_toRightOf="@+id/tv12"
            app:layout_constraintRight_toRightOf="parent"
            app:layout_constraintHorizontal_weight="1"/>


        <!--约束布局的嵌套
                app:layout_constraintHorizontal_chainStyle="spread_inside" 的效果-->
        <android.support.constraint.ConstraintLayout
            android:layout_width="0dp"
            android:layout_height="0dp"
            android:background="#cccccc"
            android:layout_marginTop="20dp"
            app:layout_constraintTop_toBottomOf="@id/tv11"
            app:layout_constraintBottom_toBottomOf="parent"
            app:layout_constraintLeft_toLeftOf="parent"
            app:layout_constraintRight_toRightOf="parent">

            <TextView
                android:id="@+id/tv21"
                android:layout_width="wrap_content"
                android:layout_height="wrap_content"
                android:background="#ff0000"
                android:gravity="center"
                android:text="tab1我是这三个里面最长的"
                app:layout_constraintLeft_toLeftOf="parent"
                app:layout_constraintRight_toLeftOf="@+id/tv22"
                app:layout_constraintHorizontal_weight="1"
                app:layout_constraintHorizontal_chainStyle="spread_inside"/>

            <TextView
                android:id="@+id/tv22"
                android:layout_width="wrap_content"
                android:layout_height="wrap_content"
                android:background="#ffff00"
                android:gravity="center"
                android:text="tab2第二长的"
                app:layout_constraintLeft_toRightOf="@+id/tv21"
                app:layout_constraintRight_toLeftOf="@+id/tv23"
                app:layout_constraintHorizontal_weight="1"/>

            <TextView
                android:id="@+id/tv23"
                android:layout_width="wrap_content"
                android:layout_height="wrap_content"
                android:background="#ff0000"
                android:gravity="center"
                android:text="tab3"
                app:layout_constraintLeft_toRightOf="@+id/tv22"
                app:layout_constraintRight_toRightOf="parent"
                app:layout_constraintHorizontal_weight="1"/>

        </android.support.constraint.ConstraintLayout>

    </android.support.constraint.ConstraintLayout>


</android.support.constraint.ConstraintLayout>
效果图: 当我把上面三个样式的第二个TextView文本加长,就变成下图的效果了
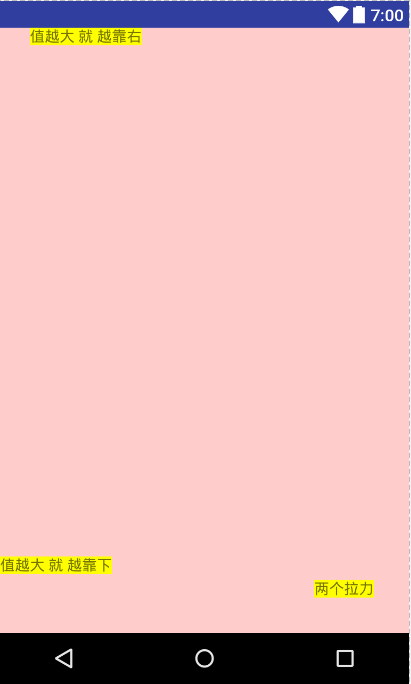
4.拉力的控制:
<?xml version="1.0" encoding="utf-8"?>
<android.support.constraint.ConstraintLayout xmlns:android="http://schemas.android.com/apk/res/android"
    xmlns:app="http://schemas.android.com/apk/res-auto"
    android:background="#ffcccc"
    android:layout_width="match_parent"
    android:layout_height="match_parent">

    <!--拉力的控制
        layout_constraintVertical_bias 从上到下 [0,1]  值越大 就 越靠下    (可以大于1,不过就拉出去了)
            当为“1”时,该控件的底部与父布局底部对齐-->

    <TextView
        android:layout_width="wrap_content"
        android:layout_height="wrap_content"
        android:text="值越大 就 越靠下"
        android:background="#ffff00"
        app:layout_constraintBottom_toBottomOf="parent"
        app:layout_constraintTop_toTopOf="parent"
        app:layout_constraintVertical_bias="0.9"/>

    <!--拉力的控制
        layout_constraintVertical_bias 从左到右 [0,1]  值越大 就 越靠右
            当为“1”时,该控件的右边与父布局右边对齐-->
    <TextView
        android:layout_width="wrap_content"
        android:layout_height="wrap_content"
        android:text="值越大 就 越靠右"
        android:background="#ffff00"
        app:layout_constraintLeft_toLeftOf="parent"
        app:layout_constraintRight_toRightOf="parent"
        app:layout_constraintHorizontal_bias="0.1"/>


    <!--  二者合一,同时使用  -->
    <TextView
        android:layout_width="wrap_content"
        android:layout_height="wrap_content"
        android:text="两个拉力"
        android:background="#ffff00"
        app:layout_constraintBottom_toBottomOf="parent"
        app:layout_constraintTop_toTopOf="parent"
        app:layout_constraintVertical_bias="0.94"
        app:layout_constraintLeft_toLeftOf="parent"
        app:layout_constraintRight_toRightOf="parent"
        app:layout_constraintHorizontal_bias="0.9"/>

</android.support.constraint.ConstraintLayout>
效果图:
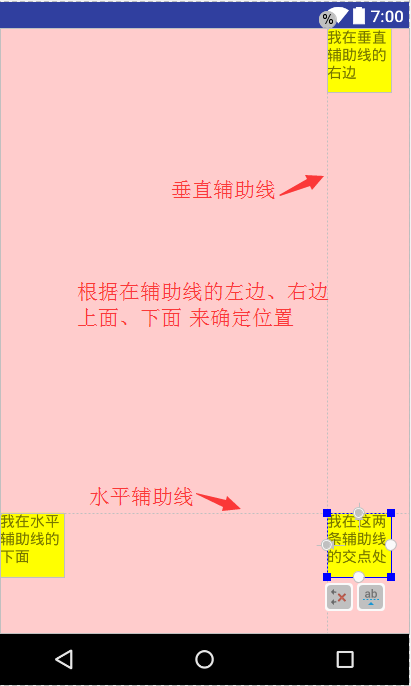
5.辅助线Guideline的使用:
<?xml version="1.0" encoding="utf-8"?>
<android.support.constraint.ConstraintLayout xmlns:android="http://schemas.android.com/apk/res/android"
    xmlns:app="http://schemas.android.com/apk/res-auto"
    android:background="#ffcccc"
    android:layout_width="match_parent"
    android:layout_height="match_parent">

    <!--辅助线Guideline的使用:Guideline是不会显示在界面上的,属性说明:
            android:orientation取值为”vertical”和”horizontal”.代表辅助线是水平的还是垂直的

            layout_constraintGuide_begin = 30dp,即可认为距离顶部30dp的地方有个辅助线,根据orientation来决定是横向还是纵向。
            layout_constraintGuide_end = 30dp,即为距离底部的距离。
            layout_constraintGuide_percent = 0.8 即为距离顶部80%。
        -->

    <!--代表:距离屏幕顶部80%有一条水平的辅助线-->
    <android.support.constraint.Guideline
        android:id="@+id/guideline_horizontal"
        android:layout_width="wrap_content"
        android:layout_height="wrap_content"
        android:orientation="horizontal"
        app:layout_constraintGuide_percent="0.8" />

    <!--代表:距离屏幕顶部80%有一条垂直方向的辅助线-->
    <android.support.constraint.Guideline
        android:id="@+id/guideline_vertical"
        android:layout_width="wrap_content"
        android:layout_height="wrap_content"
        android:orientation="vertical"
        app:layout_constraintGuide_percent="0.8" />


    <TextView
        android:layout_width="60dp"
        android:layout_height="60dp"
        android:background="#ffff00"
        android:text="我在水平辅助线的下面"
        app:layout_constraintTop_toBottomOf="@id/guideline_horizontal" />
    <TextView
        android:layout_width="60dp"
        android:layout_height="60dp"
        android:background="#ffff00"
        android:text="我在垂直辅助线的右边"
        app:layout_constraintLeft_toRightOf="@id/guideline_vertical" />

    <TextView
        android:layout_width="60dp"
        android:layout_height="60dp"
        android:background="#ffff00"
        android:text="我在这两条辅助线的交点处"
        app:layout_constraintLeft_toRightOf="@id/guideline_vertical"
        app:layout_constraintTop_toBottomOf="@id/guideline_horizontal" />


</android.support.constraint.ConstraintLayout>
效果图
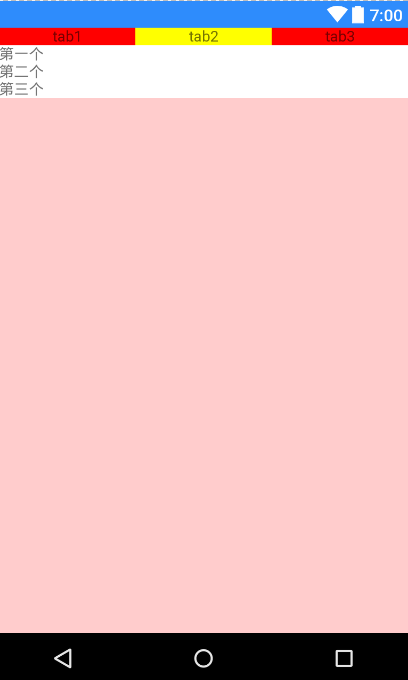
6.约束布局与线性布局的嵌套
<?xml version="1.0" encoding="utf-8"?>
<android.support.constraint.ConstraintLayout xmlns:android="http://schemas.android.com/apk/res/android"
    xmlns:app="http://schemas.android.com/apk/res-auto"
    android:background="#ffcccc"
    android:layout_width="match_parent"
    android:layout_height="match_parent">

    <TextView
        android:id="@+id/tv1"
        android:layout_width="0dp"
        android:layout_height="wrap_content"
        android:background="#ff0000"
        android:gravity="center"
        android:text="tab1"
        app:layout_constraintLeft_toLeftOf="parent"
        app:layout_constraintRight_toLeftOf="@+id/tv2"
        app:layout_constraintHorizontal_weight="1" />

    <TextView
        android:id="@+id/tv2"
        android:layout_width="0dp"
        android:layout_height="wrap_content"
        android:background="#ffff00"
        android:gravity="center"
        android:text="tab2"
        app:layout_constraintLeft_toRightOf="@+id/tv1"
        app:layout_constraintRight_toLeftOf="@+id/tv3"
        app:layout_constraintHorizontal_weight="1"/>

    <TextView
        android:id="@+id/tv3"
        android:layout_width="0dp"
        android:layout_height="wrap_content"
        android:background="#ff0000"
        android:gravity="center"
        android:text="tab3"
        app:layout_constraintLeft_toRightOf="@+id/tv2"
        app:layout_constraintRight_toRightOf="parent"
        app:layout_constraintHorizontal_weight="1" />

    <!--嵌套线性布局-->
    <LinearLayout
        android:layout_width="0dp"
        android:layout_height="wrap_content"
        android:background="#fff"
        app:layout_constraintTop_toBottomOf="@id/tv1"
        app:layout_constraintLeft_toLeftOf="parent"
        app:layout_constraintRight_toRightOf="parent"
        android:orientation="vertical">

        <TextView
            android:layout_width="match_parent"
            android:layout_height="wrap_content"
            android:text="第一个"/>
        <TextView
            android:layout_width="match_parent"
            android:layout_height="wrap_content"
            android:text="第二个"/>
        <TextView
            android:layout_width="match_parent"
            android:layout_height="wrap_content"
            android:text="第三个"/>

    </LinearLayout>

</android.support.constraint.ConstraintLayout>
效果图:
7.设置控件的最大宽高与最小宽高值:
<!--
    强制约束用于使控件在设置 wrap_content 的情况下约束依然生效
    app:layout_constrainedHeight="true"  //是否约束高度
    app:layout_constrainedWidth="false"

    约束最大宽度与高度:
    app:layout_constraintHeight_max="50dp"
    app:layout_constraintHeight_min="200dp"
    app:layout_constraintWidth_max="50dp"
    app:layout_constraintWidth_min="200dp"
-->
例子:控制recyclerView的最大高度与最小高度
<android.support.constraint.ConstraintLayout
        android:layout_width="match_parent"
        android:layout_height="wrap_content">

        <android.support.v7.widget.RecyclerView
            android:id="@+id/rvDate"
            android:layout_width="match_parent"
            android:layout_height="wrap_content"
            app:layout_constrainedHeight="true"
            app:layout_constraintHeight_min="300dp"
            app:layout_constraintHeight_max="600dp"></android.support.v7.widget.RecyclerView>

    </android.support.constraint.ConstraintLayout>
也可以这样:高度需要写成wrap_content
<android.support.constraint.ConstraintLayout
       android:layout_width="match_parent"
       android:layout_height="wrap_content"
       android:minHeight="50dp"
       android:maxHeight="200dp"
       android:background="@color/divider">

      <LinearLayout
          android:layout_width="match_parent"
          android:layout_height="wrap_content"
          android:background="@color/divider"
          android:orientation="vertical">


      </LinearLayout>

   </android.support.constraint.ConstraintLayout>
8.指定控件的宽度或高度占父控件的百分比:
<!--当控件的尺寸设置为 0dp 时,可以用以下两个属性来指定当前控件的
    宽度或高度占父控件的百分比,属性值在 0 到 1 之间:
        app:layout_constraintWidth_percent="0.8"
        app:layout_constraintHeight_percent="0.2"-->
    <Button
        android:layout_width="0dp"
        android:layout_height="wrap_content"
        android:text="Target Button"
        android:textAllCaps="false"
        app:layout_constraintBottom_toBottomOf="parent"
        app:layout_constraintEnd_toEndOf="parent"
        app:layout_constraintStart_toStartOf="parent"
        app:layout_constraintTop_toTopOf="parent"
        app:layout_constraintWidth_percent="0.8" />
9. 强制约束,layout_constrainedWidth
当一个控件设为wrap_content时,再添加约束尺寸是不起效果的。如需生效,需要设置如下属性为true:
 <androidx.constraintlayout.widget.ConstraintLayout
        android:layout_width="wrap_content"
        android:layout_height="wrap_content">

        <TextView
            android:id="@+id/textView"
            android:layout_width="wrap_content"
            android:layout_height="wrap_content"
            android:singleLine="true"
            android:text="测试文字内容啊啊啊啊啊啊啊啊啊啊啊啊啊啊啊啊啊啊啊啊啊啊啊"
            android:textColor="#000000"
            android:textSize="20sp"
            app:layout_constrainedWidth="true"
            app:layout_constraintEnd_toStartOf="@id/imageView"
            app:layout_constraintHorizontal_bias="0dp"
            app:layout_constraintStart_toStartOf="parent"
            app:layout_constraintTop_toTopOf="parent" />

        <ImageView
            android:id="@+id/imageView"
            android:layout_width="wrap_content"
            android:layout_height="wrap_content"
            android:src="@drawable/home_icon_living"
            app:layout_constraintEnd_toEndOf="parent"
            app:layout_constraintStart_toEndOf="@id/textView"
            app:layout_constraintTop_toTopOf="parent" />

    </androidx.constraintlayout.widget.ConstraintLayout>
效果如下:(橘色为手机屏幕宽度)
文字超过屏幕宽度,文字很长的效果 文字较短,没超过屏幕的效果
![]()
![]()
如果后面还有其他View,可以:
app:layout_constraintHorizontal_bias="0"
app:layout_constraintHorizontal_chainStyle="packed"
app:layout_constraintWidth_default="wrap"
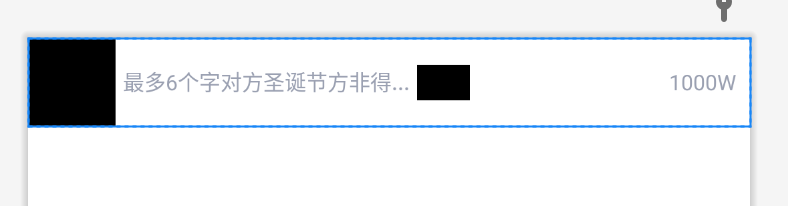
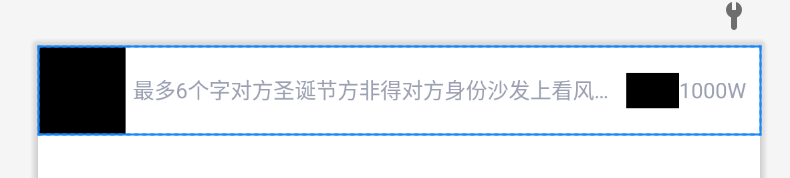
例子2
<?xml version="1.0" encoding="utf-8"?>
<androidx.constraintlayout.widget.ConstraintLayout xmlns:android="http://schemas.android.com/apk/res/android"
    android:layout_width="match_parent"
    android:layout_height="wrap_content"
    xmlns:tools="http://schemas.android.com/tools"
    xmlns:app="http://schemas.android.com/apk/res-auto">

    <ImageView
        android:id="@+id/ivHead"
        android:layout_width="50dp"
        android:layout_height="50dp"
        tools:src="@color/black"
        app:layout_constraintTop_toTopOf="parent"
        app:layout_constraintStart_toStartOf="parent"/>

    <TextView
        android:id="@+id/tvNick"
        android:layout_width="wrap_content"
        android:layout_height="wrap_content"
        android:layout_marginStart="4dp"
        android:ellipsize="end"
        android:lines="1"
        android:textColor="#9AA0B1"
        android:textSize="12sp"
        app:layout_constraintBottom_toBottomOf="@id/ivHead"
        app:layout_constraintStart_toEndOf="@id/ivHead"
        app:layout_constraintTop_toTopOf="@id/ivHead"
        app:layout_constraintEnd_toStartOf="@id/ivLevel"
        app:layout_constrainedWidth="true"
        app:layout_constraintHorizontal_chainStyle="packed"
        app:layout_constraintHorizontal_bias="0"
        tools:text="最多6个字对方圣诞节方非得..." />

    <ImageView
        android:id="@+id/ivLevel"
        android:layout_width="30dp"
        android:layout_height="20dp"
        android:layout_marginStart="4dp"
        android:adjustViewBounds="true"
        android:scaleType="fitXY"
        tools:src="@color/black"
        app:layout_constraintTop_toTopOf="@id/tvNick"
        app:layout_constraintStart_toEndOf="@id/tvNick"
        app:layout_constraintEnd_toStartOf="@id/tvViewNum"
        app:layout_constraintBottom_toBottomOf="@id/tvNick"/>


    <TextView
        android:id="@+id/tvViewNum"
        android:layout_width="wrap_content"
        android:layout_height="wrap_content"
        android:layout_marginEnd="8dp"
        android:ellipsize="end"
        android:lines="1"
        android:textColor="#9AA0B1"
        android:textSize="12dp"
        app:layout_constraintBottom_toBottomOf="@id/ivHead"
        app:layout_constraintRight_toRightOf="parent"
        app:layout_constraintTop_toTopOf="@id/ivHead"
        tools:text="1000W" />

</androidx.constraintlayout.widget.ConstraintLayout>
效果图:
10. 约束屏障
https://developer.android.google.cn/training/constraint-layout#constrain-to-a-barrier

 浙公网安备 33010602011771号