

ImageView常用属性与工具类
XML属性
android:adjustViewBounds 自动调整视图的边界到合适的值
|
属性名称 |
描述 |
|||||||||||||||||||||||||||
|
android:adjustViewBounds |
是否保持宽高比。需要与maxWidth、MaxHeight一起使用,否则单独使用没有效果。 |
|||||||||||||||||||||||||||
|
android:cropToPadding |
是否截取指定区域用空白代替。单独设置无效果,需要与scrollY一起使用,效果如下,实现代码见代码部分: |
|||||||||||||||||||||||||||
|
android:maxHeight |
设置View的最大高度,单独使用无效,需要与setAdjustViewBounds一起使用。如果想设置图片固定大小,又想保持图片宽高比,需要如下设置: 1) 设置setAdjustViewBounds为true; 2) 设置maxWidth、MaxHeight; 3) 设置设置layout_width和layout_height为wrap_content。 |
|||||||||||||||||||||||||||
|
android:maxWidth |
设置View的最大宽度。同上。 |
|||||||||||||||||||||||||||
|
android:scaleType |
设置图片的填充方式。
|
|||||||||||||||||||||||||||
|
android:src |
设置View的drawable(如图片,也可以是颜色,但是需要指定View的大小) |
|||||||||||||||||||||||||||
|
android:tint |
将图片渲染成指定的颜色。 |
图片的透明度设置:imageView.setAlpha( );//范围:0-225
|
type |
google官方说明 |
我的解释 |
|
CENTER |
Center the image in the view, but perform no scaling. |
先把当前的图片放置到ImageView的中间,不执行缩放,如果图片小,那么就会有空白区域,如果图片大,那么便会被裁减 |
|
CENTER_CROP |
Scale the image uniformly (maintain the image's aspect ratio) so that both dimensions (width and height) of the image will be equal to or larger than the corresponding dimension of the view (minus padding). |
先把当前的图片放置到ImageView的中间,执行缩放,将图片的宽度和高度按照相同比例缩放到宽度大于或者等于ImageView的宽度,同时高度大于或者等于ImageView的高度 |
|
CENTER_INSIDE |
Scale the image uniformly (maintain the image's aspect ratio) so that both dimensions (width and height) of the image will be equal to or less than the corresponding dimension of the view (minus padding). |
1. 先把当前的图片放置到ImageView的中间; |
|
FIT_CENTER |
Scale the image using CENTER. |
1.保持图片的宽高比 |
|
FIT_END |
Scale the image using END |
1.保持图片的宽高比 |
|
FIT_START |
Scale the image using START |
1.保持图片的宽高比 |
|
FIT_XY |
Scale the image using FILL |
1.不保持图片的宽高比 |
|
MATRIX |
Scale using the image matrix when drawing. |
绘制时使用图像矩阵缩放。 |
获取内存中某一路径的图片:
Bitmap map=BitmapFactory.decodeStream(is)//将输入流转化成图片(流中传入图片路径)
new ImageView(this).setImageBitmap(map);//将图片添加到视图
//点击imageView,当imageView的src属性为空时为它设置图片,否则设置图片为空
            if(iv_row_1_1.getDrawable() != null){
                iv_row_1_1.setImageDrawable(null);//对应src属性
            }else{
                iv_row_1_1.setImageResource(R.drawable.icon_buytime_checked);
            }
图片保持比例自适应:
<!--宽度可以满屏,也可以写成固定值,然后高度保持比例自适应
            android:scaleType="fitXY"
            android:adjustViewBounds="true"

         比如: Glide.with(this).load(pictureUrl).into(img_left); 此时就会自适应了-->
    <ImageView
        android:id="@+id/img_left"
        android:layout_width="match_parent"
        android:layout_height="wrap_content"
        android:scaleType="fitXY"
        android:adjustViewBounds="true"/>
工具类:
public class BaseImageUtils {

    // 计算图片的缩放值
    public static int calculateInSampleSize(BitmapFactory.Options options, int reqWidth, int reqHeight) {
        final int height = options.outHeight;
        final int width = options.outWidth;
        int inSampleSize = 1;

        if (height > reqHeight || width > reqWidth) {
            final int heightRatio = Math.round((float) height / (float) reqHeight);
            final int widthRatio = Math.round((float) width / (float) reqWidth);
            inSampleSize = heightRatio < widthRatio ? heightRatio : widthRatio;
        }
        return inSampleSize;
    }

    // 根据路径获得图片并压缩,返回bitmap用于显示
    public static Bitmap getSmallBitmap(String filePath) {
        final BitmapFactory.Options options = new BitmapFactory.Options();
        options.inJustDecodeBounds = true;
        BitmapFactory.decodeFile(filePath, options);

        // Calculate inSampleSize
        // options.inSampleSize = calculateInSampleSize(options, 480, 800);
        options.inSampleSize = calculateInSampleSize(options, 720, 1280);

        // Decode bitmap with inSampleSize set
        options.inJustDecodeBounds = false;

        return BitmapFactory.decodeFile(filePath, options);
    }

    // 把bitmap转换成String
    public static String bitmapToString(String filePath) {

        Bitmap bm = getSmallBitmap(filePath);

        // 处理图片的旋转解决
        int degree = getBitmapDegree(filePath);
        bm = rotateBitmapByDegree(bm, degree);

        ByteArrayOutputStream baos = new ByteArrayOutputStream();
        bm.compress(Bitmap.CompressFormat.JPEG, 40, baos);
        byte[] b = baos.toByteArray();
        return Base64.encodeToString(b, Base64.DEFAULT);
    }

    /**
     * 读取图片的旋转的角度
     *
     * @param path
     *            图片绝对路径
     * @return 图片的旋转角度
     */
    private static int getBitmapDegree(String path) {
        int degree = 0;
        try {
            // 从指定路径下读取图片,并获取其EXIF信息
            ExifInterface exifInterface = new ExifInterface(path);
            // 获取图片的旋转信息
            int orientation = exifInterface.getAttributeInt(ExifInterface.TAG_ORIENTATION,
                    ExifInterface.ORIENTATION_NORMAL);
            switch (orientation) {
            case ExifInterface.ORIENTATION_ROTATE_90:
                degree = 90;
                break;
            case ExifInterface.ORIENTATION_ROTATE_180:
                degree = 180;
                break;
            case ExifInterface.ORIENTATION_ROTATE_270:
                degree = 270;
                break;
            }
        } catch (IOException e) {
            e.printStackTrace();
        }
        return degree;
    }


    /**
     * Base64 解码  参数:compiledString(编译后的字符串)
     * 将字符串解码成bitmap 需要的jar包:sun.misc.BASE64Decoder.jar
     * @throws IOException
     */
    public static Bitmap base64Decode(String compiledString) throws IOException {

        BASE64Decoder decoder = new BASE64Decoder();
        // Base64解码
        byte[] a = decoder.decodeBuffer(compiledString);
        for (int i = 0; i < a.length; ++i) {
            if (a[i] < 0) {// 调整异常数据
                a[i] += 256;
            }
        }
        Bitmap bitmap = BitmapFactory.decodeByteArray(a, 0, a.length);
        return bitmap;
    }


    /**
     * 将图片按照某个角度进行旋转
     *
     * @param bm
     *            需要旋转的图片
     * @param degree
     *            旋转角度
     * @return 旋转后的图片
     */
    public static Bitmap rotateBitmapByDegree(Bitmap bm, int degree) {
        Bitmap returnBm = null;

        // 根据旋转角度,生成旋转矩阵
        Matrix matrix = new Matrix();
        matrix.postRotate(degree);
        try {
            // 将原始图片按照旋转矩阵进行旋转,并得到新的图片
            returnBm = Bitmap.createBitmap(bm, 0, 0, bm.getWidth(), bm.getHeight(), matrix, true);
        } catch (OutOfMemoryError e) {
        }
        if (returnBm == null) {
            returnBm = bm;
        }
        if (bm != returnBm) {
            bm.recycle();
        }
        return returnBm;
    }

}
使用inBitmap复用旧的Bitmap的内存:
options.inBitmap = bitmap
options.inMutable = true
宽度撑满,高度自适应,从下往上铺
<ImageView
    android:id="@+id/fitImageView"
    android:layout_width="200dp"
    android:layout_height="200dp"
    android:background="@color/color_9AA0B1"
    android:scaleType="matrix" />
val url = "https://img0.baidu.com/it/u=1604010673,2427861166&fm=253&app=138&size=w931&n=0&f=JPEG&fmt=auto?sec=1686330000&t=7b6ce1eeeb051445953bbcf6c83124bc"
        findViewById<ImageView>(R.id.fitImageView)?.apply {
            ImageLoader.with(mContext).asBitmap().loadWebp(url, WebpRequestOptions.ORIGINAL).into(object : SimpleTarget<Bitmap>(){
                override fun onResourceReady(resource: Bitmap, transition: Transition<in Bitmap>?) {
                    //宽度撑满,高度自适应,从下往上铺
                    val picWidth = resource.width
                    val picHeight = resource.height
                    val scale = width.toFloat() / picWidth
                    val imageMatrix = Matrix()
                    imageMatrix.postScale(scale, scale)
                    imageMatrix.postTranslate(0f, height - picHeight * scale)
                    setImageMatrix(imageMatrix)
                    setImageBitmap(resource)
                }
            })
        }
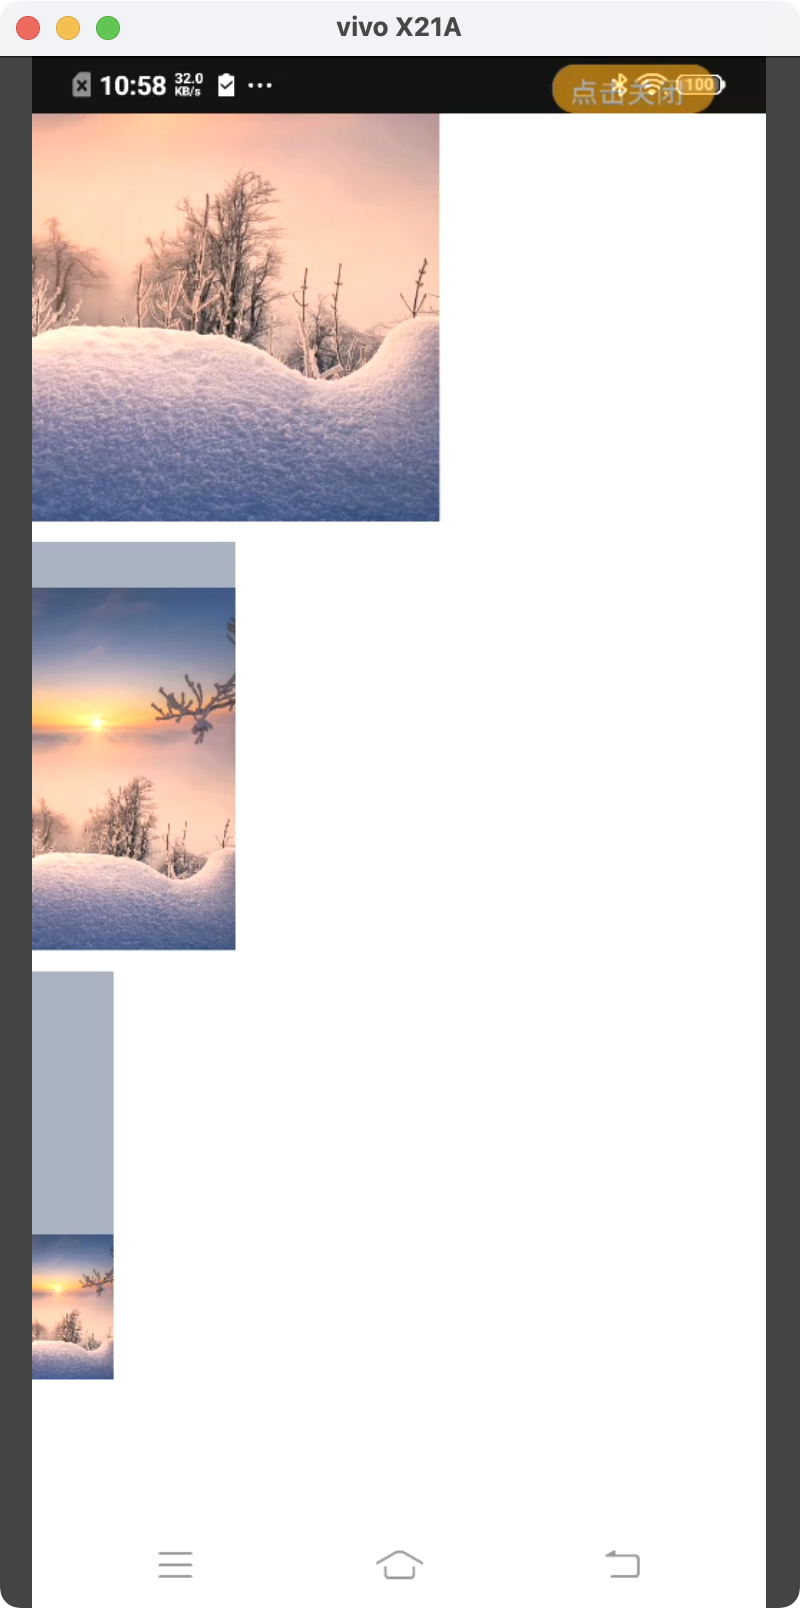
如果要从上往下铺,那就把平移去掉就好了

 浙公网安备 33010602011771号