SpringBoot 整合 RabbitMQ
RabbitMQ 安装
docker pull rabbitmq

//集群部署添加hostname
docker run -d  --name rabbit -p 15672:15672 -p 5672:5672 rabbitmq

 docker exec -it rabbitmq /bin/bash

 rabbitmq-plugins enable rabbitmq_management

 // 退出容器   ctrl+p 和 ctrl+q
基础概念
channel:通道 发送/接收消息到mq 的通道
exchange:交换机 消息的路由器
queue: 队列 存储消息
消息模型
基本消息队列(basic queue)
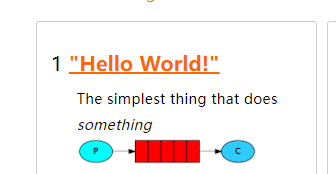
直接将消息发送至队列
工作消息队列(work queue)
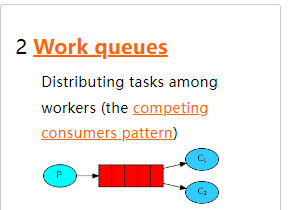
直接将消息发送至队列
多个消费者共同处理消息,消费者先从队列中获取完消息再处理。可以设置一次只允许取一个消息
发布订阅模型,根据交换机不同分为三种
发布订阅都是将消息发送到exchange 再有exchange 转发到队列当中。如果exchange 发送消息到队列失败 ,则消息会丢失
广播 (FanoutExchange)
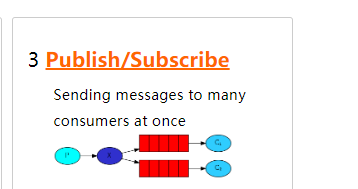
将消息发送至交换机,由交换机发送至绑定的每一个队列
package com.tlj.rabbitmq.config;

import org.springframework.amqp.core.Binding;
import org.springframework.amqp.core.BindingBuilder;
import org.springframework.amqp.core.FanoutExchange;
import org.springframework.amqp.core.Queue;
import org.springframework.context.annotation.Bean;
import org.springframework.context.annotation.Configuration;

/**
 * @Author: tanglj
 * @Date: 2022/8/19
 * @Description:
 */
@Configuration
public class RabbitConfig {

    @Bean
    public FanoutExchange fanoutExchange() {
        return new FanoutExchange("msg");
    }

    @Bean
    public Queue queue1() {
        return new Queue("que1");
    }

    @Bean
    public Queue queue2() {
        return new Queue("que2");
    }

    @Bean
    public Binding bingQue1(Queue queue1,FanoutExchange fanoutExchange) {
        return BindingBuilder.bind(queue1).to(fanoutExchange);
    }
    @Bean
    public Binding bingQue2(Queue queue2,FanoutExchange fanoutExchange) {
        return BindingBuilder.bind(queue2).to(fanoutExchange);
    }
}
路由 (DirectExchange)
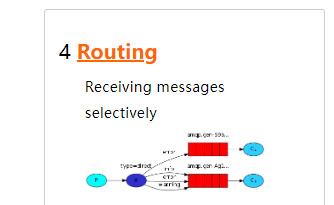
交换机会将消息根据指定规则路由到不同的消息队列当中
步骤 :
-
每一个队列都会和交换机设置绑定bindingKey
-
发布者发送消息时指定bingkey
-
exchange将消息路由到bindingKey 和roundingKey 一直的消息队列
样例 :
    @RabbitListener(bindings = @QueueBinding(
                            value = @Queue("que3"), // 队列
                            exchange = @Exchange(name ="change1",type = ExchangeTypes.DIRECT), // 交换机
                            key = {"a","b"})) // 指定bindingKey
    public void receiver3(String msg) {
        System.out.println("msg = " + msg);
    }
主题(TopicExchange)
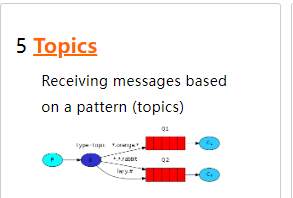
与路由交换机类似 ,区别在于queue 与 exchange 指定bindingKey时 可以使用通配符,以 . 分割
#:代表零个或多个单词
*:指一个单词
样例:
    @RabbitListener(bindings = @QueueBinding(
            value = @Queue("que3"), // 队列
            exchange = @Exchange(name ="change1",type = ExchangeTypes.TOPIC), // 交换机
            key = {"user.#","#.name"})) // 指定bindingKey
    public void receiver4(String msg) {
        System.out.println("msg = " + msg);
    }
消息转换器
SpringAMQP中默认消息的序列化和反序列化是用 MessageConverter 实现的(jdk 序列化),可以重新定义MessageConverter 来实现序列化的更改
,但是发送方和接收方 都必须使用相同的 MessageConverter。
消息可靠性
生产者确保消息发送成功
生产者 -> 队列 需要经过两步:
- 生产者 到 交换机 ConfirmCallback
- 交换机 到 队列 ReturnsCallback
package com.tlj.rabbitmq.config;

import lombok.extern.slf4j.Slf4j;
import org.springframework.amqp.rabbit.connection.CorrelationData;
import org.springframework.amqp.rabbit.core.RabbitTemplate;
import org.springframework.beans.factory.annotation.Autowired;
import org.springframework.context.annotation.Configuration;
import org.springframework.stereotype.Component;

import javax.annotation.PostConstruct;

/**
 * @Author: login
 * @Date: 2022/8/22
 * @Description:  消息发送到交换机 是否成功
 * 配置文件 添加 :publisher-confirm-type: correlated
 */
@Component
@Slf4j
public class RabbitConfirmConfig implements RabbitTemplate.ConfirmCallback {


    @Autowired
    private  RabbitTemplate   rabbitTemplate ;


    @PostConstruct
    public void init(){
        rabbitTemplate.setConfirmCallback(this);
    }


    @Override
    public void confirm(CorrelationData correlationData, boolean ack, String cause) {
        if (ack) {
            log.info("消息发送成功");
        } else {
            log.info("消息发送到交换机失败");
        }
    }
}
package com.tlj.rabbitmq.config;

import com.alibaba.fastjson.JSON;
import com.alibaba.fastjson.JSONObject;
import com.alibaba.fastjson.parser.Feature;
import lombok.extern.slf4j.Slf4j;
import org.springframework.amqp.core.Message;
import org.springframework.amqp.core.ReturnedMessage;
import org.springframework.amqp.rabbit.core.RabbitTemplate;
import org.springframework.beans.factory.annotation.Autowired;
import org.springframework.beans.factory.annotation.Configurable;
import org.springframework.context.annotation.Configuration;
import org.springframework.stereotype.Component;

import javax.annotation.PostConstruct;

/**
 * @Author: login
 * @Date: 2022/8/22
 * @Description:  消息发送到队列失败返回,比如路由不到队列时触发回调
 * 配置文件添加: publisher-returns: true
 */
@Component
@Slf4j
public class RabbitReturnConfig implements RabbitTemplate.ReturnsCallback {

    @Autowired
    private  RabbitTemplate   rabbitTemplate ;


    @PostConstruct
    public void init(){
        rabbitTemplate.setReturnsCallback(this);
    }

    /**
      *
      * @desc:
     *   处理方法一:  可以先将消息存到数据库,有定时任务拉取重复发送,将异常信息保存到数据库
      */
    @Override
    public void returnedMessage(ReturnedMessage returned) {
        int replyCode = returned.getReplyCode();
        Message message = returned.getMessage();
        Object parse = JSON.parseObject(new String(message.getBody()), Object.class);;
        log.info("消息发送至队列失败{}",parse);
    }
}
该方法对性能影响待考证
消费者手动确认消息
    @RabbitListener(bindings = @QueueBinding(
                            value = @Queue("que3"), // 队列
                            exchange = @Exchange(name ="change1",type = ExchangeTypes.TOPIC), // 交换机
                            key = {"a","b"}),
                    ackMode = "MANUAL"
                ) // 指定bindingKey
    public void receiver3(@Payload String msg, Channel channel, Message message) {
        try {
            /**
              *
              * @desc: 成功确认,使用此回执方法后,消息会被rabbitmq broker 删除。
             * deliveryTag:表示消息投递序号,每次消费消息或者消息重新投递后,deliveryTag都会增加。deliveryTag(唯一标识 ID):当一个消费者向 RabbitMQ 注册后,会建立起一个 Channel ,RabbitMQ 会用 basic.deliver 方法向消费者推送消息,这个方法携带了一个 delivery tag, 它代表了 RabbitMQ 向该 Channel 投递的这条消息的唯一标识 ID,是一个单调递增的正整数,delivery tag 的范围仅限于 Channel
             * multiple:是否批量确认,值为 true 则会一次性 ack所有小于当前消息 deliveryTag 的消息
              */
            channel.basicAck(message.getMessageProperties().getDeliveryTag(),true);

            /**
              *
              * @desc: 失败确认
             * requeue:值为 true 消息将重新入队列
              */
            channel.basicNack(message.getMessageProperties().getDeliveryTag(),true,false);

            /**
              *
              * @desc: 拒绝消息
             *
              */
            channel.basicReject(message.getMessageProperties().getDeliveryTag(),false);
        } catch (IOException e) {
            e.printStackTrace();
        }

    }
论业务逻辑是否处理成功,最终都要将消息手动签收,MQ的使命不是保证客人进店了必须消费,不消费就不让走,而是客人能进来就行,哪怕是随便看看也算任务完成。区别于 自动确认:可以获取到异常日志信息。
因为MQ是中间件,本身就是辅助工具。如果强加给MQ过多压力,只会造成本身业务的畸形。使用MQ的目的就是解耦和转发,不再做多余的事情,保证MQ本身是流畅的、职责单一的即可。
消息重复消费
发送消息时携带一个唯一id,消费者消费成功后将消息唯一id存放redis或者其他中间件,再次消费消息时查看redis是否有这个key
延时队列
需要安装rabbitmq的插件,下载地址:
https://www.rabbitmq.com/community-plugins.html
    //进入容器
	docker exec -it rabbit /bin/bash
	// 查看插件目录
	rabbitmq-plugins directories -s

退出容器后,将插件拷贝到插件目录

进入容器开启插件
rabbitmq-plugins enable rabbitmq_delayed_message_exchange
重启容器
docker restart rabbit
使用案例:
定义队列交换机和绑定关系:
    /**
     * 定义一个延迟交换机
     */
    @Bean
    public CustomExchange customExchange() {
        Map<String, Object> map = new HashMap<>();
        map.put("x-delayed-type", "direct");
        return new CustomExchange("delay.exchange", "x-delayed-message", true, false, map);
    }

    /**
     * 创建延迟队列1
     */
    @Bean()
    public Queue delayQue() {
        return QueueBuilder.durable("delay.que").build();
    }

    @Bean
    public Binding bingDelayQue(Queue delayQue,CustomExchange customExchange) {
        return BindingBuilder.bind(delayQue).to(customExchange).with("a").noargs();
    }
发送消息:
    @Test
    void sendDelayMsg() {
        String exchange = "delay.exchange";
        String msg = "******************";
        rabbitTemplate.convertAndSend(exchange,"a",msg,(message)->{
            message.getMessageProperties().setHeader(MessageProperties.X_DELAY,1000L);
            return message;
        });
    }


【推荐】国内首个AI IDE,深度理解中文开发场景,立即下载体验Trae
【推荐】编程新体验,更懂你的AI,立即体验豆包MarsCode编程助手
【推荐】抖音旗下AI助手豆包,你的智能百科全书,全免费不限次数
【推荐】轻量又高性能的 SSH 工具 IShell:AI 加持,快人一步
· 震惊!C++程序真的从main开始吗?99%的程序员都答错了
· 【硬核科普】Trae如何「偷看」你的代码?零基础破解AI编程运行原理
· 单元测试从入门到精通
· 上周热点回顾(3.3-3.9)
· winform 绘制太阳,地球,月球 运作规律