Python|在图像上叠加绘制分割结果的方法
简介
在进行图像分割之后,我们常常需要将分割的结果叠加绘制到原图上,并以不同的颜色显示,以便进行展示.
已有的方案
scikit-image,OpenCV,GluonCV, detectron2 中都提供有类似功能的函数.不过还是存在一定的缺点:
- scikit-image 中的 skimage.color.label2rgb 只能处理灰度图像,彩色图像也是必须转换为灰度图像之后才将分割结果绘制上去.只能说勉强能用.
- OpenCV中的 cv2.addWeighted 实际上是用于将两个图像按照不同的比例进行融合.将其简单的用于图像与分割结果的融合,会发现在没有分割目标的区域灰度降低,即整体的图像变暗了.其实不算是很好的解决方案.
- detectron2 中的 detectron2.utils.visualizer.Visualizer 也提供了类似的功能,但是文档说其为了渲染质量而牺牲了速度,不易在需要实时展示的场景使用.而且为了找个功能而单独安装 detectron2 有点得不偿失.但是这部分代码却很难单独抽取出来使用.
- GluonCV提供的 gluoncv.utils.viz.plot_mask 代码简洁.我们可以将其单独提取出来,并且简单修改一下,更加好用.
修改后的版本
基于 gluoncv.utils.viz.plot_mask,将其简单的修改,代码如下:
# -*- coding: utf-8 -*-
"""
PROJECT_NAME: Dataset_Authoring
FILE_NAME: Show_Result
AUTHOR: welt
E_MAIL: tjlwelt@foxmail.com
DATE: 2022/10/22
"""

import numpy as np
import cv2


def plot_mask(img, masks, colors=None, alpha=0.5) -> np.ndarray:
   """Visualize segmentation mask.

    Parameters
    ----------
    img: numpy.ndarray
        Image with shape `(H, W, 3)`.
    masks: numpy.ndarray
        Binary images with shape `(N, H, W)`.
    colors: numpy.ndarray
        color for mask, shape `(N, 3)`.
        if None, generate random color for mask
    alpha: float, optional, default 0.5
        Transparency of plotted mask

    Returns
    -------
    numpy.ndarray
        The image plotted with segmentation masks, shape `(H, W, 3)`

    """
   if colors is None:
      colors = np.random.random((masks.shape[0], 3)) * 255
   else:
      if colors.shape[0] < masks.shape[0]:
         raise RuntimeError(
            f"colors count: {colors.shape[0]} is less than masks count: {masks.shape[0]}"
         )
   for mask, color in zip(masks, colors):
      mask = np.stack([mask, mask, mask], -1)
      img = np.where(mask, img * (1 - alpha) + color * alpha, img)

   return img.astype(np.uint8)


def read_image_color(image_path, label_path, color_map):
   """
   :param image_path: 图像文件路径
   :param label_path: 标签文件路径
   :param color_map: 输入的颜色列表
   :returns:
   img: numpy.ndarray
        Image with shape `(H, W, 3)`.
    label_trans: numpy.ndarray
        Binary images with shape `(N, H, W)`.
    RGB_map: numpy.ndarray
        color for mask, shape `(N, 3)`.
   """
   img = cv2.imread(image_path)
   mask = cv2.imread(label_path, cv2.IMREAD_GRAYSCALE)
   mask = mask[:, :, np.newaxis]
   # print(mask.shape)
   label_trans = mask.transpose(2, 0, 1)
   color_map[0], color_map[2] = color_map[2], color_map[0]
   RGB_map = np.array(color_map)
   RGB_map = RGB_map.T
   RGB_map = RGB_map[np.newaxis, :]
   # print(color_RGB.shape)
   return img, label_trans, RGB_map


if __name__ == "__main__":
   img_path = 'D:/Dataset_Authoring/media_images_images_521_2c7ce265b47b7320d5a3.png'
   mask_path = 'D:/Dataset_Authoring/label1/media_images_pred_521_42b45d96e8dc14ad315d.png'
   mask_color = [
      255, 0, 0
   ]  # 输入颜色数组为RGB格式,这里只支持单类别的颜色设置,多类别的后续可能会改进出来
   image, label, color_RGB = read_image_color(img_path, mask_path, mask_color)
   masked_image = plot_mask(image, label, colors=color_RGB, alpha=0.3)
   out_path = 'D:/Dataset_Authoring/test.jpg'
   cv2.imwrite(out_path, masked_image)
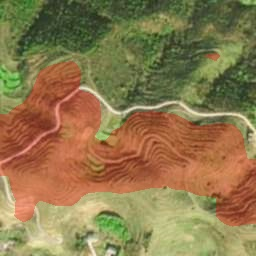
运行结果如下: