Spring详解(九)----注解@Scope、@DependsOn、@Lazy、@ImportResource的使用
1、@Scope注解:指定Bean的作用域
@Scope可以用在类上和方法上,用来配置bean的作用域,等效于bean xml中的bean元素中的scope属性,xml代码:<bean id="" class="" scope="prototype" />。
先来看下@Scope注解的源码:
@Target({ElementType.TYPE, ElementType.METHOD})
@Retention(RetentionPolicy.RUNTIME)
@Documented
public @interface Scope {
    @AliasFor("scopeName")
    String value() default "";

    @AliasFor("value")
    String scopeName() default "";

    ScopedProxyMode proxyMode() default ScopedProxyMode.DEFAULT;
}
参数介绍:value和scopeName效果一样,用来指定bean作用域名称,例如singleton单例模式;prototype原型模式(多例模式)
注解设置作用域: @Scope("prototype") 或者 @Scope(ConfigurableBeanFactory.SCOPE_PROTOTYPE)
常见的两种用法:
- 和@Compontent一起使用在类上
- 和@Bean一起标注在方法上
案例1:和@Compontent一起使用在类上
@Component
@Scope(ConfigurableBeanFactory.SCOPE_SINGLETON)
public class ServiceA {
}
上面定义了一个bean,作用域为单例的。直接使用ConfigurableBeanFactory接口中定义了几个作用域相关的常量。
案例2:和@Bean一起标注在方法上
@Bean标注在方法上,可以通过这个方法来向spring容器中注册一个bean,在此方法上加上@Scope可以指定这个bean的作用域,如:
@Configurable
public class BeanConfig2 {
    @Bean
    @Scope(ConfigurableBeanFactory.SCOPE_PROTOTYPE)
    public ServiceA serviceA() {
        return new ServiceA();
    }
}
2、@DependsOn:指定当前Bean依赖的Bean
@DependsOn:可以用在任意类型和方法上,等效于bean xml中的bean元素中的depend-on属性。作用: 用于指定某个类的创建依赖的bean对象先创建。Spring中没有特定bean的加载顺序,使用此注解则可指定bean的加载顺序。。简单来说就是这个组件要依赖于另一个组件,也就是说被依赖的组件会比该组件先注册到IOC容器中。Spring在创建Bean的时候,如果Bean之间没有依赖关系,那么Spring容器很难保证Bean实例创建的顺序,如果想确保容器在创建某些Bean之前,需要先创建好一些其他的Bean,可以通过@DependsOn来实现(在基于注解配置中,是按照类中方法的书写顺序决定的),@DependsOn可以指定当前Bean依赖的Bean,通过这个可以确保@DependsOn指定的Bean在当前Bean创建之前先创建好。
先看一下其源码:
@Target({ElementType.TYPE, ElementType.METHOD})
@Retention(RetentionPolicy.RUNTIME)
@Documented
public @interface DependsOn {
    String[] value() default {};
}
属性value:是一个string类型的数组,用来指定当前Bean需要依赖的Bean名称,可以确保当前容器在创建被@DependsOn标注的Bean之前,先将value指定的多个Bean先创建好。
@DependsOn常见的2种用法
- 和@Compontent一起使用在类上;
- 和@Bean一起标注在方法上;
案例1:和@Compontent一起使用在类上
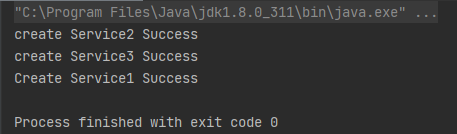
下面定义3个bean:service1、service2、service3;service1需要依赖于其他2个service,需要确保容器在创建service1之前需要先将其他2个bean先创建好。
@DependsOn({"service2", "service3"})
@Component
public class Service1 {
    public Service1() {
        System.out.println("Create Service1 Success");
    }
}

@Component
public class Service2 {
    public Service2() {
        System.out.println("create Service2 Success");
    }
}

@Component
public class Service3 {
    public Service3() {
        System.out.println("create Service3 Success");
    }
}
配置类,代码如下:
@ComponentScan(value = "com.thr.spring.*")
public class BeanConfig {

}
运行测试类,代码如下:
/**
 * Spring测试代码
 *
 * @author tanghaorong
 */
public class SpringRunTest {
    public static void main(String[] args) {
        //1.初始化Spring容器,通过注解加载
        ApplicationContext applicationContext = new AnnotationConfigApplicationContext(BeanConfig.class);
        //2.通过容器获取实例
        Service1 service1 = applicationContext.getBean(Service1.class);
    }
}
运行输出结果
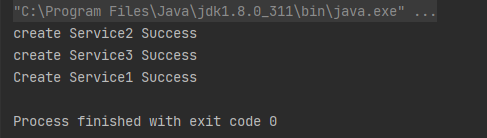
案例2:和@Bean一起标注在方法上
下面通过配置文件的方式来创建bean,如下:
@Configuration
public class BeanConfig1 {

    @Bean
    @DependsOn({"service2", "service3"})
    public Service1 service1() {
        return new Service1();
    }

    @Bean
    public Service2 service2() {
        return new Service2();
    }

    @Bean
    public Service3 service3() {
        return new Service3();
    }
}
运行输出结果:
3、@Lazy注解:延迟加载
Spring IoC(ApplicationContext)容器一般都会在启动的时候实例化所有单实例 Bean。但是如果我们想要 Spring 在启动的时候延迟加载 Bean,即在调用某个 Bean 的时候再去初始化,那么就可以使用 @Lazy 注解。@Lazy等效于bean.xml中bean元素的lazy-init属性,可以实现bean的延迟初始化。所谓延迟初始化:就是使用到的时候才会去进行初始化。
来看一下其定义:
@Target({ElementType.TYPE, ElementType.METHOD, ElementType.CONSTRUCTOR,
        ElementType.PARAMETER, ElementType.FIELD})
@Retention(RetentionPolicy.RUNTIME)
@Documented
public @interface Lazy {
    boolean value() default true;
}
参数介绍:value:boolean类型,用来配置是否应发生延迟初始化,默认为true。
@Lazy注解常用3种方式:
- 和@Compontent一起标注在类上,可以使这个类延迟初始化
- 和@Configuration一起标注在配置类上,可以让当前配置类中通过@Bean注册的bean延迟初始化
- 和@Bean一起使用,可以使当前bean延迟初始化
如果 @Component 或 @Bean 定义上不存在 @Lazy 注解,则会进行初始化。如果存在 @Lazy 注解且设置 value为true,则 @Bean或 @Component 定义的 Bean 将不会被初始化,直到被另一个 Bean 引用或从封闭的 BeanFactory 中显式检索。如果存在 @Lazy 且设置 value 为false,则将在执行启动单例初始化的Bean工厂启动时实例化Bean。
如果 @Configuration 类上存在 @Lazy 注解,则表明该 @Configuration 中的所有 @Bean 方法都应延迟初始化。如果在 @Lazy 注解的 @Configuration 类中的 @Bean方法上存在 @Lazy 注解且设置 value 为 false,则表明重写了“默认延迟”行为,并且应立即初始化Bean。
案例1:和@Compontent一起标注在类上
定义User实体类,代码如下:
@Data
@Component
@Lazy
public class User {
    @Value(value = "2020")
    private Integer userId;
    @Value(value = "小唐")
    private String userName;
    @Value(value = "20")
    private Integer userAge;
    @Value(value = "123456")
    private String userPwd;
    @Value(value = "中国北京")
    private String userAddress;
}
上面的User类使用到了@Lazy注解,默认值为true,所以它会被延迟初始化,在容器启动过程中不会被初始化,当从容器中查找这个bean的时候才会被初始化。
配置类,代码如下:
@ComponentScan(value = "com.thr.spring.pojo")
public class BeanConfig {

}
测试运行代码如下:
public class SpringRunTest {
    public static void main(String[] args) {
        //1.初始化Spring容器,通过注解加载
        System.out.println("准备启动spring容器");
        ApplicationContext applicationContext = new AnnotationConfigApplicationContext(BeanConfig.class);
        System.out.println("spring容器启动完毕");
        //2.通过容器获取实例
        User user = applicationContext.getBean(User.class);
        System.out.println(user);
    }
}
运行输出结果:

案例2:和@Configuration一起标注在配置类上
@Lazy和@Configuration一起使用,此时配置类中所有通过@Bean方式注册的Bean都会被延迟初始化,看下面代码:
@Configuration
@Lazy
public class BeanConfig {

    @Bean
    public User user() {
        return new User();
    }
}
案例3:和@Bean一起标注在方法上
如果配置类上使用了@Lazy,此时会对当前类中所有@Bean标注的方法生效,但是某个配置方法上面也使用到了@Lazy,那么就以当前配置方法的为准,可以理解为就近原则,此时user2这个bean不会被延迟初始化,user这个bean会被延迟初始化。
@Configuration
@Lazy
public class BeanConfig {

    @Bean
    public User user() {
        return new User();
    }

    @Bean
    @Lazy(value = false)
    public User user2() {
        return new User();
    }
}
4、@ImportResource注解:配置类中导入bean定义的配置文件
@ImportResource 注解用于导入 Spring 的配置文件,如:spring-mvc.xml、application-Context.xml。但遗憾的是 Spring Boot 里面没有Spring 配置文件,都是通过 Java 代码进行配置。如果我们自己编写了配置文件,Spring Boot 是不能自动识别,此时需要使用 @ImportResource 注解将自己的配置文件加载进来。
来看一下其定义:
@Retention(RetentionPolicy.RUNTIME)
@Target(ElementType.TYPE)
@Documented
public @interface ImportResource {
    @AliasFor("locations")
    String[] value() default {};

    @AliasFor("value")
    String[] locations() default {};

    Class<? extends BeanDefinitionReader> reader() default
            BeanDefinitionReader.class;
}
@ImportResource 注解的可选属性,如下:
- String[] locations:要导入的资源路径,如:classpath:spring-mvc.xml 从类路径加载 spring-mvc.xml 配置文件。
- String[] value:locations() 的别名
- Class<? extends BeanDefinitionReader> reader:在处理通过 value() 属性指定的资源时使用的 BeanDefinitionReader 实现。默认情况下,读取器将适应指定的资源路径:“.groovy” 文件将使用 GroovyBeanDefinitionReader 处理;然而,所有其他资源都将使用 XmlBeanDefinitionReader 进行处理。
示例代码
我们在 resources 目录下面创建一个 applicationContext.xml 文件,该文件中手动声明一个 Bean。applicationContext.xml 配置文件内容如下:
<?xml version="1.0" encoding="UTF-8"?>
<beans xmlns="http://www.springframework.org/schema/beans"
       xmlns:xsi="http://www.w3.org/2001/XMLSchema-instance"
       xsi:schemaLocation="http://www.springframework.org/schema/beans
        http://www.springframework.org/schema/beans/spring-beans.xsd">

    <!--实例化User-->
    <bean id="user" class="com.thr.spring.pojo.User"/>
</beans>
定义User实体类,代码如下:
@Data
public class User {
    @Value(value = "2020")
    private Integer userId;
    @Value(value = "小唐")
    private String userName;
    @Value(value = "20")
    private Integer userAge;
    @Value(value = "123456")
    private String userPwd;
    @Value(value = "中国北京")
    private String userAddress;
}
配置类,代码如下:
@ImportResource(value = "classpath:applicationContext.xml")
public class BeanConfig {

}
测试运行代码如下:
public class SpringRunTest {
    public static void main(String[] args) {
        //1.初始化Spring容器,通过注解加载
        ApplicationContext applicationContext = new AnnotationConfigApplicationContext(BeanConfig.class);
        //2.通过容器获取实例
        User user = applicationContext.getBean(User.class);
        System.out.println(user);
    }
}
运行输出结果:


【推荐】国内首个AI IDE,深度理解中文开发场景,立即下载体验Trae
【推荐】编程新体验,更懂你的AI,立即体验豆包MarsCode编程助手
【推荐】抖音旗下AI助手豆包,你的智能百科全书,全免费不限次数
【推荐】轻量又高性能的 SSH 工具 IShell:AI 加持,快人一步
· AI与.NET技术实操系列:基于图像分类模型对图像进行分类
· go语言实现终端里的倒计时
· 如何编写易于单元测试的代码
· 10年+ .NET Coder 心语,封装的思维:从隐藏、稳定开始理解其本质意义
· .NET Core 中如何实现缓存的预热?
· 25岁的心里话
· 闲置电脑爆改个人服务器(超详细) #公网映射 #Vmware虚拟网络编辑器
· 零经验选手,Compose 一天开发一款小游戏!
· 通过 API 将Deepseek响应流式内容输出到前端
· 因为Apifox不支持离线,我果断选择了Apipost!