LC(学圈)阿里云centos部署
已部署成功。ip访问已失效,请用域名访问。
谢谢。网站部署的测试版,bug比较多。
访问链接 http://www.lcgb.online/
centos7自带python2.7
一
安装virtualenvwrapper
pip install virtualenvwrapper
创建虚拟环境目录
mkdir ~/.virtualenvs -
配置环境变量
用vim打开~/.bashrc
export WORKON_HOME=~/.virtualenvs
source /usr/bin/virtualenvwrapper.sh
不同的系统virtualenvwrapper.sh的位置可能会不一样
source ~/.bashrc执行.bashrc使文件生效
-
使用mkvirtualenv 创建虚拟环境
mkvirtualenv LCVENV创建完成之后 会自动进入虚拟环境
-
virtualenvwrapper其他操作
# 退出虚拟环境
deactivate

# 查看当前有哪些虚拟环境
workon

# 进入指定的虚拟环境 workon [虚拟环境名]
workon test2

# 在指定虚拟环境安装包
# 1. 进入指定虚拟环境
# 2. 查看当前虚拟环境中有哪些安装包
# 3. 安装包
workon test2
pip list
pip install requests

# 卸载包
pip uninstall requests


二
上传项目或克隆项目到云主机并配置依赖环境
我们可以通过 pip freeze > requirements.txt 将本地的虚拟环境安装包相信信息导出来

然后将requirements.txt文件上传到服务器之后运行:

workon LCVENV
pip install -r requirements.txt
安装依赖包
我这里使用到MySQL像配置MySQL
详细链接
https://www.cnblogs.com/starof/p/4680083.html
我这里直接如下这么做即可# wget http://dev.mysql.com/get/mysql-community-release-el7-5.noarch.rpm # rpm -ivh mysql-community-release-el7-5.noarch.rpm # yum install mysql-community-server
安装成功后重启mysql服务。
# service mysqld restart
初次安装mysql,root账户没有密码。
设置密码
mysql> set password for 'root'@'localhost' =password('PW');
Query OK, 0 rows affected (0.00 sec)

mysql>
不需要重启数据库即可生效。
编码与远程连接设置
mysql配置文件为/etc/my.cnf
最后加上编码配置
[mysql]
default-character-set =utf8
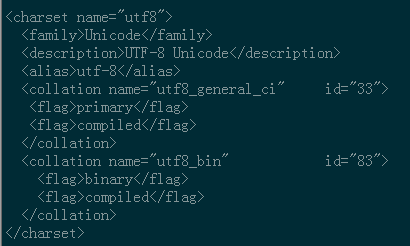
这里的字符编码必须和/usr/share/mysql/charsets/Index.xml中一致。

把在所有数据库的所有表的所有权限赋值给位于所有IP地址的root用户。
mysql> grant all privileges on *.* to root@'%'identified by 'pw';
如果是新用户而不是root,则要先新建用户
mysql>create user 'username'@'%' identified by 'pw';
此时就可以进行远程连接了。
我项目中用到MySQL-python-1.2.5.zip
只能手动配置
详细链接https://blog.csdn.net/yelu_hong/article/details/83827833

我这项目只需如下配置
下载安装包:
MySQL-python-1.2.5.zip(下载地址:https://pypi.python.org/pypi/MySQL-python )
setuptools-0.6c8.tar.gz(下载地址:http://pypi.python.org/packages/source/s/setuptools/setuptools-0.6c8.tar.gz)
1.下载安装setuptools
[root@localhost opt]#tar xzf setuptools-0.6c8.tar.gz
[root@localhost setuptools-0.6c8]# python setup.py build
[root@localhost setuptools-0.6c8]# python setup.py install
2.下载安装MySQL-python
[root@localhost opt]#unzip MySQL-python-1.2.5.zip
[root@localhost opt]# cd MySQL-python-1.2.5/
[root@localhost MySQL-python-1.2.5]$ sudo python setup.py build
[root@localhost MySQL-python-1.2.5]$ sudo python setup.py install
如果中间报很多奇奇怪怪的错,
原因是因为没有安装mysql和python开发环境。
解决方法: sudo yum install python-devel mysql-devel
然后再安装一次即可成功
[root@localhost MySQL-python-1.2.5]$ python setup.py build
[root@localhost MySQL-python-1.2.5]$ python setup.py install
window系统下:
安装:MySQL-python-1.2.3.win-amd64-py2.7.exe(32位安装:MySQL-python-1.2.5.win32-py2.7.exe)
DjangoUeditor
https://github.com/zhangfisher/DjangoUeditor
cd 解压后路径
python setup.py install
三
安装nginx
https://www.digitalocean.com/community/tutorials/how-to-install-nginx-on-centos-7LCVENV下 安装uwsgi
pip install uwsgi
测试uwsgi
uwsgi --http :8000 --module LC.wsgi配置nginx
mkdir /root/LC/conf/nginx/
新建uc_nginx.conf
# the upstream component nginx needs to connect to
upstream django {
# server unix:///path/to/your/mysite/mysite.sock; # for a file socket
server 127.0.0.1:8000; # for a web port socket (we'll use this first)
}
# configuration of the server

server {
# the port your site will be served on
listen      80;
# the domain name it will serve for
server_name 39.; # substitute your machine's IP address or FQDN
charset     utf-8;

# max upload size
client_max_body_size 75M;   # adjust to taste


#location /staticfiles {
#    alias /root/LC/staticfiles;
#}
# Django media
location /media  {
    alias /root/LC/media;  # 指向django的media目录
}

location /static {
    alias /root/LC/static; # 指向django的static目录
}

# Finally, send all non-media requests to the Django server.
location / {
    uwsgi_pass  django;
    include     uwsgi_params; # the uwsgi_params file you installed
}
}
                                                                       37,1          Bot
sudo ln -s /root/LC/conf/nginx/uc_nginx.conf /etc/nginx/conf.d/
拉取所有需要的static file 到同一个目录
在django的setting文件中,添加下面一行内容:

    STATIC_ROOT = os.path.join(BASE_DIR, "staticfiles")
运行命令
    python manage.py collectstatic
通过配置文件启动uwsgi
新建uwsgi.ini 配置文件, 内容如下:
# mysite_uwsgi.ini file
[uwsgi]

# Django-related settings
# the base directory (full path)
chdir = /root/LC
# Django's wsgi file
module = LC.wsgi
# the virtualenv (full path)

# process-related settings
# master
master = true
# maximum number of worker processes
processes = 10
# the socket (use the full path to be safe
# socket = 127.0.0.1:8000
socket = 127.0.0.1:8000
# ... with appropriate permissions - may be needed
# chmod-socket    = 664
# clear environment on exit
vacuum = true
virtualenv = /root/.virtualenvs/LCVENV

#logto = /tmp/mylog.log
vim LC/conf/nginx/uc_nginx.conf
netstat -ntlp
kill -9 。。
sudo /usr/sbin/nginx
最后
workon LCVENV
uwsgi -i /root/LC/conf/uwsgi.ini &
注意net::ERR_ABORTED 403 (Forbidden)
静态文件权限问题最终解决方法是在nginx.conf配置文件头部加user root:
user root;
额外无关了解
Django+uwsgi+nginx
nginx和uwsgi的区别和作用:
1, nginx是对外的服务器,外部浏览器通过url访问nginx, uwsgi是对内的服务器,主要用来处理动态请求。
2, nginx接收到浏览器发送过来的http请求,将包进行解析,分析url, a.如果是静态文件请求就直接访问用户给nginx配置的静态文件目录,直接返回用户请求的静态文件, b.如果不是静态文件,而是一个动态的请求,那么nginx就将请求转发给uwsgi,
uwsgi接收到请求之后将包进行处理,处理成wsgi可以接受的格式,并发给wsgi,
wsgi根据请求调用应用程序的某个文件,某个文件的某个函数,最后处理完将
返回值再次交给wsgi,wsgi将返回值进行打包,打包成uwsgi能够接收的格式,
uwsgi接收wsgi发送的请求,并转发给nginx,nginx最终将返回值返回给浏览器。


 浙公网安备 33010602011771号