SSH项目的搭建
SSH是指JavaEE中的三种框架:Struts2,Spring,Hibernate。
1,准备工作
1.先要有一个eclipse工具,运行环境是jdk1.8。tomcat8.0
2.然后在网上下载Struts2,Spring,Hibernate的包

这是我用的SSH的包和版本。
3.解压3个jar包:
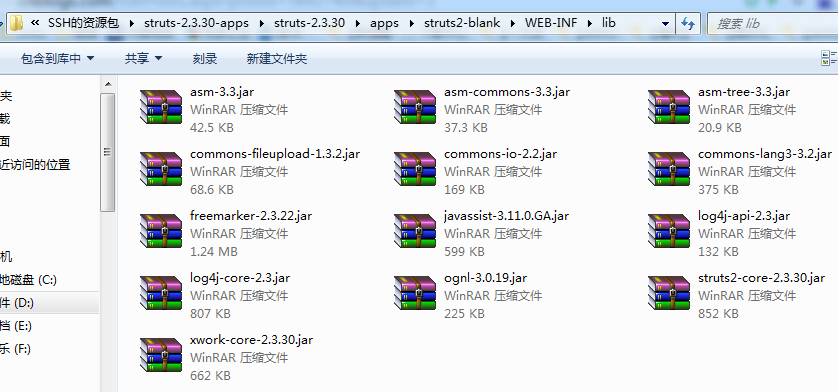
这是Struts2解压后所需要的包的路径,D:\SSH的资源包\struts-2.3.30-apps\apps\struts2-blank\WEB-INF\lib
———————————————————————————————————————————————————————————————
spring解压后的路径,D:\SSH的资源包\spring-framework-4.2.2.RELEASE\libs

但并不是所有的包都是需要的,比如“javadoc.jar、sources.jar”这两个结尾的包是不需要的,不会在项目中加入它们
除了以上的包,spring还要导入两个包:commons-logging.jar 和 struts2-spring-plugin.jar
这两个包在Struts2的包里,路径是:D:\SSH的资源包\struts-2.3.30\apps\struts2-showcase\WEB-INF\lib

——————————————————————————————————————————————————————
Hibernate解压后所需要的包的路径:D:\SSH的资源包\hibernate-release-5.2.2.Final\lib\required

然后还需要一个数据库连接池的包,可以在网上下载,也可以在Hibernate包里找:路径是,D:\SSH的资源包\hibernate-release-5.2.2.Final\lib\optional\c3p0

以上这些包都是要用到的。下面正式开始
2.新建项目
1.首先打开eclipse工具新建一个web项目
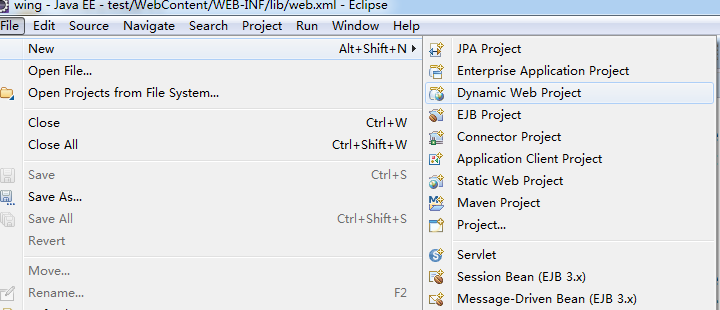
这个选项是动态的web项目,点击之后进行下一步的设置
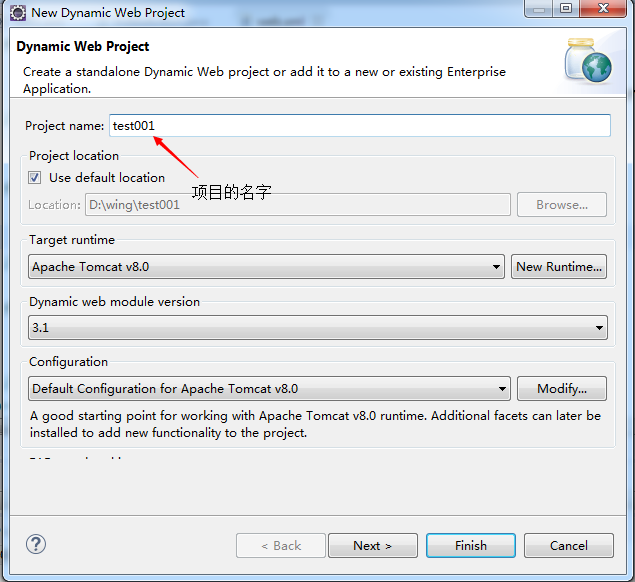
不要直接Finish(完成),点next(下一步)
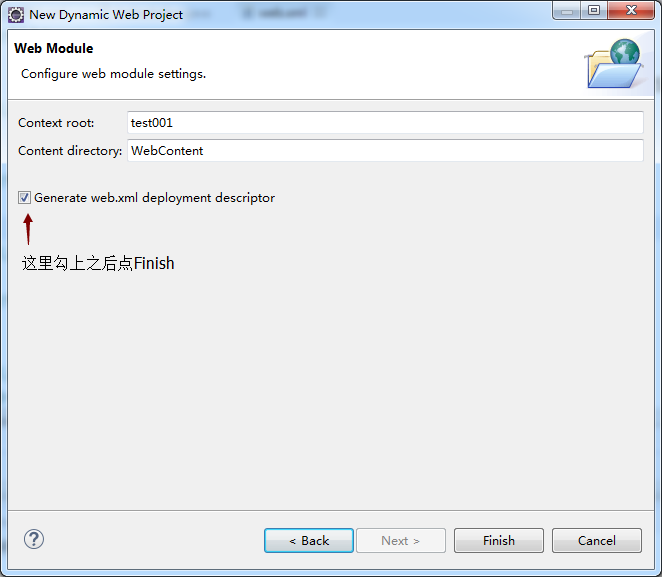
完成之后如下图
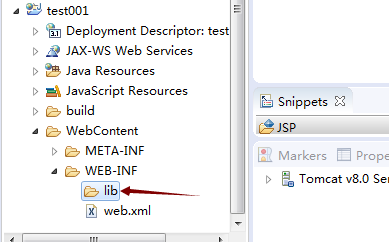
之前准备好的包放入箭头所指的文件夹里
2.在web.xml配置Struts2和spring
<?xml version="1.0" encoding="UTF-8"?>
<web-app xmlns:xsi="http://www.w3.org/2001/XMLSchema-instance"
    xmlns="http://xmlns.jcp.org/xml/ns/javaee"
    xsi:schemaLocation="http://xmlns.jcp.org/xml/ns/javaee http://xmlns.jcp.org/xml/ns/javaee/web-app_3_1.xsd"
    id="WebApp_ID" version="3.1">
这是配置的头信息,可以从Struts2包里的示例项目中拷过来
<filter>
    <filter-name>struts2</filter-name>
    <filter-class>org.apache.struts2.dispatcher.ng.filter.StrutsPrepareAndExecuteFilter</filter-class>
</filter>

<filter-mapping>
    <filter-name>struts2</filter-name>
    <url-pattern>/*</url-pattern>
</filter-mapping>
这是以过滤器的形式引入Struts2的包。这是个版本是一个过滤器,在后面的版本会变成两个过滤器,接下来配置spring
<context-param>
<param-name>contextConfigLocation</param-name>
<param-value>classpath:applicationContext.xml</param-value>
</context-param>
<listener>
<listener-class>org.springframework.web.context.ContextLoaderListener</listener-class>
</listener>
到这里就配置好了,进行下一步
3.要编写一个代替servlet跳转的action类。先新建一个action类,如下图
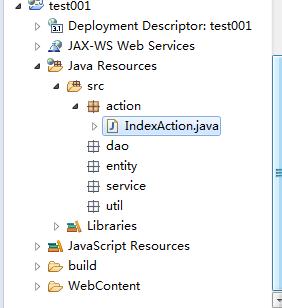
名字可随意起,不过一般会起个有意义的名字,方便查找。这里我把一般要用到的包都写上去了分别是,action(跳转),dao(访问数据库),service(业务逻辑),entity(实体类),util(工具)。
public class IndexAction extends ActionSupport{
    //声明service,但不给它创建具体的实现类的实例,
    //因为:action不应该关注具体是谁来实现service
    //具体service实现类是谁,我们使用spring注入进来
    private IndexService is;
    public viod setIs(IndexService){//这里就是用spring注入
        this. is = is ;
    }
    public String execute1{
        return: "index" ;
    }
}
4.编写完Action类后,我们要配置struts.xml文件,首先新建一个xml文件,如下图

下面开始写配置文件
<struts>
    <constant name="struts.obiectFactory" value="spring"/>
    <include file="s001.xml"/>
    <package name="mypck001" extends="struts-default">
        <action name="Index" class="myIndexAction" method="execute1">
            <result name="success">/WEB-INF/jsp/index.jsp</result>
            <result name="fail">/WEB-INF/jsp/fail.jsp</result>//防止不通过action就可以访问jsp页面
        </action>
    </package>
</struts>
5.写appliCation.xml配置文件,也是在src文件夹内新建一个xml文件。
<?xml version="1.0" encoding="UTF-8"?>
<beans xmlns="http://www.springframework.org/schema/beans"
        xmlns:xsi="http://www.w3.org/2001/XMLSchema-instance"
        xmlns:p="http://www.springframework.org/schema/p"
        xmlns:aop="http://www.springframework.org/schema/aop"
        xmlns:context="http://www.springframework.org/schema/context"
        xmlns:jee="http://www.springframework.org/schema/jee"
        xmlns:tx="http://www.springframework.org/schema/tx"
        xsi:schemaLocation="
            http://www.springframework.org/schema/aop http://www.springframework.org/schema/aop/spring-aop-4.2.xsd
            http://www.springframework.org/schema/beans http://www.springframework.org/schema/beans/spring-beans-4.2.xsd
            http://www.springframework.org/schema/context http://www.springframework.org/schema/context/spring-context-4.2.xsd
            http://www.springframework.org/schema/jee http://www.springframework.org/schema/jee/spring-jee-4.2.xsd
            http://www.springframework.org/schema/tx http://www.springframework.org/schema/tx/spring-tx-4.2.xsd">


    <!-- ①一个bean标签对应一个类,id为myIndexAction的bean就对应项目中的IndexAction类     ②id的值是随便起,但最好有意义   ③class的值是包名.类名     ④scope="prototype"是非单例,不用理解,但一定要写这句代码,记住有这回事就行 -->
    <bean id="myIndexAction" class="ssh.action.IndexAction" scope="prototype">
          <!-- ①name的值是要注入的变量名   ②ref是引用类的类名,name为“is”的变量引用的是myIndexService的值 -->
        <property name="is" ref="myIndexService"/>
    </bean>

      <!-- myIndexService = new ssh.service.IndexServiceImpl()  id为myIndexService的bean对应项目中的IndexService类-->
    <bean id="myIndexService" class="ssh.service.IndexServiceImpl" scope="prototype">
    <!-- name为id的变量引用的是myIndexDao的值 -->
        <property name="id" ref="myIndexDao"/>
    </bean>

    <bean id="myIndexDao" class="ssh.dao.IndexDaoImpl" scope="prototype">
        <property name="c" ref="myConnection"></property>
    </bean>


      <!-- 下面这个bean是对应项目中的connection类,class的值是包名.类名 -->
    <bean id="myConnection" class="ssh.util.MyConnectionImpl_SQLSERVER" scope="prototype">
      <!-- 这里没有<property>是因为connection这个类已经是连接数据库的类,我们已经不需要通过new实现类了 -->
    </bean>

</beans>
6.然后写数据库的配置文件,首先把(hibernate-release-5.2.2.Final\project\hibernate-core\src\test\resources)目录下的hibernate.cfg.xml文件放在src目录下。

然后在hibernate.cfg.xml文件里最顶部加上<?xml version="1.0" encoding="utf-8"?>
接着配置hibernate.cfg.xml文件,并配置映射文件
<?xml version="1.0" encoding="utf-8"?>
<!DOCTYPE hibernate-configuration PUBLIC
"-//Hibernate/Hibernate Configuration DTD 3.0//EN"
"http://www.hibernate.org/dtd/hibernate-configuration-3.0.dtd">

<hibernate-configuration>
    <session-factory>
        <!-- hibernate配置文件 -->
     <!-- 配置数据库名,以及用户名,密码 -->
        <property name="connection.driver_class">com.mysql.jdbc.Driver</property>
        <property name="connection.url">jdbc:mysql://localhost:3306/CardDB</property>
        <property name="connection.username">root</property>
        <property name="connection.password">123456</property>
        <!-- 每个数据库都有1个 -->
        <property name="dialect">org.hibernate.dialect.MySQL5Dialect</property>
        <property name="connection.pool_size">5</property>
        <property name="show_sql">true</property>
        <property name="format_sql">true</property>
        <property name="hbm2ddl.auto">update</property>
        <!-- 配置映射文件 -->
        <mapping resource="ssh/entity/BookCard.hbm.xml"/>
    </session-factory>
</hibernate-configuration>
7.然后在src文件夹内再新建一个BookCard.hbm.xml(实体类配置)文件并进行配置
<?xml version="1.0" encoding="UTF-8"?>
<hibernate-mapping xmlns="http://www.hibernate.org/xsd/hibernate-mapping">
  <!-- ①class的值是包名.实体类名    ②table的值是数据库表名 -->
    <class name="ssh.entity.BookCard" table="BookCard">
        <!-- ①<id>标签是要作为主键的属性或字段才能用    ②column是数据库的字段名-->
        <id name="cid" column="cid">
            <generator class="native"></generator>
        </id>
        <!-- <property>标签对应于属性(数据库字段)在<property>标签中设置数据库相关的属性,比如长度、类型、是否为空、列名...等等 -->
        <property name="name" type="string" length="50" column="name" not-null="true"></property>
        <property name="sex" type="string" length="2" column="sex"></property>
        <property name="cardDate" type="date" column="cardDate"></property>
        <property name="deposit" type="double" column="deposit"></property>
    </class>
</hibernate-mapping>
8.在IndexDaoImpl实现类中构造SessionFactory
package ssh.dao;

import org.hibernate.Session;
import org.hibernate.SessionFactory;
import org.hibernate.cfg.Configuration;
import org.hibernate.query.Query;

public class IndexDaoImpl implements IndexDao {
  <!-- SessionFactory是hibernate的内置对象 -->
    private SessionFactory sessionFactory;
  <!-- 给SessionFactory一个set方法,便于spring注入 -->
    public void setSessionFactory(SessionFactory sf) {
        this.sessionFactory = sf;
    }

    @Override
    public List<BookCard> getAllBookCard() {
        <!-- sessionFactory这个实例可以自己按常规的hibernate传统写法创建也可以交给spring去托管sessionFactory = new Configuration().configure().buildSessionFactory(); -->
        Session session = sessionFactory.openSession();
    }

}
以上就是一个简易的SSH框架项目的搭建


【推荐】编程新体验,更懂你的AI,立即体验豆包MarsCode编程助手
【推荐】凌霞软件回馈社区,博客园 & 1Panel & Halo 联合会员上线
【推荐】抖音旗下AI助手豆包,你的智能百科全书,全免费不限次数
【推荐】博客园社区专享云产品让利特惠,阿里云新客6.5折上折
【推荐】轻量又高性能的 SSH 工具 IShell:AI 加持,快人一步