Canvas学习与使用 (H5新增标签)
Canvas学习与使用(不需要借助于第三方插件,canvas是一个行内双标签)
<canvas> 是 HTML5 新增的,一个可以使用脚本(通常为 JavaScript) 在其中绘制图像的 HTML 元素。它可以用来制作照片集或者制作简单(也不是那么简单)的动画,甚至可以进行实时视频处理和渲染。
<canvas> 只有两个可选的属性 width、heigth 属性,默认 width为300、height 为 150,单位都是 px
一、绘制形状的原理
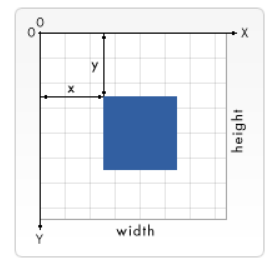
栅格的起点为左上角,坐标为 (0,0) 。所有元素的位置都相对于原点来定位;图中蓝色方形左上角的坐标为距离左边(X 轴)x 像素,距离上边(Y 轴)y 像素,坐标为 (x,y)
二、渲染上下文
<canvas> 会创建一个固定大小的画布,会公开一个或多个渲染上下文(画笔),使用渲染上下文来绘制和处理要展示的内容
//设置一个宽500 高500的画布
<canvas id="canvas" width="500" height="500">你的浏览器不支持 canvas,请升级你的浏览器。</canvas>// 获取画布
let canvas = document.getElementById('canvas');
// 创建上下文对象(画笔)
let ctx = canvas.getContext('2d');
三、绘制矩形
-
1、
fillRect(x, y, width, height):绘制一个填充的矩形。 -
2、
strokeRect(x, y, width, height):绘制一个矩形的边框。 -
3、
clearRect(x, y, widh, height):清除指定的矩形区域,然后这块区域会变的完全透明 -
x, y:指的是矩形的左上角的坐标。(相对于canvas的坐标原点)
-
width, height:指的是绘制的矩形的宽和高。
<canvas class="canvas" width="500" height="500">
    您的浏览器不支持 HTML5 canvas 标签。
</canvas>// 获取画布元素
let canvas = document.querySelector('.canvas');
// 创建画笔
let ctx = canvas.getContext('2d');
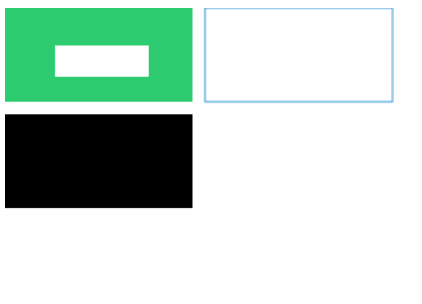
// 默认的矩形是黑色
ctx.fillRect(0, 85, 150, 75);
// 设置填充颜色
ctx.fillStyle = "#2ecc71";
// 绘制一个矩形
ctx.fillRect(0, 0, 150, 75);
// 设置边框颜色
ctx.strokeStyle = '#3498db'
// 绘制一个矩形边框
ctx.strokeRect(160, 0, 150, 75);
// 清除指定矩形区域
ctx.clearRect(40, 30, 75, 25)
四、绘制路径
图形的基本元素是路径。路径是通过不同颜色和宽度的线段或曲线相连形成的不同形状的点的集合。一个路径,甚至一个子路径,都是闭合的。
使用路径绘制图形需要的步骤:
- 创建路径起始点
- 调用绘制方法去绘制路径
- 把路径封闭
- 一旦路径形成,通过描边或填充路径区域来渲染图形
方法:
beginPath()新建一条路径,路径一旦创建成功,图形绘制命令被指向到路径上生成路径moveTo(x, y)把画笔移动到指定的坐标(x, y)。相当于设置路径的起始点坐标。closePath()闭合路径之后,图形绘制命令又重新指向到上下文中stroke()通过线条来绘制图形轮廓fill()通过填充路径的内容区域生成实心的图形
五、绘制线段
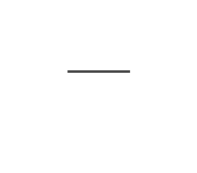
示例1:绘制线段
<canvas class="canvas" width="500" height="500">暂不支持</canvas>// 获取画布
let canvas =document.querySelector('.canvas');
// 创建画笔
let ctx = canvas.getContext('2d');
// 1. 新建一条路径
ctx.beginPath();
// 2. 将画笔移动到指定位置
ctx.moveTo(50,50);
// 3. 绘制一条从当前位置到指定坐标的直线
ctx.lineTo(100,50);
// 4.闭合路径。会拉一条从当前点到path起始点的直线。如果当前点与起始点重合,则什么都不做
ctx.closePath();
// 5. 绘制路径
ctx.stroke();
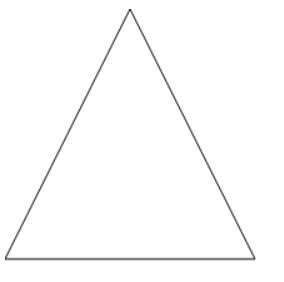
示例2:绘制三角形
<canvas class="canvas" width="500" height="500">暂不支持</canvas>// 获取画布
let canvas = document.querySelector('.canvas')
// 创建画笔
let ctx = canvas.getContext('2d');
ctx.beginPath();
ctx.moveTo(0,200)
ctx.lineTo(100,0)
ctx.lineTo(200,200)
ctx.closePath(); //闭合路径
ctx.stroke();// 描边
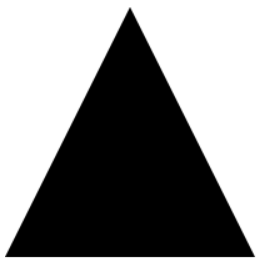
示例3:填充三角形
- 1
<canvas class="canvas" width="500" height="500">暂不支持</canvas>// 获取画布
let canvas = document.querySelector('.canvas')
// 创建画笔
let ctx = canvas.getContext('2d');
ctx.beginPath();
ctx.moveTo(0,200)
ctx.lineTo(100,0)
ctx.fill(); // 填充闭合区域。如果path没有闭合,则fill()会自动闭合路径
六、绘制圆弧
1、arc(x, y, r, startAngle, endAngle, boolen): 以(x, y) 为圆心,以r 为半径,从 startAngle 弧度开始到endAngle弧度结束。boolen 是布尔值,true 表示逆时针,false 表示顺时针(默认是顺时针)。
注意:
-
这里的度数都是弧度。
-
0弧度是指的x轴正方向。JSradians=(Math.PI/180)*degrees //角度转换成弧度
2、arcTo(x1, y1, x2, y2, radius): 根据给定的控制点和半径画一段圆弧,最后再以直线连接两个控制点。
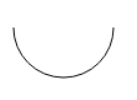
示例1:
// 获取画布
let canvas = document.querySelector('.canvas')
// 创建画笔
let ctx = canvas.getContext('2d');
ctx.beginPath();
ctx.arc(50, 50, 40, 0,Math.PI, false);
ctx.stroke();
示例2:
ctx.beginPath();
ctx.arc(50, 50, 40, 0, Math.PI * 2, false);
ctx.stroke();

ctx.beginPath();
ctx.arc(150, 50, 40, 0, Math.PI, false);
ctx.stroke();

ctx.beginPath();
ctx.arc(250, 50, 40, 0, Math.PI / 2, false);
ctx.stroke();

ctx.beginPath();
ctx.arc(350, 50, 40, 0, Math.PI / 3, false);
ctx.stroke();

示例3:
ctx.beginPath();
ctx.arc(50, 150, 40, 0, Math.PI * 2, true);
ctx.stroke();

ctx.beginPath();
ctx.arc(150, 150, 40, 0, Math.PI, true);
ctx.stroke();

ctx.beginPath();
ctx.arc(250, 150, 40, 0, Math.PI / 2, true);
ctx.stroke();

ctx.beginPath();
ctx.arc(350, 150, 40, 0, Math.PI / 3, true);
ctx.stroke();

示例4:
ctx.beginPath();
ctx.arc(50, 250, 40, 0, Math.PI * 2, false);
ctx.closePath(); //闭合路径·
ctx.stroke();

ctx.beginPath();
ctx.arc(150, 250, 40, 0, Math.PI, false);
ctx.closePath(); //闭合路径·
ctx.stroke();

ctx.beginPath();
ctx.arc(250, 250, 40, 0, Math.PI / 2, false);
ctx.closePath(); //闭合路径·
ctx.stroke();

ctx.beginPath();
ctx.arc(350, 250, 40, 0, Math.PI / 3, false);
ctx.closePath(); //闭合路径·
ctx.stroke();

示例5:
ctx.beginPath();
ctx.arc(50, 350, 40, 0, Math.PI * 2, true);
ctx.closePath(); //闭合路径·
ctx.stroke();

ctx.beginPath();
ctx.arc(150, 350, 40, 0, Math.PI, true);
ctx.closePath(); //闭合路径·
ctx.stroke();

ctx.beginPath();
ctx.arc(250, 350, 40, 0, Math.PI / 2, true);
ctx.closePath(); //闭合路径·
ctx.stroke();

ctx.beginPath();
ctx.arc(350, 350, 40, 0, Math.PI / 3, true);
ctx.closePath(); //闭合路径·
ctx.stroke();

示例6:💡
<canvas class="canvas" width="500" height="500">暂不支持</canvas>
<script>
    // 获取画布
    let canvas = document.querySelector('.canvas')
    // 创建画笔
    let ctx = canvas.getContext('2d');
    ctx.beginPath();
    ctx.moveTo(50, 50);
    //参数1、2:控制点1坐标   参数3、4:控制点2坐标  参数4:圆弧半径
    ctx.arcTo(200, 50, 200, 200, 100);
    ctx.lineTo(200, 200)
    ctx.stroke();
    ctx.beginPath();
    ctx.rect(50, 50, 10, 10);
    ctx.rect(200, 50, 10, 10)
    ctx.rect(200, 200, 10, 10)
    ctx.fill()
</script>
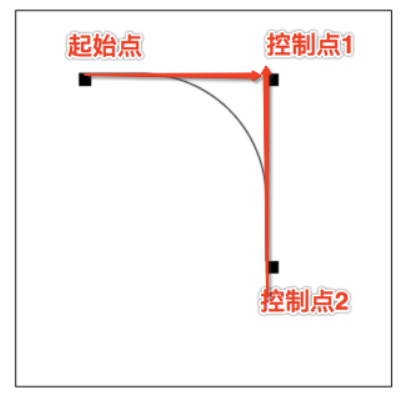
arcTo 方法的说明:
这个方法可以这样理解。绘制的弧形是由两条切线所决定。
第 1 条切线:起始点和控制点1决定的直线。
第 2 条切线:控制点1 和控制点2决定的直线。
其实绘制的圆弧就是与这两条直线相切的圆弧。
七、添加样式和颜色
1、设置填充颜色
fillStyle = color 设置图形的填充颜色
2、设置轮廓颜色
strokeStyle = color 设置图形轮廓的颜色
备注:⚠️
- color 可以是表示 css 颜色值的字符串、渐变对象或者图案对象。
- 默认情况下,线条和填充颜色都是黑色。
- 一旦您设置了 strokeStyle 或者 fillStyle 的值,那么这个新值就会成为新绘制的图形的默认值。如果你要给每个图形上不同的颜色,你需要重新设置 fillStyle 或 strokeStyle 的值。
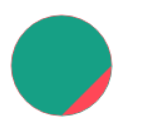
示例:
<canvas class="canvas" width="500" height="500">暂不支持</canvas>
    <script>
        // 获取画布
        let canvas = document.querySelector('.canvas')
        // 创建画笔
        let ctx = canvas.getContext('2d');

        ctx.beginPath(); // 新建路径
        ctx.fillStyle ='#16a085'; // 填充颜色
        ctx.strokeStyle='#ff4757' // 轮廓颜色
        ctx.arc(50, 50, 40, 0, Math.PI /2, true);
        ctx.closePath(); //闭合路径·
        ctx.stroke(); // 绘制轮廓
        ctx.fill(); // 填充内容

        ctx.beginPath();
        ctx.fillStyle ='#ff4757';
        ctx.strokeStyle='#16a085'
        ctx.arc(50, 50, 40, 0, Math.PI /2, false);
        ctx.closePath(); //闭合路径·
        ctx.stroke();
        ctx.fill();
    </script>
3、透明度
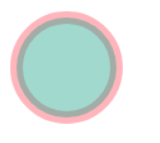
globalAlpha = transparencyValue: 这个属性影响到 canvas 里所有图形的透明度,有效的值范围是 0.0 (完全透明)到 1.0(完全不透明),默认是 1.0
4、线宽
线宽。只能是正值。默认是 1.0。
起始点和终点的连线为中心,上下各占线宽的一半。
示例:
<canvas class="canvas" width="500" height="500">暂不支持</canvas>
<script>
    // 获取画布
    let canvas = document.querySelector('.canvas')
    // 创建画笔
    let ctx = canvas.getContext('2d');
    ctx.globalAlpha = 0.4; //透明度
    ctx.lineWidth = 10; // 设置轮廓宽度,上下各占线宽一半
    ctx.beginPath(); // 新建路径
    ctx.fillStyle = '#16a085'; // 填充颜色
    ctx.strokeStyle = '#ff4757' // 轮廓颜色
    ctx.arc(50, 50, 40, 0, Math.PI * 2, true);
    ctx.closePath(); //闭合路径·
    ctx.stroke(); // 绘制轮廓
    ctx.fill(); // 填充内容
</script>
5、线条末端样式
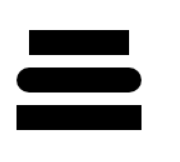
lineCap = type 线条末端样式
共有三个值:
butt:线段末端以方形结束round:线段末端以圆形结束square:线段末端以方形结束,但是增加了一个宽度和线段相同,高度是线段厚度一半的矩形区域。
<canvas class="canvas" width="500" height="500">暂不支持</canvas>
    <script>
        // 获取画布
        let canvas = document.querySelector('.canvas');
        // 创建画笔
        let ctx = canvas.getContext('2d');
        // ==========================================
        ctx.lineWidth = 20; //1.线宽
        ctx.beginPath();
        ctx.lineCap = 'butt'; //2. 末端方形结束
        ctx.moveTo(20, 50);
        ctx.lineTo(100, 50);
        ctx.stroke();
        ctx.closePath();
        // =================================
        ctx.lineWidth = 20;
        ctx.beginPath();
        ctx.lineCap = 'round'; // 末端圆形结束
        ctx.moveTo(20, 80);
        ctx.lineTo(100, 80);
        ctx.stroke();
        ctx.closePath();

        // ======================================
        ctx.lineWidth = 20;
        ctx.beginPath();
        ctx.lineCap = 'square'; // 末端方形结束,但增加一个宽度和线段相同,高度是线段厚度一半的矩形区域
        ctx.moveTo(20, 110);
        ctx.lineTo(100, 110);
        ctx.stroke();
        ctx.closePath();
    </script>
6、线条接合处样式
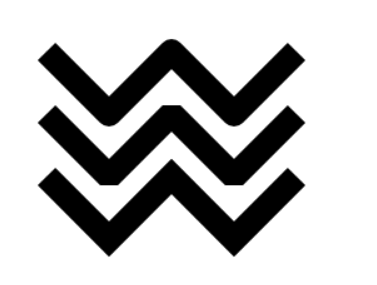
lineJoin = type 同一个 path 内,设定线条与线条间接合处的样式。
共有 3 个值 round, bevel 和 miter:
round通过填充一个额外的,圆心在相连部分末端的扇形,绘制拐角的形状。 圆角的半径是线段的宽度。bevel在相连部分的末端填充一个额外的以三角形为底的区域, 每个部分都有各自独立的矩形拐角。miter(默认) 通过延伸相连部分的外边缘,使其相交于一点,形成一个额外的菱形区域。
<canvas class="canvas" width="500" height="500">暂不支持</canvas>
<script>
    // 获取画布
    let canvas = document.querySelector('.canvas')
    // 创建画笔
    let ctx = canvas.getContext('2d');
    let lineJoin = ['round', 'bevel', 'miter'];
    ctx.lineWidth = 20;
    for (let i = 0; i < lineJoin.length; i++) {
        ctx.lineJoin = lineJoin[i];
        ctx.beginPath();
        ctx.moveTo(50, 50 + i * 50);
        ctx.lineTo(100, 100 + i * 50);
        ctx.lineTo(150, 50 + i * 50);
        ctx.lineTo(200, 100 + i * 50);
        ctx.lineTo(250, 50 + i * 50);
        ctx.stroke();
    }
</script>
7、虚线
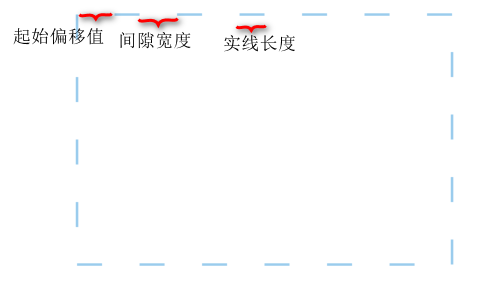
用 setLineDash 方法和 lineDashOffset 属性来制定虚线样式。 setLineDash 方法接受一个数组,来指定线段与间隙的交替;lineDashOffset属性设置起始偏移量。
<canvas class="canvas" width="500" height="500">
        您的浏览器不支持 HTML5 canvas 标签。
    </canvas>

    <script>
        /** @type {HTMLCanvasElement} */
        // 获取画布元素
        let canvas = document.querySelector('.canvas');
        // 创建画笔
        let ctx = canvas.getContext('2d');

        // 设置边框颜色
        ctx.strokeStyle = '#3498db'
        ctx.setLineDash([20, 30]); // [实线长度,间隙宽度]
        ctx.lineDashOffset = 20; // 起始偏移量
        // 绘制一个矩形边框
        ctx.strokeRect(160, 10, 300, 200);
</script>
八、绘制文本
canvas 提供了两种方法来渲染文本:
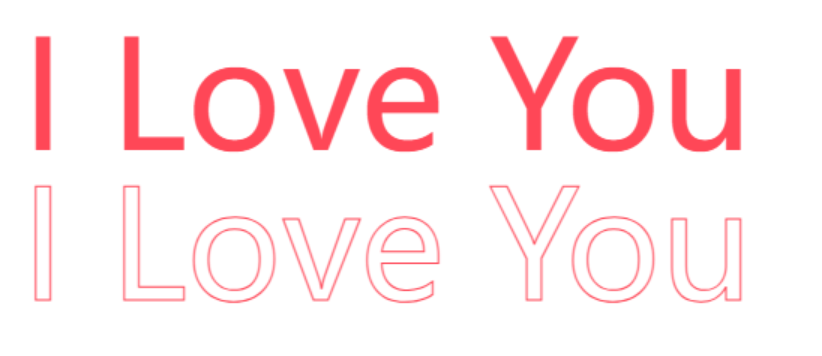
fillText(text, x, y [, maxWidth])在指定的 (x,y) 位置填充指定的文本,绘制的最大宽度是可选的。strokeText(text, x, y [, maxWidth])在指定的 (x,y) 位置绘制文本边框,绘制的最大宽度是可选的。
   <canvas class="canvas" width="500" height="500">暂不支持</canvas>
   <script>
       /** @type {HTMLCanvasElement} */
       function draw() {
           let canvas = document.querySelector('.canvas');
           let ctx = canvas.getContext("2d");
           if (!canvas.getContext) return;
           ctx.font = "100px sans-serif"
           ctx.fillStyle='#ff4757'; // 字体颜色
           ctx.fillText("I Love You", 10, 100);
           ctx.strokeStyle='#ff4757'; // 字体轮廓颜色
           ctx.strokeText("I Love You", 10, 200)

       }
       draw();
   </script>
给文本添加样式
font = value当前我们用来绘制文本的样式。这个字符串使用和CSS font属性相同的语法。 默认的字体是10px sans-serif。textAlign = value文本对齐选项。 可选的值包括:start,end,left,rightorcenter。 默认值是start。textBaseline = value基线对齐选项,可选的值包括:top,hanging,middle,alphabetic,ideographic,bottom。默认值是alphabetic。。direction = value文本方向。可能的值包括:ltr,rtl,inherit。默认值是inherit。
九、绘制图片
注意:考虑到图片是从网络加载,如果 drawImage 的时候图片还没有完全加载完成,则什么都不做,个别浏览器会抛异常。所以我们应该保证在 img 绘制完成之后再 drawImage。
绘图功能
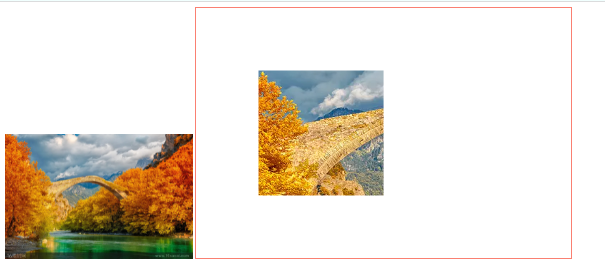
ctx.drawImage(obj, x1, y1) obj 绘制的图片对象 x1, y1 绘制的起点坐标值 原图没有被压缩 超出画布部分不显示
ctx.drawImage(obj, x1, y1, width, height) width height 绘制图片的大小
ctx.drawImage(obj, sx, sy, sw, sh, x, y, w, h)
sx, sy 从图片的哪个地方开始裁剪
sw, sh 裁剪多大的区域
x, y 从画布的哪个位置开始绘图
w, h 绘制多大的图片
<img src="./img/img.webp" alt=" " width="300">
<canvas id="canvas" width="600" height="400"></canvas>
<script>
    /** @type {HTMLCanvasElement} */
    var canvas = document.querySelector('#canvas');
    var ctx = canvas.getContext("2d");
    var img = document.querySelector("img");
    img.onload = function () {
        // ctx.drawImage(img, 0, 0);
        // ctx.drawImage(img, 0, 0, 300, 300)
        ctx.drawImage(img, 200, 200, 200, 200, 100, 100, 200, 200);
    }
</script>
十、状态的保存与恢复
ave() 和 restore()
save 和 restore 方法是用来保存和恢复 canvas 状态的,都没有参数
1、关于 save() :Canvas状态存储在栈中,每当save()方法被调用后,当前的状态就被推送到栈中保存。
一个绘画状态包括:
- 当前应用的变形(即移动,旋转和缩放)
strokeStyle,fillStyle,globalAlpha,lineWidth,lineCap,lineJoin,miterLimit,shadowOffsetX,shadowOffsetY,shadowBlur,shadowColor,globalCompositeOperation的值- 当前的裁切路径(clipping path)
可以调用任意多次save方法(类似数组的push())
2、关于restore():每一次调用 restore 方法,上一个保存的状态就从栈中弹出,所有设定都恢复(类似数组的 pop())
<canvas class="canvas" width="300" height="300"></canvas>
    <script>
        /** @type {HTMLCanvasElement} */
        let canvas = document.querySelector('.canvas')
        let ctx = canvas.getContext('2d');

        ctx.fillRect(0, 0, 150, 150) // 创建一个矩形
        ctx.save(); // 保存默认状态
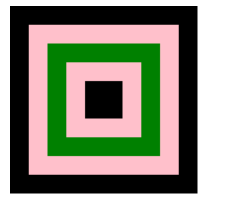
        // 1. 此时是一个黑色矩形

        ctx.fillStyle = 'pink' // 在原有配置基础上对颜色做改变
        ctx.fillRect(15, 15, 120, 120); // 重新绘制一个矩形
        ctx.save(); // 保存当前状态
        // 2. 此时黑色矩形上面放了一个粉色盒子

        ctx.fillStyle = 'green'; //再次改变颜色配置
        ctx.fillRect(30, 30, 90, 90); //使用新的配置绘制一个矩形
        // 3. 此时黑色矩形里面放了一个粉色矩形,粉色矩形上面有一个绿色矩形

        ctx.restore(); // 重新加载之前的颜色状态
        ctx.fillRect(45, 45, 60, 60); // 使用上一次的配置绘制一个矩形

        ctx.restore(); // 加载默认颜色配置
        ctx.fillRect(60, 60, 30, 30); // 使用加载的配置绘制一个矩形
    </script>
十一、变形
translate
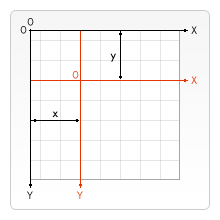
translate(x, y) 用来移动 canvas 的原点到指定的位置,x 是左右偏移量,y 是上下偏移量
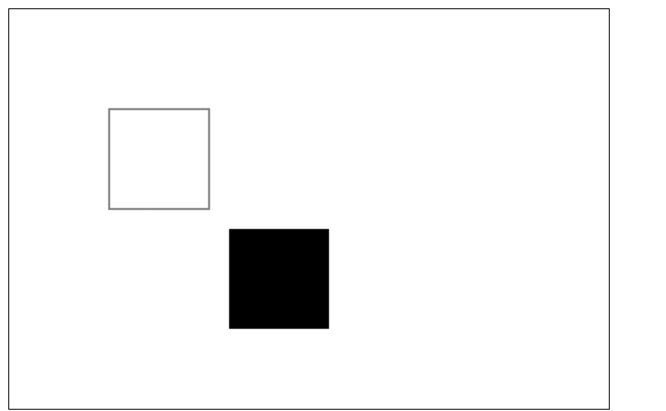
注意:translate 移动的是 canvas 的坐标原点(坐标变换)。
<canvas class="canvas" width="500" height="500" >暂不支持</canvas>
<script>
    /** @type {HTMLCanvasElement} */
    let canvas = document.querySelector('.canvas');
    let ctx = canvas.getContext('2d');
    ctx.save(); // 保存坐标原点平移之前的状态
    ctx.translate(100,100); //更改坐标原点
    ctx.strokeRect(0,0,100,100); // 绘制矩形
    ctx.restore() // 恢复最初状态
    ctx.translate(220,220); // 更改坐标
    ctx.fillRect(0,0,100,100)
</script>
rotate
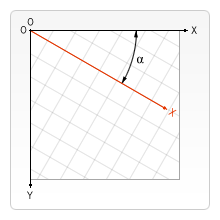
rotate(angle) 旋转坐标轴;这个方法只接受一个参数:旋转的角度(angle),它是顺时针方向的,以弧度为单位的值。
旋转的中心是坐标原点。
<canvas class="canvas" width="500" height="500">暂不支持</canvas>
<script>
    /** @type {HTMLCanvasElement} */
    let canvas = document.querySelector('.canvas');
    let ctx = canvas.getContext('2d');
    ctx.fillStyle = 'red'
    ctx.save();
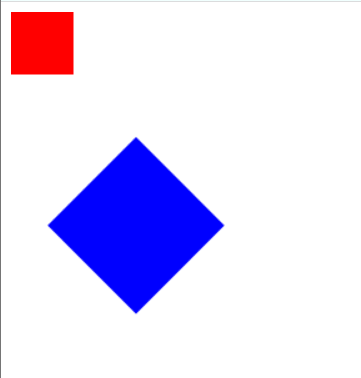
    ctx.translate(100, 100)  // 更改原点位置
    ctx.rotate(Math.PI / 180 * 45) // 旋转角度
    ctx.fillStyle = 'blue' //矩形颜色
    ctx.fillRect(0, 0, 100, 100) // 绘制填充矩形
    ctx.restore();  // 回复之前保存的状态
    ctx.translate(0, 0);  // 设置远端坐标位置
    ctx.fillRect(0, 0, 50, 50) // 绘制填充矩形
    ctx.restore(); // 回复之前保存的状态
</script>
scale
scale(x,y) 增减图形在 canvas 中的像素数目,对形状,位图进行缩小或者放大
cale方法接受两个参数。x,y 分别是横轴和纵轴的缩放因子,它们都必须是正值。值比 1.0 小表示缩 小,比 1.0 大则表示放大,值为 1.0 时什么效果都没有
<canvas class="canvas" width="500" height="500">暂不支持</canvas>
<script>
    /** @type {HTMLCanvasElement} */
    let canvas = document.querySelector('.canvas');
    let ctx = canvas.getContext('2d');
    ctx.fillStyle = 'blue' //矩形颜色
    ctx.scale(2,2) // 相当于将矩形放大2倍
    // ctx.scale(0.5,0.5) // 相当于将矩形缩小0.5倍
    ctx.fillRect(0, 0, 100, 100) // 绘制填充矩形
</script>
transform
变形矩阵 transform(a, b, c, d, e, f)

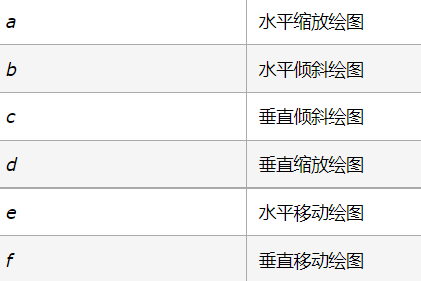
让多个小球在canvas里面自动运动的案例:
css:
1     #arr {
2             display: block;
3             margin: 0 auto;
4             border: 1px solid red;
5         }
html:
1 <canvas id="arr" width="500" height="500"></canvas>
js:
 1   let arr = document.querySelector('#arr');
 2         let obj = arr.getContext('2d');
 3         let x = 100,
 4             y = 100,
 5             r = 20,
 6             speedx = parseInt(Math.random() * 5),
 7             speedy = parseInt(Math.random() * 5);
 8         //  随机数
 9         function random(a, b) {
10             return Math.floor(Math.random() * (b - a + 1) + a)
11         }
12         //  声明一个数组,存储所有的小球
13         let ball1 = [];
14         // 生成很多小球
15         for (let i = 0; i < random(10, 50); i++) {
16             let ball = {
17                 x: 100,
18                 y: 100,
19                 r: random(10, 30),
20                 color: `#${Math.random().toString(16).slice(-6)}`,
21                 speedx: random(-5, 5),
22                 speedy: random(-5, 5),
23
24
25             }
26             ball1.push(ball);
27         }
28         // 开始绘画小球
29         function arc(ball) {
30             obj.beginPath();
31             obj.arc(ball.x, ball.y, ball.r, 0, Math.PI * 2);
32             obj.fillStyle = ball.color;
33             obj.fill();
34         }
35
36         // 利用计时器实现运动效果
37
38         const timer = setInterval(function () {
39
40
41             // 这一步是用来让一个小球在canvas里面运动
42             obj.clearRect(0, 0, 500, 500);
43             // 在计时器里面调用这个函数
44             // 利用遍历找到每个小球 让每个小球运动
45             ball1.forEach(function (item, index) {
46                 item.x += item.speedx;
47                 item.y += item.speedy;
48
49                 // 判断小球是否触碰边界,如果触碰 需要反弹回来
50                 item.speedx = item.x > 500 - item.r ? - item.speedx : item.x <= item.r ? - item.speedx : item.speedx;
51                 item.speedy = item.y > 500 - item.r ? - item.speedy : item.y <= item.r ? - item.speedy : item.speedy;
52                 arc(item)
53             });
54
55
56         }, 16.7);


