unittest框架-测试报告模板【BeautifulReport】安装、配置使用、生成带截图的测试报告
一、下载BeautifulReport模块
1.下载BeautifulReport模块
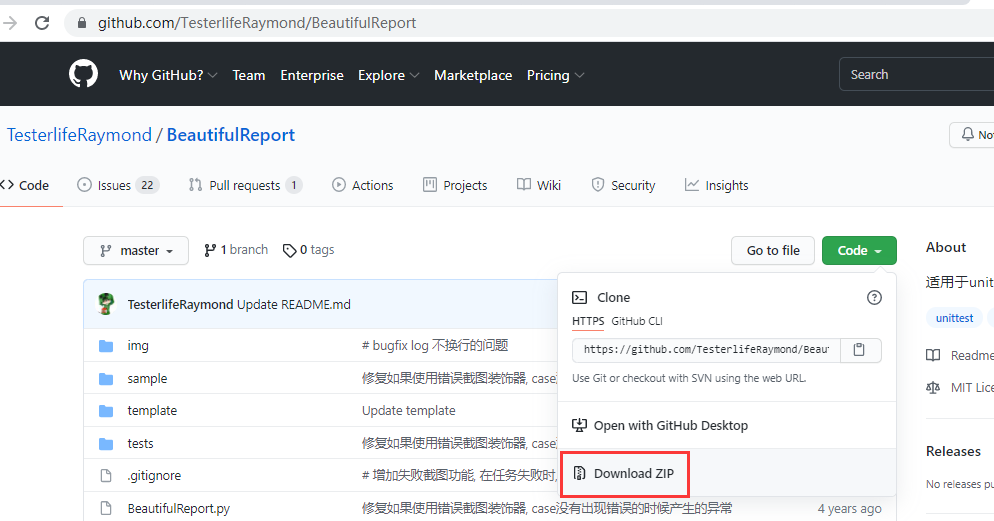
下载地址:https://github.com/TesterlifeRaymond/BeautifulReport,下载zip文件,如下图:
2、cmd命令安装
pip install BeautifulReport(这种的模板不稳定,有报错,需要高版本python支持)
3、环境要求:python3.5以上
二、下载BeautifulReport模块的导入
1、下载zip文件解压与存放路径
然后解压,把整个文件包放到本地python的/Lib/site-packages/目录下,默认BeautifulReport-master名字改为BeautifulReport,如下图:

2、模块导入
from BeautifulReport import BeautifulReport
三、BeautifulReport模块使用
1、例子目录:
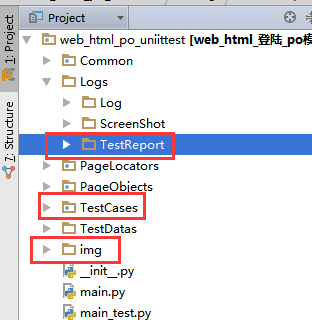
备注:img是截图存放地址必须是这个名字,不能改
2、截图封装使用实例:
BeatufulRort截图具体原理:
先定义好:错误截图方法(直接封装好,或者用例前面定义好即可!)
然后在用例前面使用装饰器@BeautifulReport.add_test_img('test_2_login_ok') ,括号里面是用例函数名,直接调用错误截图方法
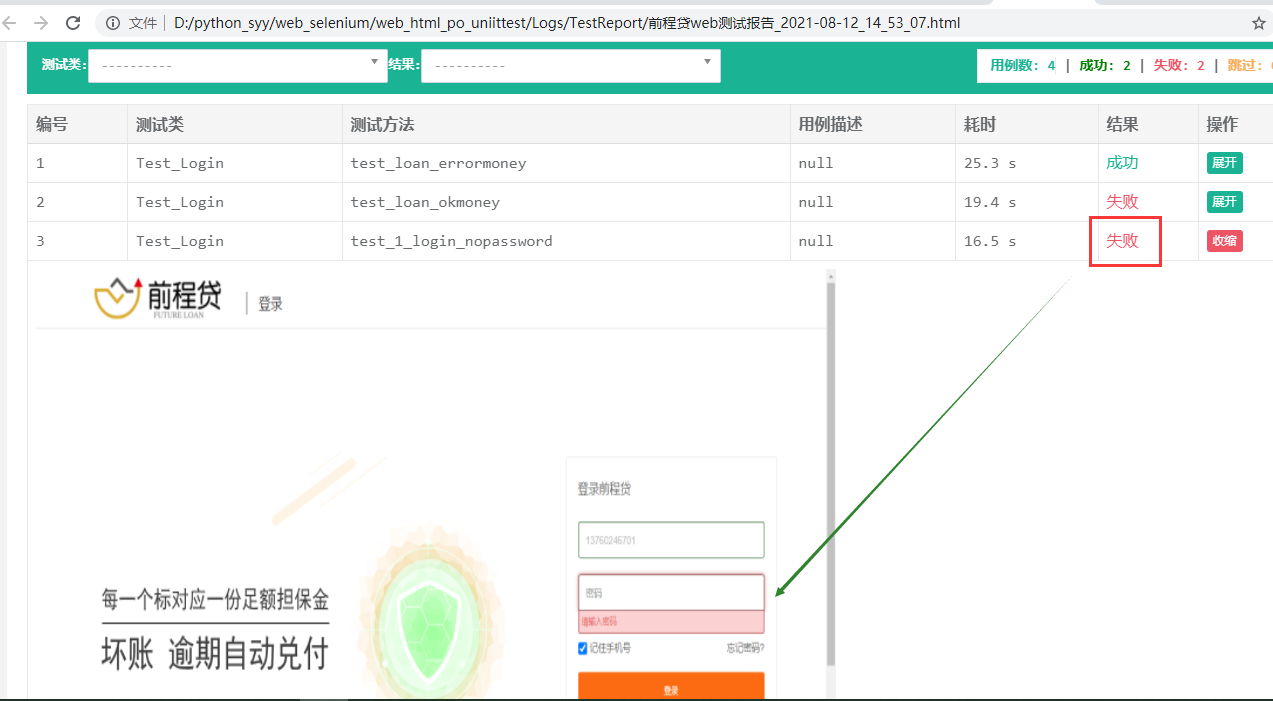
这种截图展示在测试报告上
没有错误截图需要截图:引用装饰器,直接引用错误截图方法self.save_img("test_1_login_nopassword"),括号里面是用例函数名,
这种截图不会展示在测试报告上
BasePage.py
def save_img(self, img_name):  #错误截图方法,这个必须先定义好
  """传入一个img_name, 并存储到默认的文件路径下
  :param img_name:
  :return:"""
  self.driver.get_screenshot_as_file('{}/{}.png'.format(os.path.abspath(r"D:\python_syy\web_selenium\web_html_po_uniittest\img"), img_name))
   #os.path.abspath(r"G:\Test_Project\img")截图存放绝对路径
#等待元素可见
def wait_eleVisble(self,locator,by=By.XPATH,wait_times=1):
    #确定定位表达式是selenium可以用的
    if by not in  By.__dict__.values():
         logging.error("定位类型不支持,请检查您的定位表达式")
        #开始时间
    t1 = time.time()
    try:
        WebDriverWait(self.driver,wait_times,1).until(EC.visibility_of_element_located((by,locator)))
        t2 = time.time()
        # 结束时间 - 两者之差就是真正的等待时间
        logging.info("wait element visible start time:{0},end time:{1},total wait times is: {2}".format(t1, t2, t2 - t1))
    except Exception as e:
        self.save_img(error)
        logging.exception("页面元素<{}>等待存在失败!}".format(locator))
        # 抛出异常
        raise e
test_login.py
import unittest
from selenium import webdriver
from PageObjects.login_page import LoginPage
from PageObjects.home_page import homePage
from TestDatas.login_testdata import *
from PageObjects.BasePage import BasePage
#引入日志路径
from TestDatas.Common_Data import *
from Common.dir_config import *
import time
from Common import myLogger2
import logging
#引入BeatufulRort模块
from BeautifulReport import BeautifulReport


class Test_Login(unittest.TestCase):

    def setUp(self):
        logging.info("======测试用例开始=======")

        self.driver=webdriver.Chrome()
        self.lp=LoginPage(self.driver)
        self.verificationErrors=[]
        self.imgs=[]  # (可选)初始化截图列表
        pass

    def tearDown(self):
        logging.info("======测试用例结束=======")
        self.driver.close()
        self.driver.quit()
    #def save_img(self, img_name):  #错误截图方法,这个必须先定义好,
      # """传入一个img_name, 并存储到默认的文件路径下
      # :param img_name:
       #:return:"""
        #截图存放路径,绝对路径,必须是img文件
       #self.driver.get_screenshot_as_file('{}/{}.png'.format(os.path.abspath(r"D:\python_syy\web_selenium\web_html_po_uniittest\img"), img_name))

    @BeautifulReport.add_test_img('test_1_login_nopassword')#用例没有错截图实例
    def test_1_login_nopassword(self): #用例没有错截图实例
        logging.info("========开始执行测试用例:登陆无密码用例=========")

    #执行步骤
        self.lp.login(url,login_testDatas[0]['user_name'],login_testDatas[0]['password'])
    #期望结果和实际结果比对
        self.save_img("test_1_login_nopassword") #没有报错也要截图的话,直接在这里调用方法就行了(暂时报告没有成功的截图)
        self.assertEqual(self.lp.get_errormsg_loginArea(), login_testDatas[1]['check_msg'])
    @BeautifulReport.add_test_img('test_2_login_ok') #装饰器,当你用例错误了,那么会自动调用save_img截图方法,存到指定目录下
    def test_2_login_ok(self):#用例错误示例
        logging.info("========开始执行测试用例:登陆成功用例=========")
    #执行步骤
        self.lp.login(url,login_testDatas[1]['user_name'],login_testDatas[1]['password'])
        time.sleep(3)
        url_1 =  self.lp.get_url()
        print("当前ur地址为:",url_1)
    #期望结果和实际结果比对
        hp=homePage(self.driver)
        nink_name=hp.get_user_nickname()
        self.assertEqual(nink_name,login_testDatas[1]['check_msg'])
3、执行用例实例:main_test.py
#引入BeautifulReport模块
from BeautifulReport import BeautifulReport
import unittest
import time
#from TestCases.test_login import Test_Login
from Common.dir_config import *
suite = unittest.TestSuite()
#suite.addTests(unittest.TestLoader().loadTestsFromTestCase(Test_Login))
suite.addTests(unittest.TestLoader().discover(testcase_dir))
#报告的地址和名字
now=time.strftime('%Y-%m-%d_%H_%M_%S')
file_pach=htmlreport_dir+'/前程贷web测试报告_'+ now + ".html" #file_pach不能直接直接引用,会报路径问题,可能now的原因
print(file_pach)

with open(file_pach,"wb+")  as file:
  result = BeautifulReport(suite)
  result.report(description='前程贷web测试报告', filename='/前程贷web测试报告_'+ now ,log_path=htmlreport_dir)
  #filename=报告名称,description=所有用例总的名称,report_path=报告路径,如果不填写默认当前执行文件目录。
  #theme=报告的主题,这个版本的模板展示没有支持,有四种可以选择:theme_default,theme_cyan,theme_candy,theme_memories  默认是第一种
4、报错问题
1、如果运行后报错如下:can use starred expression only as assignment target

2、 通过错误信息可以看出是python版本的问题:(不支持小于python3.5的版本)

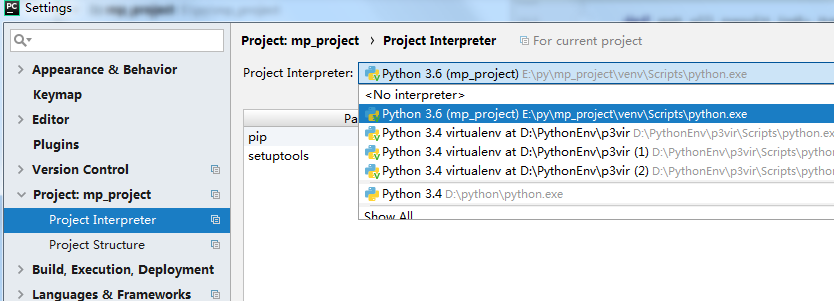
3、如果pycharm中存在多个版本,可直接切换使用(没有的话可下载新的python版本,可存在不同的Python版本)
四、BeautifulReport模块的导出测试报告原理
1、.报告生成原理
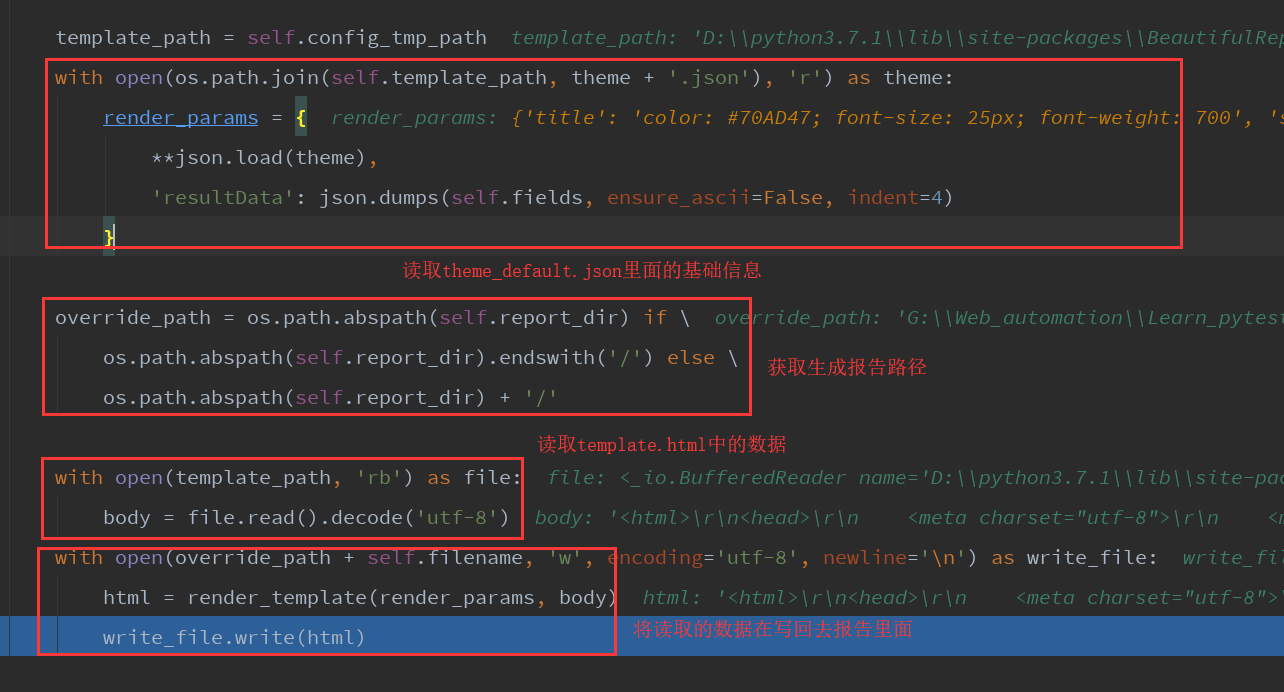
说明:生成报告原理:他是读取了D:\python3.7.1\Lib\site-packages\BeautifulReport\template路径下面的theme_default.json基础数据,在读取template.html的数据,然后在写入你运行用例后的结果+body到报告里面去,就生成了报告
2、报告样式

安装参考地址:https://www.cnblogs.com/hao2018/p/10093343.html
报错参考地址:https://www.cnblogs.com/may18/p/10445162.html


