使用playbook实现一键优化集群
环境
| 外网IP | 内网IP | 主机名 |
|---|---|---|
| 10.0.0.5 | 172.16.1.5 | lb01 (负载均衡) |
| 10.0.0.6 | 172.16.1.6 | lb02 |
| 10.0.0.7 | 172.16.1.7 | web01(服务器) |
| 10.0.0.8 | 172.16.1.8 | web02 |
| 10.0.0.9 | 172.16.1.9 | web03 |
| 10.0.0.31 | 172.16.1.31 | nfs (共享存储) |
| 10.0.0.41 | 172.16.1.41 | backup |
| 10.0.0.51 | 172.16.1.51 | db01 (数据库) |
| 10.0.0.52 | 172.16.1.52 | db02 |
| 10.0.0.53 | 172.16.1.53 | db03(代理机) |
| 10.0.0.54 | 172.16.1.54 | db04(代理机) |
| 10.0.0.61 | 172.16.1.61 | m01 (跳板机) |
| 10.0.0.71 | 172.16.1.71 | zabbix |
流程分析
1.安装ansible
2.优化ansible
3.推送公钥
4.开启防火墙
5.开启80 443 873 nfs等端口和服务白名单
6.关闭selinux
7.创建同一的用户
推送公钥
1.创建密钥对
[root@m01 ~]# ssh-keygen
2.推送公钥
[root@m01 ~]# ssh-copy-id -i ~/.ssh/id_rsa.pub root@172.16.1.5
[root@m01 ~]# ssh-copy-id -i ~/.ssh/id_rsa.pub root@172.16.1.6
[root@m01 ~]# ssh-copy-id -i ~/.ssh/id_rsa.pub root@172.16.1.7
[root@m01 ~]# ssh-copy-id -i ~/.ssh/id_rsa.pub root@172.16.1.8
[root@m01 ~]# ssh-copy-id -i ~/.ssh/id_rsa.pub root@172.16.1.9
[root@m01 ~]# ssh-copy-id -i ~/.ssh/id_rsa.pub root@172.16.1.31
[root@m01 ~]# ssh-copy-id -i ~/.ssh/id_rsa.pub root@172.16.1.41
[root@m01 ~]# ssh-copy-id -i ~/.ssh/id_rsa.pub root@172.16.1.51
[root@m01 ~]# ssh-copy-id -i ~/.ssh/id_rsa.pub root@172.16.1.52
[root@m01 ~]# ssh-copy-id -i ~/.ssh/id_rsa.pub root@172.16.1.53
[root@m01 ~]# ssh-copy-id -i ~/.ssh/id_rsa.pub root@172.16.1.54
[root@m01 ~]# ssh-copy-id -i ~/.ssh/id_rsa.pub root@172.16.1.61
[root@m01 ~]# ssh-copy-id -i ~/.ssh/id_rsa.pub root@172.16.1.71
[root@m01 ~]# ssh-copy-id -i ~/.ssh/id_rsa.pub root@172.16.1.81
推送公钥脚本
#推送过后,使用172.16.1.网段, 跳板机可以直接连接,10.0.0.网段第一次的连接只需要输入yes
#使用该脚本可以向新克隆的虚拟机推送该公钥

vim /root/jb.sh
#!/bin/bash
pass='1'
        ip='172.16.1.'
        ip2='10.0.0.'

        ssh-keygen -t rsa -P "" -f /root/.ssh/id_rsa

        for i in  5 6 7 8 9 31 41 51 52 53 54 61 71 81;
        do
        sshpass -p $pass ssh-copy-id -i /root/.ssh/id_rsa.pub -o stricthostkeychecking=no root@${ip}${i}

        sshpass -p $pass ssh-copy-id -i /root/.ssh/id_rsa.pub -o stricthostkeychecking=no root@${ip2}${i}

        done
	    chmod 600 /root/jb.sh
ansible优化
1.下载
[root@m01 ~]#  yum install -y ansible
2.优化
[root@m01 ~]#  vim /etc/ansible/ansible.cfg		#改为
host_key_checking = False
配置主机清单
[root@m01 ~]# vim /root/ansible/hosts
#[]标签名任意,但是最好不要用特殊符号(- | &)和大写字母,中文(不能是nginx)
#端口是22的时候可以省略
[web_group]
172.16.1.7 ansible_ssh_port=22 asible_ssh_user=root ansible_ssh_pass='1'
172.16.1.8 ansible_ssh_port=22 asible_ssh_user=root ansible_ssh_pass='1'
172.16.1.9 ansible_ssh_port=22 asible_ssh_user=root ansible_ssh_pass='1'

[db_group]
172.16.1.51 ansible_ssh_port=22 asible_ssh_user=root ansible_ssh_pass='1'
172.16.1.52 ansible_ssh_port=22 asible_ssh_user=root ansible_ssh_pass='1'
172.16.1.53 ansible_ssh_port=22 asible_ssh_user=root ansible_ssh_pass='1'
172.16.1.54 ansible_ssh_port=22 asible_ssh_user=root ansible_ssh_pass='1'

[nfs_group]
172.16.1.31 ansible_ssh_port=22 asible_ssh_user=root ansible_ssh_pass='1'

[redis_group]
172.16.1.81 ansible_ssh_port=22 asible_ssh_user=root ansible_ssh_pass='1'

[lb_group]
172.16.1.5 ansible_ssh_port=22 asible_ssh_user=root ansible_ssh_pass='1'
172.16.1.6 ansible_ssh_port=22 asible_ssh_user=root ansible_ssh_pass='1'

[backup_group]
172.16.1.41 ansible_ssh_port=22 asible_ssh_user=root ansible_ssh_pass='1'

[zabbix_group]
172.16.1.71 ansible_ssh_port=22 asible_ssh_user=root ansible_ssh_pass='1'

[m01_group]
172.16.1.61 ansible_ssh_port=22 asible_ssh_user=root ansible_ssh_pass='1'

[mtj_group]
172.16.1.202 ansible_ssh_port=22 asible_ssh_user=root ansible_ssh_pass='1'
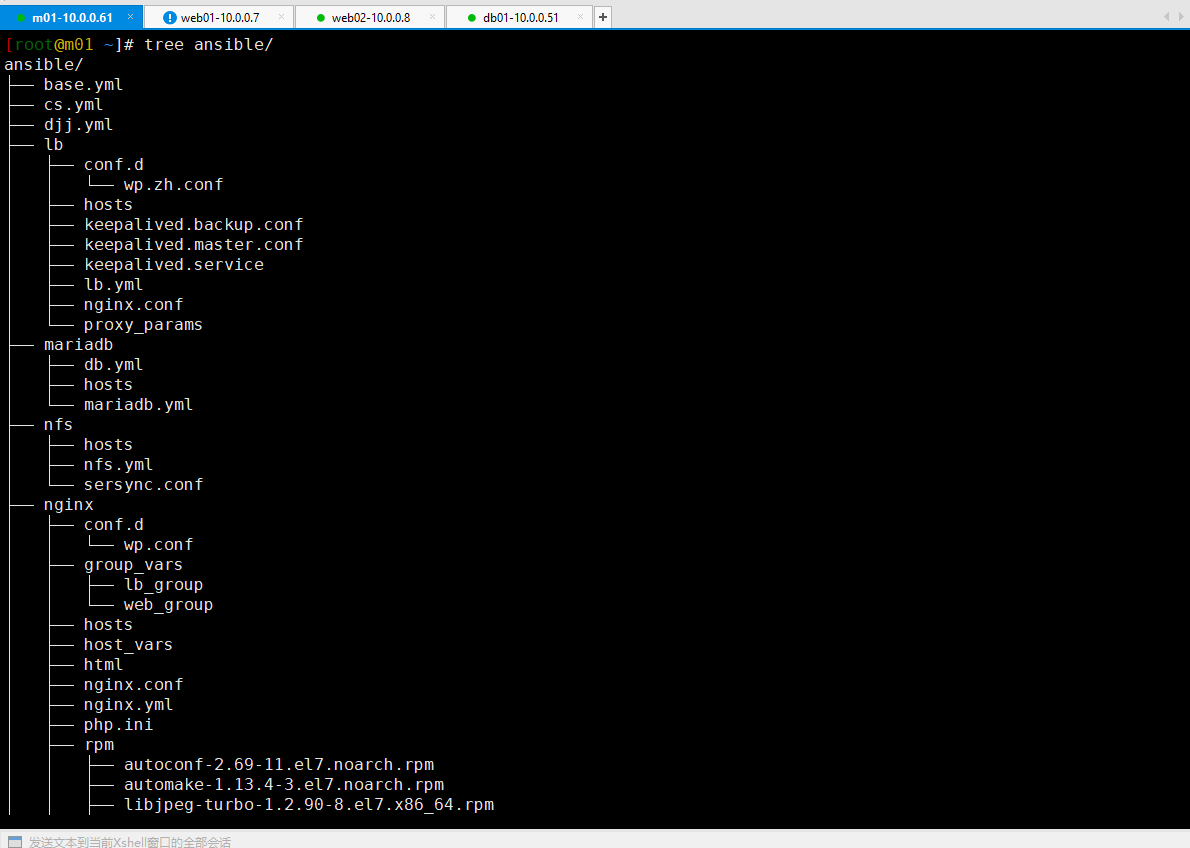
目录结构

yml
mkdir /root/ansible/ -p &&\
vim /root/ansible/base.yml

- hosts: all
  tasks:
    - name: Start FireWall
      service:
        name: firewalld
        state: started

    - name: Stop SeLinux
      selinux:
        state: disabled

    - name: Create www Group
      group:
        name: www
        gid: 666
        state: present

    - name: Create www User
      user:
        name: www
        uid: 666
        group: www
        shell: /sbin/nologin
        create_home: false

    - name: Open http Port
      firewalld:
        service: http
        state: enabled
        permanent: no

    - name: Open https Port
      firewalld:
        service: https
        state: enabled
        permanent: no

    - name: Open rsync Port
      firewalld:
        port: 873/tcp
        state: enabled
        permanent: no

    - name: Open nfs Port
      firewalld:
        service: nfs
        state: enabled
        permanent: no
yml2
- hosts: all
  tasks:
    - name: Start FireWall
      service:
        name: firewalld
        state: started
        enabled: yes

    - name: Stop SeLinux
      selinux:
        state: disabled

    - name: open ports
      firewalld:
        port: '{{ item.port }}'
        state: enabled
        permanent: no
      with_items:
        - { port: "80/tcp" }
        - { port: "443/tcp" }
        - { port: "873/tcp" }

    - name: open nfs
      firewalld:
        service: nfs
        state: enabled
        permanent: no

    - name: Create www Group
      group:
        name: www
        gid: 666
        state: present

    - name: Create www User
      user:
        name: www
        uid: 666
        group: www
        shell: /sbin/nologin
        create_home: false
分类:
使用playbook一键部署


【推荐】编程新体验,更懂你的AI,立即体验豆包MarsCode编程助手
【推荐】凌霞软件回馈社区,博客园 & 1Panel & Halo 联合会员上线
【推荐】抖音旗下AI助手豆包,你的智能百科全书,全免费不限次数
【推荐】博客园社区专享云产品让利特惠,阿里云新客6.5折上折
【推荐】轻量又高性能的 SSH 工具 IShell:AI 加持,快人一步
· Java 中堆内存和栈内存上的数据分布和特点
· 开发中对象命名的一点思考
· .NET Core内存结构体系(Windows环境)底层原理浅谈
· C# 深度学习:对抗生成网络(GAN)训练头像生成模型
· .NET 适配 HarmonyOS 进展
· 本地部署 DeepSeek:小白也能轻松搞定!
· 如何给本地部署的DeepSeek投喂数据,让他更懂你
· 从 Windows Forms 到微服务的经验教训
· 李飞飞的50美金比肩DeepSeek把CEO忽悠瘸了,倒霉的却是程序员
· 超详细,DeepSeek 接入PyCharm实现AI编程!(支持本地部署DeepSeek及官方Dee