SpringBoot整合websocket
1.websocket介绍
WebSocket协议是基于TCP的一种新的网络协议。它实现了浏览器与服务器全双工(full-duplex)通信——允许服务器主动发送信息给客户端。websocket 协议是在 http 协议上的一种补充协议,是 html5 的新特性,是一种持久化的协议。
2.应用场景
- 系统实时通告
- 聊天室
- ....
3.spring boot 整合(亲测有效)
(1)导入pom
 <!--webSocket-->
  <dependency>
      <groupId>org.springframework.boot</groupId>
      <artifactId>spring-boot-starter-websocket</artifactId>
  </dependency>
(2)websocket配置类:
 package com.ruoyi.framework.config.websocked;

import org.springframework.context.annotation.Bean;
import org.springframework.context.annotation.Configuration;
import org.springframework.web.socket.server.standard.ServerEndpointExporter;


@Configuration
public class WebSocketConfig {
    @Bean
    public ServerEndpointExporter serverEndpointExporter() {

        return new ServerEndpointExporter();
    }
}
作用:可以将带有 @ServerEndpoint 注解的 WebSocket 端点注册到应用程序中,以便能够处理 WebSocket 连接。
(3)websocket操作类:
 package com.ruoyi.project.websorcked;

import org.slf4j.Logger;
import org.slf4j.LoggerFactory;
import org.springframework.stereotype.Component;

import javax.websocket.*;
import javax.websocket.server.PathParam;
import javax.websocket.server.ServerEndpoint;
import java.util.concurrent.ConcurrentHashMap;
import java.util.concurrent.CopyOnWriteArraySet;


@Component
@ServerEndpoint("/websocket/{userId}")
public class WebSocketServer {
    /**
     * 日志工具
     */
    private Logger logger = LoggerFactory.getLogger(this.getClass());
    /**
     * 与某个客户端的连接会话,需要通过它来给客户端发送数据
     */
    private Session session;
    /**
     * 用户id
     */
    private String userId;
    /**
     * 用来存放每个客户端对应的MyWebSocket对象
     */
    private static CopyOnWriteArraySet<WebSocketServer> webSockets = new CopyOnWriteArraySet<>();
    /**
     * 用来存在线连接用户信息
     */
    private static ConcurrentHashMap<String, Session> sessionPool = new ConcurrentHashMap<String, Session>();

    /**
     * 链接成功调用的方法
     */
    @OnOpen
    public void onOpen(Session session, @PathParam(value = "userId") String userId) {
        try {
            this.session = session;
            this.userId = userId;
            webSockets.add(this);
            sessionPool.put(userId, session);
            logger.info("【websocket消息】有新的连接,总数为:" + webSockets.size());
        } catch (Exception e) {
        }
    }

    /**
     * 链接关闭调用的方法
     */
    @OnClose
    public void onClose() {
        try {
            webSockets.remove(this);
            sessionPool.remove(this.userId);
            logger.info("【websocket消息】连接断开,总数为:" + webSockets.size());
        } catch (Exception e) {
        }
    }

    /**
     * 收到客户端消息后调用的方法
     */
    @OnMessage
    public void onMessage(String message) {
        logger.info("【websocket消息】收到客户端消息:" + message);
    }

    /**
     * 发送错误时的处理
     *
     * @param session
     * @param error
     */
    @OnError
    public void onError(Session session, Throwable error) {
        logger.error("用户错误,原因:" + error.getMessage());
        error.printStackTrace();
    }

    /**
     * 此为广播消息
     */
    public static void sendAllMessage(String message) {
//        logger.info("【websocket消息】广播消息:" + message);
        System.out.println("【websocket消息】广播消息:" + message);
        for (WebSocketServer webSocket : webSockets) {
            try {
                if (webSocket.session.isOpen()) {
                    webSocket.session.getAsyncRemote().sendText(message);
                }
            } catch (Exception e) {
                e.printStackTrace();
            }
        }
    }

    /**
     * 此为单点消息
     */
    public void sendOneMessage(String userId, String message) {
        Session session = sessionPool.get(userId);
        if (session != null && session.isOpen()) {
            try {
                logger.info("【websocket消息】 单点消息:" + message);
                session.getAsyncRemote().sendText(message);
            } catch (Exception e) {
                e.printStackTrace();
            }
        }
    }

    /**
     * 此为单点消息(多人)
     */
    public void sendMoreMessage(String[] userIds, String message) {
        for (String userId : userIds) {
            Session session = sessionPool.get(userId);
            if (session != null && session.isOpen()) {
                try {
                    logger.info("【websocket消息】 单点消息:" + message);
                    session.getAsyncRemote().sendText(message);
                } catch (Exception e) {
                    e.printStackTrace();
                }
            }
        }

    }
}
说明
-
(1)@ServerEndpoint(“/websocket/{userId}”) 前端通过此 URI 和后端交互,建立连接
-
(2)@Component 不用说将此类交给 spring 管理
-
(3)@OnOpen websocket 建立连接的注解,前端触发上面 URI 时会进入此注解标注的方法
-
(4)@OnMessage 收到前端传来的消息后执行的方法
-
(5)@OnClose 顾名思义关闭连接,销毁 session
(4)前端样例:
var userId = "your_user_id"; // 替换为实际的用户 ID
var socket = new WebSocket("ws://your_server_address/websocket/" + userId);

socket.onopen = function(event) {
    // WebSocket 连接已打开
};

socket.onmessage = function(event) {
    // 收到来自服务器的消息
    var message = event.data;
    console.log("Received message: " + message);
};

socket.onclose = function(event) {
    // WebSocket 连接已关闭
};
(5)前端demo:
<!DOCTYPE html>
<html lang="en">
<head>
    <meta charset="UTF-8">
  <title>websocket通讯</title>
</head>
<body>
<p>【socket开启者的ID信息】:<div><input id="userId" name="userId" type="text" value="10"></div>
<p>【客户端向服务器发送的内容】:<div><input id="toUserId" name="toUserId" type="text" value="20">
  <input id="contentText" name="contentText" type="text" value="hello websocket"></div>
<p>【操作】:<button><a onclick="openSocket()">开启socket</a></button>
<p>【操作】:<button><a onclick="sendMessage()">发送消息</a></button>
<p>【操作】:<button><a onclick="getMessage()">获取后台广播消息</a></button>
</body>
<script src="https://cdn.bootcss.com/jquery/3.3.1/jquery.js"></script>
<script>
  let socket;
  function openSocket() {
    const socketUrl = "ws://localhost:80/websocket";
    console.log(socketUrl);
    if(socket!=null){
      socket.close();
      socket=null;
    }
    socket = new WebSocket(socketUrl);
    //打开事件
    socket.onopen = function() {
      console.log("websocket已打开");
    };
    //获得消息事件
    socket.onmessage = function(msg) {
      console.log(msg.data);
      //发现消息进入,开始处理前端触发逻辑
    };
    //关闭事件
    socket.onclose = function() {
      console.log("websocket已关闭");
    };
    //发生了错误事件
    socket.onerror = function() {
      console.log("websocket发生了错误");
    }
  }
  $(function (){
      openSocket();
  })
  function sendMessage() {

    socket.send('{"toUserId":"'+$("#toUserId").val()+'","contentText":"'+$("#contentText").val()+'"}');
    console.log('{"toUserId":"'+$("#toUserId").val()+'","contentText":"'+$("#contentText").val()+'"}');
  }

  function getMessage(){
      $.ajax({
          url: '/api/v1/websocket/sendTestMessage',
          type: 'get',
          data: {
              message: '9'
          },
          success: function (data) {
            alert("已成功发送~")
          }
      });
      //获得消息事件
      // socket.onmessage = function(msg) {
      //     console.log(msg.data);
      //     //发现消息进入,开始处理前端触发逻辑
      // };
  }
</script>
</html>
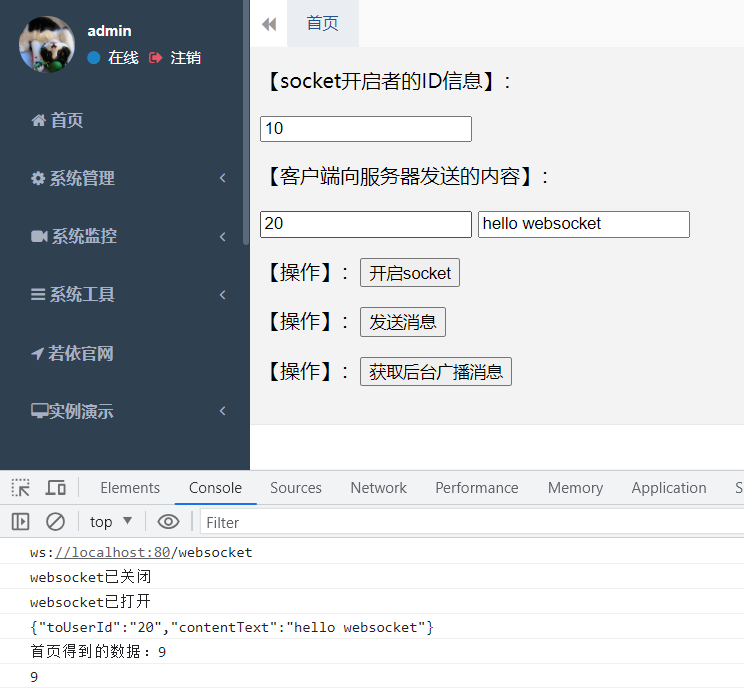
(6)效果图:

(7)通过后端接口发送消息到客户端,客户端成功接收:
代码如下
package com.ruoyi.project.websorcked;

import com.ruoyi.framework.web.domain.AjaxResult;
import io.swagger.annotations.Api;
import io.swagger.annotations.ApiImplicitParam;
import io.swagger.annotations.ApiImplicitParams;
import io.swagger.annotations.ApiOperation;
import org.springframework.beans.factory.annotation.Autowired;
import org.springframework.web.bind.annotation.RequestMapping;
import org.springframework.web.bind.annotation.RequestMethod;
import org.springframework.web.bind.annotation.RequestParam;
import org.springframework.web.bind.annotation.RestController;


@RestController
@RequestMapping(value = "/api/v1/websocket")
@Api(tags = "websocket接口", value = "AlarmDpController")
public class WebSocketController {
    @Autowired
    private WebSocketServer webSocketServer;

    /**
     * 模拟数据发送
     */
    @ApiOperation(value = "模拟数据发送", notes = "模拟数据发送")
    @ApiImplicitParams({
            @ApiImplicitParam(paramType = "query", name = "message", value = "模拟消息", required = true, dataType = "String"),
    })
    @RequestMapping(value = "/sendTestMessage", method = RequestMethod.GET)
    public AjaxResult sendTestMessage(@RequestParam("message")String message) {
        AjaxResult ajaxJson = new AjaxResult();
        try {
            webSocketServer.sendAllMessage(message);
        } catch (Exception e) {
            e.printStackTrace();
//            return AjaxJson.returnExceptionInfo(LoitStatusMsg.LOIT_USER_LOGIN_FAIL);
        }
        return ajaxJson;
    }
}
4.遇到的问题
(1) websocket发送连接请求到服务端,报错Filed
解决如下,因为我使用的是若依的项目,使用的安全框架为shiro,在shiro的config类中添加白名单放行

5.补充
(1)如果想向两个人发送不同的消息可以这样
// 创建两个 WebSocket 实例,分别用于不同的人
const person1Socket = new WebSocket("ws://localhost:80/websocket/person1");
const person2Socket = new WebSocket("ws://localhost:80/websocket/person2");

// 打开 WebSocket 连接
person1Socket.onopen = function() {
  console.log("WebSocket连接已打开 - Person 1");
};

person2Socket.onopen = function() {
  console.log("WebSocket连接已打开 - Person 2");
};

// 发送消息给不同的人
function sendMessageToPerson1(message) {
  person1Socket.send(message);
}

function sendMessageToPerson2(message) {
  person2Socket.send(message);
}

// 关闭 WebSocket 连接
function closeWebSocketConnections() {
  person1Socket.close();
  person2Socket.close();
}

// 为不同的 WebSocket 实例设置消息处理程序
person1Socket.onmessage = function(msg) {
  console.log("收到消息 (Person 1): " + msg.data);
  // 处理消息
};

person2Socket.onmessage = function(msg) {
  console.log("收到消息 (Person 2): " + msg.data);
  // 处理消息
};
(2) 相应的把后台接口换一下
- 后台:
@ServerEndpoint("/websocket/{userId}")


