WCF服务的建立以及调用
WCF对我来说既陌生又熟悉,陌生是因为没怎么接触过,熟悉是听得太多,今天抽出点时间看了一下WCF,并且自己也写了一WCF的小程序以及调用WCF。步骤为:
1.创建一个解决方案WCF,和一个控制台项目WCFTestService(这就就是WCF服务)
2.配置WCF服务的App.Config
3.写WCF服务代码
4.新建项目WCFTestClient(客户端项目,用来测试访问服务)
5.写客户端代码
6.执行访问服务
下面详细说明每步的操作以及代码编写:
1.创建一个解决方案WCF,和一个控制台项目WCFTestService(这就就是WCF服务)
这一步是基础,肯定都会创建,就不在累赘。此处省略一万字··········
2.配置WCF服务的App.Config
首先我先贴上真个App.Config的内容

<?xml version="1.0" encoding="utf-8" ?>
<configuration>
    <startup>
        <supportedRuntime version="v4.0" sku=".NETFramework,Version=v4.5" />
    </startup>
  <system.serviceModel>
    <serviceHostingEnvironment aspNetCompatibilityEnabled="true" />
    <standardEndpoints>
      <webHttpEndpoint>
        <standardEndpoint name="" maxReceivedMessageSize="300000000" defaultOutgoingResponseFormat="Json" helpEnabled="true" automaticFormatSelectionEnabled="true">
          <readerQuotas maxArrayLength="30000000" />
        </standardEndpoint>
      </webHttpEndpoint>
    </standardEndpoints>
    <bindings>
      <webHttpBinding>
        <binding name="webHttpBindingConfig" sendTimeout="00:10:00" bypassProxyOnLocal="false" maxReceivedMessageSize="2147483646">
          <readerQuotas maxStringContentLength="2147483646" maxArrayLength="2147483646" />
        </binding>
      </webHttpBinding>
    </bindings>
    <services>
      <!-- 注意: 服务名称必须与服务实现的名称相匹配。 -->
      <service name="WCFTestService.DbApiInfo" behaviorConfiguration="RestServiceBehavior">
        <!-- 注意: 服务必须有一个 http 基址以便添加此终结点。 -->
        <host>
          <baseAddresses>
            <add baseAddress="http://localhost:8888/Service/DbApiInfo" />
          </baseAddresses>
        </host>
        <!-- 添加下列终结点。 -->
        <endpoint address="" behaviorConfiguration="RestEndpointBehavior" binding="webHttpBinding" bindingConfiguration="webHttpBindingConfig" contract="WCFTestService.IApiInfo">
          <identity>
            <dns value="Localhost" />
          </identity>
        </endpoint>
      </service>
      <!-- 注意: 服务名称必须与服务实现的名称相匹配。 -->
      <service name="WCFTestService.DbUpLoad" behaviorConfiguration="RestServiceBehavior">
         <!--注意: 服务必须有一个 http 基址以便添加此终结点。-->
        <host>
          <baseAddresses>
            <add baseAddress="http://localhost:8888/Service/DbUpLoad" />
          </baseAddresses>
        </host>
         <!--添加下列终结点。-->
        <endpoint address="" behaviorConfiguration="RestEndpointBehavior" binding="webHttpBinding" bindingConfiguration="webHttpBindingConfig" contract="WCFTestService.IUpLoad">
          <identity>
            <dns value="Localhost" />
          </identity>
        </endpoint>
      </service>
    </services>
    <behaviors>
      <endpointBehaviors>
        <behavior name="RestEndpointBehavior">
          <webHttp helpEnabled="true" defaultOutgoingResponseFormat="Json" />
        </behavior>
      </endpointBehaviors>
      <serviceBehaviors>
        <behavior name="RestServiceBehavior">
          <!-- 将下列元素添加到服务行为配置中。 -->
          <serviceMetadata httpGetEnabled="true" />
        </behavior>
      </serviceBehaviors>
    </behaviors>
  </system.serviceModel>
</configuration>
仔细观察这个代码,大家就会发现,这App.Config的内容就比我们新生成的App.Config多了一个节点<system.serviceModel></system.serviceModel>
以及他里面包含大内容。
<system.serviceModel></system.serviceModel>就是我们的服务配置内容。
最重要的是<system.serviceModel></system.serviceModel>里面的节点<services></services>,这才是服务配置的重点,
在这个节点里我们看到有两个<service></service>节点,每个<service></service>节点就是一个配置服务。
我们拿出一个<service></service>节点来说明:
<!-- 注意: 服务名称必须与服务实现的名称相匹配。 -->
<service name="WCFTestService.DbApiInfo" behaviorConfiguration="RestServiceBehavior">
<!-- 注意: 服务必须有一个 http 基址以便添加此终结点。 -->
<host>
<baseAddresses>
<add baseAddress="http://localhost:8888/Service/DbApiInfo" />
</baseAddresses>
</host>
<!-- 添加下列终结点。 -->
<endpoint address="" behaviorConfiguration="RestEndpointBehavior" binding="webHttpBinding" bindingConfiguration="webHttpBindingConfig" contract="WCFTestService.IApiInfo">
<identity>
<dns value="Localhost" />
</identity>
</endpoint>
</service>
name="WCFTestService.DbApiInfo":顾名思义,就是服务的名称。不同的服务名称肯定不同。WCFTestService是命名空间
<add baseAddress="http://localhost:8888/Service/DbApiInfo" />:这个是服务的访问地址。
contract="WCFTestService.IApiInfo">:是服务的接口。WCFTestService是命名空间
注意:每次要新增一个服务的时候,就新建一个节点<service></service>,并且修改上面三个所有对应的名称,这样配置文件就OK了。
对于没有其他特殊需求的时候,配置文件其他地方是不需要修改的。由于只是一个简单的WCF测试服务,其他的我也就不说了,免得累赘。
3.写WCF服务代码
编写WCF代码,分为三步:
(1)添加一个服务对应的接口:如服务 "WCFTestService.DbApiInfo"对应的接口:IApiInfo(就是上面提到的接口名称要和上面一致)
[ServiceContract]
    public interface IApiInfo
    {
        [OperationContract]
        [ServiceKnownType(typeof(string))]
        [WebInvoke(Method = "POST", ResponseFormat = WebMessageFormat.Json, BodyStyle = WebMessageBodyStyle.Bare)]
        string CreateApi(Stream name);
    }
我们定义了[ServiceContract]标签,此标签代表此接口及实现此接口的类都是对外发布的Service类,在每个需要对外发布的方法上都加上[OperationContract]标签,以使外部可以访问到此方法。两个标签缺一,方法都不能被外部访问。
[ServiceContract]和[OperationContract]这两个标签需要导入using System.ServiceModel命名空间。
(2)添加接口对应的实现类:DbApiInfo.cs
public class DbApiInfo:IApiInfo
    {

        public string CreateApi(Stream name)
        {
            //name.Position = 0;
            StreamReader reader = new StreamReader(name);
            string text = reader.ReadToEnd();

            return "你的名字是:" + text;
        }
    }
(3)启动服务的代码编写
启动服务的方法是
 private static List<ServiceHost> _LsSvcHost = new List<ServiceHost>();
public static void StartSvc()
        {
            try
            {
                ServicesSection servicesSection = ConfigurationManager.GetSection("system.serviceModel/services") as ServicesSection;
                foreach (ServiceElement service in servicesSection.Services)
                {
                    Type serviceType = Type.GetType(service.Name);
                    ServiceHost SvcHost = new ServiceHost(serviceType);
                    string strLog = string.Empty;
                    SvcHost.Opened += delegate
                    {
                        Console.WriteLine(string.Format("服务[{0}]已经启动,公开服务地址有:", service.Name));
                    };
                    SvcHost.Open();
                    foreach (var endpoint in SvcHost.Description.Endpoints)
                    {
                        Console.WriteLine(string.Format("Endpoint:{0} ", endpoint.Address.ToString()));
                    }
                    //logger.Info(strLog);
                    _LsSvcHost.Add(SvcHost);

                }
            }
            catch (System.Exception ex)
            {
                Console.WriteLine("启动数据服务异常:", ex);
            }
        }
然后把方法放到main()函数里调用即可:
static void Main(string[] args)
        {
            StartSvc();
            Console.ReadKey();
            foreach (ServiceHost SvcHosts in _LsSvcHost) SvcHosts.Close();
        }
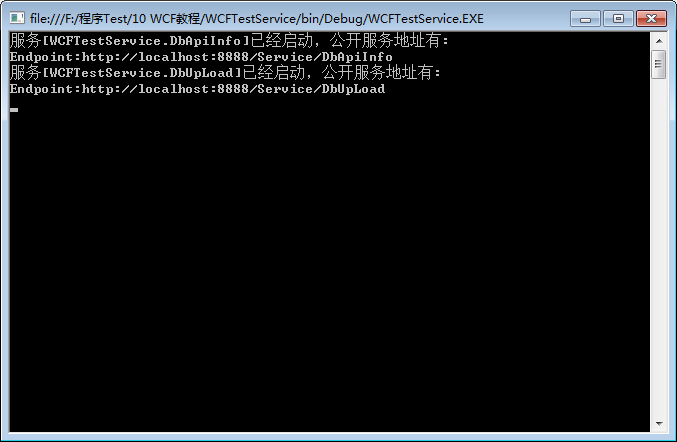
启动服务就可以看到服务已启动:

由于配置文件里配置了两个服务,这里也就启动了两个服务(注意:配置服务之后一定要添加对应的接口和接口实现类)。
4.新建项目WCFTestClient(客户端项目,用来测试访问服务)
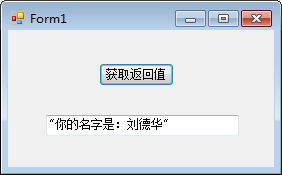
新建项目这个也简单,也不多说,只把我的的界面贴出来(由于是测试,界面不好看,大家见谅····)

5.写客户端代码
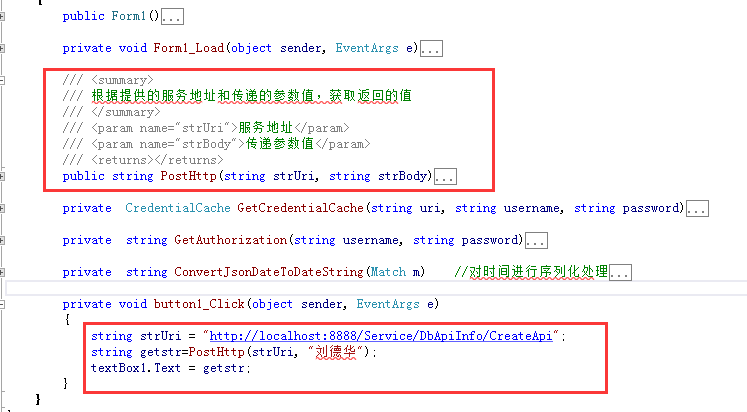
这个主要就是写按钮“获取返回值”的Click事件,先贴代码,在讲解:

public partial class Form1 : Form
    {
        public Form1()
        {
            InitializeComponent();
        }

        private void Form1_Load(object sender, EventArgs e)
        {

        }

        /// <summary>
        /// 根据提供的服务地址和传递的参数值,获取返回的值
        /// </summary>
        /// <param name="strUri">服务地址</param>
        /// <param name="strBody">传递参数值</param>
        /// <returns></returns>
        public string PostHttp(string strUri, string strBody)
        {
            HttpWebRequest myRequest = (HttpWebRequest)WebRequest.Create(strUri);

            if (!string.IsNullOrEmpty(string.Empty) && !string.IsNullOrEmpty(string.Empty))
            {
                myRequest.Credentials = GetCredentialCache(strUri, string.Empty, string.Empty);
                myRequest.Headers.Add("Authorization", GetAuthorization(string.Empty, string.Empty));
            }

            //转成网络流
            byte[] buf = UnicodeEncoding.UTF8.GetBytes(strBody);
            //设置
            myRequest.Method = "POST";
            myRequest.ContentLength = buf.Length;
            myRequest.ContentType = "application/x-www-form-urlencoded";
            myRequest.KeepAlive = false;
            myRequest.ProtocolVersion = HttpVersion.Version10;
            //发送请求
            Stream newStream = myRequest.GetRequestStream();
            newStream.Write(buf, 0, buf.Length);
            newStream.Close();
            //获得接口返回值
            HttpWebResponse myResponse = (HttpWebResponse)myRequest.GetResponse();
            StreamReader reader = new StreamReader(myResponse.GetResponseStream(), Encoding.UTF8);
            string strReturn = HttpUtility.HtmlDecode(reader.ReadToEnd());
            reader.Close();
            myResponse.Close();
            string p = @"\\/Date\((\d+)\+\d+\)\\/";
            MatchEvaluator evaluator = new MatchEvaluator(ConvertJsonDateToDateString);

            //对时间进行处理,需要引用System.Text.RegularExpressions;命名空间
            Regex reg = new Regex(p);
            strReturn = reg.Replace(strReturn, evaluator);
            return strReturn;
        }

        private  CredentialCache GetCredentialCache(string uri, string username, string password)
        {
            string authorization = string.Format("{0}:{1}", username, password);

            CredentialCache credCache = new CredentialCache();
            credCache.Add(new Uri(uri), "Basic", new NetworkCredential(username, password));

            return credCache;
        }

        private  string GetAuthorization(string username, string password)
        {
            string authorization = string.Format("{0}:{1}", username, password);

            return "Basic " + Convert.ToBase64String(new ASCIIEncoding().GetBytes(authorization));
        }

        private  string ConvertJsonDateToDateString(Match m)  //对时间进行序列化处理
        {
            string result = string.Empty;
            DateTime dt = new DateTime(1970, 1, 1);
            dt = dt.AddMilliseconds(long.Parse(m.Groups[1].Value));
            dt = dt.ToLocalTime();
            result = dt.ToString("yyyy-MM-dd HH:mm:ss");
            return result;
        }

        private void button1_Click(object sender, EventArgs e)
        {
            string strUri = "http://localhost:8888/Service/DbApiInfo/CreateApi";
            string getstr=PostHttp(strUri, "刘德华");
            textBox1.Text = getstr;
        }
    }

这里主要就是一个方法PostHttp,这个方法是通用,可作为公用方法被调用。
Click事件里调用方法。
6.执行访问服务
这个我们只需要把服务运行,在运行客户端,点击按钮,就可以得到服务给我们返回的结果了

至此,一个简单的WCF服务的建立以及调用就完成了······


