Qt之QComboBox定制
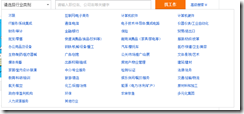
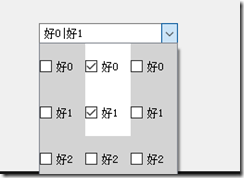
说起下拉框,想必大家都比较熟悉,在我们注册一些网站的时候,会出现大量的地区数据供我们选择,这个时候出现的就是下拉框列表,再比如字体选择的时候也是使用的下拉框,如图1所示。下拉框到处可见,作为一个图形库,qt也提供了QtComboBox类来供我们使用,但是有些时候简单的下拉列表已经满足不了我们的需求,如图2所示,是一个下拉表格,这个时候就需要我们自己定制一下QComboBox。
上边说了我们需求的变化,接下来我就讲述一下关于QComboBox定制的一些内容,本片文章我就只讲述两种常用的下拉选项控制,分别是列表和表格
一、列表的实现
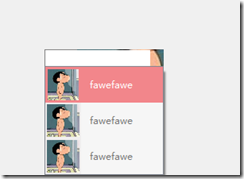
首先我上一张qq的登录框,如图3所示,下拉列表里不仅仅是一个文字描述或者复选框,而是含有图片文字和关闭按钮的复杂窗口,那么这个时候简单的QComboBox是完成不了这项功能的,要做到像qq这样美观的功能是需要我们自己做一定的处理
列表窗口定制步骤如下:
1、首先我们需要自定义一个窗口,上边有我们需要操作的内容,这个窗口讲会是QComboBox下拉框中的一项,我自己定义的类名为CActionContentWidget,头文件如下:
 1 class CActionContentWidget : public QWidget
 2 {
 3     Q_OBJECT
 4 signals:
 5     void IconClicked();
 6     void showText(const QString &);
 7
 8 public:
 9     CActionContentWidget(const QString & text, QWidget * parent = nullptr);
10     ~CActionContentWidget();
11
12 public:
13     void SetContentText(const QString & text);//设置显示文字
14     void SetItemIcon(const QString & icon, const QString & hover);//设置图标
15
16 public:
17     void SetBackgroundRole(bool hover);
18
19 protected:
20     virtual void enterEvent(QEvent *) Q_DECL_OVERRIDE;//暂时没用
21     virtual void leaveEvent(QEvent *) Q_DECL_OVERRIDE;//暂时没用
22     virtual bool eventFilter(QObject *, QEvent *) Q_DECL_OVERRIDE;
23     virtual void mousePressEvent(QMouseEvent *) Q_DECL_OVERRIDE;
24
25
26     virtual void mouseReleaseEvent(QMouseEvent *) Q_DECL_OVERRIDE;
27
28 private:
29     void InitializeUI();
30
31 private:
32     bool m_Mouse_press = false;
33     QWidget * m_ContentWidget = nullptr;
34     QPushButton * m_ActIcon = nullptr;
35     QLabel * m_ActText = nullptr;
36 };
这个窗口支持鼠标hover事件,并且我自己实现了鼠标按下和弹起方法,为的是自己控制QComboBox下拉框的隐藏,接口SetBackgroundRole是控制窗口背景色变化的函数,由于enterEvent和leaveEvent方法在成为了代理窗口后,事件触发我自己也没有搞清楚是怎么回事,因此我使用了installEventFilter方法把该窗口的事件放到父窗口去处理,在窗口中判断鼠标当前位置和CActionContentWidget 窗口之间的关系来判断鼠标是否进入该窗口。
2、如图4所示,是我实现的结果预览,接下来我们需要把定制的窗口放到QComboBox的下拉框中,代码如下:
 1 class combobox : public QWidget
 2 {
 3     Q_OBJECT
 4
 5 public:
 6     combobox(QWidget *parent = 0);
 7     ~combobox();
 8
 9 protected:
10     virtual bool eventFilter(QObject *, QEvent *) Q_DECL_OVERRIDE;
11
12 private:
13     void ConstructList();//列表定制
14     void ConstructTable();//表格定制
15
16 private:
17     Ui::comboboxClass ui;
18 };
ConstructList方法是列表的定制,也就是上图4所示的效果,ConstructTable方法内封装的是定制表格,后续我会讲解。
3、上边提到定制的窗口和鼠标位置的判断是在父窗口中进行的,那么接下来我就解释下父窗口的eventFIlter方法。代码比较简单,我就不一一进行解释了
 1 bool combobox::eventFilter(QObject * watched, QEvent * event)
 2 {
 3     if (watched->inherits("QWidget") && event->type() == QEvent::Paint)
 4     {
 5         if (CActionContentWidget * actionItem = dynamic_cast<CActionContentWidget *>(watched))
 6         {
 7             if (actionItem->rect().contains(actionItem->mapFromGlobal(QCursor::pos())))
 8             {
 9                 actionItem->SetBackgroundRole(true);
10             }
11             else
12             {
13                 actionItem->SetBackgroundRole(false);
14             }
15         }
16     }
17
18     return QWidget::eventFilter(watched, event);
19 }
4、ConstructList列表实现,代码如下:

 1 void combobox::ConstructList()
 2 {
 3     QListWidget * listWidget = new QListWidget;
 4     listWidget->setViewMode(QListView::ListMode);
 5
 6     for (int i = 0; i < 5; i++)
 7     {
 8         CActionContentWidget * itemWidget = new CActionContentWidget("fawefawe");
 9         connect(itemWidget, &CActionContentWidget::showText, this, [this, listWidget](const QString & text){
10             ui.comboBox->hidePopup();
11             if (ui.comboBox->isEditable())
12             {
13                 ui.comboBox->setCurrentText(text);
14             }
15             else
16             {
17                 for (int c = 0; c < listWidget->count(); ++c)
18                 {
19                     CActionContentWidget * itemWidget = dynamic_cast<CActionContentWidget *>(listWidget->itemWidget(listWidget->item(c)));
20                     if (itemWidget == sender())
21                     {
22                         ui.comboBox->setCurrentIndex(c);
23                     }
24                 }
25             }
26         });
27         itemWidget->SetItemIcon(":/combobox/Resources/icon1.jpg", ":/combobox/Resources/icon1.jpg");
28         itemWidget->setFixedHeight(45);
29         itemWidget->setFixedWidth(150);
30          QListWidgetItem * item = new QListWidgetItem(listWidget);
31         item->setText(QStringLiteral("%1").arg(i));
32     //    item->setCheckState(Qt::Checked);
33         listWidget->setItemWidget(item, itemWidget);
34         listWidget->addItem(item);
35         itemWidget->installEventFilter(this);
36     }
37
38     ui.comboBox->setModel(listWidget->model());
39     ui.comboBox->setView(listWidget);
40     ui.comboBox->setEditable(true);//是否支持下拉框可编辑
41     ui.comboBox->setMaxVisibleItems(3);
42
43     setStyleSheet("QComboBox{border:1px solid gray;}"
44         "QComboBox QAbstractItemView::item{height:45px;}" //下拉选项高度
45         "QComboBox::down-arrow{image:url(:/combobox/Resources/icon1.jpg);}" //下拉箭头
46         "QComboBox::drop-down{border:0px;}"); //下拉按钮
47 }
其中的setStyleSheet是用来设置下拉框中每一项的信息的,我们自己定制的窗口只是覆盖在原有窗口之上而已,原有的窗口还是存在的,因此我们的窗口必须和定制的窗口大小一样,负责会出现一些意外的情况。初次之外还需要注意的是:设置下拉框是否可编辑,如图5帮助文档所描述,QComboBox在可编辑状态下可以通过setCurrentText来设置displayText,但是如果不可编辑,他则会显示当前原有窗口的text,而非我们自己定制的窗口内容,因此我在showText信号的处理槽中,判断了下下拉框是否可编辑,并做相应的处理。
还有几个设置下拉框属性的接口,我就不一一细说了,想了解的同学自己看帮助文档吧。其中setModel和setView是两居重点的代码,千万不能忘记,这两句代码是把QComboBox的视图和数据跟QListWidget绑定在一起了。QListWidget还支持ViewMode::IconMode这种现实模式,但是我们的下拉框定制用不到,因此我就不讲解这个了。
5、到此我们的列表定制就完成了。
二、表格实现
看明白了列表的实现,表格的实现就不在话下,不过我们列表的实现和表格的实现我在实现的时候还是有一定的区别的,有兴趣的同学可以接着往下看。首先就说下拉框的隐藏这一事件就和列表不一样,表格我是使用QTableWidget,内容使用QCheckBox,我自己重写了QCheckBox,并重新是了hitButton这个方法,因为当这个方法返回false时,鼠标点击不会选中/取消选中选择框,这个时候事件循环应该是传递到了父窗口上,而窗口把弹框隐藏了,这样做显然不满足我们的需求,有时候我们可能需要进行多个选择。说完需求之后我们来看代码。
1、首先我自己重写了QCheckBox,头文件代码如下:
 1 class CheckBox : public QCheckBox
 2 {
 3 public:
 4     CheckBox(QWidget * parent = nullptr) :QCheckBox(parent){}
 5     ~CheckBox(){};;
 6
 7 protected:
 8     virtual void checkStateSet() Q_DECL_OVERRIDE;
 9     virtual bool hitButton(const QPoint & pos) const Q_DECL_OVERRIDE;
10     virtual void nextCheckState() Q_DECL_OVERRIDE;
11 };
大多数函数都是没有做处理,仅仅对hitButton方法做了重写,返回值直接返回true。这个时候就我们就可以进行多项选择,而弹框也不会消失。最终的实现效果如图6所示
2、ConstructTable方法的实现如下:

 1 void combobox::ConstructTable()
 2 {
 3     setStyleSheet("QComboBox QAbstractItemView {selection-background-color: transparent;}");
 4
 5     QTableWidget * tableWidget = new QTableWidget(3, 3);
 6     tableWidget->verticalHeader()->setVisible(false);
 7     tableWidget->horizontalHeader()->setVisible(false);
 8     tableWidget->setShowGrid(false);
 9     for (int i = 0; i < 3; ++i)
10     {
11         tableWidget->setColumnWidth(i, 49);
12         tableWidget->setRowHeight(i, 50);
13         for (int j = 0; j < 3; ++j)
14         {
15         /*    CActionContentWidget *itemWidget = new CActionContentWidget("fawefawe");
16             itemWidget->SetItemIcon(":/combobox/Resources/icon1.jpg", ":/combobox/Resources/icon1.jpg");
17             itemWidget->setFixedHeight(50);
18             itemWidget->setFixedWidth(50);*/
19             CheckBox * itemWidget = new CheckBox;
20             itemWidget->setFixedSize(50, 50);
21             itemWidget->setStyleSheet(QString("QCheckBox {background-color:lightgray;}"
22                 "QCheckBox:checked{background-color:white;}"));
23             connect(itemWidget, &QCheckBox::clicked, this, [this]{
24                 QObject * sender = this->sender();
25                 if (QCheckBox * item = dynamic_cast<QCheckBox *>(sender))
26                 {
27                     QString text = ui.comboBox->currentText();
28                     if (text.isEmpty() == false)
29                     {
30                         if (item->isChecked())
31                         {
32                             if (text.split("|").indexOf(item->text()) == -1)
33                             {
34                                 text.append("|" + item->text());
35                             }
36                         }
37                         else
38                         {
39                             text.remove("|" + item->text());
40                             text.remove(item->text());
41                             if (text.size() != 0 && text.at(0) == '|')
42                             {
43                                 text.remove(0, 1);
44                             }
45                         }
46                     }
47                     else
48                     {
49                         if (item->isChecked())
50                         {
51                             text.append(item->text());
52                         }
53                     }
54                     ui.comboBox->setCurrentText(text);
55                 }
56             });
57             itemWidget->setText(QStringLiteral("好%1").arg(i));
58             itemWidget->setCheckable(true);
59         //    tableWidget->setItem(i, j, new QTableWidgetItem(QStringLiteral("热分%1").arg(i)));
60             tableWidget->setCellWidget(i, j, itemWidget);
61
62             itemWidget->installEventFilter(this);
63         }
64     }
65
66     ui.comboBox->setModel(tableWidget->model());
67     ui.comboBox->setView(tableWidget);
68 //    ui.comboBox->setEditable(true);
69 }
上边的代码都比较简单,我就不多了,我只说一个点,在设置表格列宽度的时候设置的为49,因为表格具有boder,如果设置50就会超出tableWidget,而出现左右滚动的现象
demo下载链接:http://download.csdn.net/detail/qq_30392343/9587529
 |
 |
很重要--转载声明
- 本站文章无特别说明,皆为原创,版权所有,转载时请用链接的方式,给出原文出处。同时写上原作者:朝十晚八 or Twowords
- 如要转载,请原文转载,如在转载时修改本文,请事先告知,谢绝在转载时通过修改本文达到有利于转载者的目的。


