
SpringBoot 随记
注册Servlet、Filter、Listener
原贴:https://blog.csdn.net/cl_andywin/article/details/54605831
在Servlet 3.0之前我们都是使用web.xml进行配置,需要增加Servlet、Filter或者Listener都是在web.xml增加相应的配置即可。这里我们使用的是使用Java配置来注册Servlet、Filter、Listener。
进入的顺序是Filter-->Interceptor-->ControllerAdvice-->Aspect-->Controller(后进先出)
注册Servlet
(1)使用ServletRegistrationBean注册
使用ServletRegistrationBean注册只需要在@Configuration类中加入即可,例如以下代码:
@Bean
	public ServletRegistrationBean myServlet() {
		ServletRegistrationBean myServlet = new ServletRegistrationBean();
		myServlet.addUrlMappings("/servlet");
		myServlet.setServlet(new MyServlet());
		return myServlet;
	}

注册成功后,启动时控制台可以看到自定义servlet的信息
(2)使用@WebServlet
使用@WebServlet注册,需要在Servlet类上使用该注解即可,但是需要在@Configuration类中使用Spring Boot提供的注解@ServletComponentScan扫描注册相应的Servlet。
注册Filter
(1)使用FilterRegistrationBean注册
使用FilterRegistrationBean注册Filter,只需要在@Configuration类中加入即可,例如以下代码:
@Value("${xss.urlPatterns}")
    private String urlPatterns;

@Bean
	public FilterRegistrationBean myFilter() {
		FilterRegistrationBean myFilter = new FilterRegistrationBean();
		myFilter.addUrlPatterns("/*");
		myFilter.setFilter(new MyFilter());
		return myFilter;
	}

 @Bean
    public FilterRegistrationBean xssFilterRegistration()
    {
        FilterRegistrationBean registration = new FilterRegistrationBean();
        registration.setDispatcherTypes(DispatcherType.REQUEST);
        registration.setFilter(new XssFilter());
        registration.addUrlPatterns(StringUtils.split(urlPatterns, ","));
        registration.setName("xssFilter");
        registration.setOrder(Integer.MAX_VALUE);
        Map<String, String> initParameters = new HashMap<String, String>();
        initParameters.put("excludes", excludes);//相当于web.xml配置的<init-param>
        initParameters.put("enabled", enabled);
        registration.setInitParameters(initParameters);
        return registration;
    }
(2)使用@WebFilter
使用@WebFilter注册,需要在Filter类上使用该注解即可,但是需要在@Configuration类中使用Spring Boot提供的注解@ServletComponentScan扫描注册相应的Filter。
( 3 ) Filter实现 implements Filter
    public List<String> excludes = new ArrayList<>();

    @Override
    public void init(FilterConfig filterConfig) throws ServletException
    {
        String tempExcludes = filterConfig.getInitParameter("excludes");
        String tempEnabled = filterConfig.getInitParameter("enabled");
        if (StringUtils.isNotEmpty(tempExcludes))
        {
            String[] url = tempExcludes.split(",");
            for (int i = 0; url != null && i < url.length; i++)
            {
                excludes.add(url[i]);
            }
        }
        if (StringUtils.isNotEmpty(tempEnabled))
        {
            enabled = Boolean.valueOf(tempEnabled);
        }
    }

    @Override
    public void doFilter(ServletRequest request, ServletResponse response, FilterChain chain)
            throws IOException, ServletException
    {
        HttpServletRequest req = (HttpServletRequest) request;
        HttpServletResponse resp = (HttpServletResponse) response;
        if (handleExcludeURL(req, resp)) //自定义方法 排除不需要过滤的
        {
            chain.doFilter(request, response);
            return;  //这个return一定要有 否则下层过滤完成后,返回来会继续执行
        }
        XssHttpServletRequestWrapper xssRequest = new XssHttpServletRequestWrapper((HttpServletRequest) request);
        chain.doFilter(xssRequest, response);
    }
FilterConfig作用也是获取Filter的相关配置信息:
1.初始化参数的获取
String getInitparameter(String name);
Enumeration EnumerngetInitParameterNames();
2.Filter的名称获取
getFilterName();
3.ServletContext对象的获取
getServletContext();
注册Listener
(1)使用ServletListenerRegistrationBean注册
使用ServletListenerRegistrationBean注册Listener只需要在@Configuration类中加入即可,例如以下代码:
@Bean
	public ServletListenerRegistrationBean<MyListener> myServletListener() {
		ServletListenerRegistrationBean<MyListener> myListener = new ServletListenerRegistrationBean<MyListener>();
		myListener.setListener(new MyListener());
		return myListener;
	}
(2)使用@WebListener
使用@WebListener注册,需要在Filter类上使用该注解即可,但是需要在@Configuration类中使用Spring Boot提供的注解@ServletComponentScan扫描注册相应的Listener。
取得BeanFactory+ApplicationContext,动态注册/销毁/删除Bean
1.Bean实现BeanFactoryAware、ApplicationContextAware接口的相应方法
2.通过@Autowired,取得BeanFactory+ApplicationContext
3 注意:手动注册的new Bean(),@Autowired,AOP等等都失效。因为registerSingleton()直接将对象注册到容器缓存中,所以getbean()时直接命中缓存,没有装配过程。
DI需要手动将需要的成员变量Bean引用赋值给这个手动注册的Bean中。否则会出现NPE。
AOP是getBean()时BeanPostProcess在其初始化后用代理对象替换原有的bean实现。
BeanFactory 删除/注册Bean
@Autowired
private ApplicationContext applicationContext;

@Autowired
    private RedisTemplate<Object, Object> redisTemplate;


//BeanFactory
DefaultListableBeanFactory defaultListableBeanFactory =
   (DefaultListableBeanFactory) applicationContext.getAutowireCapableBeanFactory();


//注册bean   new实例化Spring不负责@Autowired、AOP,将需要的bean引用手动传入
defaultListableBeanFactory.registerSingleton("mybean", new BeanObject(redisTemplate));

//注册bean  Spring创建Bean  负责@Autowired+AOP
BeanObject a=defaultListableBeanFactory.createBean(BeanObject.class); //Spring创建Bean
a.setBeanName("mybean"); //因为是手动创建此时还没有BeanName,BeanNameAware注入全类名。需要手动指定BeanName
defaultListableBeanFactory.registerSingleton("mybean",a );

//销毁
defaultListableBeanFactory.destroySingleton("mybean");

//删除beanDefinition
defaultListableBeanFactory.removeBeanDefinition("mybean");
替换BEAN
@Test
public void testBeanFactory() {
    DefaultListableBeanFactory defaultListableBeanFactory =
          (DefaultListableBeanFactory) applicationContext.getAutowireCapableBeanFactory();
    //注册
    defaultListableBeanFactory.registerSingleton("mybean","123");
    System.out.println(applicationContext.getBean("mybean"));
    //销毁(不注销抛出已存在异常)
    defaultListableBeanFactory.destroySingleton("mybean");
    //注册
    defaultListableBeanFactory.registerSingleton("mybean","456");
    System.out.println(applicationContext.getBean("mybean"));

}
Spring IOC生命周期
https://blog.csdn.net/shanchahua123456/article/details/86552224
IOC环境构建完成后,项目启动完成前,进行业务逻辑
https://blog.csdn.net/shanchahua123456/article/details/87286148
Http编码配置
spring mvc项目中需要在web.xml添加CharacterEncodingFilter过滤器
因为springboot启动时默认有CharacterEncodingFilter过滤器,只要在配置文件中为过滤器设置属性参数即可修改默认过滤属性,
所以springboot中只需要在配置文件中添加以下配置:
spring.http.encoding.charset=UTF-8
spring.http.encoding.enabled=true
spring.http.encoding.force=true

SpringBoot 编译jar 右键项目run as选择maven instell,然后报错
[ERROR] Failed to execute goal org.apache.maven.plugins:maven-compiler-plugin:3.7.0:compile (default-compile) on project jcseg-core: Compilation failure
[ERROR] No compiler is provided in this environment. Perhaps you are running on a JRE rather than a JDK?
解决方法:
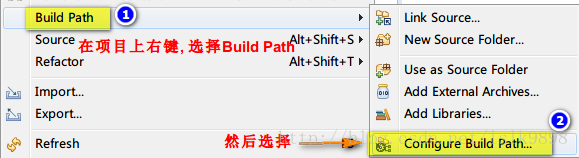
a Window → Preferences → 对话框中的左侧选择Java → Installed JREs → 对话框右侧点击 Add 按钮 → Standard VM → next → JRE home 选择 JDK 的安装路径 → Finish → 选中 jdk 的复选框 → 点击 OK 按钮
(一定要勾选与项目匹配JDK,而不能选择JRE。选择JRE也会报错)
参考:https://blog.csdn.net/zhangchao19890805/article/details/54694114

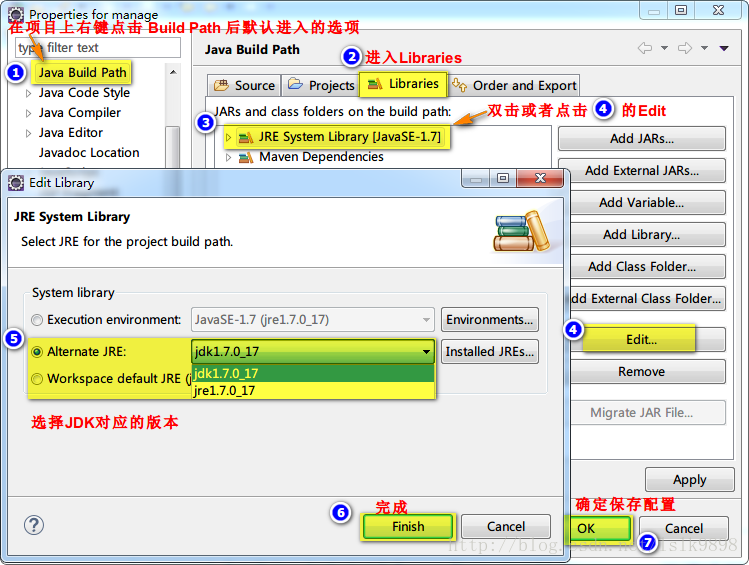
b 将项目BuildPath指向对应的jdk版本
参考:https://blog.csdn.net/lslk9898/article/details/73836745
使用springboot 链接sqlserver2005报SSL异常,异常内容如下
com.microsoft.sqlserver.jdbc.SQLServerException: The driver could not establish a secure connection to SQL Server by using Secure Sockets Layer (SSL) encryption. Error: "SQL Server did not return a response. The connection has been closed. ClientConnectionId:335af645-58ea-40f9-9d63-a282531142a3".
...
Caused by: java.io.IOException: SQL Server did not return a response. The connection has been closed. ClientConnectionId:335af645-58ea-40f9-9d63-a282531142a3
使用的依赖版本:
spring boot 2.0.3,JDK1.8
<dependency>
			<groupId>org.springframework.boot</groupId>
			<artifactId>spring-boot-starter-jdbc</artifactId>
</dependency>
<dependency>
			<groupId>com.microsoft.sqlserver</groupId>
			<artifactId>mssql-jdbc</artifactId>
			<scope>runtime</scope>
</dependency>
<dependency>
			<groupId>com.alibaba</groupId>
			<artifactId>druid-spring-boot-starter</artifactId>
			<version>1.1.9</version>
</dependency>
经测试后发现,是JDK版本问题:
使用JDK 8u171,JDK 8u181会发生异常
使用JDK 8u65,JDK 8u111就可以正常链接数据库
灵活运用自动装配@EnableAutoConfiguration
会扫描META-INF/spring.factories,文件在org.springframework.boot.autoconfigure的spring.factories,在这个文件中,可以看到一系列Spring Boot自动配置的列表。
例如:可以自己创建的common项目时,在common中创建META-INF/spring.factories,并配置boot自动扫描的的类。
这样当其他项目依赖common项目的jar时,就不用再次手动指定扫描common项目中的包/类了。
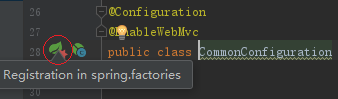
//spring.factories添加此配置后,boot自动扫描CommonConfiguration类
org.springframework.boot.autoconfigure.EnableAutoConfiguration=\
  cn.springcloud.book.common.config.CommonConfiguration
配置成功后IDEA会有下图的图标提示
拦截器 HandlerInterceptor
springboot有两种方法注册拦截器
1 拦截器直接继承HandlerInterceptorAdapter实体类
2 实现HandlerInterceptor接口,然后在WebMvcConfiguration中通过addInterceptors()方法注册
可以覆盖三个不同时间点的拦截方法。以preHandle为例
import org.springframework.web.method.HandlerMethod;

public boolean preHandle(HttpServletRequest request, HttpServletResponse response, Object handler){
 if(handler instanceof HandlerMethod) {
    //handlerMethod 有很多实用方法
    HandlerMethod handlerMethod = (HandlerMethod) handler;

    Object bean=handlerMethod.getBean();
    Method method =handlerMethod.getMethod() ;
    MethodParameter[] MethodParameters= handlerMethod.getMethodParameters() ;
    A a= handlerMethod.getMethodAnnotation(Class<A> annotationType) ;
    boolean b= handlerMethod.hasMethodAnnotation(Class<A> annotationType);
 }
}
3 preHandle 返回false不向下继续执行,此时通过HttpServletResponse返回给客户端信息
private void render(HttpServletResponse response, CodeMsg cm)throws Exception {
      response.setContentType("application/json;charset=UTF-8");
      OutputStream out = response.getOutputStream();
      String str  = JSON.toJSONString(Result.error(cm));
      out.write(str.getBytes("UTF-8"));
      out.flush();
      out.close();
   }
设置项目全局请求前缀
在 application.properties 中 server.servlet.context-path=/b,则所有请求URL前都要加上/b (不同版本设置略有不同)。
非常适合配合NGINX路由分配使用
例如:项目中 @GetMapping("/getcookie") 其对应的请求url:/b/getcookie
容器Bean中获取当前线程对应的request、response对象
RequestContextHolder中的ThreadLocal保存了ServletRequestAttributes,这也是RequestContextHolder最主要的作用。
ServletRequestAttributes中包含当前线程对应请求的request、response 、session。
方法一:
HttpServletRequest request = ((ServletRequestAttributes) RequestContextHolder.getRequestAttributes()).getRequest();
HttpServletResponse response = ((ServletRequestAttributes) RequestContextHolder.getRequestAttributes()).getResponse();

方法二:
@autowired
HttpServletRequest request;
通过main()指定profiles的参数
在配置文件中设置多个 profiles不同配置,在main方法启动项目时,指定启用的profiles。还可以指定其他配置参数
public static void main(String[] args) {
        SpringApplication.run(ErpApplication.class, "spring.proflies.active=node1");
}
自定义Spring注解@应用
可以在Interceptor \ AOP 中获取方法的注解,并取得注解参数。而且可以已注解作为切点。
其思路都是先取得最终执行方法Method对象。
应用于AOP
通过AOP+@,实现日志管理,数据源切换等操作
//切点为@DataSource注解
@Pointcut("@annotation(com.ruoyi.common.annotation.DataSource)")
    public void dsPointCut()
    {
    }

//切面
@Around("dsPointCut()")
    public Object around(ProceedingJoinPoint point) throws Throwable
    {
        MethodSignature signature = (MethodSignature) point.getSignature();
        //取得被代理方法对象
        Method method = signature.getMethod();
        //取得其DataSource注解
        DataSource dataSource = method.getAnnotation(DataSource.class);

        if (dataSource != null){
             //取得注解属性
             dataSource.value().name();
        }

        return point.proceed();

    }
应用于拦截器Interceptor
@Override
    public boolean preHandle(HttpServletRequest request, HttpServletResponse response,
                             Object handler) throws Exception {

        HandlerMethod handlerMethod = (HandlerMethod) handler;
        Method method = handlerMethod.getMethod();
        //取得方法上的RateLimiter注解
        RateLimiter rateLimiter = method.getAnnotation(RateLimiter.class);
        if (rateLimiter != null){

        }
  ......
}
利用ApplicationContext实现事件监听
https://segmentfault.com/a/1190000011433514?utm_source=tag-newest
//发送事件
applicationContext.publishEvent(new SysLogEvent(logVo));
//监听事件
//默认是同步串行执行
@Async  //并发执行
@Order
@EventListener(SysLogEvent.class)
public void saveSysLog(SysLogEvent event) {
		SysLog sysLog = (SysLog) event.getSource();
		remoteLogService.saveLog(sysLog);
}
/**
* 系统日志事件
*/
public class SysLogEvent extends ApplicationEvent { //必须继承ApplicationEvent
public SysLogEvent(SysLog source) {
super(source);
}
}ControllerAdvice统一异常处理
@ControllerAdvice 切入Controller执行统一异常捕获处理,可以返回JSON或MV。若抛出异常类型,多个处理方法都满足捕获条件,优先命中最精准的。比如抛出MyException.class下面两个方法都满足,Spring会选择myErrorHandler方法执行。
@ControllerAdvice
public class MyControllerAdvice {

    /**
     * 全局异常捕捉处理
     * @param ex
     * @return
     */
    @ResponseBody
    @ExceptionHandler(value = Exception.class)
    public Map errorHandler(Exception ex) {
        Map map = new HashMap();
        map.put("code", 100);
        map.put("msg", ex.getMessage());
        return map;
    }

    /**
     * 拦截捕捉自定义异常 MyException.class
     * @param ex
     * @return
     */
    @ResponseBody
    @ExceptionHandler(value = MyException.class)
    public ModelAndView myErrorHandler(MyException ex) {
       ModelAndView modelAndView = new ModelAndView();
       modelAndView.setViewName("error");
       modelAndView.addObject("code", ex.getCode());
       modelAndView.addObject("msg", ex.getMsg());
       return modelAndView;
    }

}
日志
SpringBoot默认使用SLF4J作为日志门面,底层默认是LOGBACK。SLF4J作为门面其目的是用相同的开发代码适配底层不同的日志实现logback、log4j等等。当引入第三方框架时,框架底层的日志实现可能各不相同。未达到统一配置,可以在Maven引入第三方框架jar时排除其日志jar,这样SpringBoot的提供的底层LOGBACK伪装会代替其原有日志框架。
logging.level.root = INFO
logging.level.com.mypacket = INFO  #定义包的日志级别

logging:
    path: /var/logs          # 在项目根目录下/var/logs目录生成spring.log文件
    file: /var/logs/test.log # 在项目根目录下/var/logs目录生成test.log文件


private static final Logger LOG = LoggerFactory.getLogger(XXX.class);
异步任务@Async
启动异步任务支持@EnableAsync。若有返回值,异步任务需要返回实现Future接口的对象,否则执行时调用方会报错。AsyncResult<V>是Spring框架提供的Future实现。调用方通过Future的isDone() 、cancel()、get()等方法控制并取得异步任务。 还可以自定义异步任务的线程池Bean。
@Async
public Future<Boolean> getBool() throws InterruptedException {
      Thread.sleep(3000);
      return new AsyncResult<Boolean>(new Boolean(true));
}
YAML
定义LIST
express:
  vendors:
    - code: "ZTO"
      name: "中通快递"
    - code: "YTO"
      name: "圆通速递"


@ConfigurationProperties(prefix = "express")
private List<Map<String, String>> vendors = new ArrayList<>();
允许跨域访问CORS
全局解决:1. 如果通过Nginx做反向代理,可以解决前端跨域访问的问题。2 通过WebMvcConfigurerAdapter 配置
@Configuration
@EnableWebMvc
public class WebConfig extends WebMvcConfigurerAdapter {

    @Override
    public void addCorsMappings(CorsRegistry registry) {
        registry.addMapping("/**");
    }
}局部解决:利用@CrossOrigin注解,可放至在控制层类上或者方法上。类上代表整个控制层所有的映射方法都支持跨域请求。
若在Controller注解上方添加@CrossOrigin注解后,仍然出现跨域问题。在@RequestMapping注解中没有指定Get、Post方式,具体指定后问题解决。
@CrossOrigin(origins = "http://blog.lqdev.cn", maxAge = 3600)


origins(可不填): 允许可访问的域列表

maxAge(可不填):准备响应前的缓存持续的最大时间(以秒为单位)。
自动加密 / 解密请求中的 Json
涉及到@RequestBody和@ResponseBody的类型转换问题一般都在MappingJackson2HttpMessageConverter中解决,想要自动加密 / 解密只需要继承这个类并重写readInternal/writeInternal方法
@SensitiveFormat基于注解的敏感词过滤功能
将其中的敏感词替换为 * 等特殊字符
https://blog.csdn.net/lycit/article/details/79668184
方法参数中使用注解
 public JedisSentinelPool jedisPool(@Qualifier("jedis.pool.config") JedisPoolConfig config,
                                       @Value("${spring.redis.sentinel.master}") String clusterName,
                                       @Value("${spring.redis.sentinel.nodes}") String sentinelNodes,
                                       @Value("${spring.redis.timeout}") int timeout,
                                       @Value("${spring.redis.password}") String password)
返回文件
@RequestMapping(“/retfile”)
    public void retfile() throws IOException {
        Resource resource =  new ClassPathResource("/static/ueditor/ueditorConfig.json");
        org.apache.commons.io.IOUtils.copy(resource.getInputStream(), response.getOutputStream());
        response.flushBuffer();
    }
 浙公网安备 33010602011771号