StatefulSet
StatefulSet
- 部署有状态应用
- 什么是无状态服务:
deployment部署的pod属于无状态服务,控制器中的Pod因为物理节点,从一个Node漂移到另一个Node.或者在当前服务下直接拉起一个新的pod,这些操作都不影响服务的运行状态。即Pod的网络地址,存储与pod中的应用没有强依赖关系。比如:web的集群服务。
-
- 什么是有状态服务:
控制器中的每个Pod都有自己存储位置和存储内容,多个Pod之间的启动有严格的顺序,pod之间有独立的通讯要求。比如etcd数据库。
-
- 有状态应用部署需要考虑:
- 稳定的网络ID,实例之间通信地址要固定
- 实例的独立存储
- 先后的启动顺序
- 应用场景:分布式应用(mysql,zk,etcd)
- 解决pod独立生命周期,保持pod启动顺序和唯一性
- 稳定,唯一的网络标识符,持久存储
- 有序,优雅的部署和扩展、删除、终止
- 有序,流动更新
稳定的网络ID
实现方法:Headless Service
- normal service 与 Headless Service区别

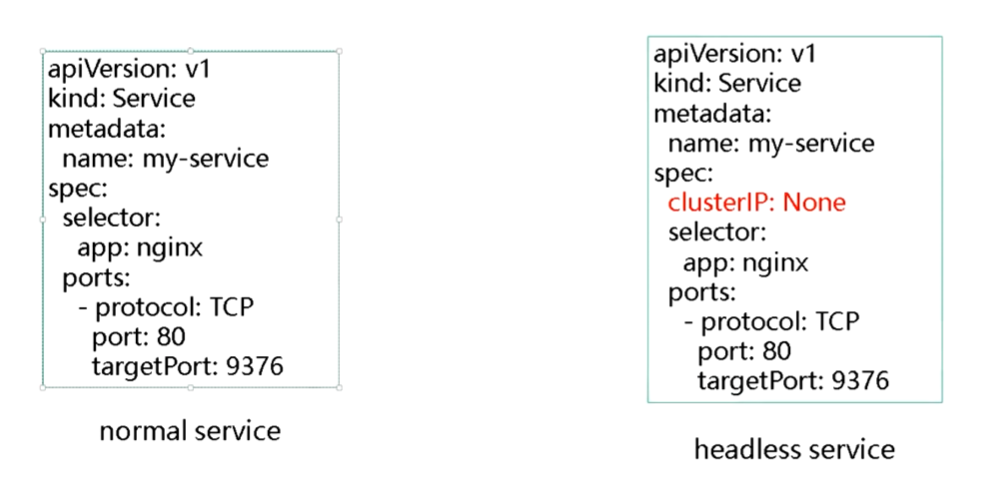
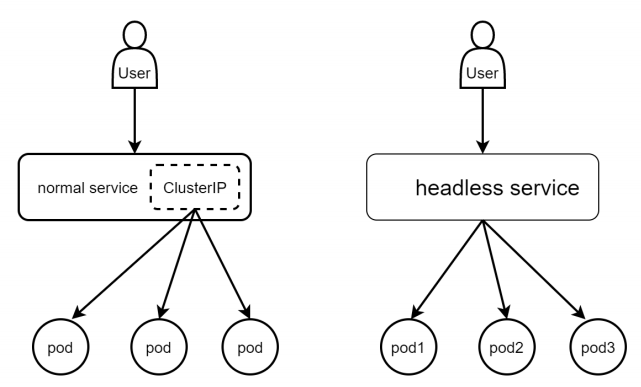
Headless服务与正常的服务相比多了一个字段:ClusterIP: None. 在normal service中这个字段的地址是做VIP的,客户端访问后端服务时不需要知道后台服务器的真实地址,它只需要访问VIP,service的负载均衡器会把它的请求转发给其中一个服务器。而heardless service不需要这个VIP。例如,Client访问mysql的主从服务时,client的读写请求要么是访问主,要么是访问从,它不能把请求服务给VIP,让vip转发。

1)用yaml文件生成一个headless service
手动快速生成一个headless service的yaml文件
[root@master ~]# kubectl create deploy web --image=nginx
deployment.apps/web created
[root@master ~]# kubectl  expose deploy web --port=80 --target-port=80  --dry-run -o yaml > service-headless.yaml
W0821 17:01:11.402969    2689 helpers.go:535] --dry-run is deprecated and can be replaced with --dry-run=client.
[root@master ~]#
[root@master ~]#                                 #删除时间戳和状态字段,添加clusetrIP
[root@master statefulset]# vim  service-headless.yaml
apiVersion: v1
kind: Service
metadata:
  labels:
    app: web
  name: web
spec:
  clusterIP: None
  ports:
  - port: 80
    protocol: TCP
    targetPort: 80
  selector:
    app: web
[root@master statefulset]#


[root@master statefulset]# kubectl apply -f service-headless.yaml
service/web created
[root@master statefulset]# kubectl get svc
NAME         TYPE        CLUSTER-IP   EXTERNAL-IP   PORT(S)   AGE
kubernetes   ClusterIP   10.96.0.1    <none>        443/TCP   279d
web          ClusterIP   None         <none>        80/TCP    3s
[root@master statefulset]#
1)用yaml文件生成一个statefulset
快速复制一份statefulset文件
                                  #从任意地址拷贝一份deployment
                                  #复制后对部分字段进行修改,修改kind,replicas.  删除浅色部分
[root@master statefulset]# cp ../../PV-PVC/deployment-web.yaml   statefulset-headless.yaml
[root@master statefulset]#
[root@master statefulset]# cat statefulset-headless.yaml
apiVersion: apps/v1
kind: Deployment
metadata:
  labels:
    app: web
  name: web
spec:
  replicas: 1
  selector:
    matchLabels:
      app: web
  strategy: {}
  template:
    metadata:
      labels:
        app: web
    spec:
      containers:
      - image: nginx
        name: nginx
        resources: {}
        volumeMounts:
        - name: data
          mountPath: /usr/share/nginx/html

      volumes:
      - name: data
        nfs:
          server: 192.168.1.63
          path: /ifs/kubernetes

                               # 添加 serviceName,注意这里serviceName 的值是service-headless.yaml中metadata.name
 [root@master statefulset]# vim statefulset-headless.yaml
apiVersion: apps/v1
kind: StatefulSet
metadata:
  name: web
spec:
  serviceName: "web"
  replicas: 3
  selector:
    matchLabels:
      app: web
  template:
    metadata:
      labels:
        app: web
    spec:
      containers:
      - image: nginx
        name: nginx
[root@master statefulset]#
[root@master statefulset]# kubectl apply -f statefulset-headless.yaml
statefulset.apps/web created
[root@master statefulset]#        #观察statefulset控制器生成的pod时的命名规律
[root@master statefulset]# kubectl get pod
NAME                   READY   STATUS    RESTARTS   AGE
web-0                  1/1     Running   0          58s
web-1                  1/1     Running   0          36s
web-2                  1/1     Running   0          19s
[root@master statefulset]#
3) 再用deployment生成副本为3的pod, 同时生成一个normal server与之关联,用于与statefulset做比较
[root@master statefulset]# kubectl create deploy web2 --image=nginx
deployment.apps/web2 created
[root@master statefulset]# kubectl scale deploy web2 --replicas=3
deployment.apps/web2 scaled
[root@master statefulset]# kubectl expose deploy web2 --port=80 --target-port=80
service/web2 exposed
[root@master statefulset]#         #比较deploy,satefulset的pod的不同之处
[root@master statefulset]# kubectl get pod
NAME                    READY   STATUS    RESTARTS   AGE
web-0                   1/1     Running   0          23m
web-1                   1/1     Running   0          22m
web-2                   1/1     Running   0          22m
web2-6448bfd7b7-5bv5q   1/1     Running   0          2m8s
web2-6448bfd7b7-nht29   1/1     Running   0          2m37s
web2-6448bfd7b7-wrh6t   1/1     Running   0          2m8s
[root@master statefulset]#
[root@master statefulset]#         #比较normal server, headless service的不同之处
[root@master statefulset]# kubectl get svc
NAME         TYPE        CLUSTER-IP      EXTERNAL-IP   PORT(S)   AGE
web          ClusterIP   None            <none>        80/TCP    61m
web2         ClusterIP   10.110.187.41   <none>        80/TCP    97s
[root@master statefulset]#

                                  #查看pod的IP
[root@master ~]# kubectl get pod -o wide
NAME                    READY   STATUS    RESTARTS   AGE   IP             NODE    NOMINATED NODE   READINESS GATES
sh                      1/1     Running   0          8m    10.244.2.31    node2   <none>           <none>
web-0                   1/1     Running   0          43m   10.244.1.192   node1   <none>           <none>
web-1                   1/1     Running   0          43m   10.244.2.27    node2   <none>           <none>
web-2                   1/1     Running   0          43m   10.244.1.193   node1   <none>           <none>
web2-6448bfd7b7-5bv5q   1/1     Running   0          22m   10.244.2.30    node2   <none>           <none>
web2-6448bfd7b7-nht29   1/1     Running   0          23m   10.244.2.28    node2   <none>           <none>
web2-6448bfd7b7-wrh6t   1/1     Running   0          22m   10.244.2.29    node2   <none>           <none>
[root@master ~]#
4) 用busybox镜像启动一个临时的pod,在容器内用DNS做解析,比较headless service的不同之处
# --rm 表示容器退出时,自动清除容器内的文件系统 [root@master statefulset]# kubectl run -it --rm --image=busybox:1.28.4 sh If you don't see a command prompt, try pressing enter. / # / # 在pod内分别对normal service, headless service做域名解析,比较不同之处。 DNS解析web2时返回的结果是clusterIP,与 <service-name>.<namespace-name>.svc.cluster.local的对应关系,clusterIP对应的是哪个pod 我们并不知道,但是解析web时返回的结果是pod的Ip与<statefulsetName-index>.<service-name> .<namespace-name>.svc.cluster.local 之间的对应关系,也即:每个pod的IP对应当前pod的主机名是唯一对应的。 / # nslookup web2.default Server: 10.96.0.10 Address 1: 10.96.0.10 kube-dns.kube-system.svc.cluster.local Name: web2.default Address 1: 10.110.187.41 web2.default.svc.cluster.local / # / # nslookup web.default Server: 10.96.0.10 Address 1: 10.96.0.10 kube-dns.kube-system.svc.cluster.local Name: web.default Address 1: 10.244.1.193 web-2.web.default.svc.cluster.local Address 2: 10.244.1.192 web-0.web.default.svc.cluster.local Address 3: 10.244.2.27 web-1.web.default.svc.cluster.local / # CoreDNS对headless的解析时,它解析的是pod的名字与pod的地址的对应关系 当使用headless service,且statefulset中serviceName字段又指定这个headless service时,这就已告诉statefulset它所管理的pod的身份是由headless来保证的。控制器的service不再为pod提供clusterIP,而是为每个pod提供一个固定的DNS名字,这个dns名字就是pod的name,即web-0,web-1,web-2. [root@master ~]# kubectl get pod NAME READY STATUS RESTARTS AGE sh 1/1 Running 0 8m14s web-0 1/1 Running 0 44m web-1 1/1 Running 0 43m web-2 1/1 Running 0 43m [root@master ~]# [root@master ~]# kubectl exec -it web-0 -- bash root@web-0:/# hostname web-0 root@web-0:/# root@web-0:/# cat /etc/hosts # Kubernetes-managed hosts file. 127.0.0.1 localhost ::1 localhost ip6-localhost ip6-loopback fe00::0 ip6-localnet fe00::0 ip6-mcastprefix fe00::1 ip6-allnodes fe00::2 ip6-allrouters 10.244.1.192 web-0.web.default.svc.cluster.local web-0 root@web-0:/#
5)service提供的稳定网络ID的格式
ClusterIP ip地址 记录格式:
<service-name>.<namespace-name>.svc.cluster.local
示例: web2.default.svc.cluster.local
ClusterIP=None 记录格式:
<statefulsetName-index>.<service-name> .<namespace-name>.svc.cluster.local
示例: web-0.web.default.svc.cluster.local
稳定的存储

1) 用deploy创建三个pod运行web服务,三个web服务器共用一个PV, 使用动态PV来实现
-
- 因为动态pvc使用的是nfs的存储类型,所以这里配置storageclass之外,还要安装让nfs支持动态pvc的插件。所以这里用了三个文件分别是
class.yaml,deployment.yaml,rbac.yaml
[root@master storage]# kubectl apply -f class.yaml
storageclass.storage.k8s.io/managed-nfs-storage created
[root@master storage]# kubectl apply -f deployment.yaml
serviceaccount/nfs-client-provisioner created
deployment.apps/nfs-client-provisioner created
[root@master storage]# kubectl apply -f rbac.yaml
serviceaccount/nfs-client-provisioner unchanged
clusterrole.rbac.authorization.k8s.io/nfs-client-provisioner-runner created
clusterrolebinding.rbac.authorization.k8s.io/run-nfs-client-provisioner created
role.rbac.authorization.k8s.io/leader-locking-nfs-client-provisioner created
rolebinding.rbac.authorization.k8s.io/leader-locking-nfs-client-provisioner created
[root@master storage]#
-
- 用deploy的yaml文件生成三个pod,并用yam文件生成pvc,注意观察这两个文件的关联方法
[root@master storage]# cat  deploy-pvc.yaml
apiVersion: apps/v1
kind: Deployment
metadata:
  labels:
    app: web
  name: web
spec:
  name: web
spec:
  replicas: 3
  selector:
    matchLabels:
      app: web
  template:
    metadata:
      labels:
        app: web
    spec:
      containers:
      - image: nginx
        name: nginx
        volumeMounts:
        - name: data
          mountPath: /usr/share/nginx/html

      volumes:
      - name: data
        persistentVolumeClaim:
          claimName: my-pvc2
---
apiVersion: v1
kind: PersistentVolumeClaim
metadata:
  name: my-pvc2
spec:
  storageClassName: "managed-nfs-storage"     #这里的storageClassName的名字是上面class.yaml中SC的名字,用kubectl get sc查看
  accessModes:
    - ReadWriteMany
  resources:
    requests:
      storage: 9Gi
[root@master storage]#
[root@master storage]# kubectl apply -f deploy-pvc.yaml
deployment.apps/web created
persistentvolumeclaim/my-pvc2 created
[root@master storage]#
-
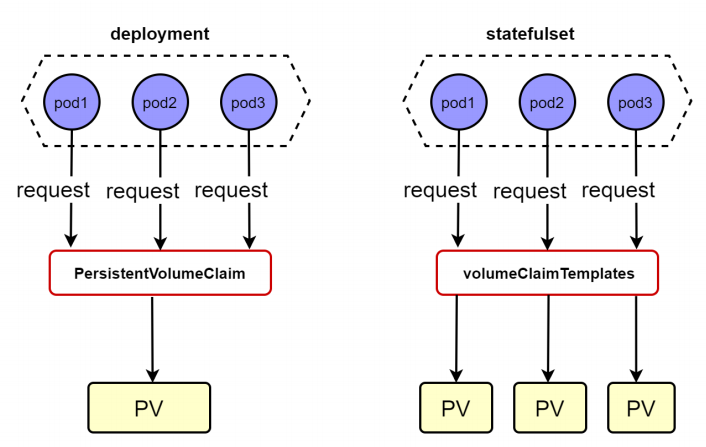
- 查看创建的资源,虽然deploy创建了三个pod,但他们共用一个pvc,共用一个pv
[root@master storage]# kubectl get pod
NAME                                      READY   STATUS    RESTARTS   AGE
nfs-client-provisioner-7676dc9cfc-c9z7s   1/1     Running   0          9m59s
web-748845d84d-mgwzc                      1/1     Running   0          81s
web-748845d84d-nskhl                      1/1     Running   0          81s
web-748845d84d-p6xg7                      1/1     Running   0          81s
[root@master storage]#
[root@master storage]# kubectl get pvc
NAME      STATUS   VOLUME                                     CAPACITY   ACCESS MODES   STORAGECLASS          AGE
my-pvc2   Bound    pvc-cae4b9e0-3c10-4e14-b435-835c2ceea446   9Gi        RWX            managed-nfs-storage   88s
[root@master storage]#
[root@master storage]# kubectl get pv
NAME                                     CAPACITY ACCESS MODES  RECLAIM POLICY  STATUS  CLAIM           STORAGECLASS         AGE
pvc-cae4b9e0-3c10-4e14-b435-835c2ceea446 9Gi      RWX           Delete          Bound   default/my-pvc2 managed-nfs-storage  103s
[root@master storage]#
2)用statefulset创建三个pod运行web服务,三个web服务器分别用自己独立的pv, 使用动态PV
-
- 注意deploy使用的是PVC,statefulset使用的是VCT,VCT是statefulset特有资源。在statefulset中不再需要volumes:字段
[root@master storage]# cat statefulset-vct.yaml
apiVersion: apps/v1
kind: StatefulSet
metadata:
  name: web
spec:
  selector:
    matchLabels:
      app: nginx
  serviceName: "headless-svc"
  replicas: 3
  template:
    metadata:
      labels:
        app: nginx
    spec:
      containers:
      - name: nginx
        image: nginx
        ports:
        - containerPort: 80
          name: web
        volumeMounts:
        - name: www                      #卷的name要与vct的name一致
          mountPath: /usr/share/nginx/html
  volumeClaimTemplates:
  - metadata:
      name: www
    spec:
      accessModes: [ "ReadWriteOnce" ]
      storageClassName: "managed-nfs-storage"
      resources:
        requests:
          storage: 2Gi
[root@master storage]#
[root@master storage]# kubectl apply -f statefulset-vct.yaml
statefulset.apps/web created
[root@master storage]#
-
- 查看创建的资源,有三个pod分别是web-0,web-1,web-2 有三个PVC和三个PV
[root@master storage]# kubectl get pod
NAME                                      READY   STATUS    RESTARTS   AGE
nfs-client-provisioner-7676dc9cfc-c9z7s   1/1     Running   0          36m
web-0                                     1/1     Running   0          4m43s
web-1                                     1/1     Running   0          4m15s
web-2                                     1/1     Running   0          3m57s
web-748845d84d-mgwzc                      1/1     Running   0          28m
web-748845d84d-nskhl                      1/1     Running   0          28m
web-748845d84d-p6xg7                      1/1     Running   0          28m
[root@master storage]#

[root@master storage]# kubectl get pvc
NAME        STATUS   VOLUME                                     CAPACITY   ACCESS MODES   STORAGECLASS          AGE
my-pvc2     Bound    pvc-cae4b9e0-3c10-4e14-b435-835c2ceea446   9Gi        RWX            managed-nfs-storage   29m
www-web-0   Bound    pvc-c826db3b-8314-44c4-aa73-1b981c036c9e   2Gi        RWO            managed-nfs-storage   6m15s
www-web-1   Bound    pvc-77d1d297-c463-40de-90f8-e5c44527f530   2Gi        RWO            managed-nfs-storage   5m47s
www-web-2   Bound    pvc-052d0234-b350-434a-a7c0-8eed56f5eb55   2Gi        RWO            managed-nfs-storage   5m29s
[root@master storage]#

[root@master storage]# kubectl get pv
NAME                                      CAPACITY ACCESS MODES  RECLAIM POLICY STATUS CLAIM             STORAGECLASS         AGE
pvc-052d0234-b350-434a-a7c0-8eed56f5eb55  2Gi      RWO           Delete         Bound  default/www-web-2 managed-nfs-storage  6m3s
pvc-77d1d297-c463-40de-90f8-e5c44527f530  2Gi      RWO           Delete         Bound  default/www-web-1 managed-nfs-storage  6m21s
pvc-c826db3b-8314-44c4-aa73-1b981c036c9e  2Gi      RWO           Delete         Bound  default/www-web-0 managed-nfs-storage  6m49s
pvc-cae4b9e0-3c10-4e14-b435-835c2ceea446  9Gi      RWX           Delete         Bound  default/my-pvc2   managed-nfs-storage  30m
[root@master storage]#
-
- 进入statefulset的不同pod写入不同数据,在nfs的物理目录中验证
[root@master storage]# kubectl exec -it web-0 -- bash
root@web-0:/# cd /usr/share/nginx/html/
root@web-0:/usr/share/nginx/html# echo hello 0 > index.html
root@web-0:/usr/share/nginx/html# ls
index.html
root@web-0:/usr/share/nginx/html# exit
exit
[root@master storage]# kubectl exec -it web-1 -- bash
root@web-1:/# cd /usr/share/nginx/html/
root@web-1:/usr/share/nginx/html# echo hello 1 > index.html
root@web-1:/usr/share/nginx/html# ls
index.html
root@web-1:/usr/share/nginx/html# exit
exit
[root@master storage]#

[root@node2 kubernetes]# pwd
/ifs/kubernetes
[root@node2 kubernetes]# ls
default-my-pvc2-pvc-cae4b9e0-3c10-4e14-b435-835c2ceea446    default-www-web-1-pvc-77d1d297-c463-40de-90f8-e5c44527f530
default-www-web-0-pvc-c826db3b-8314-44c4-aa73-1b981c036c9e  default-www-web-2-pvc-052d0234-b350-434a-a7c0-8eed56f5eb55
[root@node2 kubernetes]# cat default-www-web-0-pvc-c826db3b-8314-44c4-aa73-1b981c036c9e/index.html
hello 0
[root@node2 kubernetes]# cat default-www-web-1-pvc-77d1d297-c463-40de-90f8-e5c44527f530/index.html
hello 1
[root@node2 kubernetes]#


