Git
版本控制 Git
为什么使用Git:
world,脚本,PPT,程序代码 反复修改时需要回退和统计,需要用版本控制软件。
使用ftp的缺点:
上传相同文件名时,原文件会被覆盖
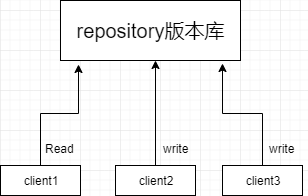
版本库是版本控制的核心,这个库可以被任意数量的用户同时访问,适合整个团队协同完成现一个项目

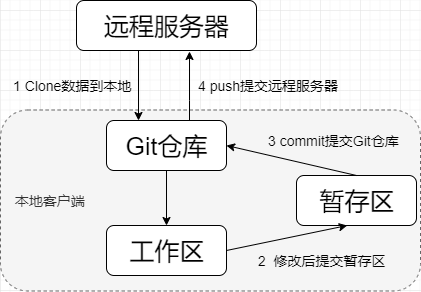
Git的流程图:

客户端的 工作区:/root/project/
工作区只保留最新版本,在客户端上clone之后这个目录会自动生成。
客户端的 本地仓库:/root/project/.git
保存历史版本,在客户端上clone之后这个目录会自动生成。
客户端的 暂存区/root/project/.git/HEAD
保存被修改文件的索引 。git服务无法直接识别用户具体修改了哪个文件,用户通过add指令把已修改
文件的文件名提交到暂存区,再执行commint指令告诉git服务暂存区记录的文件名是修改过的文件。
Git功能介绍:
1) 部署Git服务器
YUM安装Git软件。
[root@web1 ~]# yum -y install git           #默认已安装
[root@web1 ~]# git --version
git version 1.8.3.1

[root@web1 ~]# mkdir /var/git               #建目录,为仓库做准备,目录可以任意
[root@web1 ~]# git init /var/git/project --bare
                                            #建一个空仓库,bare是祼的意思
[root@web1 ~]# ls /var/git
project                                     #服务器端的源仓库,相当于共享文件夹
[root@web1 ~]#                              #git服务是不需要启动的,它后台用的是ssh服务,默认ssh已开启
[root@web1 project]# ls
branches  config  description  HEAD  hooks  info  objects  refs
2) clone克隆服务器仓库到本地
[root@web2 ~]# rpm -q git                   #确认clinet上也安装git

[root@web2 ~]# git clone root@192.168.2.100:/var/git/project
正克隆到 'project'...                        #客户端以root从192.168.2.100克隆/var/git/project这个仓库
Warning: Permanently added '192.168.2.100' (ECDSA) to the list of known hosts.
root@192.168.2.100's password:             #git服务器端的密码
warning: 您似乎克隆了一个空版本库。             #克隆成功后,客户端会产生工作区/root/project

[root@web2 ~]# ls
Desktop   project                          #web2的家目录下会产生project
[root@web2 project]# pwd
/root/project                              #客户端上的工作区,只存放最新版本
[root@web2 project]# ls -a
.  ..  .git                                #工作区中执行commit,会把前版本备份到本地仓库./.git
[root@web2 ~]# cd /root/project/.git/
[root@web2 .git]# pwd
/root/project/.git                         #客户端上的本地仓库,保存了所有历史版本
[root@web2 .git]# ls                       #这个目录下的内容是和git服务器上源仓库中的文件一样的
branches  description  hooks  info  objects      refs
config    HEAD         index  logs  packed-refs
[root@web2 .git]#
[root@web2 .git]# cat /root/project/.git/HEAD
                                           #客户端上的暂存区
3) 修改git客户端配置
                                           #暂存区通过commit提交到本地仓库时,会让提交数据的用户
                                           #出示身份。这里需要提前做身份验证
[root@web2 project]# git config --global user.email "you@example.com"
[root@web2 project]# git config --global user.name "Your Name"
[root@web2 project]# cat  ~/.gitconfig     #存放身份的文件
[user]
    email = you@example.com
    name = Your Name

3) 本地工作区对数据进行增删改查
                                           #执行操作之前一定要进入本地仓库/root/project/
[root@web2 project]# echo "init date" > init.txt
                                           #在工作区新增一文件新增一文件
[root@web2 project]# mkdir demo
[root@web2 project]# cp /etc/hosts demo    #在工作区新增一文件夹并放入数据
4) 查看本地仓库中数据的状态
[root@web2 project]# git status
# 位于分支 master
#
# 初始提交
#
# 未跟踪的文件:                             #因为没有索引,所以这里会显示未跟踪的文件demo,init.txt
#   (使用 "git add <file>..." 以包含要提交的内容)
                                          #这个方式一次只能提交一个文件,如果要提交
                                          #全部文件用 git add .  “.”代表当前目录
#
#    demo/                                 #罗列出来的未跟踪文件
#    init.txt
提交为空,但是存在尚未跟踪的文件(使用 "git add" 建立跟踪)
5) 提交到暂存区
[root@web2 project]# git add .            #将工作区的所有文件全部提交到暂存区,暂存区并
                                          #不实际存储文件,仅是对修改过的文件做个标识
6) 将暂存区修改提交到本地仓库
[root@web2 project]# du -sh .git/         #提交前先查看下本地仓库的文件夹大小
68K    .git/
[root@web2 project]#
[root@web2 project]# git commit -m "first version"
[master(根提交) 3e8bb1a] first version  #注释,这里通常写为什么要修改代码,为何要提交代码
 2 files changed, 3 insertions(+)         #执行这个commit之前,需要身份验证
 create mode 100644 demo/hosts            #demo/hosts文件提交本地仓库成功
 create mode 100644 init.txt              #./init.txt文件提交本地仓库成功
[root@web2 project]# du -sh .git/         #文件提交本地仓库后查看文件夹大小
96K    .git/                                 #注意:commit操作相当于把工作区的文件备份到了本
[root@web2 project]#                      #地仓库,本仓库是以数据库的形式存放的文件,无法
                                          #通过ls查看,只能通过比较文件大小的方式判断
[root@web2 project]# git status
# 位于分支 master
无文件要提交,干净的工作区
[root@web2 project]#
7)本地仓库提交到远程仓库
[root@web2 project]# git config --global push.default simple
                                         #在第一次执行git push提交远程仓库之前需要确认
                                         #一下,以什么试提交代码,这里用的是simple模式

[root@web2 project]# git push            #把文件提交到服务器,(web2将数据推送到web1)
root@192.168.2.100's password:           #输入web1主机的密码123456
Counting objects: 5, done.
Delta compression using up to 2 threads.
Compressing objects: 100% (3/3), done.
Writing objects: 100% (5/5), 358 bytes | 0 bytes/s, done.
Total 5 (delta 0), reused 0 (delta 0)
To root@192.168.2.100:/var/git/project
 * [new branch]      master -> master
[root@web2 project]#
8) 将服务器上的数据更新到本地
[root@web3 project]# git pull #web1的数据更新到web3
9) 查看已修改过文件的版本日志
[root@web2 project]# git log
commit 3e8bb1a36e118f201ddfe6a0f01d02f6f71046c7
                                        #文件版本,当前只有一个版本,每执行一次commit就会多一个版本日志
Author: Your Name <you@example.com>     #谁提交的这个版本
Date:   Sat Jan 4 17:38:33 2020 +0800   #提交的日期

    first version                       #为什么提交这个版本,提交的原因
[root@web2 project]#


[root@web2 project]# git log --pretty=oneline
                                        #查看版本日志的简洁模式
3e8bb1a36e118f201ddfe6a0f01d02f6f71046c7 first version


[root@web2 project]# git log --oneline
3e8bb1a first version                   #查看版本日志的最简洁模式
[root@web2 project]#

[root@web2 project]# git reflog         #简洁日志信息,当需要恢复版本时一定会需要先查看日志
3e8bb1a HEAD@{0}: commit (initial): first version
[root@web2 project]#
HEAD指针操作
HEAD指针是一个可以在任何分支和版本移动的指针,通过移动指针我们可以将数据还
原至任何版本。每做一次提交操作都会导致git更新一个版本,HEAD指针也跟着自动移动。
1) 对工作区中文件多少修改,并提交使之产生多个版本
新建文件new.txt,然后多次在原文件中追加内容每修改一次就提交一次本地仓库,最后上传服务器
[root@web2 project]# echo "new file" > new.txt
[root@web2 project]# git add .
[root@web2 project]# git commit -m "add new.txt"
[root@web2 project]#
[root@web2 project]# echo "first" >> new.txt
[root@web2 project]# git add .
[root@web2 project]# git commit -m "new.txt:first line"
[root@web2 project]#
[root@web2 project]# echo "second" >> new.txt
[root@web2 project]# git add .
[root@web2 project]# git commit -m "new.txt:second"
[root@web2 project]#
[root@web2 project]# echo "third" >> new.txt
[root@web2 project]# git add .
[root@web2 project]# git commit -m "new.txt:third"
[root@web2 project]#
[root@web2 project]# git push
                                     #新建一个文件num.txt,对文件内容进行两个重写覆盖,每重写一次提交一个本地仓库,最后上传
                                     #服务器
[root@web2 project]#
[root@web2 project]# echo "123" > num.txt
[root@web2 project]# git add .
[root@web2 project]# git commit -m "num.txt:123"
[root@web2 project]#
[root@web2 project]# echo "456" > num.txt
[root@web2 project]# git add .
[root@web2 project]# git commit -m "num.txt:456"
[root@web2 project]#
[root@web2 project]# echo "789" > num.txt
[root@web2 project]# git add .
[root@web2 project]# git commit -m "num.txt:789"
[root@web2 project]#
[root@web2 project]# git push
2)查看Git版本信息
如果要恢复数据需要先查看日志,在日志信息可以看到所有修改过的文件的版本
[root@web2 project]# git reflog
a3b9645 HEAD@{0}: commit: num.txt:789
75e05d2 HEAD@{1}: commit: num.txt:456
f925288 HEAD@{2}: commit: num.txt:123
d28d549 HEAD@{3}: commit: new.txt:third
32e11fa HEAD@{4}: commit: new.txt:second
17cfdbb HEAD@{5}: commit: new.txt:first line
ec5dbdc HEAD@{6}: commit: add new.txt
3e8bb1a HEAD@{7}: commit (initial): first version
[root@web2 project]#

[root@web2 project]# git log --oneline
a3b9645 num.txt:789                    #查看版本日志的最简洁模式
75e05d2 num.txt:456
f925288 num.txt:123
d28d549 new.txt:third
32e11fa new.txt:second
17cfdbb new.txt:first line
ec5dbdc add new.txt
3e8bb1a first version
[root@web2 project]#
3)HEAD指针
默认情况下head指针是指向当前正在使用的版本,通过移动指令可以把将数据还原到任意版本
[root@web2 project]# git reflog
a3b9645 HEAD@{0}: commit: num.txt:789
                                   #<----当前指针在这里,当前HEAD指针为HEAD@{0}
75e05d2 HEAD@{1}: commit: num.txt:456
f925288 HEAD@{2}: commit: num.txt:123
d28d549 HEAD@{3}: commit: new.txt:third
32e11fa HEAD@{4}: commit: new.txt:second
17cfdbb HEAD@{5}: commit: new.txt:first line
ec5dbdc HEAD@{6}: commit: add new.txt
3e8bb1a HEAD@{7}: commit (initial): first version
[root@web2 project]#

                                   #如果需要把num.txt文件恢复到内容是123的时候
                                   #那么把指令移动到f925288
[root@web2 project]# git reset --hard f925288
HEAD 现在位于 f925288 num.txt:123
[root@web2 project]# cat num.txt   #查看内容已恢复为123
123
[root@web2 project]# git reflog
f925288 HEAD@{0}: reset: moving to f925288
                                   #指针 HEAD@{0}:已指向 f925288
a3b9645 HEAD@{1}: commit: num.txt:789
75e05d2 HEAD@{2}: commit: num.txt:456
f925288 HEAD@{3}: commit: num.txt:123
d28d549 HEAD@{4}: commit: new.txt:third
32e11fa HEAD@{5}: commit: new.txt:second
17cfdbb HEAD@{6}: commit: new.txt:first line
ec5dbdc HEAD@{7}: commit: add new.txt
3e8bb1a HEAD@{8}: commit (initial): first version
[root@web2 project]#
                                   #把文件恢复到first line
[root@web2 project]# git reset --hard 17cfdbb
HEAD 现在位于 17cfdbb new.txt:first line
[root@web2 project]#               #把文件恢复到first version
[root@web2 project]# git reset --hard 3e8bb1a
HEAD 现在位于 3e8bb1a first version
[root@web2 project]#               #把文件恢复到789
[root@web2 project]# git reset --hard a3b9645
HEAD 现在位于 a3b9645 num.txt:789
[root@web2 project]# ls
demo  init.txt  new.txt  num.txt   #所有文件全部被恢复
[root@web2 project]#
[root@web2 project]# git reflog    #再次查看版本信息,原来的指针移动记录会被保存
a3b9645 HEAD@{0}: reset: moving to a3b9645
3e8bb1a HEAD@{1}: reset: moving to 3e8bb1a
17cfdbb HEAD@{2}: reset: moving to 17cfdbb
f925288 HEAD@{3}: reset: moving to f925288
a3b9645 HEAD@{4}: commit: num.txt:789
75e05d2 HEAD@{5}: commit: num.txt:456
f925288 HEAD@{6}: commit: num.txt:123
d28d549 HEAD@{7}: commit: new.txt:third
32e11fa HEAD@{8}: commit: new.txt:second
17cfdbb HEAD@{9}: commit: new.txt:first line
ec5dbdc HEAD@{10}: commit: add new.txt
3e8bb1a HEAD@{11}: commit (initial): first version
[root@web2 project]#
Git分支
Git支持按功能模块、时间、版本等标准创建分支,分支可以让开发分多条主线同时进行,每条主线互不影响
1)查看当前分支
[root@web2 project]# git status   #git默认只有一个master分枝
# 位于分支 master
无文件要提交,干净的工作区
[root@web2 project]#
                                  #查看当前所有分枝,*表示当前所在分枝
[root@web2 project]# git branch -v
* master a3b9645 num.txt:789
[root@web2 project]#
2)创建分支
[root@web2 project]# git branch hotfix
[root@web2 project]# git branch feature
[root@web2 project]# git branch -v
                                  #创建hostfix.feature这两个分支之后,此时加上master这三个分支中版本的内容是一样的。
                                  #三个分支可以在相同的基础上进行不同功能的开发
  feature a3b9645 num.txt:789
  hotfix  a3b9645 num.txt:789
* master  a3b9645 num.txt:789
[root@web2 project]#
3)切换分支
[root@web2 project]# git checkout hotfix
切换到分支到'hotfix'                #把当前分枝切换到hotfix
[root@web2 project]# git branch -v
  feature bcf6ba8 num.txt:789
* hotfix  bcf6ba8 num.txt:789     #切换成功
  master  bcf6ba8 num.txt:789
[root@web2 project]#              #当前的hotfix分枝有mster分枝的所有内容,因为它是
[root@web2 project]# ls           #复制过来的
demo  init.txt  new.txt  new.txxt  num.txt
4 )在新的分支上可以继续进行数据操作(增、删、改、查)
                                  #在hotfix分支下对文件做修改
[root@web2 project]# echo "fix a bug" >>new.txt
[root@web2 project]# git add .    #修改new.txt文件内容并提交本地版本库
[root@web2 project]# git commit -m "fix a bug"
[hotfix 3ae2a7e] fix a bug
 1 file changed, 1 insertion(+)
[root@web2 project]#
[root@web2 project]# cat new.txt  #确认hostfix分枝上的文件已修改
new file                          #此时master分枝上并没有被修改
first
second
third
fix a bug
[root@web2 project]#

                                  #切回到master分枝,验证new.txt文件内容
[root@web2 project]# git checkout  master
切换到分支 'master'
[root@web2 project]# ls
demo  init.txt  new.txt  new.txxt  num.txt
[root@web2 project]# cat new.txt
new file
first
second                            #new.txt文件内容没有fix a bug
[root@web2 project]#
5)将hotfix修改的数据合并到master分支
                                 #把当前分枝合并到目的分时,要先切把目的分枝
[root@web2 project]# git merge hotfix
更新 a3b9645..33ae0bb
Fast-forward
 new.txt | 1 +
 1 file changed, 1 insertion(+)
[root@web2 project]#
[root@web2 project]# cat new.txt
new file
first
second
fix a bug                          #mster分枝的内容已量新
[root@web2 project]#
6)将所有本地修改提交远程服务器
[root@web2 project]# git push
root@192.168.2.100's password:
Counting objects: 5, done.
Delta compression using up to 2 threads.
Compressing objects: 100% (2/2), done.
Writing objects: 100% (3/3), 283 bytes | 0 bytes/s, done.
Total 3 (delta 1), reused 0 (delta 0)
To root@192.168.2.100:/var/git/project
   a3b9645..33ae0bb  master -> master
[root@web2 project]#
版本分支的冲突
两个分枝在对同一个文件修改时,对相同文件的同一行修改的内容不一样,在合并分枝时就会发生冲突
1) 在hotfix和master分支中修改同一文件a.txt
[root@web2 project]# git checkout hotfix
切换到分支 'hotfix'               #在hotfix分枝上创建a.txt内容为AAA
[root@web2 project]#
[root@web2 project]# echo "AAA" > a.txt
[root@web2 project]# git add .
[root@web2 project]# git commit -m "AAA"
[hotfix 1eedfbb] AAA
 1 file changed, 1 insertion(+)
 create mode 100644 a.txt
[root@web2 project]#

[root@web2 project]# git checkout master
切换到分支 'master'                #在master分枝上创建a.txt内容为BBB
[root@web2 project]# echo "BBB" > a.txt
[root@web2 project]# git add .
[root@web2 project]# git commit -m "BBB"
[master 0420600] BBB
 1 file changed, 1 insertion(+)
 create mode 100644 a.txt
[root@web2 project]#

[root@web2 project]# git merge hotfix
自动合并 a.txt                    #这时把hotfix合并到master时会提示分支冲突
冲突(添加/添加):合并冲突于 a.txt
自动合并失败,修正冲突然后提交修正的结果。
[root@web2 project]#
2) 手动解决冲突
[root@web2 project]# cat a.txt
<<<<<<< HEAD
BBB
=======
AAA
>>>>>>> hotfix
[root@web2 project]#
[root@web2 project]# vim a.txt    #打开有冲突的文件,修改为想要留下的数据,保存退出
BBB
[root@web2 project]# git add .
[root@web2 project]# git  commit -m "resolved"
[master 69bbbd2] resolved
[root@web2 project]#


