knative之serving
knative
基于k8s云原生平台,用于管理现代serverless工作负载,是serverless平台,非serverless的实现(非开发框架),用户可在knative和K8s上,借助三方项目自行构建faas系统,如kyma project
类似k8s与容器的关系,knative仅对severless应用进行编排。本身是对k8s做的额外扩展,允许k8s实现更丰富的功能
专注于云原生中绑定内容,serverless,同时兼顾服务编排和事件驱动的绑定需求。redhat、谷歌、IBM等开源社区维护
适用于:无状态、容器化的服务,仅支持http、grpc
组件:
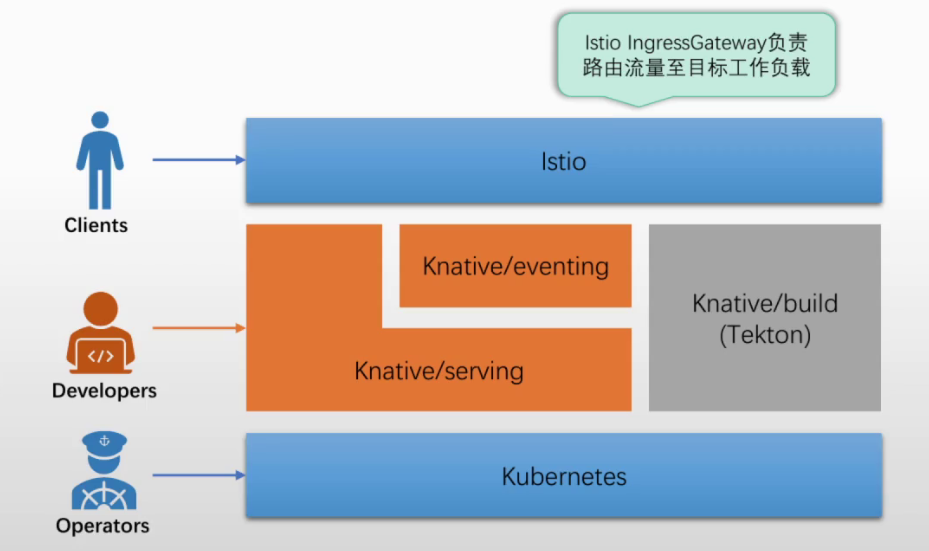
serving
serving控制器、自定义api资源,自动化完成服务的部署、扩缩容
- 部署、管理、扩展无状态应用
- 支持由请求驱动的计算
- 支持缩容到0
eventing
标准化事件驱动基础设施
- 以声明的方式创建对事件源的订阅,并将事件路由到目标端点
- 事件订阅、传递和处理
- 基于发布者、订阅者模型连接knative的工作负载
build
- 从源代码构建出应用镜像
- 已经由独立的tekton项目取代
serving
属于baas层面,提供自动扩缩容部分
功能
- 使用ksvc替代deployment控制器,负责编排运行http无状态应用,创建时自动管理deployment、svc
- 提供额外的功能特性,如service相当于k8s中svc+deploy的功能
- 支持单个请求进行负载均衡
- 基于请求的快速、自动化扩缩容
- 通过pod扩展时缓冲请求来削峰填谷
- 流量切分
安装后运行pod说明
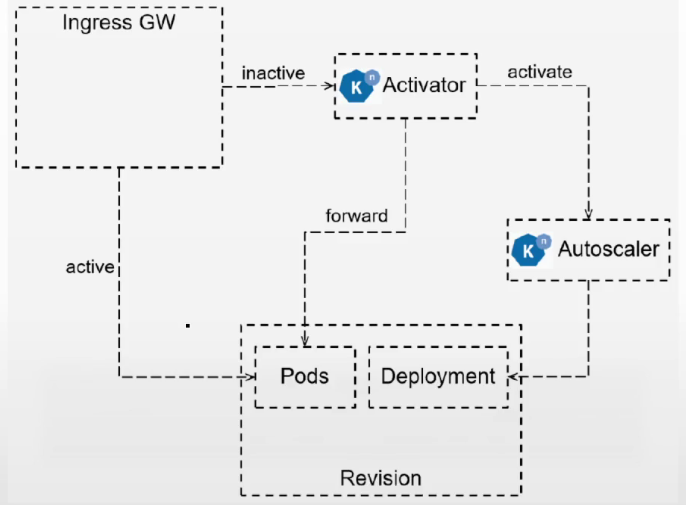
- avtivator:revision中pod数量收缩到0时,activator负责接收缓存相关请求,同时报告指标给autosacler,并在autoscaler在revision上扩展出必要的pod后,再将请求路由到响应的revision
- autoscaler:knative通过注入1个成为queue-proxy容器的sidecar代理来了解它部署的pod上的请求,而autoscaler会为每个服务使用每秒请求数来自动缩放其revision上的pod
- controller:负责监视serving资源(kservice、configuration、route、revision)相关的api对象并管理他的生命周期,是serving声明式api的关键保障
- webhook:为k8s提供外置的准入控制器,间距验证和鉴权功能,主要作用于serving专有的几个api资源上,以及相关的cm资源
- domain-mapping:将制定的域名映射到service、kservice,甚至是knatice route上,从而使用自定义域名访问服务,部署
Magic DNS时才有 - domainmapping-webhook:domain-mapping专用的准入控制器,部署
Magic DNS时才有 - net-certmanager-controller:证书管理协同时使用的专用控制器,部署证书管理应用时才有
- net-istio-controller:istio协同使用使用的专用控制器

CRD资源
主要关注serving.knative.dev组
serving.knative.dev群组
- Service
- Configuration
- Revision
- Route
- DomainMapping
autoscaling.internal.knative.dev群组
- Metric
- PodAutoscaler
networking.internal.knative.dev群组
- ServerlessService
- ClusterDomainClaim
- Certificate
主要关注crd:
-
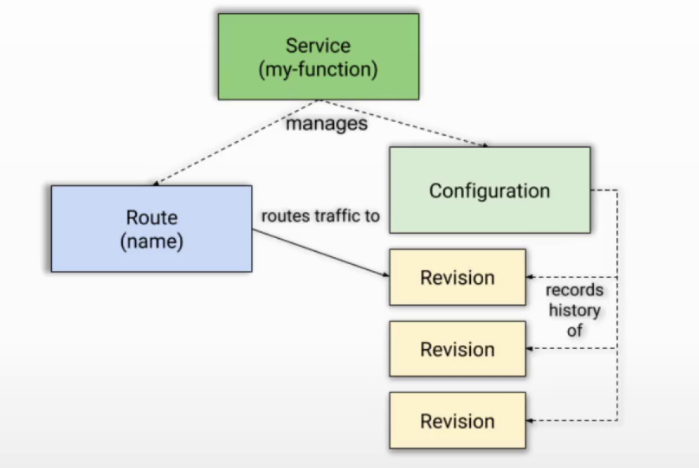
service
- 简写ksvc
- 对自动编排serverless类型应用的功能的抽象,负责自动管理工作负载的真个生命周期
- 自动控制下面3个类型的资源对象的管理
- 主要配置字段为:template(创建和更新configuration,也就是revision)、traffic(创建和更新route)
-
configuration
- 反映service当前期望状态的配置(spec)
- service对象时,configuration也更新
-
revision
- service的每次代码或配置的变更都生成1个revision,类似版本变记录
- 快照型数据,不可变
- 可用于流量切分,金丝雀、蓝绿
- 版本回滚比k8s自带的更加好用
- kubectl get ksvc -o json |jq .items[0].status|grep -i lat
-
route
- 将请求流量路由到目标revision,默认到最新版本revision
- 支持将流量按比例切分并路由到多个revision
对应关系:
当创建ksvc时,service会自动创建:
- 一个configuration对象,它会创建一个revision,并由该revision自动创建2个对象:
- 1个deoloyment对象
- 1个podAutoscaler对象(使用KPA)
- 一个route对象,它会创建:
- 1个k8s的svc对象
- 1组istio的vs对象,包括:ksvc名称-ingress、ksvc名称-mesh
- 启用网格功能时,通过vs路由
- 未启用网格功能时,流量转给knative-local-gateway.istio-system.svc
- 如果网络层不是istio,则是其他的

工作模式
实线框:knative组件,虚线框:crd资源,很淡的虚线框:内部资源,三种颜色对应各自组件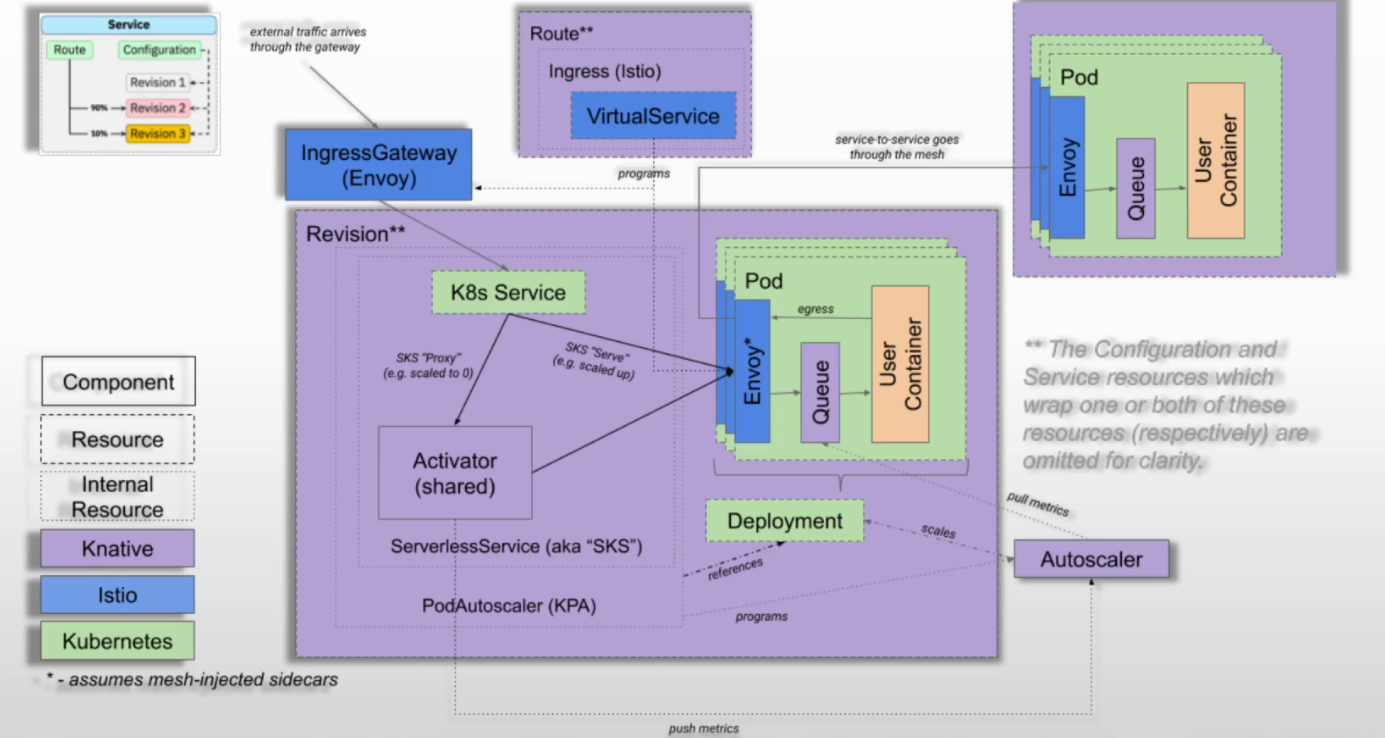
注:ksvc的流量转发依赖route(对应istio的vs)
集群外流量
注:ksvc外部名称需要在外部dns上做名称解析(名称较多时可用泛域名)
- 通过ksvc的外部名(ksvc名.ns名.域名,dm资源映射)将流量转给istio-ingress-gw使用externalIP的外部地址,流量进入k8s集群
- 再通过svc的标签选择器,选中后端pod
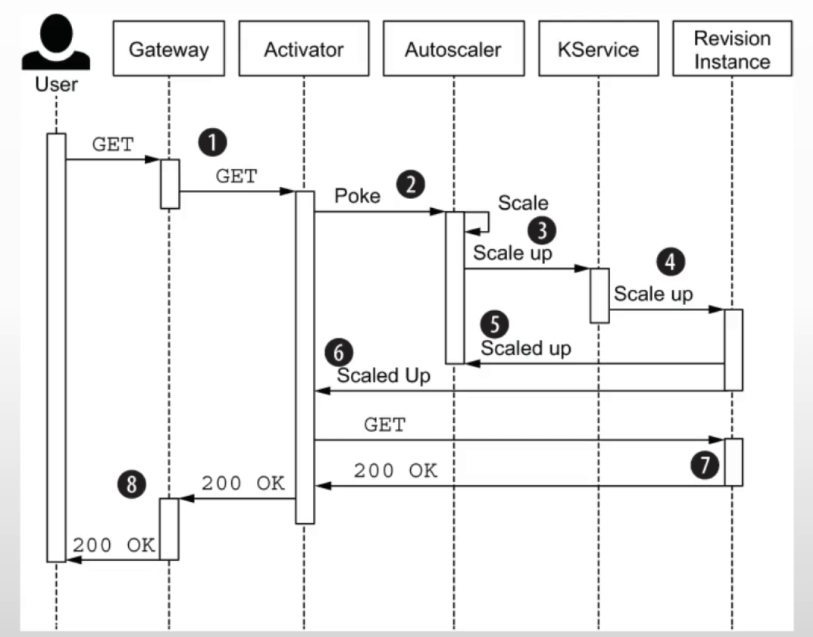
- 如果没有后端pod在运行(副本数为0),则实际后端为acticator的ip地址,但acticator本身不提供服务,只是缓存用户请求,将当前请求的并发量发送给autoscaler
- autoscaler会通知KPA(knative组件),KPA根据提前预定义的每个pod最大接收并发量,来计算一下当前请求并发量需要启动多少个pod,再使用deploy控制器控制副本数
- pod启动完成后,acticator的地址就变为真实pod地址
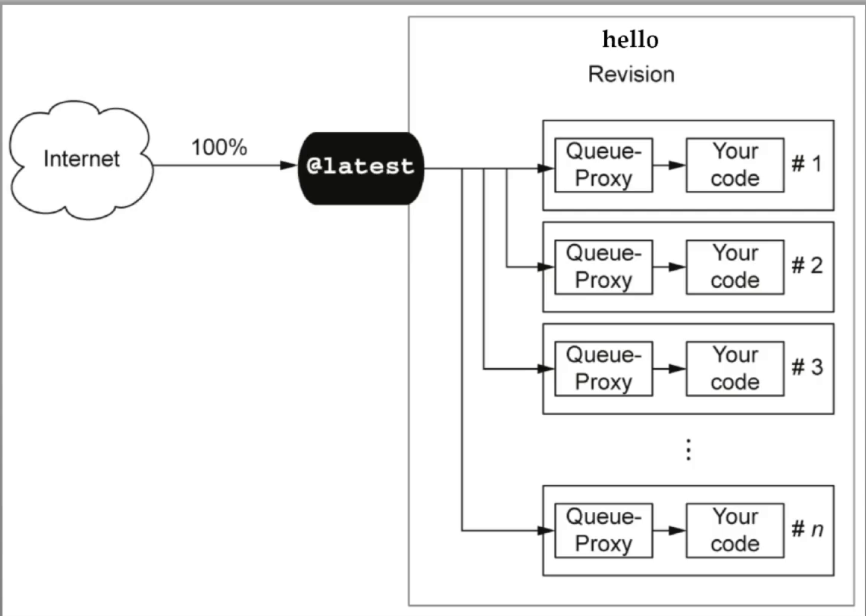
- 最后请求到达pod中istio-proxy容器(根据istio注入产生),再经过queue-proxy容器(根据knative注入产生),最后到达业务容器。出站则直接出去,或经过istio-proxy容器代理出去,或egress出去(istio可选部署内容)
- autoscaler默认每2秒1次,采集单个pod中queue-proxy的请求并发量,后续根据实际情况来扩缩容,直到最后重新为0
集群内流量
knative自身有1个knative-local-gw(在istio-system命名空间),当没有使用网格时,集群中pod1到pod2的流量都经过他,其他流程与上面相同
- 未启用mesh时:通过ksvc内部名称(ksvc名.ns名.域名)转发到knative-local-gw
- 启用mesh时:流量由mesh根据流量策略转发,无需进过knative-local-gw
注入容器
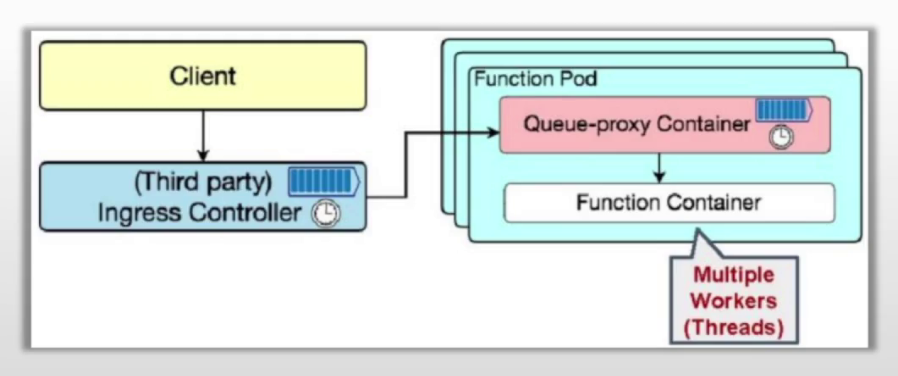
knative serving为每个pod注入1个queue-proxy容器
queue-proxy
端口
- 8012:http
- 8013:http2,代理grpc
- 8022:管理端口,健康状态等
- 9090:指标暴露端口,提供给autoscaler,与扩缩容相关
- 9091:指标暴露端口,提供给普罗米修斯,与监控相关
作用
- 为业务代码提供代理功能,流量从ingress-gw进入pod后交给queue-proxy容器中监听的8012端口,再转发给业务容器
- 报告实例中相关客户端请求的指标给autoscaler
- pod健康状态检测(k8s探针)
- 为超出实例最大并发量的请求提供缓冲队列
自动缩放
依赖AutoScaler完成自动缩放,简称为KPA,还支持使用k8s的HPA完成deployment控制器缩放(使用hpa时,就不能缩容到0)
自动缩放需要考虑的问题:
- 不能因为服务缩容到0后,用户请求时返回错误
- 请求不能导致应用过载
- 系统不能导致无用的资源浪费
扩缩容的依赖条件
请求驱动计算:
- 需要为pod实例配置支持的目标并发数(指定时间内可同时处理的请求数)
- 应用实例支持的缩放边界(最小与最大,0就是无)
机制:
请求驱动计算是serverless的核心特性,knative中,由AutoScaler、Activator、Queue-proxy三者协同管理应用规模、流量规模
- 从0开始扩容(revision实例为0):当初次请求时,由ingress-gw转给activator进行缓存,同时报告数据给autosacler(kpa),由kpa控制deploy控制器完成pod扩容,pod准备好后,activator将缓存的请求转发给相应的pod对象,之后只要还有ready状态的pod,ingress-gw把流量直接转给pod,不会再交给activator
- 按需扩容:autoscaler根据revision中各实例的queue-proxy报告指标数据,调整revision的数量
- 缩容至0(有revision但无请求):autoscaler在queue-proxy持续一段时间报告指标为0之后,将pod减到0,新请求来时从Ingress-gw转到activator
图解:零实例时
图解:非零实例时
缩放窗口和恐慌
负载变动频繁时,knative会因此而频繁创建或销毁pod,为了避免这种抖动情况,autoscaler支持2种扩缩容模式:
- stable稳定版:根据稳定窗口期(默认60s)的平均请求数,和每个pod的目标并发数计算pod数
- panic恐慌版:短期内收到大量请求时,将启用恐慌模式,直到60s后,重新返回稳定模式。恐慌触发条件:
期望pod数 / 现有pod数 >= 2十分之一窗口期(6s)的平均并发数 >= 2 * 单实例的目标并发数
排队算法基础:
排队系统3要素:
- 输入过程:请求者到来的方式
- 定长输入:匀速到达
- 随机(存在峰值):通常符合某种分布模型,如k阶erlang分布等
- 排队规则:排队的方式,如何接受接受服务
- 损失制:请求者到达时,所有服务均被占用,则请求自动消失
- 等待制:请求者到达时,所有服务均被占用,则请求排队
- 混合制:一起使用,等候区满载时,请求自动消失,否则有空余空间就进入等待区
- 服务机构:服务提供者
- 服务器数量
- 服务器之间的串并联结构
- 服务于每个请求所需要的时长,通常满足某种分布特征
排队系统的数量指标:
- 等待队长:排队等待的请求数
- 等待时长:请求处于排队等待状态的时长
- 服务时长:请求在接收服务过程中经历的时长
- 逗留时长:等待时间+服务时间
- 并发度:处于等待或接收服务状态的请求数
- 到达率:单位时间内到达的请求数
- 服务率:单位时间内可服务的请求数
- 利用率:服务器处于繁忙状态的时间比例
计算公式:
平均并发度 = 平均到达率 * 平均服务时长利用率 = 到达率 / 服务率
KPA计算Pod数的方式
指标收集周期与决策周期:
- autoscaler每2s计算一次revision上所需要的pod实例数量
- autoscaler每2s从revision的queue-proxy容器抓取一次指标数据,并将每秒平均值存储在单独的bucket(时间序列数据)中
- 实例较少时,从每个实例抓取指标
- 实例较多时,从实例的1个子集上抓取指标,所以计算的pod数就不是很精准了
决策过程:
autoscaler在revision中检索就绪状态的pod实例数量,如果为0,则设为1(使用activator作为实例)
autoscaler检查累积收集的可用指标,不存在任何可用指标时,将所需pod数设为0;存在累积指标时,计算窗口期内的平均并发请求数,根据结算结果和每个配置的实例的并发数,算出需要的pod数
公式:
窗口期内每实例的并发请求数 = bucket中样本值之和 / bucket数量
每实例的目标并发请求数 = 单实例目标并发数 * 服务利用率
期望pod数 = 窗口期内每实例的并发请求数 / 每实例目标并发请求数
配置autoscaler
参考下面的单独配置段中:podautoscalers资源
配置
注:当使用kn命令行出现提示:api版本即将弃用,需要更新时,可能真的需要更新,会有些功能已经被弃用了,导致识别不了,博主在k8s: 1.28.1种使用knative:1.11.2时,域名映射不能识别,查看net-istio控制器的日志显示错误,更新到knavive:1.12.3后,域名映射识别正常,但由于未过多测试,猜测也可能只需要更新kn命令行工具

Service资源
简写ksvc
命令
使用命令行工具kn,可以直接运行
关于kn命令,单独写命令行用法
#创建
kn service apply demoapp --image ikubernetes/demoapp:v1.0 -e VS=v1

#查看
kn service ls
kn service describe demoapp
kn revision ls

#更新
kn service update demoapp -e VS=v2 --scale-max 10

#删除
kn service delete demoapp
语法
apiVersion: serving.knative.dev/v1
kind: Service
metadata:
  name: hello
spec:
  template:   #configuraton对象,创建1个revision,并由revision自动创建1个deoloy控制器和1个PodAutoscaler资源。任何更新都创建新的revision
    metadata:
      name: hello-world       #revision的名称,一旦命名,则必须遵循ksvc名-revision名
      namespace: str
      annotations: {}
      labels: {}
      finalizers: []
    spec:           #pod资源,本质上revision是用deploy控制器,参考deploy资源
      affinity: {obj}
      automountServiceAccountToken: boolean
      containerConcurrency: 0     #配置pod的最大并发连接数,默认0为不限制,系统自动根据情况扩缩容。用于配置扩缩容的请求依据,是否需要扩缩容
      enableServiceLinks: boolean   #是否应该显示服务的信息,注入到pod的环境变量中,匹配Docker的语法链接。Knative默认为false
      responseStartTimeoutSeconds: int    #服务启动后等待第一个响应的超时时间,以秒为单位
      runtimeClassName: str     #指定服务的运行时类别,它决定了服务将在哪种运行时环境中执行
      containers:
      - image: ikubernetes/helloworld-go
        ports:
        - containerPort: 8080
        env:
        - name: TARGET
          value: "World"
        volumeMounts:		#重要说明,容器内挂载路径不能是:/、/dev、/dev/log、/tmp、/var、/var/log,源码中将这几个路径设为保留路径,以源码为准(1.12.3不可以):https://github.com/knative/serving/blob/main/pkg/apis/serving/k8s_validation.go
        - name: xx
          mountPath: 路径
        ...
  traffic:      #创建和更新route对象,自动创建svc、vs资源
  - configurationName: str      #流量的目标配置,实际接收流量的是对应的最新版revision
    latestRevision: boolean     #显示指定最新版revision,与revisionName互斥
    revisionName: str       #路由的目标revision
    percent: int            #流量比例
    tag: str                #自定义标签,哪怕流量比率为0也可使用此标签访问(vs中看详情),打了tag后,多了vs名称:tag名-原名称
    url: str                #显示的url,仅显示用
configurationName流量迁移问题
当新的revision就绪后,configuration的所有流量都会立即转到最新revision,这可能导致queue-proxy或acticator的请求队列过长,以至于部分请求可能被拒绝
解决方法
- 在ksvc或route中使用注解:
serving.knative.dev/rollout-duration: "时间"来指定流量迁移的时间 - 新的revision上线后,只会从configuration迁移1%流量,后续再继续迁移
示例
例1:创建示例ksvc
apiVersion: serving.knative.dev/v1
kind: Service
metadata:
  name: hello
spec:
  template:
    metadata:
      name: hello-world
    spec:
      containers:
      - image: ikubernetes/helloworld-go
        ports:
        - containerPort: 8080
        env:
        - name: TARGET
          value: "World"
svc中,名称是总流量入口,template模板名称是集群外访问入口,带private的是集群内访问入口
自动床架的kservice
自动创建的configurations

自动创建的revisions


自动创建的deploymen控制器

自动创建的podautoscalers

自动创建的vs,对应集群外与集群内

例2:限制pod最大并发,并更新容器版本
apiVersion: serving.knative.dev/v1
kind: Service
metadata:
  name: hello
spec:
  template:
    metadata:
      name: hello-world-002
    spec:
      containerConcurrency: 10
      containers:
      - image: ikubernetes/helloworld-go
        ports:
        - containerPort: 8080
        env:
        - name: TARGET
          value: "World-002"
流量全部转到新版本

DomainMapping资源
命令
kn domain create
--ref --tls --namespace
#创建域名映射,访问www.hj.com时,转给ksvc时hello的服务
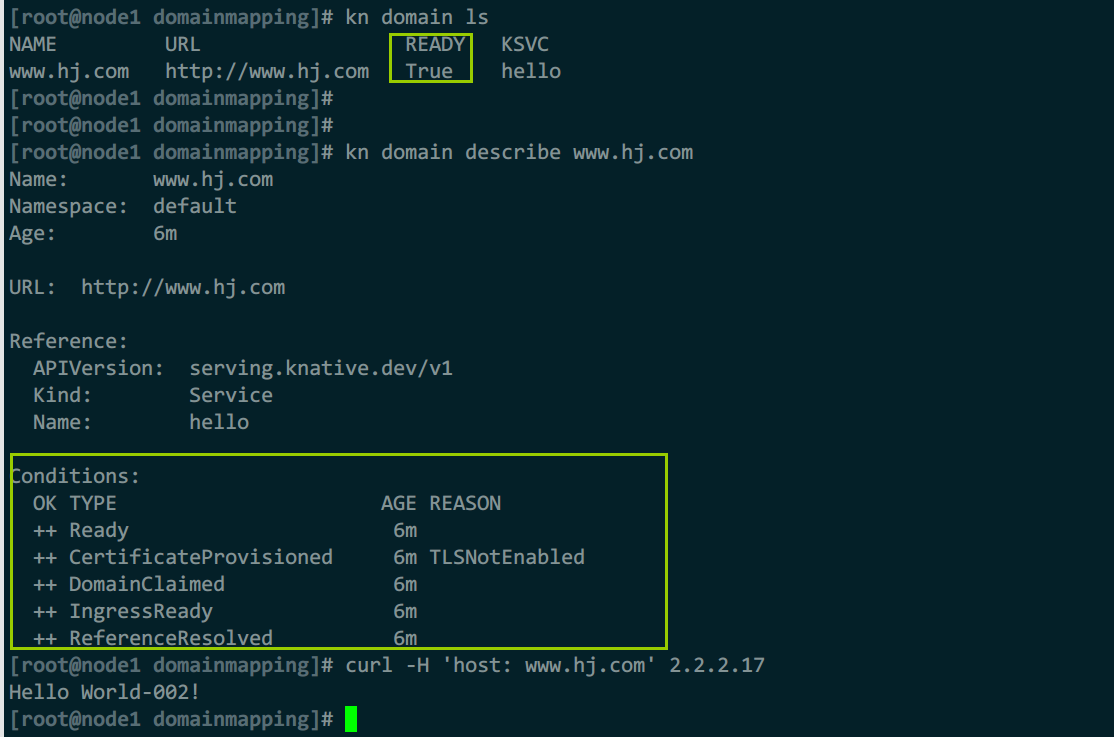
kn domain create www.hj.com --ref ksvc:hello:default

#查看详细信息
kn domain ls
kn domain describe www.hj.com
ref映射信息
- ksvc:ksvc服务名:直接映射为ksvc运行的服务
- ksvc服务名:效果同上
- ksvc:服务名:ns名:效果同上,但可以跨命名空间
- kroute:路由名:与路由建立映射关系
- ksvc:name:namespace:特定 Knative 服务关联起来
详细解释
- DomainAlreadyClaimed:表示域名已经有人关联了,为了避免如A服务在default命名空间,B服务在demo命名空间,A已经关联
www.hj.com,但B服务没有权限访问default命名空间,所以自己也创建映射关联www.hj.com,此时就不知道该路由给A还是B,所以域名映射后应该立即配置ClusterDomainClaim资源认领域名

语法
创建域名映射,简写dm
可以实现:访问公网域名www.hj.com时,转为访问demoapp.default.example.com
apiVersion: serving.knative.dev/v1beta1
kind: DomainMapping
metadata:
  name: <domain-name>
  namespace: <namespace>
spec:
  ref:
    name: <service-name>
    kind: Service
    apiVersion: serving.knative.dev/v1
  tls:
    secretName: <cert-secret>
cm配置:config-domain
apiVersion: v1
kind: ConfigMap
metadata:
  labels:
    app.kubernetes.io/component: controller
    app.kubernetes.io/name: knative-serving
    app.kubernetes.io/version: 1.11.1
  name: config-domain
  namespace: knative-serving
data:
  _example: |
    ################################
    #                              #
    #    EXAMPLE CONFIGURATION     #
    #                              #
    ################################

    # This block is not actually functional configuration,
    # but serves to illustrate the available configuration
    # options and document them in a way that is accessible
    # to users that `kubectl edit` this config map.
    #
    # These sample configuration options may be copied out of
    # this example block and unindented to be in the data block
    # to actually change the configuration.

    # Default value for domain.
    # Routes having the cluster domain suffix (by default 'svc.cluster.local')
    # will not be exposed through Ingress. You can define your own label
    # selector to assign that domain suffix to your Route here, or you can set
    # the label
    #    "networking.knative.dev/visibility=cluster-local"
    # to achieve the same effect.  This shows how to make routes having
    # the label app=secret only exposed to the local cluster.
    svc.cluster.local: |
      selector:
        app: secret

    # These are example settings of domain.
    # example.com will be used for all routes, but it is the least-specific rule so it
    # will only be used if no other domain matches.
    example.com: |

    # example.org will be used for routes having app=nonprofit.
    example.org: |
      selector:
        app: nonprofit
  example.com: ""
  hj.com: | #配置自定义域名,修改默认域名。用于路由配置,流量管理时,可以选择生效在指定域名。一旦配置自定义域名,则之前部署时配置的 example.com 域名就不会生效,而是:ksvc名.命名空间.hj.com
示例
例1:直接修改cm配置为hj.com
kubectl patch cm -n knative-serving config-domain \
 --type merge \
 --patch '{"data":{"hj.com": ""}}'
ClusterDomainClaim资源
在集群中声明域名,将域名与哪些服务做绑定
语法
apiVersion: networking.internal.knative.dev/v1alpha1
kind: ClusterDomainClaim
metadata:
  name: str
spec:
  namespace: str	#绑定的命名空间,表示映射的域名在哪个ns中使用
cm配置:config-network
apiVersion: v1
kind: ConfigMap
metadata:
  labels:
    app.kubernetes.io/component: networking
    app.kubernetes.io/name: knative-serving
    app.kubernetes.io/version: 1.12.3
  name: config-network
data:
  #开启自动创建域名映射绑定(自动为域名映射在istio-ingress上创建vs)
  autocreate-cluster-domain-claims": true
  _example: |
    ################################
    #                              #
    #    EXAMPLE CONFIGURATION     #
    #                              #
    ################################

    # This block is not actually functional configuration,
    # but serves to illustrate the available configuration
    # options and document them in a way that is accessible
    # to users that `kubectl edit` this config map.
    #
    # These sample configuration options may be copied out of
    # this example block and unindented to be in the data block
    # to actually change the configuration.

    # ingress-class specifies the default ingress class
    # to use when not dictated by Route annotation.
    #
    # If not specified, will use the Istio ingress.
    #
    # Note that changing the Ingress class of an existing Route
    # will result in undefined behavior.  Therefore it is best to only
    # update this value during the setup of Knative, to avoid getting
    # undefined behavior.
    ingress-class: "istio.ingress.networking.knative.dev"

    # certificate-class specifies the default Certificate class
    # to use when not dictated by Route annotation.
    #
    # If not specified, will use the Cert-Manager Certificate.
    #
    # Note that changing the Certificate class of an existing Route
    # will result in undefined behavior.  Therefore it is best to only
    # update this value during the setup of Knative, to avoid getting
    # undefined behavior.
    certificate-class: "cert-manager.certificate.networking.knative.dev"

    # namespace-wildcard-cert-selector specifies a LabelSelector which
    # determines which namespaces should have a wildcard certificate
    # provisioned.
    #
    # Use an empty value to disable the feature (this is the default):
    #   namespace-wildcard-cert-selector: ""
    #
    # Use an empty object to enable for all namespaces
    #   namespace-wildcard-cert-selector: {}
    #
    # Useful labels include the "kubernetes.io/metadata.name" label to
    # avoid provisioning a certificate for the "kube-system" namespaces.
    # Use the following selector to match pre-1.0 behavior of using
    # "networking.knative.dev/disableWildcardCert" to exclude namespaces:
    #
    # matchExpressions:
    # - key: "networking.knative.dev/disableWildcardCert"
    #   operator: "NotIn"
    #   values: ["true"]
    namespace-wildcard-cert-selector: ""

    # domain-template specifies the golang text template string to use
    # when constructing the Knative service's DNS name. The default
    # value is "{{.Name}}.{{.Namespace}}.{{.Domain}}".
    #
    # Valid variables defined in the template include Name, Namespace, Domain,
    # Labels, and Annotations. Name will be the result of the tag-template
    # below, if a tag is specified for the route.
    #
    # Changing this value might be necessary when the extra levels in
    # the domain name generated is problematic for wildcard certificates
    # that only support a single level of domain name added to the
    # certificate's domain. In those cases you might consider using a value
    # of "{{.Name}}-{{.Namespace}}.{{.Domain}}", or removing the Namespace
    # entirely from the template. When choosing a new value be thoughtful
    # of the potential for conflicts - for example, when users choose to use
    # characters such as `-` in their service, or namespace, names.
    # {{.Annotations}} or {{.Labels}} can be used for any customization in the
    # go template if needed.
    # We strongly recommend keeping namespace part of the template to avoid
    # domain name clashes:
    # eg. '{{.Name}}-{{.Namespace}}.{{ index .Annotations "sub"}}.{{.Domain}}'
    # and you have an annotation {"sub":"foo"}, then the generated template
    # would be {Name}-{Namespace}.foo.{Domain}
    domain-template: "{{.Name}}.{{.Namespace}}.{{.Domain}}"

    # tag-template specifies the golang text template string to use
    # when constructing the DNS name for "tags" within the traffic blocks
    # of Routes and Configuration.  This is used in conjunction with the
    # domain-template above to determine the full URL for the tag.
    tag-template: "{{.Tag}}-{{.Name}}"

    # auto-tls is deprecated and replaced by external-domain-tls
    auto-tls: "Disabled"

    # Controls whether TLS certificates are automatically provisioned and
    # installed in the Knative ingress to terminate TLS connections
    # for cluster external domains (like: app.example.com)
    # - Enabled: enables the TLS certificate provisioning feature for cluster external domains.
    # - Disabled: disables the TLS certificate provisioning feature for cluster external domains.
    external-domain-tls: "Disabled"

    # Controls weather TLS certificates are automatically provisioned and
    # installed in the Knative ingress to terminate TLS connections
    # for cluster local domains (like: app.namespace.svc.<your-cluster-domain>)
    # - Enabled: enables the TLS certificate provisioning feature for cluster cluster-local domains.
    # - Disabled: disables the TLS certificate provisioning feature for cluster cluster local domains.
    # NOTE: This flag is in an alpha state and is mostly here to enable internal testing
    #       for now. Use with caution.
    cluster-local-domain-tls: "Disabled"

    # internal-encryption is deprecated and replaced by system-internal-tls
    internal-encryption: "false"

    # system-internal-tls controls weather TLS encryption is used for connections between
    # the internal components of Knative:
    # - ingress to activator
    # - ingress to queue-proxy
    # - activator to queue-proxy
    #
    # Possible values for this flag are:
    # - Enabled: enables the TLS certificate provisioning feature for cluster cluster-local domains.
    # - Disabled: disables the TLS certificate provisioning feature for cluster cluster local domains.
    # NOTE: This flag is in an alpha state and is mostly here to enable internal testing
    #       for now. Use with caution.
    system-internal-tls: "Disabled"

    # Controls the behavior of the HTTP endpoint for the Knative ingress.
    # It requires auto-tls to be enabled.
    # - Enabled: The Knative ingress will be able to serve HTTP connection.
    # - Redirected: The Knative ingress will send a 301 redirect for all
    # http connections, asking the clients to use HTTPS.
    #
    # "Disabled" option is deprecated.
    http-protocol: "Enabled"

    # rollout-duration contains the minimal duration in seconds over which the
    # Configuration traffic targets are rolled out to the newest revision.
    rollout-duration: "0"

    #自动配置域名绑定,创建域名映射后,不再需要手动创建cdc资源做绑定
    autocreate-cluster-domain-claims: "false"

    # If true, networking plugins can add additional information to deployed
    # applications to make their pods directly accessible via their IPs even if mesh is
    # enabled and thus direct-addressability is usually not possible.
    # Consumers like Knative Serving can use this setting to adjust their behavior
    # accordingly, i.e. to drop fallback solutions for non-pod-addressable systems.
    #
    # NOTE: This flag is in an alpha state and is mostly here to enable internal testing
    #       for now. Use with caution.
    enable-mesh-pod-addressability: "false"

    # mesh-compatibility-mode indicates whether consumers of network plugins
    # should directly contact Pod IPs (most efficient), or should use the
    # Cluster IP (less efficient, needed when mesh is enabled unless
    # `enable-mesh-pod-addressability`, above, is set).
    # Permitted values are:
    #  - "auto" (default): automatically determine which mesh mode to use by trying Pod IP and falling back to Cluster IP as needed.
    #  - "enabled": always use Cluster IP and do not attempt to use Pod IPs.
    #  - "disabled": always use Pod IPs and do not fall back to Cluster IP on failure.
    mesh-compatibility-mode: "auto"

    # Defines the scheme used for external URLs if auto-tls is not enabled.
    # This can be used for making Knative report all URLs as "HTTPS" for example, if you're
    # fronting Knative with an external loadbalancer that deals with TLS termination and
    # Knative doesn't know about that otherwise.
    default-external-scheme: "http"
示例
例1:配置域名绑定
kubectl apply -f - <<eof
apiVersion: networking.internal.knative.dev/v1alpha1
kind: ClusterDomainClaim
metadata:
  name: www.hj.com
spec:
  namespace: default
eof
例2:开启自动域名映射(vs自动创建)
kubectl patch cm -n knative-serving config-network \
 -p '{"data":{"autocreate-cluster-domain-claims":"true"}}'
revison资源
应用代码以及相关容器配置某个版本的不可变快照,ksvc上的spec.template每次变动,都会自动生成新的revision,所以一般不需要手动创建、维护
使用场景
- 流量切分到不同版本程序间(金丝雀、蓝绿)
- 版本回滚
route资源
可以由ksvc的traffic自动生成,未定义时,将由就绪状态的revision列表中最新版本的revsion接收和处理该ksvc的所有请求
route依托入口网关和网格(或本地网关)完成流量转发
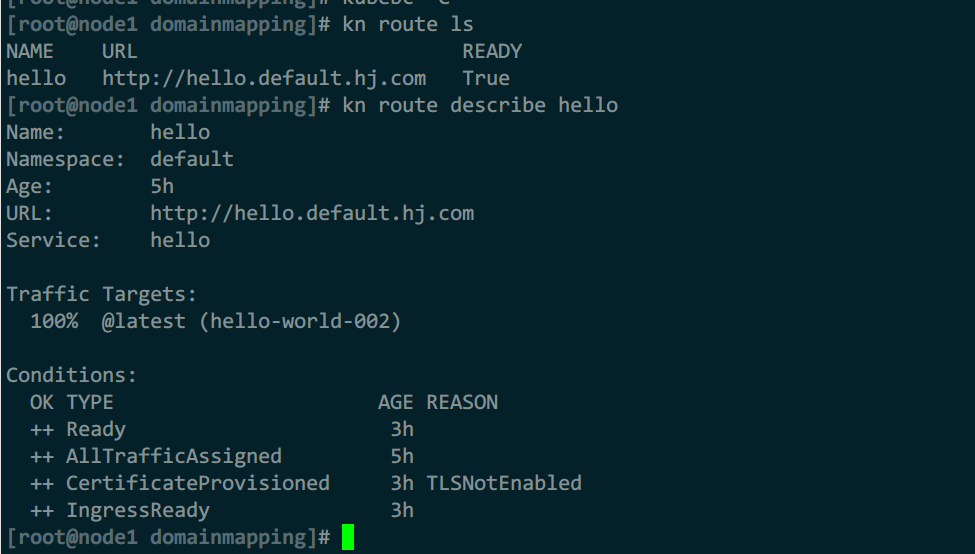
route自动创建的资源如下:
- k8s的svc
- istio的vs
限制域名访问
默认route将ksvc流量同时暴露到外部与内部,如果只想要创建内部服务,可以如下配置:
- 全局配置:修改cm资源:
config-domain,将默认域设置为:svc.cluster.local - 单ksvc配置:ksvc资源中使用标签
networking.knative.dev/visibility: cluster-local;无ksvc时,可以配置在相关route和k8s的svc上
注:如果之前有配合域名映射,外部的域名可继续访问,但内部的就不行了
示例
例1:为指定ksvc关闭内部访问
#开启限制仅内部访问
kubectl label ksvc hello networking.knative.dev/visibility=cluster-local

#此时内部域名会访问失败
curl -H 'host: hello.default.hj.com' 2.2.2.17
#但外部的域名映射依旧正常
curl -H 'host: www.hj.com' 2.2.2.17

#取消
kubectl label ksvc hello networking.knative.dev/visibility-

podautoscalers资源
配置方式:
- 全局配置:cm资源的
config-autoscaler - 单个revision配置:
ksvc.spec.metadata注解中加入config-autoscaler的配置
扩缩容控制器选用:
- KPA:knative自己实现的,默认使用,可用指标有:并发连接数、rps(请求数/s)
- HPA:k8s内置,可用指标有:cpu、内存、自定义
cm配置:config-autoscaler
注:应该在全局配置中,做最大扩容限制,避免特殊情况耗尽系统资源,导致其他服务不可用
apiVersion: v1
kind: ConfigMap
metadata:
  name: config-autoscaler
  namespace: knative-serving
data:
  container-concurrency-target-percentage: "70"   #实例的目标利用率,默认为70%。如果请求数为200,则140个时就要扩容
  container-concurrency-target-default: "100"     #实例的目标最大并发数,默认100个。软限制
  requests-per-second-target-default: "200"       #每秒请求数为200个,使用rps指标时生效
  target-burst-capacity: "211"        #突发请求容量,默认211个
  stable-window: "60s"        #稳定窗口时间,默认60s,取值范围:6s~1h
  panic-window-percentage: "10.0"     #恐慌期相当于稳定窗口的百分比时间,默认10,即百分之10
  panic-threshold-percentage: "200.0"     #因pod数量偏差而出发恐慌阈值百分比,默认200,即2倍
  max-scale-up-rate: "1000.0"         #最大扩容速率,默认1000.当前可最大扩容数=最大扩容速率*ready状态pod数
  max-scale-down-rate: "2.0"          #最大缩容率,默认2,当前最大缩容数=ready状态pod数/最大缩容速率
  enable-scale-to-zero: "true"        #支持缩容到0,仅kpa支持。不支持revision级别配置
  scale-to-zero-grace-period: "30s"   #缩容到0的宽限期,即等待最后1个pod删除的最大时长,默认30s。不支持revision级别配置
  scale-to-zero-pod-retention-period: "0s"    #决定缩容到0后,允许最后1个pod处于活动状态的最小时长,默认0s
  pod-autoscaler-class: 控制器       #控制器默认使用kpa,可用hpa
  activator-capacity: "100.0"
  initial-scale: "1"              #初始化时启动1个副本,为0时下面的也要为true
  allow-zero-initial-scale: "false"       #不允许初始化时0副本
  min-scale: "0"
  max-scale: "0"              #0为无限制,最大扩容
  scale-down-delay: "0s"      #缩容延迟时间,在这个时间内必须请求数是递减状态才满足,默认无请求后立即缩容为0,取值0s~1h
  max-scale-limit: "0"
示例:
例1:单个revision配置扩缩容策略
apiVersion: serving.knative.dev/v1
kind: Service
metadata:
  name: hello
spec:
  template:
    metadata:
      annotations:
        autoscaling.knative.dev/scale-to-zero-pod-retention-period: "1m5s"
        autoscaling.knative.dev/class: "KPA"    #控制器
        autoscaling.knative.dev/target.utilization-percentage: 60       #目标利用率
        autoscaling.knative.dev/target: "10"          #并发数软限制
        containerConcurrency: int            #并发数硬限制
        autoscaling.knative.dev/initial-scale: int
        autoscaling.knative.dev/window: int
        autoscaling.knative.dev/metrics: "rps"  #使用rps指标
    spec:
      containers:
      - image: ikubernetes/helloworld-go
        ports:
        - containerPort: 8080
        env:
        - name: TARGET
          value: "Hello"
其他cm配置
config-defaults
revision-timeout-seconds: "300"  # 5 minutes

# max-revision-timeout-seconds contains the maximum number of
# seconds that can be used for revision-timeout-seconds.
# This value must be greater than or equal to revision-timeout-seconds.
# If omitted, the system default is used (600 seconds).
#
# If this value is increased, the activator's terminationGraceTimeSeconds
# should also be increased to prevent in-flight requests being disrupted.
max-revision-timeout-seconds: "600"  # 10 minutes

# revision-response-start-timeout-seconds contains the default number of
# seconds a request will be allowed to stay open while waiting to
# receive any bytes from the user's application, if none is specified.
#
# This defaults to 'revision-timeout-seconds'
revision-response-start-timeout-seconds: "300"

# revision-idle-timeout-seconds contains the default number of
# seconds a request will be allowed to stay open while not receiving any
# bytes from the user's application, if none is specified.
revision-idle-timeout-seconds: "0"  # infinite

# revision-ephemeral-storage-request contains the ephemeral storage
# allocation to assign to revisions by default.  If omitted, no value is
# specified and the system default is used.
revision-ephemeral-storage-request: "500M"  # 500 megabytes of storage

revision-cpu-request: "400m"  #pod创建时依赖cpu资源限制
revision-memory-request: "100M"  #pod创建时依赖内存资源限制
revision-cpu-limit: "1000m"     #revision cpu硬限制
revision-memory-limit: "200M"  #revision内存硬限制

# revision-ephemeral-storage-limit contains the ephemeral storage
# allocation to limit revisions to by default.  If omitted, no value is
# specified and the system default is used.
revision-ephemeral-storage-limit: "750M"  # 750 megabytes of storage

container-name-template: "user-container"   #注入模板容器的名称

# init-container-name-template contains a template for the default
# init container name, if none is specified.  This field supports
# Go templating and is supplied with the ObjectMeta of the
# enclosing Service or Configuration, so values such as
# {{.Name}} are also valid.
init-container-name-template: "init-container"

container-concurrency: "0"    #默认并发连接数为0,不限制

# The container concurrency max limit is an operator setting ensuring that
# the individual revisions cannot have arbitrary large concurrency
# values, or autoscaling targets. `container-concurrency` default setting
# must be at or below this value.
#
# Must be greater than 1.
#
# Note: even with this set, a user can choose a containerConcurrency
# of 0 (i.e. unbounded) unless allow-container-concurrency-zero is
# set to "false".
container-concurrency-max-limit: "1000"

# allow-container-concurrency-zero controls whether users can
# specify 0 (i.e. unbounded) for containerConcurrency.
allow-container-concurrency-zero: "true"

# enable-service-links specifies the default value used for the
# enableServiceLinks field of the PodSpec, when it is omitted by the user.
# See: https://kubernetes.io/docs/concepts/services-networking/connect-applications-service/#accessing-the-service
#
# This is a tri-state flag with possible values of (true|false|default).
#
# In environments with large number of services it is suggested
# to set this value to `false`.
# See https://github.com/knative/serving/issues/8498.
enable-service-links: "false"
config-deployment
registries-skipping-tag-resolving: "kind.local,ko.local,dev.local"    #跳过解析的tag域名
digest-resolution-timeout: "10s"    #解析镜像摘要所允许的最长时间
progress-deadline: "600s"   #在认为部署失败之前,等待部署准备就绪的持续时间

#注入qp容器资源限制
queue-sidecar-cpu-request: "25m"
queue-sidecar-cpu-limit: "1000m"
queue-sidecar-memory-request: "400Mi"
queue-sidecar-memory-limit: "800Mi"
queue-sidecar-ephemeral-storage-request: "512Mi"
queue-sidecar-ephemeral-storage-limit: "1024Mi"

# Sets tokens associated with specific audiences for queue proxy - used by QPOptions
#
# For example, to add the `service-x` audience:
#    queue-sidecar-token-audiences: "service-x"
# Also supports a list of audiences, for example:
#    queue-sidecar-token-audiences: "service-x,service-y"
# If omitted, or empty, no tokens are created
queue-sidecar-token-audiences: ""

queue-sidecar-rootca: ""      #注入容器配置ca,默认空为不注入
queue-sidecar-image: m.daocloud.io/gcr.io/knative-releases/knative.dev/serving/cmd/queue@sha256:739d6ce20e3a4eb646d47472163eca88df59bb637cad4d1e100de07a15fe63a2    #注入的queue-proxy镜像下载地址
config-istio
#2个入口网关对应knative-serving命名空间下的gw资源
gateway.knative-serving.knative-ingress-gateway: "istio-ingressgateway.istio-system.svc.cluster.local"    #入口流量网关名称
local-gateway.knative-serving.knative-local-gateway: "knative-local-gateway.istio-system.svc.cluster.local"     #本地入口流量网关名称
config-observability
logging.enable-var-log-collection: "false"      #收集/var/log,默认false关闭
logging.revision-url-template: "http://logging.example.com/?revisionUID=${REVISION_UID}"      #日志收集模板url,收集的是revision的日志,改变域名后需要修改

# If non-empty, this enables queue proxy writing user request logs to stdout, excluding probe
# requests.
# NB: after 0.18 release logging.enable-request-log must be explicitly set to true
# in order for request logging to be enabled.
#
# The value determines the shape of the request logs and it must be a valid go text/template.
# It is important to keep this as a single line. Multiple lines are parsed as separate entities
# by most collection agents and will split the request logs into multiple records.
#
# The following fields and functions are available to the template:
#
# Request: An http.Request (see https://golang.org/pkg/net/http/#Request)
# representing an HTTP request received by the server.
#
# Response:
# struct {
#   Code    int       // HTTP status code (see https://www.iana.org/assignments/http-status-codes/http-status-codes.xhtml)
#   Size    int       // An int representing the size of the response.
#   Latency float64   // A float64 representing the latency of the response in seconds.
# }
#
# Revision:
# struct {
#   Name          string  // Knative revision name
#   Namespace     string  // Knative revision namespace
#   Service       string  // Knative service name
#   Configuration string  // Knative configuration name
#   PodName       string  // Name of the pod hosting the revision
#   PodIP         string  // IP of the pod hosting the revision
# }
#

#日志模板内容
logging.request-log-template: '{"httpRequest": {"requestMethod": "{{.Request.Method}}", "requestUrl": "{{js .Request.RequestURI}}", "requestSize": "{{.Request.ContentLength}}", "status": {{.Response.Code}}, "responseSize": "{{.Response.Size}}", "userAgent": "{{js .Request.UserAgent}}", "remoteIp": "{{js .Request.RemoteAddr}}", "serverIp": "{{.Revision.PodIP}}", "referer": "{{js .Request.Referer}}", "latency": "{{.Response.Latency}}s", "protocol": "{{.Request.Proto}}"}, "traceId": "{{index .Request.Header "X-B3-Traceid"}}"}'

logging.enable-request-log: "false"     #记录请求日志,默认false关闭(这个量很大)
logging.enable-probe-request-log: "false"     #将采集指标数据时允许抓取请求日志信息。日志信息以文本格式发给普罗米修斯。生产环境配置istio的注入容器日志收集即可,knative不用开
metrics.backend-destination: prometheus     #指标信息发给普罗米修斯,要自己部署普罗米修斯服务,且svc是这个名称,就可以自动发给他
metrics.reporting-period-seconds: "5"       #指标报告间隔,默认5s

# metrics.request-metrics-backend-destination specifies the request metrics
# destination. It enables queue proxy to send request metrics.
# Currently supported values: prometheus (the default), opencensus.
metrics.request-metrics-backend-destination: prometheus

# metrics.request-metrics-reporting-period-seconds specifies the request metrics reporting period in sec at queue proxy.
# If a zero or negative value is passed the default reporting period is used (10 secs).
# If the attribute is not specified, it is overridden by the value of metrics.reporting-period-seconds.
metrics.request-metrics-reporting-period-seconds: "5"

profiling.enable: "false"   #启用debug分析,开启后暴露8080端口,访问路径为:/debug/pprof/
config-tracing
backend: "none"     #链路追踪的采集服务,默认none,支持:zipkin。生产环境在istio配置即可,此处就没有必要重复配置了,网格收集比这里全面
zipkin-endpoint: "http://zipkin.istio-system.svc.cluster.local:9411/api/v2/spans"     #zipkin访问路径
debug: "false"      #debug模式,默认false
sample-rate: "0.1"    #采样率,0.1为10%
综合案例:
例1:多revision时,做流量切割
1)创建ksvc
命令方式:
kn service apply hello --image ikubernetes/helloworld-go -e TARGET=one
kn service apply hello --image ikubernetes/helloworld-go -e TARGET=two
kn service apply hello --image ikubernetes/helloworld-go -e TARGET=123
配置清单方式:
kubectl apply -f - <<eof
apiVersion: serving.knative.dev/v1
kind: Service
metadata:
  name: hello
spec:
  template:
    spec:
      containers:
      - image: ikubernetes/helloworld-go
        ports:
        - containerPort: 8080
        env:
        - name: TARGET
          value: "Hello"
eof
kubectl apply -f - <<eof
apiVersion: serving.knative.dev/v1
kind: Service
metadata:
  name: hello
spec:
  template:
    spec:
      containers:
      - image: ikubernetes/helloworld-go
        ports:
        - containerPort: 8080
        env:
        - name: TARGET
          value: "two"
eof
kubectl apply -f - <<eof
apiVersion: serving.knative.dev/v1
kind: Service
metadata:
  name: hello
spec:
  template:
    spec:
      containers:
      - image: ikubernetes/helloworld-go
        ports:
        - containerPort: 8080
        env:
        - name: TARGET
          value: "123"
  traffic:
  - latestRevision: true
    percent: 0
  - revisionName: hello-00002
    percent: 90
  - revisionName: hello-00001
    percent: 10
eof
2)查看revision,配置流量比例
kn revision ls

#修改v1版本接收100%流量
kn service update hello --traffic hello-00001=100

#继续修改流量比例
kn service update hello --traffic hello-00001=90 --traffic hello-00002=9 --traffic hello-00003=1

修改后,流量转给了第一版revision:hello-00001
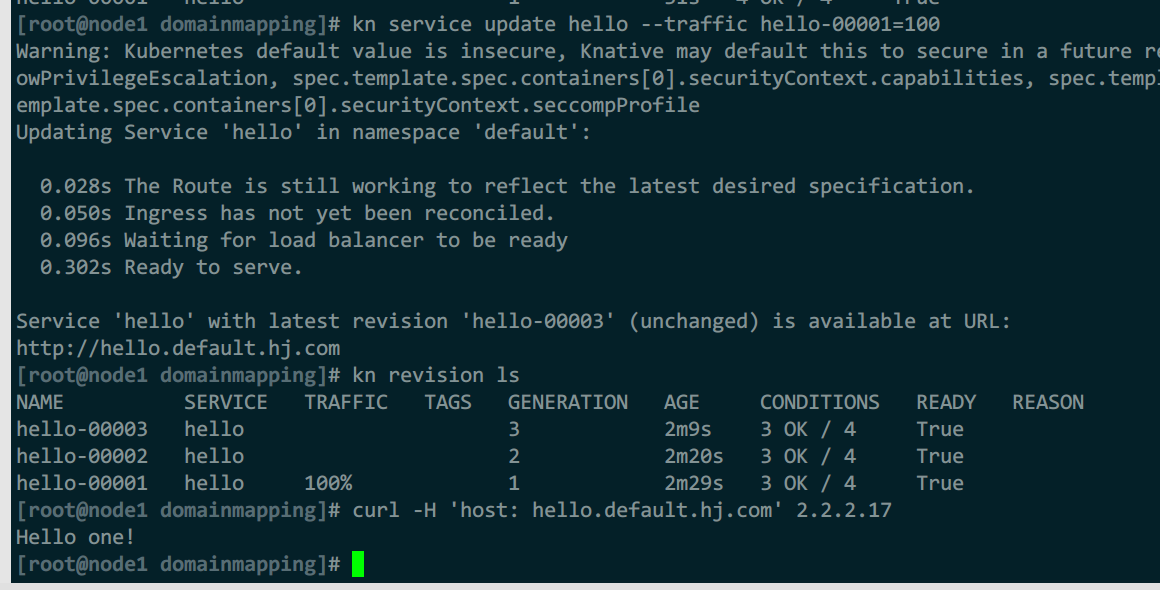
修改后比例

例2:基于tag实现自定义流量策略
为指定ksvc配置tag,可以做到附带tag的路由,访问方法:
tag名-ksvc名.ns名.域名
#打标与取消
kn service update hello --tag '@latest=staging'
kn service update hello --untag staging

#使用标签名做流量分配
kn service update hello --tag hello-00001=green --tag hello-00002=blue
kn service update hello --traffic blue=100 --traffic green=0
例3:基于knative运行bookinfo
注意:
- 默认的bookinfo中reviews存储挂载路径需要修改,因为knative源码中将:
/、/dev、/dev/log、/tmp、/var、/var/log,源码中将这几个路径设为保留路径,以源码为准(1.12.3不可以):https://github.com/knative/serving/blob/main/pkg/apis/serving/k8s_validation.go - productpage服务由于源码中就固定了其他几个服务的访问路径与端口,所以直接使用别人修改后的镜像运行
1)运行bookinfo
kubectl apply -f - <<eof
###### details
apiVersion: v1
kind: ServiceAccount
metadata:
  name: bookinfo-details
  labels:
    account: details
---
apiVersion: serving.knative.dev/v1
kind: Service
metadata:
  name: details
spec:
  template:
    spec:
      serviceAccountName: bookinfo-details
      containers:
      - name: details
        image: docker.io/istio/examples-bookinfo-details-v1:1.17.0
        imagePullPolicy: IfNotPresent
        ports:
        - containerPort: 9080
        securityContext:
          runAsUser: 1000
---
##### ratings
apiVersion: v1
kind: ServiceAccount
metadata:
  name: bookinfo-ratings
  labels:
    account: ratings
---
apiVersion: serving.knative.dev/v1
kind: Service
metadata:
  name: ratings
spec:
  template:
    spec:
      serviceAccountName: bookinfo-ratings
      containers:
      - name: ratings
        image: docker.io/istio/examples-bookinfo-ratings-v1:1.17.0
        imagePullPolicy: IfNotPresent
        ports:
        - containerPort: 9080
        securityContext:
          runAsUser: 1000
---
##### productpage
apiVersion: serving.knative.dev/v1
kind: Service
metadata:
  name: productpage
spec:
  template:
    metadata:
      annotations:
        autoscaling.knative.dev/min-scale: "1"
    spec:
      containers:
      - image: registry.cn-hangzhou.aliyuncs.com/knative-sample/productpage:v1-aliyun
        ports:
        - containerPort: 9080
        env:
        - name: SERVICES_DOMAIN
          value: default.svc.cluster.local
        - name: DETAILS_HOSTNAME
          value: details
        - name: RATINGS_HOSTNAME
          value: ratings
        - name: REVIEWS_HOSTNAME
          value: reviews
eof

kubectl apply -f - <<eof
apiVersion: v1
kind: ServiceAccount
metadata:
  name: bookinfo-reviews
  labels:
    account: reviews
---
apiVersion: serving.knative.dev/v1
kind: Service
metadata:
  name: reviews
  annotations:
    serving.knative.dev/rollout-duration: "60s"
spec:
  template:
    spec:
      serviceAccountName: bookinfo-reviews
      containers:
      - name: reviews
        image: docker.io/istio/examples-bookinfo-reviews-v1:1.17.0
        imagePullPolicy: IfNotPresent
        env:
        - name: LOG_DIR
          value: "/data/logs"
        ports:
        - containerPort: 9080
        volumeMounts:
        - name: log
          mountPath: /data
        - name: wlp-output
          mountPath: /opt/ibm/wlp/output
        securityContext:
          runAsUser: 1000
      volumes:
      - name: wlp-output
        emptyDir: {}
      - name: log
        emptyDir: {}
eof
kubectl apply -f - <<eof
apiVersion: serving.knative.dev/v1
kind: Service
metadata:
  name: reviews
  annotations:
    serving.knative.dev/rollout-duration: "60s"
spec:
  template:
    spec:
      serviceAccountName: bookinfo-reviews
      containers:
      - name: reviews
        image: docker.io/istio/examples-bookinfo-reviews-v2:1.17.0
        imagePullPolicy: IfNotPresent
        env:
        - name: LOG_DIR
          value: "/data/logs"
        ports:
        - containerPort: 9080
        volumeMounts:
        - name: log
          mountPath: /data
        - name: wlp-output
          mountPath: /opt/ibm/wlp/output
        securityContext:
          runAsUser: 1000
      volumes:
      - name: wlp-output
        emptyDir: {}
      - name: log
        emptyDir: {}
eof
kubectl apply -f - <<eof
apiVersion: serving.knative.dev/v1
kind: Service
metadata:
  name: reviews
spec:
  template:
    spec:
      serviceAccountName: bookinfo-reviews
      containers:
      - name: reviews
        image: docker.io/istio/examples-bookinfo-reviews-v3:1.17.0
        imagePullPolicy: IfNotPresent
        env:
        - name: LOG_DIR
          value: "/data/logs"
        ports:
        - containerPort: 9080
        volumeMounts:
        - name: log
          mountPath: /data
        - name: wlp-output
          mountPath: /opt/ibm/wlp/output
        securityContext:
          runAsUser: 1000
      volumes:
      - name: wlp-output
        emptyDir: {}
      - name: log
        emptyDir: {}
eof

kn service update reviews --tag reviews-00001=v1 --tag reviews-00002=v2 --tag reviews-00003=v3
kn service update reviews --traffic v1=60 --traffic v2=30 --traffic v3=10
2)配置域名映射
kubectl apply -f - <<eof
apiVersion: serving.knative.dev/v1beta1
kind: DomainMapping
metadata:
  name: bookinfo.hj.com
  namespace: default
spec:
  ref:
    name: productpage
    kind: Service
    apiVersion: serving.knative.dev/v1
eof
3)测试
while :;do curl -s -H 'host: bookinfo.hj.com' 2.2.2.17/productpage |grep Revi|grep sma ;echo ==== ;sleep .5;done
浏览器打开时,第一次访问,reviews服务需要冷启动,所以会有错误,多刷新一下就行

