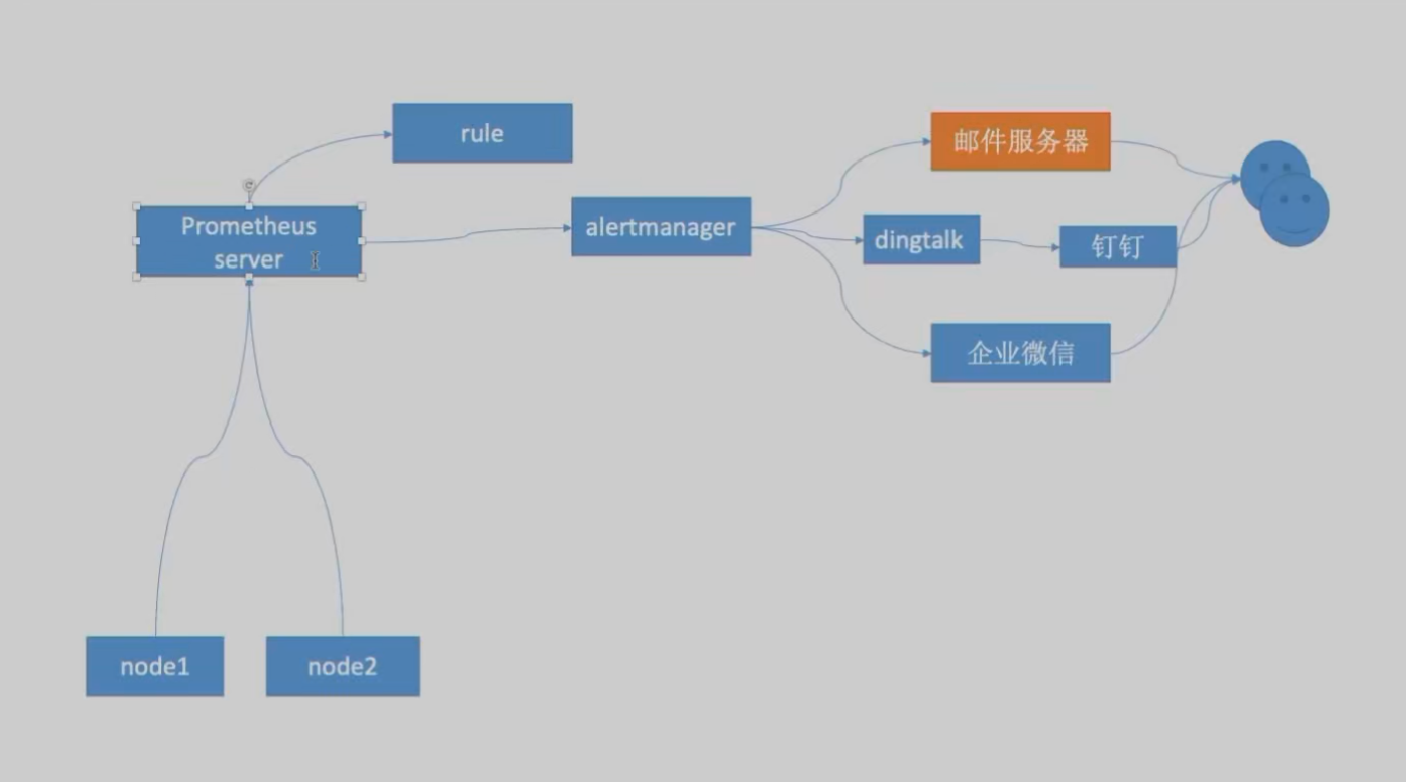
altermanagert告警
altermanager:
报警组件
github: https://github.com/prometheus/alertmanager/tags
端口:
- 9093 通信端口
- 9094 集群端口
报警过程:

pro采集数据-->触发-->alertmanager-->分组、抑制、静默-->媒介类型-->微信等
分组:将类似性质的报警合并为单个通知
静默:特定时间的静音机制,和zabbix的维护时间一样
抑制:报警发出后,停止重复发送
路由:配置报警如何传入的特定类型的告警通知,根据路由匹配规则结果来确定当前告警通知的路径和行为
配置步骤:
1、在prom中配置altermanager在何处
支持静态配置、动态发现
还应将报警程序作为监控目标,监控运行状态
2、prom中指定告警规则(哪些是异常)
配置文件:
官网: https://prometheus.io/docs/alerting/latest/configuration/
主配置文件:
global:
  resolve_timeout: 5m
  smtp_smarthost: 'smtp.qq.com:465'
  smtp_from: '1137127273@qq.com'
  smtp_auth_username: '1137127273@qq.com'
  smtp_auth_password: 'juaovhwqyjscbafa'
  smtp_hello: '@qq.com'
  smtp_require_tls: false
  smtp_auth_identity: <string>
  smtp_auth_secret: <secret>

  slack_api_url: <secret>
  slack_api_url_file: <filepath>

  victorops_api_key: <secret>
  victorops_api_key_file: <filepath>
  victorops_api_url: <string> | default = "https://alert.victorops.com/integrations/generic/20131114/alert/"

  pagerduty_url: <string> | default = "https://events.pagerduty.com/v2/enqueue"

  opsgenie_api_key: <secret>
  opsgenie_api_key_file: <filepath>
  opsgenie_api_url: <string> | default = "https://api.opsgenie.com/"

  #企业微信
  wechat_api_url: <string> | default = "https://qyapi.weixin.qq.com/cgi-bin/"
  wechat_api_secret: <secret>
  wechat_api_corp_id: <string>

  telegram_api_url: <string> | default = "https://api.telegram.org"
  webex_api_url: <string> | default = "https://webexapis.com/v1/messages"
  http_config: <http_config>


route:		#报警分发策略
  group_by: 'alertname'	#用哪个标签分组
  group_wait: 30s					#等待时间,报警后等10s才发送
  group_interval: 5m			#组报警间隔
  repeat_interval: 1h			#重复报警的间隔,默认4h
  receiver: 'web.hook'		#设置接收人
  continue: false         #默认false,匹配到当前路由后,不再继续匹配后续的路由
  match:            #当告警的所有标签都匹配这些条件时,告警才会被路由到当前路由
  - 标签1: 值
  match_re:         #当告警的所有标签都匹配这些正则表达式时,告警才会被路由到当前路由
  - 标签1: 正则
  matchers:         #字符串表达式
  - 标签1=xxx       #表达式符合支持:=、!=、=~ 、!~、运算符
  mute_time_intervals: []         #指定在哪些时间间隔内静默告警。必须匹配在mute_time_interval中定义的名称
  active_time_intervals: []       #指定在哪些时间间隔内激活告警。字符串必须匹配 time_intervals配置中定义的时间间隔名称,空为该路由始终处于活动状态
  routes: []       #定义0~n个子路由,告警首先被路由到匹配的子路由,如果没有匹配的子路由,才会被路由到当前路由
  - receiver: 'database-pager'        #发送给接受人名称是database-pager的
    group_wait: 10s
    matchers:
    - service=~"mysql|cassandra"

receivers:        #定义接收器,也是就接受报警信息的
- name: 'web.hook'
  #webhook_configs:	#调用api发送,但我们只有邮箱,所以注释
  #  - url: 'http://127.0.0.1:5001/'
  email_configs:
  - to: '1137127273@qq.com'
    from: 邮箱          #从哪个邮箱发
    smarthost: SMTP     #SMTP 服务器的地址
    auth_username: 账号       #其余选项都与全局的邮箱一样
    ...

- name: 'dingding.钉钉webhook名称'		#钉钉报警配置
  webhook_configs:
  - url: 'http://172.29.1.11:8060/dingtalk/钉钉webhook名称/send'
    send_resolved: true		#发送恢复通知

- name: 'team-X-slack'
  slack_configs:
  - api_url: 'https://hooks.slack.com/services/T0BRR5J4C/B0BRR5J4C/XXXXXXXXXXXXXXXXXXXXXXXX'
    channel: '#alerts'
- name: 'wechat'
  wechat_configs:
  - api_url: 'https://qyapi.weixin.qq.com/cgi-bin/'   #微信企业号的 API URL
    corp_id: 'your_corp_id'           #微信企业号的企业 ID
    to_party: 'PartyID1|PartyID2'     #接收通知的部门 ID 列表,多个部门 ID 之间用 | 分隔
    agent_id: 'your_agent_id'         #微信企业号的应用 ID
    api_secret: 'your_api_secret'     #微信企业号的应用密钥

inhibit_rules:		      #抑制的规则,哪些级别不报警,当源告警满足source_match的所有条件,且目标告警满足 target_match的所有条件时,抑制规则才会生效。也就是旧报警和新报警匹配才行
- source_match:	      #原来已经报警的
    severity: 报警等级
      #critical,严重的问题,需要立即处理
      #warning
      #info
      #high,高
      #medium,中
      #low,低
  target_match:	      #新报警的
    severity: 'warning'
  equal: 'alertname', 'dev', 'instance'	#定义源告警和目标告警必须具有相同值的标签。只有当这些标签在源告警和目标告警中都存在且值相同时,抑制规则才会生效
  source_match_re:        #正则模式
  target_match_re:

mute_time_intervals: []      #选项用于指定在哪些时间间隔内静默告警
- "xxx"       #使用time_intervals中定义的时间xxx规则

time_intervals:     #定义route规则的执行时间间隔,做到一天中某个时间段运行
- name: 名称
  weekdays: []      #一周中的哪些天,取值为 1(周一)到 7(周日)
    #sunday
    #monday
    #tuesday
    #wednesday
    #thursday
    #friday
    #saturday
- name:
  years           #年、月、日的范围,取值为 1 到对应的最大值
  months
  days
- name: "xxx"
  time_range:       #每晚18点到6点
    start_time: "18:00"
    end_time: "06:00"

templates:      #报警信息的模板文件,使用 Go 的 text/template 语言编写
- tmp.tmpl
告警信息模板:
#该报警模板显示:邮件标题、报警信息、报警的指标、标签、报警等级、时间、报警主机,如果是k8s的pod报警报警,则显示pod名称、pod ip、node节点ip
cat > tmp.tmpl <<eof
{{ define "email.subject" }}
[{{ .Status | toUpper }}] {{ .GroupLabels.alertname }} for {{ range .Alerts }}{{ .Labels.instance }} {{ end }}
{{ end }}

{{ define "email.text" }}
{{ range .Alerts }}
Alert: {{ .Labels.alertname }}
Metric: {{ .Annotations.metric }}
Labels: {{ range .Labels.SortedPairs }}{{ .Name }} = {{ .Value }}, {{ end }}
Severity: {{ .Labels.severity }}
Time: {{ .StartsAt }}
Host: {{ if eq .Labels.alertname "PodAlert" }}
  Pod Name: {{ .Labels.pod }},
  Pod IP: {{ .Labels.pod_ip }},
  Node IP: {{ .Labels.node_ip }}
{{ else }}
  {{ .Labels.instance }}
{{ end }}
URL: {{ .GeneratorURL }}
{{ end }}
{{ end }}
eof
promtheus配置:
alerting:
	alertmanagers:
	- static_configs:
		- targets:
			- 2.2.2.43:9093

rule_files:
- hj.yml
常见报警项:
(sum by(name)rate(container_cpu_usage_seconds_total{image!=""}[5m]))*100 > 1	#pod cpu使用率大于10%
sort_desc(ave by(name)(irate(container_memory_usage_bytes{name!=""}[5m]))*100) > 10		#内存大使用大于10%
sum by (name)(irate(container_network_receive_bytes_total{container_name="POD"}[1m])) > 50*1024*1024		#pod网络出栈流量大于20M
安装:
1)下载
wget https://github.com/prometheus/alertmanager/releases/download/v0.25.0/alertmanager-0.25.0.linux-amd64.tar.gz
tar xf alertmanager-0.25.0.linux-amd64.tar.gz
cd alertmanager-0.25.0.linux-amd64/
mv alertmanager amtool /bin/
ln -s `pwd` /opt/alertmanager
2)写service
cat > /etc/systemd/system/alertmanager.service <<-eof
[Unit]
After=network.target

[Service]
Environment="CONF_FILE=/opt/alertmanager/alertmanager.yml"
Environment="IP=`hostname -i`"
Type=simple
User=prometheus
ExecStartPre=/bin/amtool check-config \$CONF_FILE
ExecStart=/bin/alertmanager \
  --config.file=\${CONF_FILE} \
  --web.listen-address=":9093" \
  --web.external-url=http://\${IP} \
  --storage.path=/data/alertmanager \
  --cluster.advertise-address=\${IP}:9094 \
  --cluster.listen-address=":9094"	\
  --cluster.allow-insecure-public-advertise-address-discovery
ExecReload=/bin/kill -HUP \$MAINPID
TimeoutStopSec=10s
Restart=on-failore

[Install]
WantedBy=multi-user.target
eof

systemctl daemon-reload
systemctl start alertmanager.service
案例:
例1: 配置邮件报警
1)配置alter主配置文件
cat > alertmanager.yml <<eof
global:
  resolve_timeout: 5m

route:
  group_by: ['alertname']
  group_wait: 10s
  group_interval: 10s
  repeat_interval: 10s
  receiver: 'email-me'

receivers:
- name: 'email-me'
  email_configs:
  - to: '1137127273@qq.com'		#谁收
    from: '1137127273@qq.com'	#谁发
    smarthost: 'smtp.qq.com:465'
    auth_username: '1137127273@qq.com'
    auth_password: 'juaovhwqyjscbafa'
    require_tls: false
inhibit_rules:
- source_match:
    alertname: InstanceDown
    severity: critical
  target_match:
    alertname: InstanceDown
    severity: critical
  equal:
    - instance
eof
2)配置prom主配置文件
mkdir {targets,rules,alert_rules}

cat > prometheus.yml <<eof
global:
  scrape_interval: 15s
  evaluation_interval: 15s

alerting:
  alertmanagers:
  - file_sd_configs:
    - files:
      - targets/alertmanagers.yml

rule_files:
- "rules/*.yaml"
- "alert_rules/*.yaml"

scrape_configs:
- job_name: "prometheus"
  static_configs:
    - targets: ["localhost:9090"]
- job_name: 'alertmanagers'
  file_sd_configs:
  - files:
    - targets/alertmanagers.yml
    refresh_interval: 2m
- job_name: blackbox_all
  metrics_path: /probe
  params:
    module: [http_2xx]
  static_configs:
  - targets:
    - 'http://www.qq.com'
    labels:
      group: web
  relabel_configs:
  - source_labels: [__address__]
    target_label: __param_target
  - source_labels: [__param_target]
    target_label: url
  - target_label: __address__
    replacement: 127.0.0.1:9115
  - source_labels: [__meta_dns_name]
    target_label: __param_hostname
  - source_labels: [__meta_dns_name]
    target_label: vhost
eof
3)配置prom的alter服务发现文件
cat > targets/alertmanagers.yml <<eof
- targets:
  - 2.2.2.15:9093
  labels:
    app: alertmanagers
eof
4)定义路由规则
cat > alert_rules/instance_down.yaml <<eof
groups:
- name: AllInstances
  rules:
  - alert: InstanceDown
    expr: up == 0
    for: 1m
    annotations:
      title: "Instance {{ $labels.instance }} down"
      description: "{{ $labels.name }} {{ $labels.instance }} of job {{ $labels.job }} has been down,current value: {{ $value }}"
    labels:
      severity: 'critical'
eof
5)启动prom和alter
例2: 钉钉报警
插件下载: https://github.com/timonwong/prometheus-webhook-dingtalk
端口: 8060

webhook-dingtalk配置模板:
timeout: 5s       #发送超时时间

no_builtin_template: true		#设置为true,则不会使用内置的消息模板,而是使用用户自定义的模板,这些模板可以在templates字段中指定

templates:      #消息模板
- contrib/templates/legacy/template.tmpl

default_message:
  title: '{{ template "legacy.title" . }}'
  text: '{{ template "legacy.content" . }}'

targets:
  自定义名称:
    url: https://oapi.dingtalk.com/robot/send?access_token=xxxxxxxxxxxx
    secret: SEC000000000000000000000
  webhook2:
    url: https://oapi.dingtalk.com/robot/send?access_token=xxxxxxxxxxxx
  webhook_legacy:
    url: https://oapi.dingtalk.com/robot/send?access_token=xxxxxxxxxxxx
    message:		#自定义消息
      title: '{{ template "legacy.title" . }}'
      text: '{{ template "legacy.content" . }}'
  webhook_mention_all:
    url: https://oapi.dingtalk.com/robot/send?access_token=xxxxxxxxxxxx
    mention:		#发送模式
      all: true		#发给所有人
  webhook_mention_users:
    url: https://oapi.dingtalk.com/robot/send?access_token=xxxxxxxxxxxx
    mention:
      mobiles: ['156xxxx8827', '189xxxx8325']		#发给指定手机号
1)钉钉建群、加机器人
2)为机器人加签
url==机器人的webhook
secret==机器人的签
3)运行prometheus-webhook-dingtalk
配置文件
#需要将url、secret改为自己的
cat > config.yml <<eof
targets:
  webhook1:
    url: https://oapi.dingtalk.com/robot/send?access_token=xxxxxxxxxxxx
    secret: SEC000000000000000000000
  webhook_mention_all:
    url: https://oapi.dingtalk.com/robot/send?access_token=xxxxxxxxxxxx
    mention:
      all: true
eof
wget https://github.com/timonwong/prometheus-webhook-dingtalk/releases/download/v2.1.0/prometheus-webhook-dingtalk-2.1.0.linux-amd64.tar.gz
tar xf prometheus-webhook-dingtalk-2.1.0.linux-amd64.tar.gz
cd prometheus-webhook-dingtalk-2.1.0.linux-amd64/
mv prometheus-webhook-dingtalk /bin/

prometheus-webhook-dingtalk --web.enable-ui --web.enable-lifecycle
4)配置alter
global:
  resolve_timeout: 5m

route:
  group_by: ['alertname', 'severity', 'namespace']
  group_wait: 1m
  group_interval: 1m
  repeat_interval: 1m
  receiver: 'dingding.webhook1'
  routes:
  - receiver: 'dingding.webhook1'
    match:
      team: DevOps
    group_wait: 10s
    group_interval: 15s
    repeat_interval: 3h
  - receiver: 'dingding.webhook.all'
    match:
      team: SRE
    group_wait: 10s
    group_interval: 15s
    repeat_interval: 3h

receivers:
- name: 'dingding.webhook1'
  webhook_configs:
  - url: 'http://172.29.1.11:8060/dingtalk/webhook1/send'
    send_resolved: true
- name: 'dingding.webhook.all'
  webhook_configs:
  - url: 'http://172.29.1.11:8060/dingtalk/webhook_mention_all/send'
    send_resolved: true
集群模式:
集群间使用gossip协议做信息通知,可做到对一个告警,只用一个altermanage报警
alertmanager --cluster.listen-address=":9094" --cluster.peer=2:8001


