试用Workflow开发WPF应用程序
研究了半个月的《WF高级程序设计》,我觉得这个框架做的太有价值了,又将WCF和Web服务结合起来了,提高了它的应用领域。工作流使我们能够轻松地建模系统,实现真正逻辑意义上的人机交互功能。这在游戏开发中特别有用,而且将开发人员从架构的角度来设计程序,提高程序设计的逻辑性和可读性。由于书上的例子都是在WinForm和控制台上的,所以我觉得有必要运用到WPF开发中。由于WPF架构与WinForm许多的差异,所以我试着做了一个WPF的随机选数游戏来体验一下WPF与WF的结合。
由于本例子主要目的在于体现一个顺序机制,按理说应该是用顺序工作流来处理这个机制,考虑到以后的扩展,我选择了状态机工作流。我们先来了解一下状态机工作流,所谓“状态机工作流”是指一组应用程序状态以及状态之间的可能的转换。每个状态都可以处理多个外部事件,外部事件能够触发器子活动的执行,而自活动又可能包含一个到其他状态的转换。
先来看一下工作流机制:
一、建立一个空的工作流项目[一个dll]
1、定义一个公共的接口
在这个接口中设计了五个事件和一个方法。定义的事件是为了提供给工作流的使用。
Generic.xaml
2、实现接口服务的PointSelectService类,这个外部服务类提供一组事件调用方法和一个事件,供宿主使用,相应的代码如下:
 代码
代码
using System;
using System.Collections.Generic;
using System.Linq;
using System.Text;
using System.Workflow.Activities;
using System.Workflow.Runtime;

namespace SelectGameWorkflow
{
    /// <summary>
    /// 实现服务接口类
    /// </summary>
    public     class PointSelectService:IPointSelect
    {
        #region IPointSelect 成员

        public event EventHandler<System.Workflow.Activities.ExternalDataEventArgs> StartSelect;

        public event EventHandler<System.Workflow.Activities.ExternalDataEventArgs> StopSelect;

        public event EventHandler<System.Workflow.Activities.ExternalDataEventArgs> First;

        public event EventHandler<System.Workflow.Activities.ExternalDataEventArgs> Second;

        public event EventHandler<System.Workflow.Activities.ExternalDataEventArgs> Third;

        public event EventHandler<ExternalDataEventArgs> Completed;

        /// <summary>
        /// 调用宿主的事件
        /// </summary>
        /// <param name="message"></param>
        public void SendMessage(string message)
        {
            if (MessageReceived != null)
                MessageReceived(this, new MessageReceivedEventArgs(WorkflowEnvironment.WorkflowInstanceId, message));
        }

        #endregion

        /// <summary>
        ///
        /// 工作流使用的事件
        /// </summary>
        public event EventHandler<MessageReceivedEventArgs> MessageReceived;

        #region 以下定义了一组供宿主使用的方法


        public void OnStartSelect(ExternalDataEventArgs e)
        {
            if (StartSelect != null)
                StartSelect(null, e);
        }

        public void OnStopSelect(ExternalDataEventArgs e)
        {
            if (StopSelect != null)
                StopSelect(null, e);
        }

        public void OnFirst(ExternalDataEventArgs e)
        {
            if (First != null)
                First(null, e);
        }

        public void OnSecond(ExternalDataEventArgs e)
        {
            if (Second != null)
                Second(null, e);
        }

        public void OnThird(ExternalDataEventArgs e)
        {
            if (Third != null)
                Third(null, e);
        }

        public void OnCompleted(ExternalDataEventArgs e)
        {
            if (Completed != null)
                Completed(null, e);
        }
        #endregion

    }
这里还定义了一个EventArgs的派生类来传递服务消息:
 代码
代码
   /// <summary>
    /// 把工作流的相应消息发送到本地服务中
    /// </summary>
    [Serializable]
    public class MessageReceivedEventArgs : ExternalDataEventArgs
    {
        public string Message { get; set; }


        /// <summary>
        /// 在构造器中传递消息,其中会将工作流的ID传递到基类中
        /// </summary>
        /// <param name="instanceId"></param>
        /// <param name="message"></param>
        public MessageReceivedEventArgs(Guid instanceId, string message):base(instanceId )
        {
            this.Message = message;
        }
    }
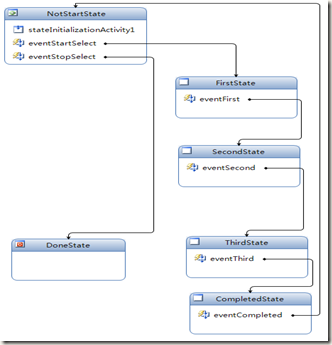
3、在刚才的项目中添加一个状态机工作流:
这里面定义了一组状态事件处理,如表所示:
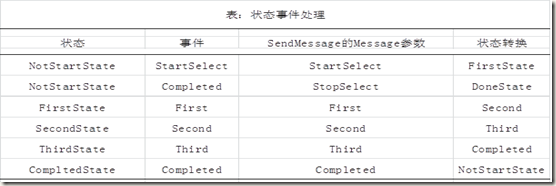
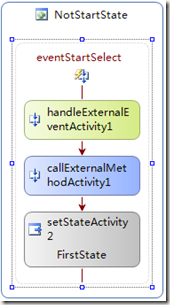
除了DoneState状态之外,每个State都有定义了三个活动,按顺序分别是:
handleExternalEventActivity、callExternalMethodActivity、setStateActivity,可以分别设置他们的接口、事件和方法,如图所示:
现在我们可以重新生成动态库了,得到SelectGameWorkflow.dll文件
二、添加一个WPF项目作为工作流的宿主,这个WPF命名为SelectGameWPF,
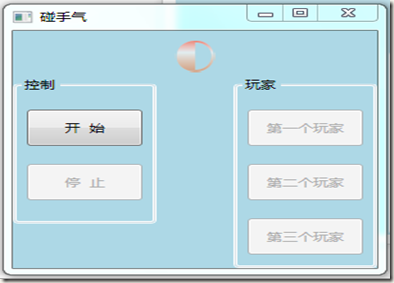
1、 先设计界面,效果如下:
相应的XAML代码如下:
 代码
代码
<Window x:Class="SelectGameWPF.Window1"
    xmlns="http://schemas.microsoft.com/winfx/2006/xaml/presentation"
    xmlns:x="http://schemas.microsoft.com/winfx/2006/xaml"
    Title="碰手气" Height="300" Width="300" xmlns:my="clr-namespace:C4F.VistaP2P.WPF.Chat;assembly=C4F_P2PWPFControls" Loaded="Window_Loaded">
    <Grid Background="LightBlue" >
        <Grid.RowDefinitions>
            <RowDefinition Height="50"/>
            <RowDefinition/>
        </Grid.RowDefinitions>
        <TextBlock Height="58"  Text="{Binding Number}" x:Name="numberText" VerticalAlignment="Top" FontSize="48" HorizontalAlignment="Center" FontFamily="Broadway">
            <TextBlock.OpacityMask>
                <LinearGradientBrush EndPoint="0.5,1" StartPoint="0.5,0">
                    <GradientStop Color="#E5000000" Offset="0"/>
                    <GradientStop Color="#99FFFFFF" Offset="1"/>
                </LinearGradientBrush>
            </TextBlock.OpacityMask>
            <TextBlock.Foreground>
                <LinearGradientBrush EndPoint="0.5,1" StartPoint="0.5,0">
                    <GradientStop Color="#FFED7B69" Offset="0"/>
                    <GradientStop Color="#CCFFFFFF" Offset="0.385"/>
                    <GradientStop Color="#E8E78851" Offset="0.931"/>
                </LinearGradientBrush>
            </TextBlock.Foreground>
        </TextBlock>
        <GroupBox HorizontalAlignment="Left" VerticalAlignment="Top" Grid.Row="1">
            <GroupBox.Header>
                <TextBlock Text="控制"/>
            </GroupBox.Header>
            <StackPanel  Width="100" x:Name="controlButtons">
                    <Button x:Name="startBtn"  Content="开  始" Height="40" Margin="5,20" Click="startBtn_Click"/>
                    <Button x:Name="stopBtn"  Content="停  止" Height="40" Margin="5,0,5,20" Click="stopBtn_Click"/>
                </StackPanel>
        </GroupBox>
        <GroupBox x:Name="control" Header="玩家" HorizontalAlignment="Right" VerticalAlignment="Top" Grid.Row="1">
            <StackPanel  Width="100" x:Name="playerButtons">
                <Button x:Name="firstBtn"  Content="第一个玩家" Height="40" Margin="5,20" Click="firstBtn_Click"/>
                <Button x:Name="secondBtn"  Content="第二个玩家" Height="40" Margin="5,0,5,20" Click="secondBtn_Click"/>
                <Button x:Name="thirdBtn"  Content="第三个玩家" Height="40" Margin="5,0,5,20" Click="thirdBtn_Click"/>
            </StackPanel>
        </GroupBox>
        <TextBlock Grid.Row="1" Height="23" HorizontalAlignment="Left"  Name="textBlock1" Text="{Binding Message}" VerticalAlignment="Bottom" Width="160" />
    </Grid>
</Window>
2、添加两个更新界面的依赖属性:
 代码
代码
      #region 定义一个随机数和消息
        public static readonly DependencyProperty NumberProperty = DependencyProperty.Register("Number", typeof(int), typeof(Window1), new PropertyMetadata(0));
        public static readonly DependencyProperty MessageProperty = DependencyProperty.Register("Message", typeof(string), typeof(Window1), new PropertyMetadata(string.Empty));

        public int Number {
            get { return (int)GetValue(NumberProperty); }
            set { SetValue(NumberProperty, value); }
        }

        public string Message {
            get { return (string)GetValue(MessageProperty); }
            set { SetValue(MessageProperty, value); }
        }
        #endregion
为了能够在UI线程中更新视觉元素,我们使用了和WinForm的Invoke异步调用的相同的Dispatcher类的BeginInvoke方法:
如下所示:
 代码
代码
     private delegate void UpdateDelegate();

  /// <summary>
        /// 在指定的时间段内产生随机数
        /// </summary>
        /// <param name="sender"></param>
        /// <param name="e"></param>
        void timer_Tick(object sender, EventArgs e)
        {
            ///将数字呈现到前台
            UpdateDelegate theDelg = () =>
            {
                Number = rand.Next(100);
            };
            Dispatcher.BeginInvoke(theDelg, null);
        }
其他的更新方式如上面所示
3、接下来调用工作流项目以及将上面的SelectGameService服务加入到运行时:
 代码
代码
     /// <summary>
        /// 初始化工作流服务
        /// </summary>
        /// <param name="sender"></param>
        /// <param name="e"></param>
        private void Window_Loaded(object sender, RoutedEventArgs e)
        {
            manager = new WorkflowRuntimeManager(new WorkflowRuntime());

            //在转换到新的状态时发生
            manager.WorkflowRuntime.WorkflowIdled += new EventHandler<WorkflowEventArgs>(WorkflowRuntime_WorkflowIdled);
            AddServices(manager.WorkflowRuntime);
        }

        /// <summary>
        /// 处理Idle事件
        /// </summary>
        /// <param name="sender"></param>
        /// <param name="e"></param>
        void WorkflowRuntime_WorkflowIdled(object sender, WorkflowEventArgs e)
        {
            UpdateDelegate theDelg = () =>
            {
                EnableEventButton(false);

                //得到内部队列信息
                ReadOnlyCollection<WorkflowQueueInfo> queueInfoData = instanceWrapper.WorkflowInstance.GetWorkflowQueueData();

                if (queueInfoData != null) {
                    foreach (WorkflowQueueInfo  info in queueInfoData) {
                        EventQueueName eventQueue = info.QueueName as EventQueueName;

                        if (eventQueue == null)
                            break;

                        EnableButtonForEvent(eventQueue.MethodName);
                    }
                }
            };

            Dispatcher.BeginInvoke(theDelg, null);
        }

        /// <summary>
        /// 根据事件名启用按钮
        /// </summary>
        /// <param name="p"></param>
        private void EnableButtonForEvent(string eventName)
        {
            var buttons1 = controlButtons.Children;
            var buttons2 = playerButtons.Children;

            foreach (Button btn in buttons1) {
                if (btn.Tag.ToString() == eventName)
                    btn.IsEnabled = true;
            }
            foreach (Button btn in buttons2)
            {
                if (btn.Tag.ToString() == eventName)
                    btn.IsEnabled = true;
            }
        }

        /// <summary>
        /// 将服务添加到工作流运行时
        /// </summary>
        /// <param name="workflowRuntime"></param>
        private void AddServices(WorkflowRuntime workflowRuntime)
        {
            ExternalDataExchangeService exchangeService = new ExternalDataExchangeService();
            workflowRuntime.AddService(exchangeService);

            pointSelectService = new PointSelectService();
            pointSelectService.MessageReceived += new EventHandler<MessageReceivedEventArgs>(pointSelectService_MessageReceived);
            exchangeService.AddService(pointSelectService);
        }

        void pointSelectService_MessageReceived(object sender, MessageReceivedEventArgs e)
        {
            UpdateDelegate theDelg = () =>
            {
                Message = e.Message;
            };

            //保存工作流实例标识
           System.Threading.Thread.Sleep(1000);
           timer.Start();
           instanceId = e.InstanceId;

           Dispatcher.BeginInvoke(theDelg, null);
        }
    }
4、初始化按钮状态和定时器
 代码
代码
   public Window1()
        {
            InitializeComponent();
            timer = new DispatcherTimer();
            timer.Interval = new TimeSpan(0, 0, 0, 0, 300);
            timer.Tick += new EventHandler(timer_Tick);
            rand = new Random();

            //设置按钮标识
            startBtn.Tag = "StartSelect";
            stopBtn.Tag = "StopSelect";
            firstBtn.Tag = "First";
            secondBtn.Tag = "Second";
            thirdBtn.Tag = "Third";

            EnableEventButton(false);

            DataContext = this;
        }

        /// <summary>
        /// 控制按钮的状态
        /// </summary>
        /// <param name="p"></param>
        private void EnableEventButton(bool p)
        {
            stopBtn.IsEnabled = p;
            firstBtn.IsEnabled = p;
            secondBtn.IsEnabled = p;
            thirdBtn.IsEnabled = p;
        }
5、添加所有按钮的Click事件,其目的是为了调用服务的方法和宿主本身的定时器的,如下所示:
 代码
代码
   #region Click events

        private void firstBtn_Click(object sender, System.Windows.RoutedEventArgs e)
        {
            // TODO: Add event handler implementation here.
            try
            {
                pointSelectService.OnFirst(GetEventArgs());
                timer.Stop();
                if (Number > temp)
                {
                    temp = Number;
                    tempPlayer = "First";
                }
            }
            catch(Exception ex) {
                HandleException(ex);
            }
        }

        private void secondBtn_Click(object sender, System.Windows.RoutedEventArgs e)
        {
            // TODO: Add event handler implementation here.
            try
            {
                pointSelectService.OnSecond(GetEventArgs());
                timer.Stop();

                if (Number > temp)
                {
                    temp = Number;
                    tempPlayer = "Second";
                }
            }
            catch (Exception ex) {
                HandleException(ex);
            }
        }

        private void thirdBtn_Click(object sender, System.Windows.RoutedEventArgs e)
        {
            // TODO: Add event handler implementation here.
            try
            {
                pointSelectService.OnThird(GetEventArgs());
                timer.Stop();

                if (Number > temp)
                {
                    temp = Number;
                    tempPlayer = "Third";
                }

                if (tempPlayer != string.Empty)
                {
                    UpdateDelegate theDelg = () =>
                    {
                        Message = tempPlayer + "得到最大数: " + temp.ToString();
                    };
                    Dispatcher.BeginInvoke(theDelg, null);
                }
            }
            catch (Exception ex) {
                HandleException(ex);
            }
        }

        #endregion
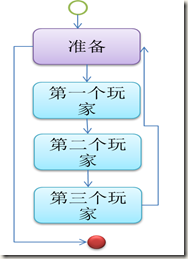
至此,整个工程全部完成,现在在启动应用程序以后,我们就可以按如开头的工作流图的顺序依次 :Start-First-Second-Third-Start。
其实这个程序我们可以演化到多用户顺序执行程序,如网络麻将、斗地主等互动游戏的结合。
完整代码下载:Workflow






【推荐】国内首个AI IDE,深度理解中文开发场景,立即下载体验Trae
【推荐】编程新体验,更懂你的AI,立即体验豆包MarsCode编程助手
【推荐】抖音旗下AI助手豆包,你的智能百科全书,全免费不限次数
【推荐】轻量又高性能的 SSH 工具 IShell:AI 加持,快人一步
· 如何编写易于单元测试的代码
· 10年+ .NET Coder 心语,封装的思维:从隐藏、稳定开始理解其本质意义
· .NET Core 中如何实现缓存的预热?
· 从 HTTP 原因短语缺失研究 HTTP/2 和 HTTP/3 的设计差异
· AI与.NET技术实操系列:向量存储与相似性搜索在 .NET 中的实现
· 周边上新:园子的第一款马克杯温暖上架
· Open-Sora 2.0 重磅开源!
· 分享 3 个 .NET 开源的文件压缩处理库,助力快速实现文件压缩解压功能!
· Ollama——大语言模型本地部署的极速利器
· [AI/GPT/综述] AI Agent的设计模式综述