

【Django】【一】视图
3.1 来写个登陆功能
启动Django的guest项目
cd到guest路径 我的本地路径是 ~/LIbrary/Python/3.7/bin/guest/
终端如下
B0178RQ2019070018:guest wangxue$ python3 manage.py runserver
Watching for file changes with StatReloader
Performing system checks...
System check identified no issues (0 silenced).
You have 17 unapplied migration(s). Your project may not work properly until you apply the migrations for app(s): admin, auth, contenttypes, sessions.
Run 'python manage.py migrate' to apply them.
June 16, 2020 - 07:12:48
Django version 3.0.6, using settings 'guest.settings'
Starting development server at http://127.0.0.1:8000/
Quit the server with CONTROL-C.
编辑 guest/sign/templates/index.html
<!DOCTYPE html>
<html lang="en">
<head>
<meta charset="UTF-8">
<title>Django Page</title>
</head>
<body>
<h1>发布会管理</h1>
<form>
<input name="username" type="text" placeholder="username">
<input name="password" type="password" placeholder="password">
<button id="btn" type="submit">登录</button>
</form>
</body>
</html>
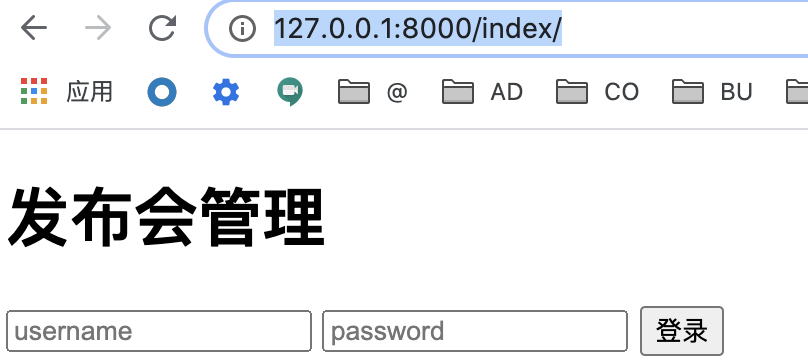
浏览器访问 http://127.0.0.1:8000/index/
3.1.1 GET 和 POST请求
1 Get 请求
编辑 guest/sign/templates/index.html
<!DOCTYPE html>
<html lang="en">
<head>
    <meta charset="UTF-8">
    <title>Django Page</title>
</head>
<body>
 <h1>发布会管理</h1>
 <form method="get">
      <input name="username" type="text" placeholder="username"><br>
      <input name="password" type="password" placeholder="password"><br>
      <button id="btn" type="submit">登录</button>
 </form>

</body>
</html>
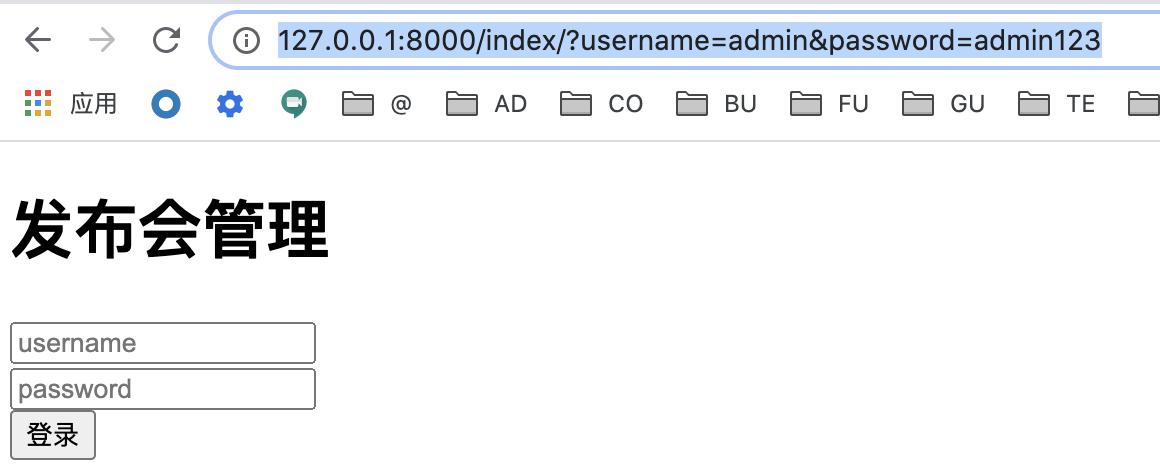
浏览器访问 http://127.0.0.1:8000/index/
输入用户名密码 admin/admin123 点击登陆按钮
浏览器显示请求地址 http://127.0.0.1:8000/index/?username=admin&password=admin123
2 Post
guest/sign/templates/index.html method改成post
浏览器访问 http://127.0.0.1:8000/index/
输入用户名密码 admin/admin123 点击登陆按钮
网页显示
Forbidden (403)
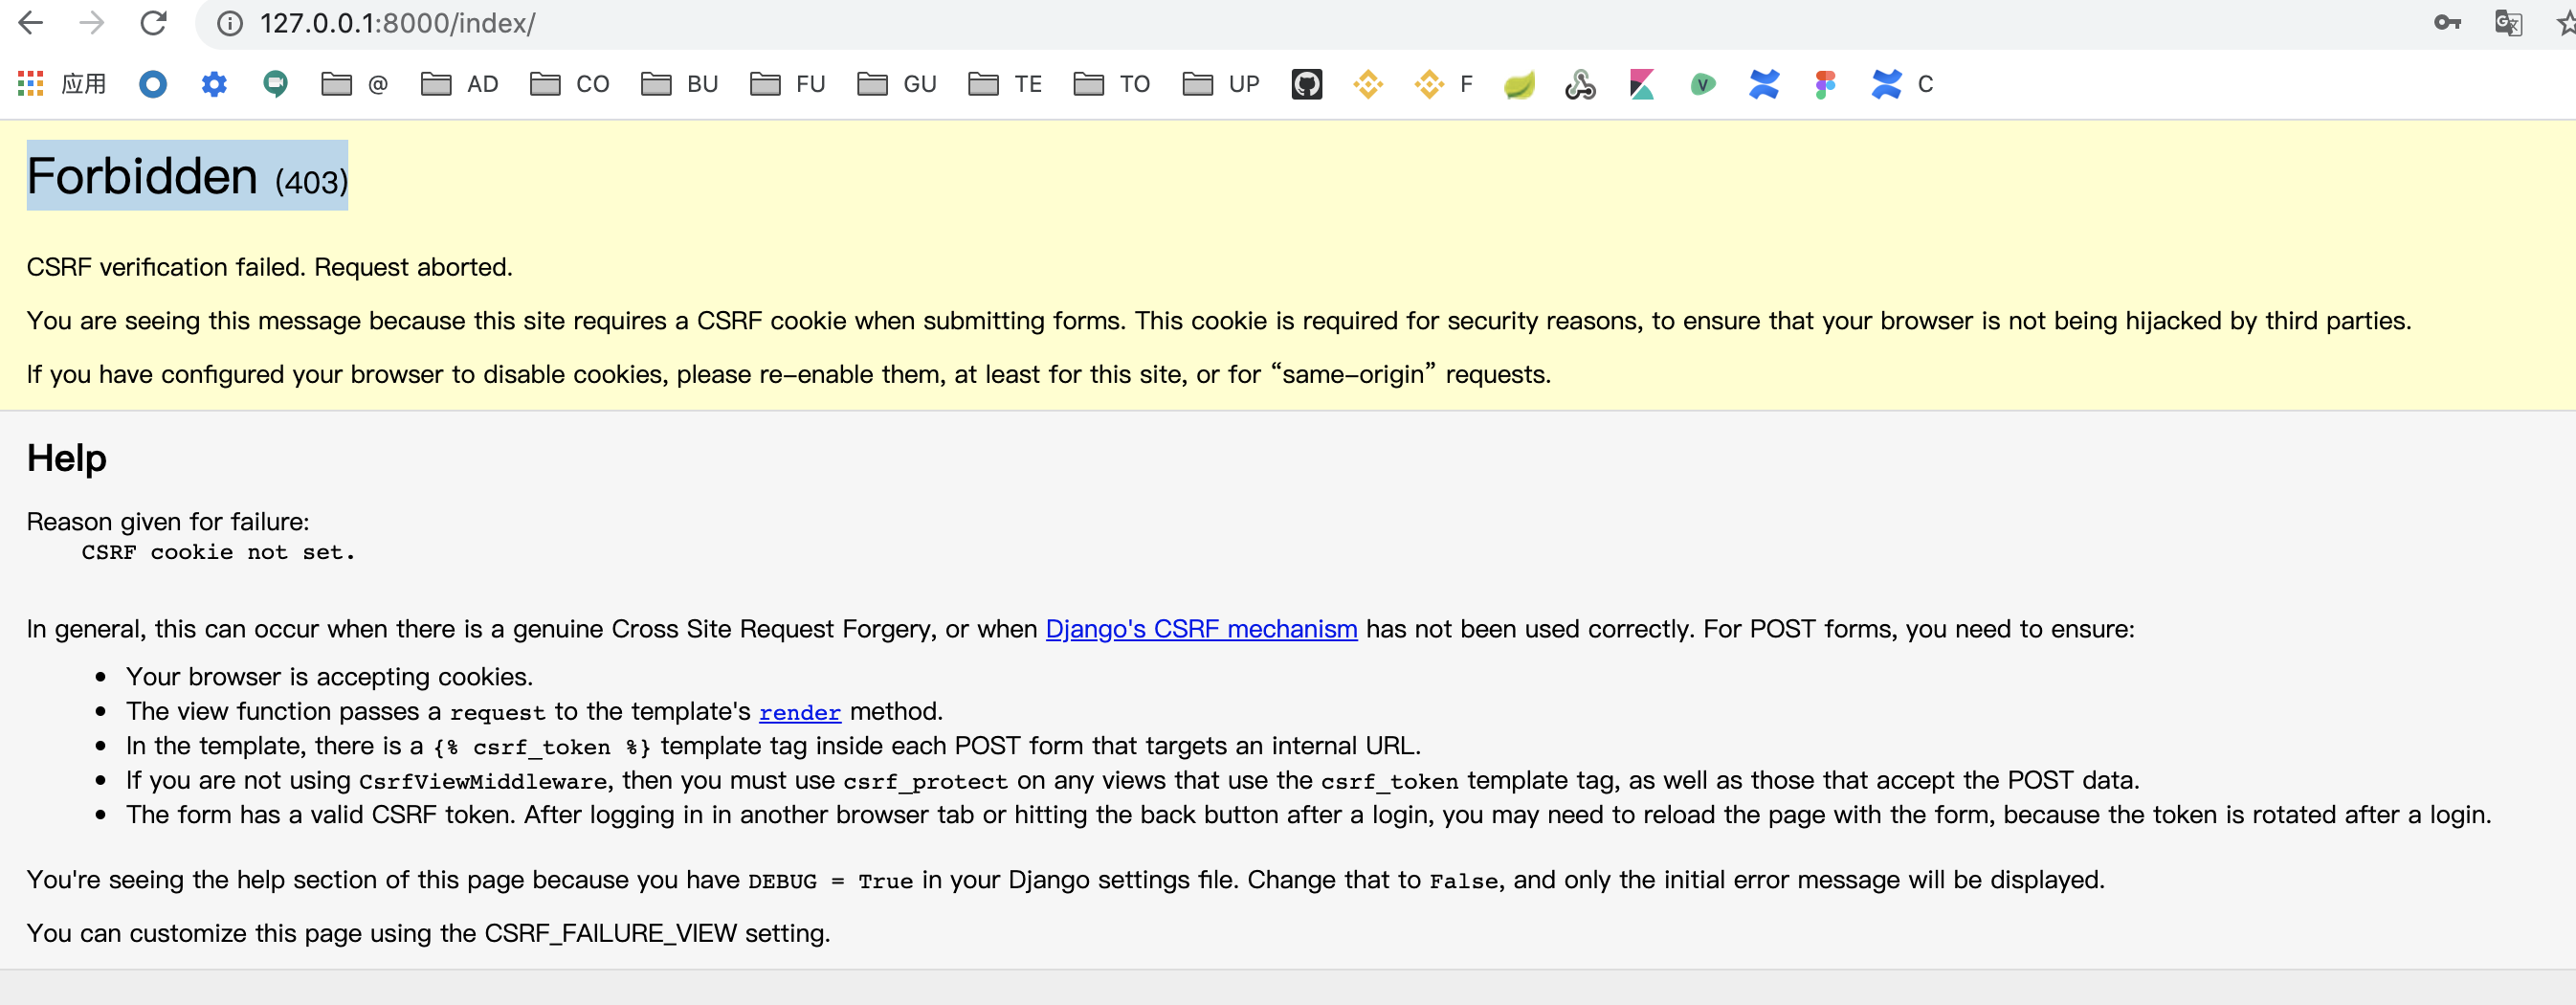
CSRF (cross-site request forgery )漏洞
Django针对CSRF的保护措施是在生成的每个表单中放置一个自动生成的令牌,通过这个令牌判断POST请求是否来自同一个网站
之前的模版都是纯粹的HTML 这里首次用到Django的模版,使用“模版标签”添加CSRF令牌 在form表单中加 {% csrf_token %}
guest/sign/templates/index.html
<!DOCTYPE html>
<html lang="en">
<head>
<meta charset="UTF-8">
<title>Django Page</title>
</head>
<body>
<h1>发布会管理</h1>
<form method="post">
<input name="username" type="text" placeholder="username"><br>
<input name="password" type="password" placeholder="password"><br>
<button id="btn" type="submit">登录</button>
{% csrf_token %}
</form>
</body>
</html>
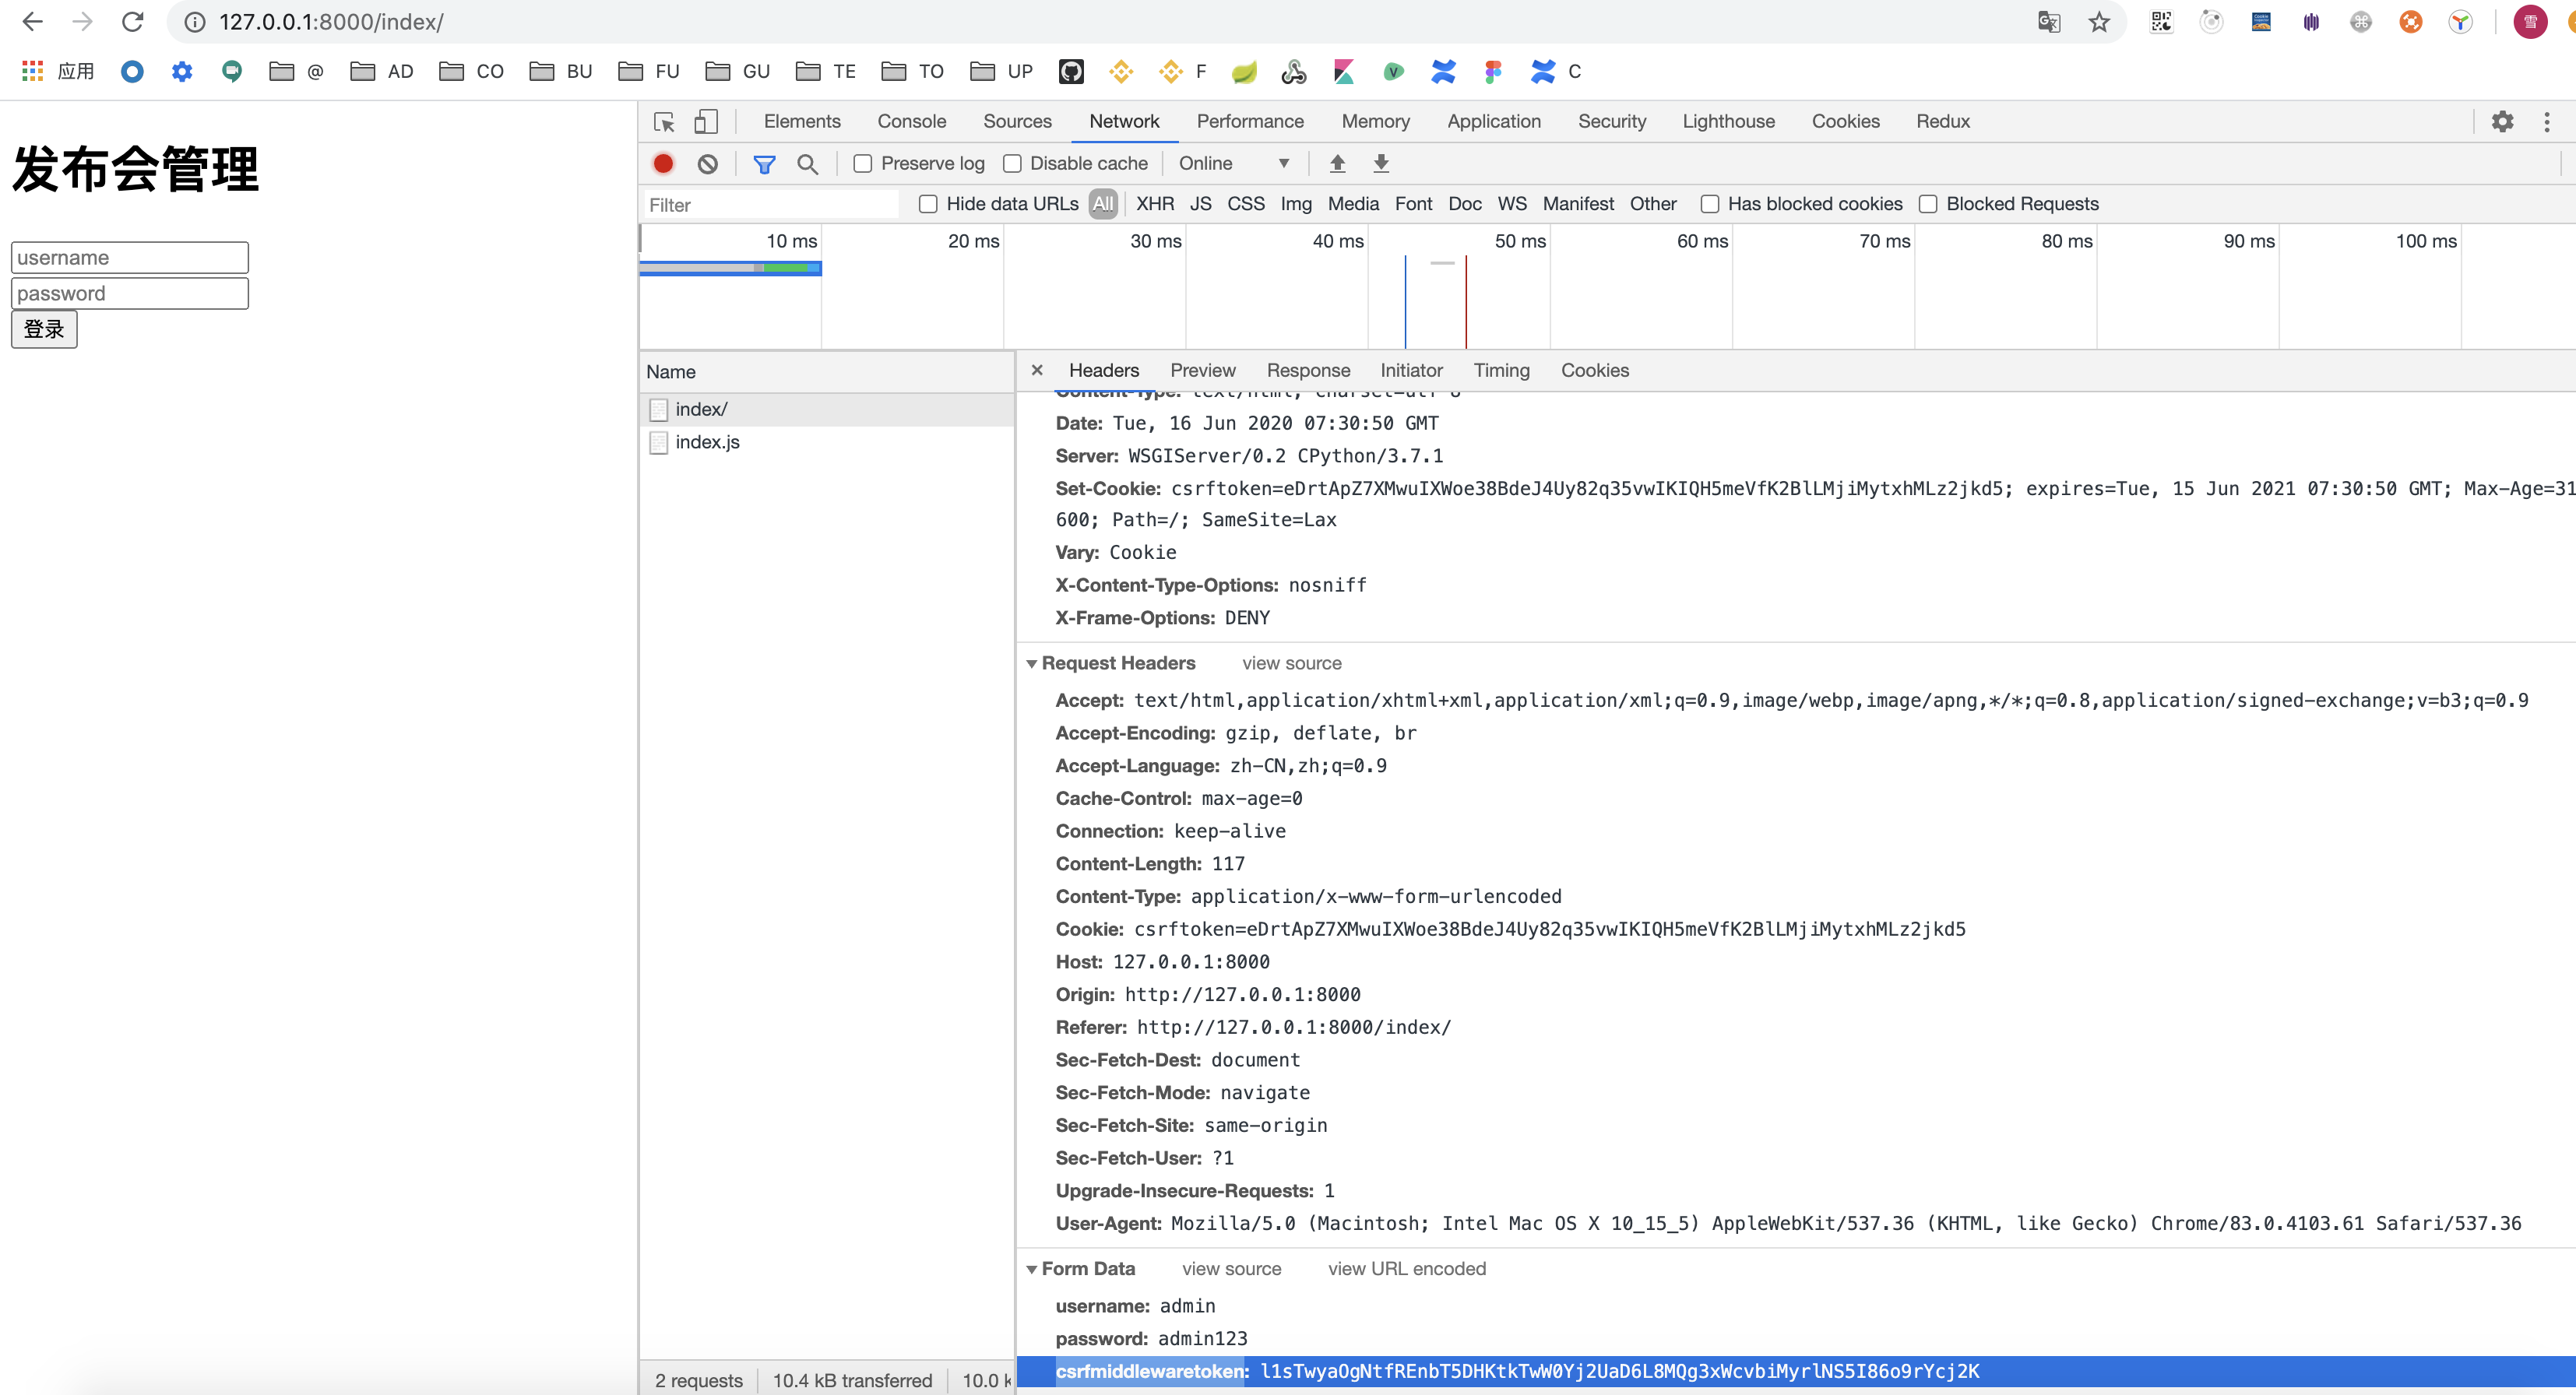
然后 刷新页面并重新提交登陆表单,错误提示页面消失了
如下图所示,浏览器右键->检查-> network 查看post请求,会看到除了 username password 参数外,还多了一个 csrfmiddlewaretoken字段,改字段的值为当前会话ID加上一个密钥的散列值。
如果想忽略掉该检查,guest/settings.py 注释csrf
......
MIDDLEWARE = [
    'django.middleware.security.SecurityMiddleware',
    'django.contrib.sessions.middleware.SessionMiddleware',
    'django.middleware.common.CommonMiddleware',
    #'django.middleware.csrf.CsrfViewMiddleware',
    'django.contrib.auth.middleware.AuthenticationMiddleware',
    'django.contrib.messages.middleware.MessageMiddleware',
    'django.middleware.clickjacking.XFrameOptionsMiddleware',
]
......


3.1.2 处理登陆请求
--guest/sign/templates/index.html--
<!DOCTYPE html>
<html lang="en">
<head>
    <meta charset="UTF-8">
    <title>Django Page</title>
</head>
<body>
 <h1>发布会管理</h1>
 <form method="post" action="/login_action/">
      <input name="username" type="text" placeholder="username"><br>
      <input name="password" type="password" placeholder="password"><br>
      {{ error }}<br>
      <button id="btn" type="submit">登录</button>
 </form>

</body>
</html>

--urls.py--
urlpatterns = [
......
    url(r'login_action/$', views.login_action),
]
--guest/sign/views.py--
def login_action(request):
    if request.method == 'POST':
        username = request.POST.get('username', '')
        password = request.POST.get('password', '')
        if username == 'admin' and password == 'admin123':
            return HttpResponse('login success!')
        else:
            return render(request, 'index.html', {'error': 'username or password error!'})


3.1.3 登陆成功页
--guest/sign/templates/event_manage.html--
<!DOCTYPE html>
<html lang="en">
<head>
    <meta charset="UTF-8">
    <title>Event Manage Page</title>
</head>
<body>
  <h1>Login Success!</h1>
</body>
</html>
--guest/sign/views.py--
from django.shortcuts import render
from django.http import HttpResponse, HttpResponseRedirect


def index(request):
    return render(request, "index.html")

def login_action(request):
    if request.method == 'POST':
        username = request.POST.get('username', '')
        password = request.POST.get('password', '')
        if username == 'admin' and password == 'admin123':
            return HttpResponseRedirect('/event_manage/')
        else:
            return render(request, 'index.html', {'error': 'username or password error!'})


# 发布会管理
def event_manage(request):
    return render(request, 'event_manage.html')
--urls.py--
urlpatterns = [
......
url(r'event_manage/$', views.event_manage),
]

3.2 Cookie Session
--guest/sign/views.py--
from django.shortcuts import render
from django.http import HttpResponse, HttpResponseRedirect


def index(request):
    return render(request, "index.html")

def login_action(request):
    if request.method == 'POST':
        username = request.POST.get('username', '')
        password = request.POST.get('password', '')
        if username == 'admin' and password == 'admin123':
            response = HttpResponseRedirect('/event_manage/')
            response.set_cookie('user', username, 3600)  #3600 cookie 在浏览器中的保持时间 默认单位 秒
            return response
        else:
            return render(request, 'index.html', {'error': 'username or password error!'})


# 发布会管理
def event_manage(request):
    username = request.COOKIES.get('user')
    return render(request, 'event_manage.html', {'user': username})
--guest/sign/templates/event_manage.html--
<!DOCTYPE html>
<html lang="en">
<head>
    <meta charset="UTF-8">
    <title>Event Manage Page</title>
</head>
<body>
  <h1>Login Success!</h1>
  <div style="float: right">
      <a>嘿! {{ user }} 欢迎 </a><hr/>
  </div>
</body>
</html>

重新登陆

3.2.2 session
--guest/sign/views.py--
from django.shortcuts import render
from django.http import HttpResponse, HttpResponseRedirect


def index(request):
    return render(request, "index.html")

def login_action(request):
    if request.method == 'POST':
        username = request.POST.get('username', '')
        password = request.POST.get('password', '')
        if username == 'admin' and password == 'admin123':
            response = HttpResponseRedirect('/event_manage/')
            #response.set_cookie('user', username, 3600)  # 添加浏览器cookie
            request.session['user'] = username  # 将session信息记录到浏览器
            return response
        else:
            return render(request, 'index.html', {'error': 'username or password error!'})


# 发布会管理
def event_manage(request):
    #username = request.COOKIES.get('user', '')  # 读取浏览器cookie
    username = request.session.get('user', '')
    return render(request, 'event_manage.html', {'user': username})

再次尝试登陆 不出意外会得到一个错误
no such table: django_session
这个错误跟session机制有关,既然要从web服务器端来记录用户的信息,那么一定要有存放用户sessionid对应信息的地方才行。所以,我们需要创建django_session表。
别着急, Django已经帮我们准备好这些常用的表,只需要他们生成即可,是不是很贴心。

参考 https://www.cnblogs.com/suren2017/p/7602564.html
这里可以直接从3开始 因为直接用的就是mysql

为什么可以通过migrate命令进行数据迁移。我们也没有配置数据库啊~ 因为Django已经默认SQLite3数据库。 在settings.py中,查看SQLite3数据库的配置。
......
# Database
# https://docs.djangoproject.com/en/3.0/ref/settings/#databases

DATABASES = {
    'default': {
        'ENGINE': 'django.db.backends.sqlite3',
        'NAME': os.path.join(BASE_DIR, 'db.sqlite3'),
    }
}
......

3.3 Django 认证系统
3.3.1 登陆Admin后台
创建登陆Admin后台的管理员账号
\guest> python3 manage.py createsuperuser
Username (leave blank to use 'fnngj') : admin
Email address: admin@mail.com
Password: #输入密码
Password (again) #重复输入密码
Superuser created successfully.
访问
http://127.0.0.1:8000/admin 用钢创建的用户登陆

创建用户 用新创建的用户也可以登陆。
3.3.2 Django 认证登陆
Django已经帮我们封装好了用户认证和登陆的相关方式,只需要拿来用即可。并且,同样使用auth_user 表中的数据进行验证,
----views.py --------
....
from django.contrib import auth

.......
def login_action(request):
    if request.method == 'POST':
        username = request.POST.get('username', '')
        password = request.POST.get('password', '')
        user = auth.authenticate(username=username, password=password)
        if user is not None:
            auth.login(request, user)
            response = HttpResponseRedirect('/event_manage/')
            request.session['user'] = username  # 将session信息记录到浏览器
            return response
        else:
            return render(request, 'index.html', {'error': 'username or password error!'})
.........


使用管理员账号还有管理员创建的用户进行登陆测试吧

3,3,3  关闭窗户

尝试直接在浏览器中访问,http://127.0.0.1:8000/event_manage/ 。直接打开了登陆成功页,那么为什么还需要通过登陆来访问这个页面呢?因此,我们需要把这些“窗户”都关上,使用户只能通过登陆来访问。

--views.py-------

....
from django.contrib.auth.decorators import login_required
...
@login_required
def event_manage(request):
....

清理浏览器缓存,再次访问
浏览器中访问,http://127.0.0.1:8000/event_manage/
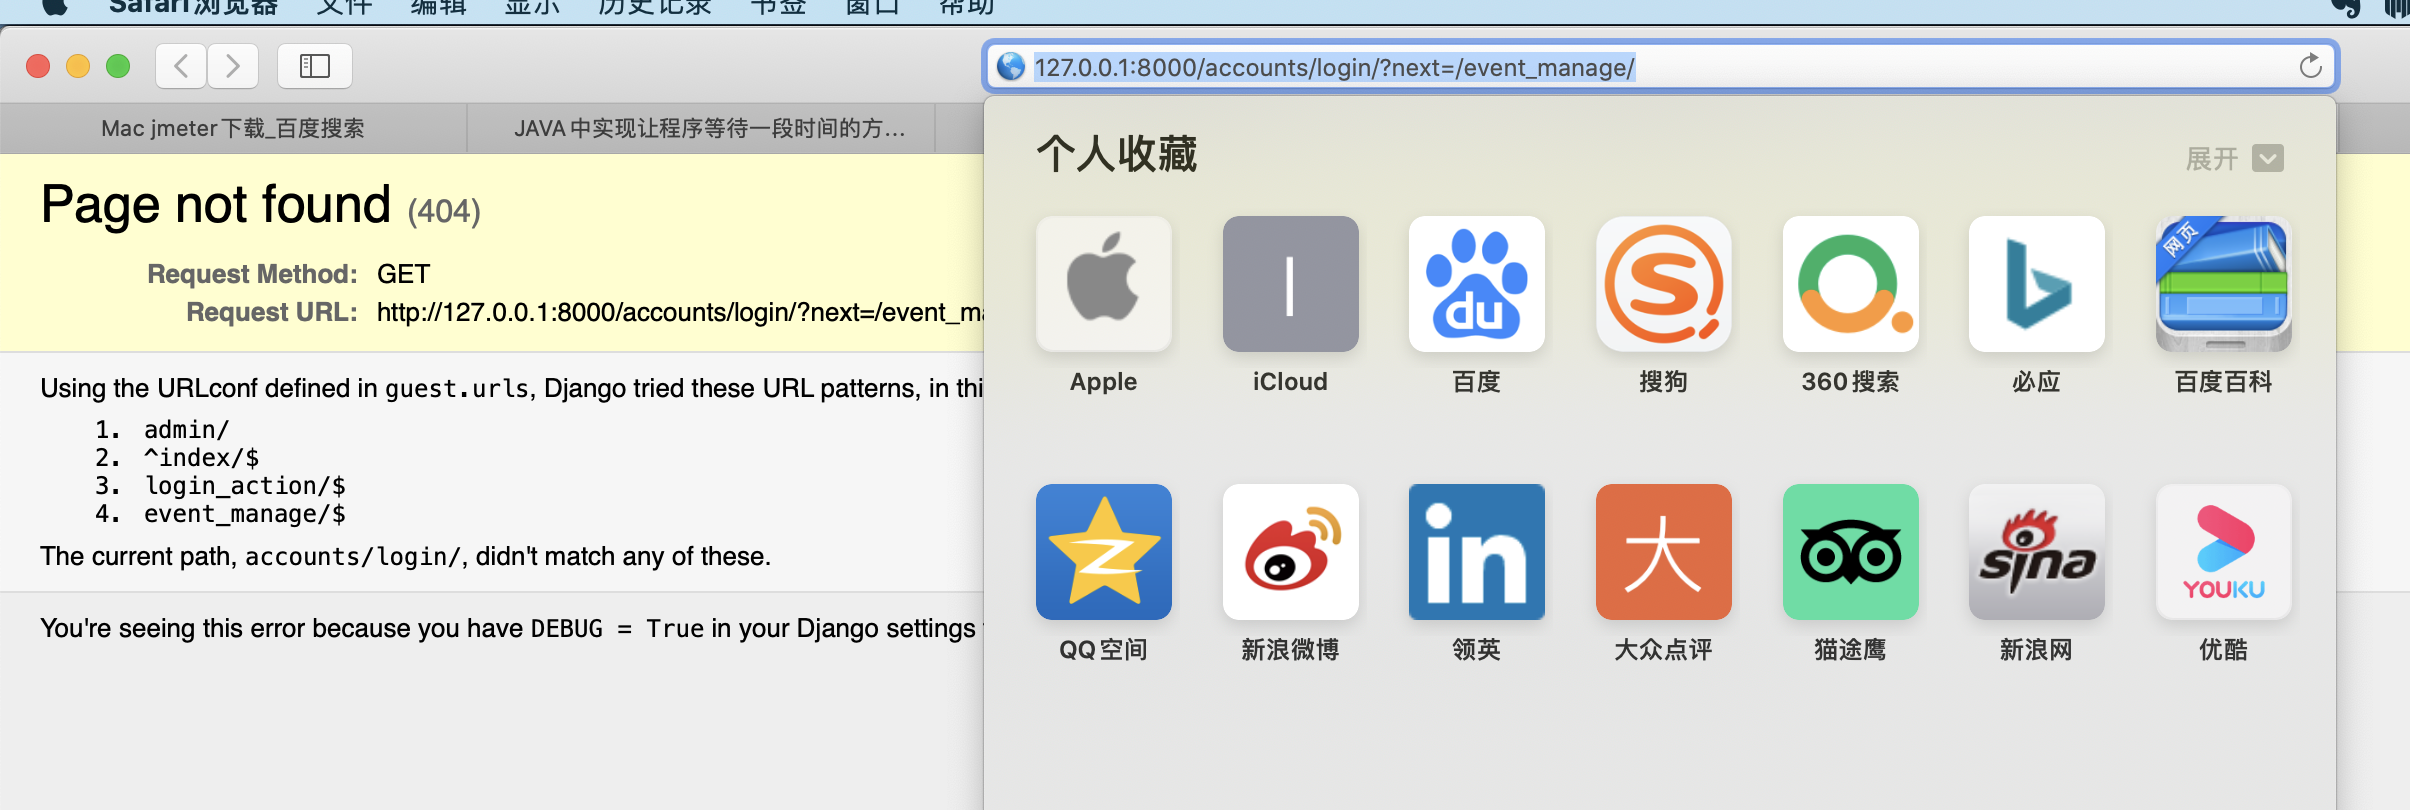
404
如果你足够细心,就可以发现访问被@login_required装饰的视图时,默认跳转的URL中会包含“/accounts/login/",为什么不让它直接跳转到登陆页面呢?
修改url.py
-- guest/guest/urls.py
...
url(r'^$', views.index),

url(r'^index/$', views.index),
url(r'^accounts/login/$', views.index),
...

此时,用户访问
http://127.0.0.1:8000/
http://127.0.0.1:8000/index/
http://127.0.0.1:8000/event_manage/

默认都会跳转到登陆页面。但是,如果你访问的是其他不存在的路径,比如/abc/, 则依然会显示404,这时候需要设置默认的404页面,我们会在项目部署一章来添加这个页面。

 浙公网安备 33010602011771号