SpringBoot登录国际化
一、准备工作
1.1): 我们需要设置编码格式,防止乱码的出现
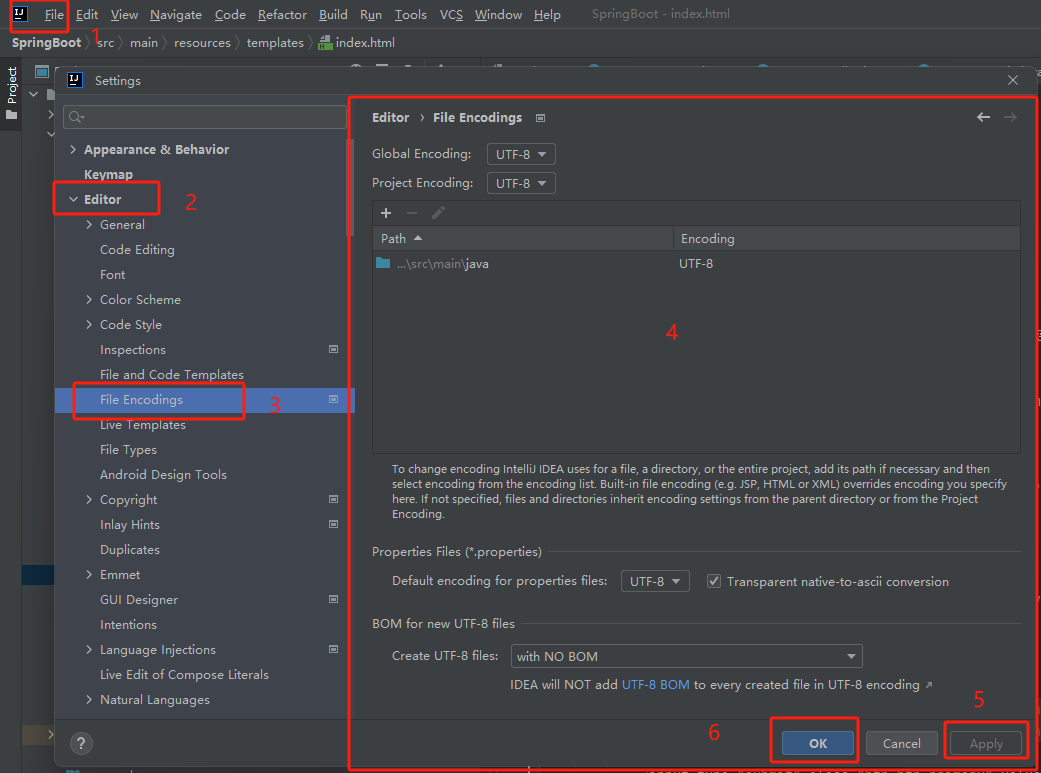
需要将你们的Idea设置成跟我一样哦~
二、创建国际化相关文件

注意:我们这里的登录页名字叫 index.html哦~
2.1): 在 i18n 文件夹中创建 index.properties 。
2.2): 在 i18n 文件夹中创建 index_zh_CN.properties,此时我们就会发现文件变了目录,生成了一个新的目录,名字叫 Resource Bundle 'index' 文件夹。
2.3): 这一步就有点特殊了哦~,当然也可以用老办法加哦!,我们在这里右击 Resource Bundle 'index' 文件夹,如下方图1,选择下放我红框中的选项。会弹出新的框框,选择2图的‘+’输入 en_US 点击ok,此时咱们就可以看图3就会多出来一个 en_US(英语/美国/),这样咱就点ok就好。此时查看文件夹中就会多出来一个 index_en_US.properties 文件。此时就和我上图中的目录一样了。


三、新增注意事项(新版IDEA需要设置,老版本可忽略直接进入第四步)
解释:因为新版本去掉了,可视化配置,所以我们新版本的就需要增加一个插件。
快捷键:Ctrl + Alt + S,会弹出一个设置框,跟我下图操作即可👇!
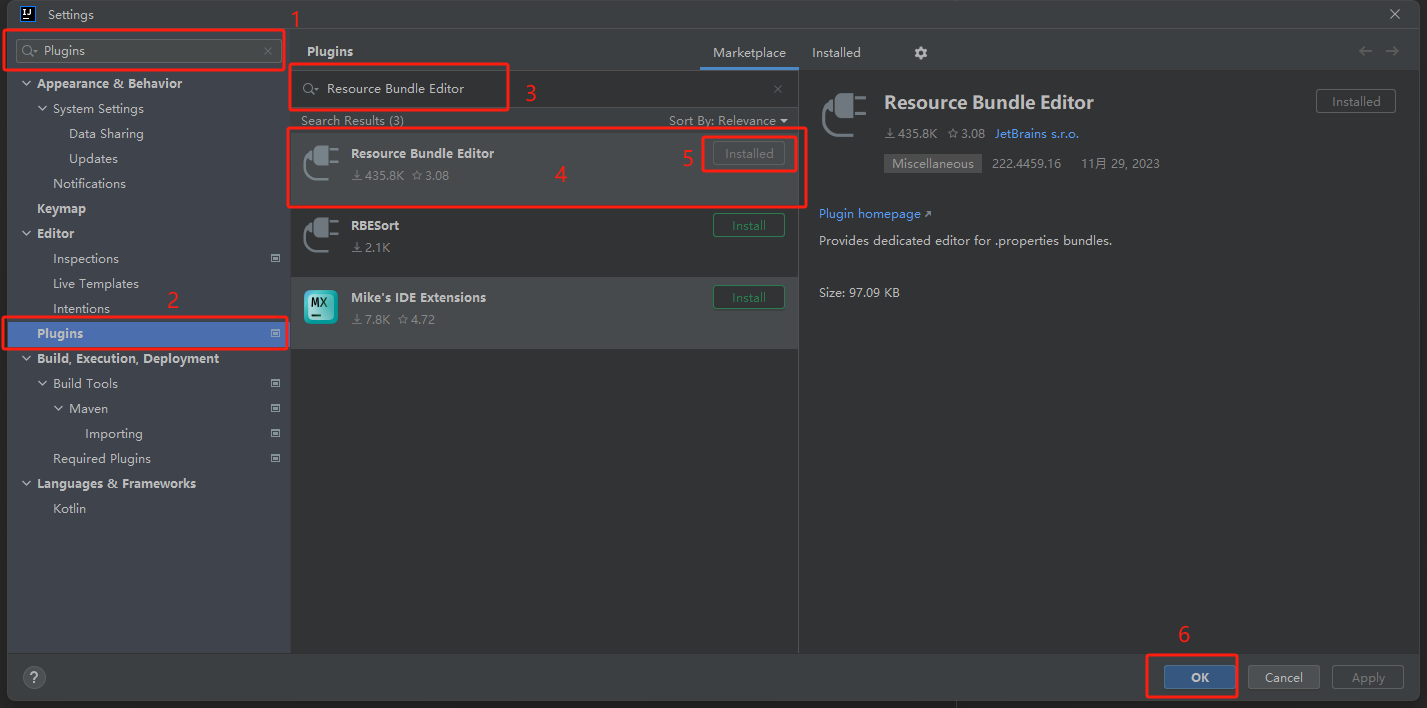
设置完成后,我们随便点击一个刚刚创建的配置文件,下方就会有 Resource Bundle 按钮。点击后就可以看到和我一样的了。


四、配置内容
4.1): 配置方法(这个需要根据自己的页面内容添加哦~只能多不能少,最好是刚刚好😂)
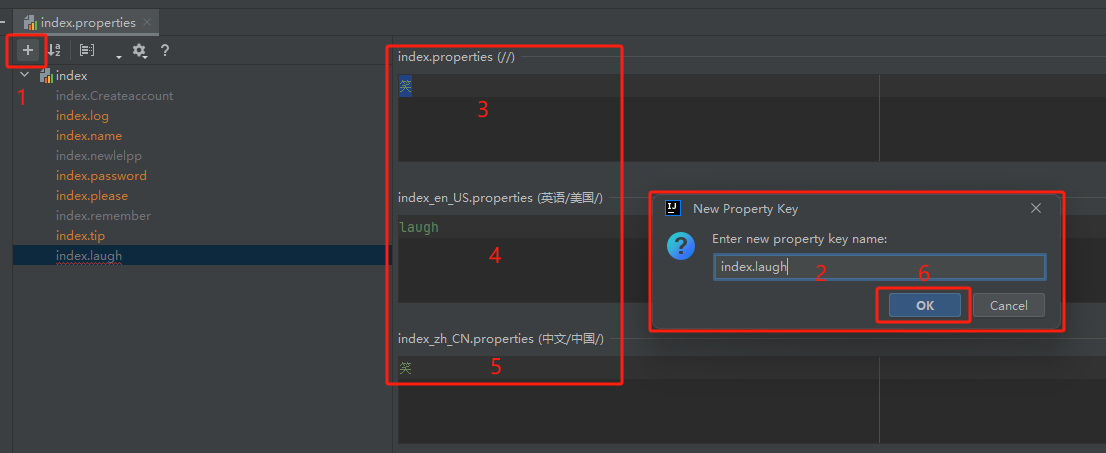
4.2): 我们依次添加下面的配置就好
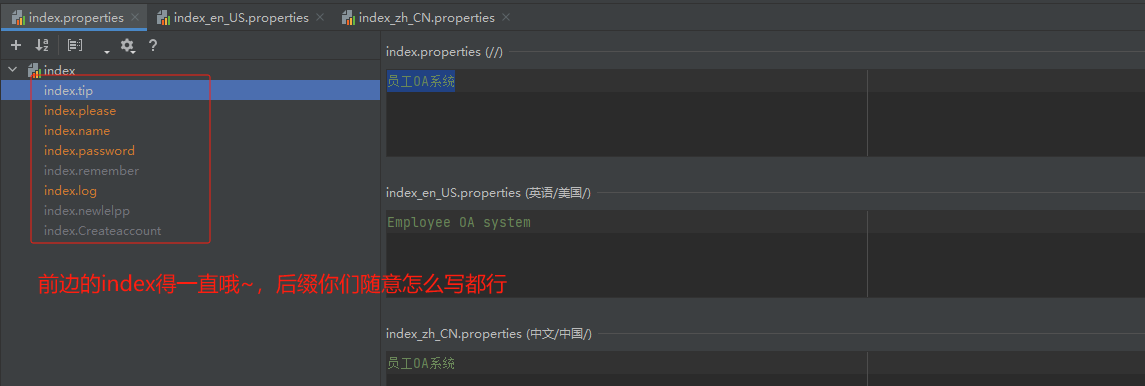
4.3): 配置完成后各文件内部展示
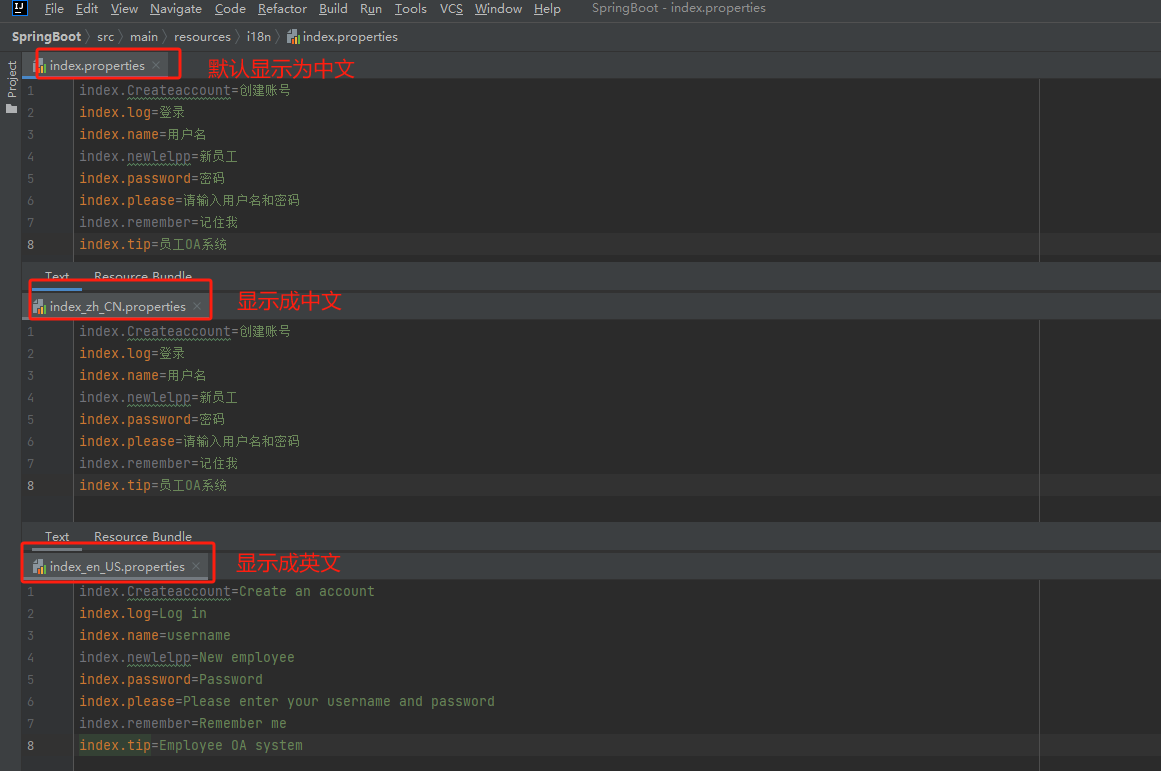
五、直接上案例代码
5.1): 项目目录
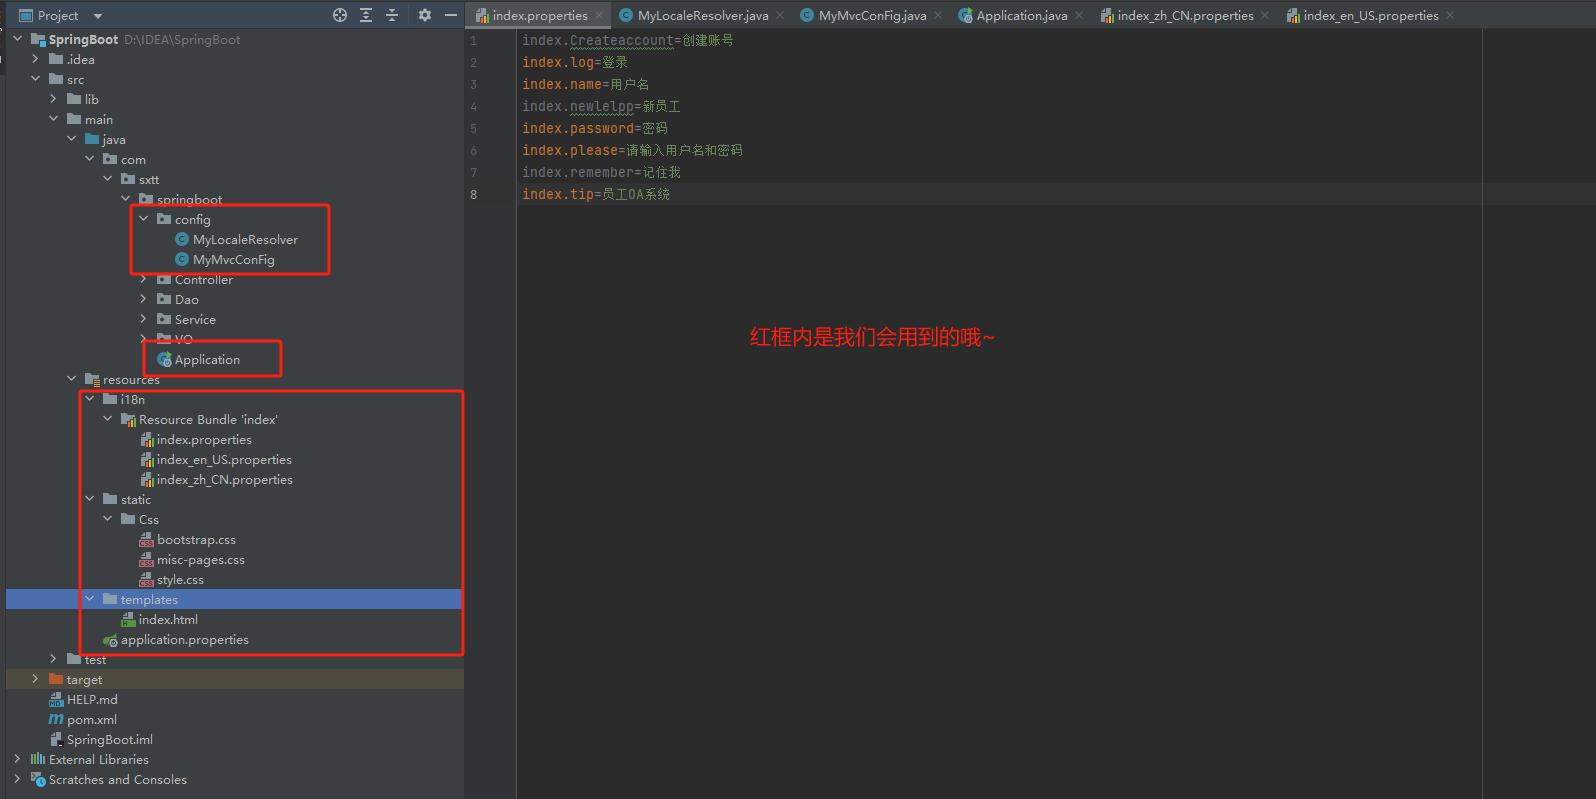
5.2): config 下面的 MyLocaleResolver
package com.sxtt.springboot.config;

import org.springframework.web.servlet.LocaleResolver;
import org.thymeleaf.util.StringUtils;
import javax.servlet.http.HttpServletRequest;
import javax.servlet.http.HttpServletResponse;
import java.util.Locale;

/**
 * @author Laugh"
 */
public class MyLocaleResolver implements LocaleResolver {
    //解析请求
    @Override
    public Locale resolveLocale(HttpServletRequest request) {
        //获取请求在的语言参数
        String language = request.getParameter("lge");
        Locale locale = Locale.getDefault();
        //判断请求是否为空
        if(!StringUtils.isEmpty(language)){
        // 分割
            String[] split = language.split("_");
        // 国家  地区
            locale = new Locale(split[0], split[1]);
        }
        return locale;
    }

    @Override
    public void setLocale(HttpServletRequest httpServletRequest, HttpServletResponse httpServletResponse, Locale locale) {
    }
}
5.3): config 下面的 MyMvcConFig
package com.sxtt.springboot.config;

import org.springframework.context.annotation.Bean;
import org.springframework.context.annotation.Configuration;
import org.springframework.web.servlet.LocaleResolver;
import org.springframework.web.servlet.config.annotation.ViewControllerRegistry;
import org.springframework.web.servlet.config.annotation.WebMvcConfigurer;

/**
 * @author Laugh"
 */
@Configuration
public class MyMvcConFig implements WebMvcConfigurer {
    //在@Configuration标注的重写配置文件中配置请求映射   快捷键 alt + ins   找ViewControllerRegistry就ok
    public void addViewControllers(ViewControllerRegistry registry){
        registry.addViewController("/").setViewName("index");
        registry.addViewController("text").setViewName("index");
        registry.addViewController("index").setViewName("index");
        registry.addViewController("login").setViewName("index");
        registry.addViewController("login.html").setViewName("index");
        registry.addViewController("index.html").setViewName("index");
    }
    //自定义的国际化就生效
    @Bean
    public LocaleResolver localeResolver(){
        return new MyLocaleResolver();
    }
}
5.4): 主类 Application
package com.sxtt.springboot;

import org.springframework.boot.SpringApplication;
import org.springframework.boot.autoconfigure.SpringBootApplication;

/**
 * @author Laugh"
 */
@SpringBootApplication
public class Application {
    public static void main(String[] args) {
        SpringApplication.run(Application.class, args);
    }
}
5.5): Resource Bundle 'index' 下面的 index.properties
index.Createaccount=创建账号
index.log=登录
index.name=用户名
index.newlelpp=新员工
index.password=密码
index.please=请输入用户名和密码
index.remember=记住我
index.tip=员工OA系统
5.6): Resource Bundle 'index' 下面的 index_en_US.properties
index.Createaccount=Create an account
index.log=Log in
index.name=username
index.newlelpp=New employee
index.password=Password
index.please=Please enter your username and password
index.remember=Remember me
index.tip=Employee OA system
5.7): Resource Bundle 'index' 下面的 index_zh_CN.properties
index.Createaccount=创建账号
index.log=登录
index.name=用户名
index.newlelpp=新员工
index.password=密码
index.please=请输入用户名和密码
index.remember=记住我
index.tip=员工OA系统
5.8): Css 下面的 bootstrap.css
打开链接地址:bootstrap.css【直接点击即可打开,打开稍微有点慢,静等即可~】
5.9): Css 下面的 misc-pages.css
打开链接地址:misc-pages.css【直接点击即可打开,打开稍微有点慢,静等即可~】
5.10): Css 下面的 style.css
打开链接地址:style.css【直接点击即可打开,打开稍微有点慢,静等即可~】
5.11): templates下面的 index.html
<!DOCTYPE HTML>

<html xmlns="http://www.w3.org/1999/xhtml" xmlns:th="http://www.thymeleaf.org">
<head>
    <meta http-equiv="Content-Type" content="text/html; charset=utf-8" />
    <link rel="stylesheet" th:href="@{/Css/bootstrap.css}">
    <link rel="stylesheet" th:href="@{Css/misc-pages.css}">
    <title>登录-员工OA系统</title>
</head>
<body class="simple-page">
<div class="simple-page-wrap">

    <div class="simple-page-logo ">
        <a href="">
            <span></span>
            <span th:text="#{index.tip}">员工OA系统</span>
        </a>
    </div>

    <div class="simple-page-form" id="login-form">
        <h4 class="form-title m-b-xl text-center" th:text="#{index.please}">请输入用户名和密码</h4>
        <form action="" method="post">

            <div class="form-group">
                <input type="text" name="username" class="form-control" th:placeholder="#{index.name}" >
            </div>

            <div class="form-group">
                <input type="password" name="password" class="form-control" th:placeholder="#{index.password}" >
            </div>

            <div class="form-group m-b-xl">
                <input name="remenberme" value="remenberme" type="checkbox" id="keep_me_logged_in"  style="height:auto;margin:0 0 0 10px;" />
                <label for="keep_me_logged_in" >[[#{index.remember}]]</label>
            </div>

            <a class="btn btn-sm" th:href="@{/index.html(lge='zh_CN')}">中文</a>
            <a class="btn btn-sm" th:href="@{/index.html(lge='en_US')}">English</a>

            <input type="submit" class="btn btn-primary" th:value="#{index.log}" >
        </form>
    </div>

    <div class="simple-page-footer">
        <p>
            <small>[[#{index.newlelpp}]] ?</small>
            <a href="">[[#{index.Createaccount}]]</a>
        </p>
    </div>
</div>
</body>
</html>
5.12): applcation.properties
#关闭模板引擎的缓存
spring.thymeleaf.cache=false
#变更虚拟目录  因为增加的虚拟目录所以访问路径需要有所修改哦~   http://localhost:8080/laugh/login
server.servlet.context-path=/laugh
#我们的配置文件的真实目录位置
spring.messages.basename=i18n.index
六、效果展示
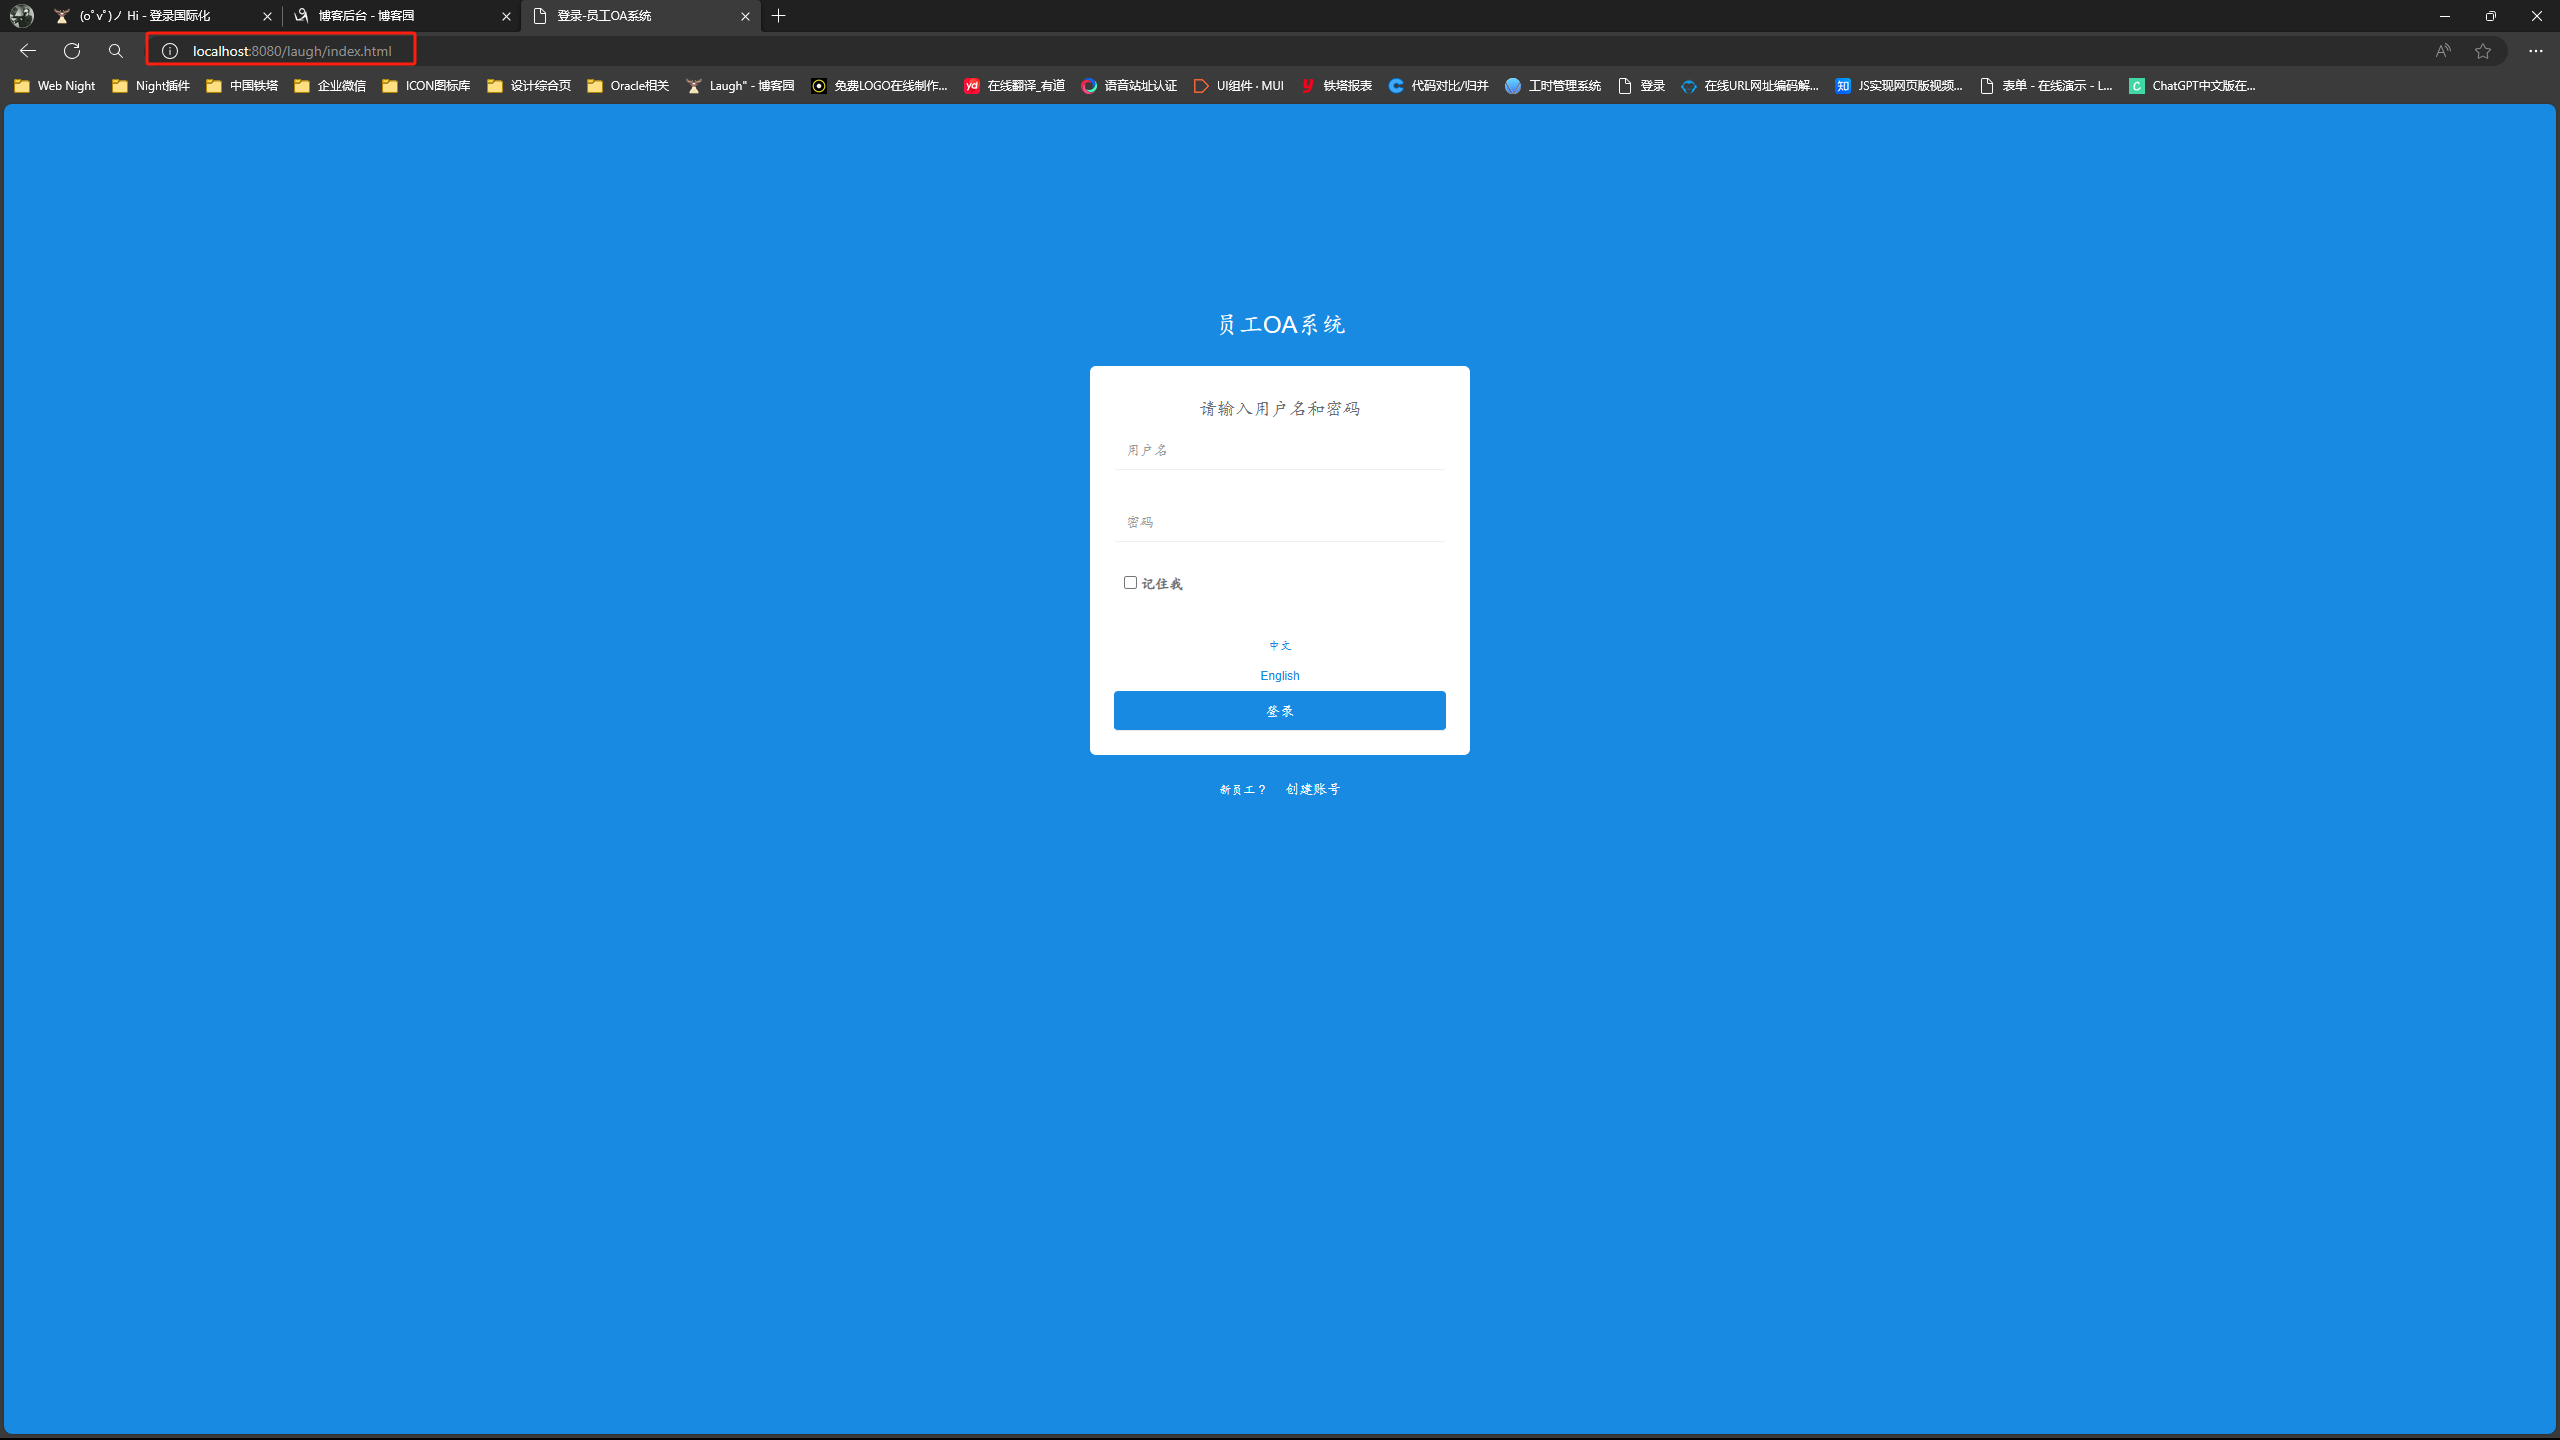
6.1): 系统默认展示
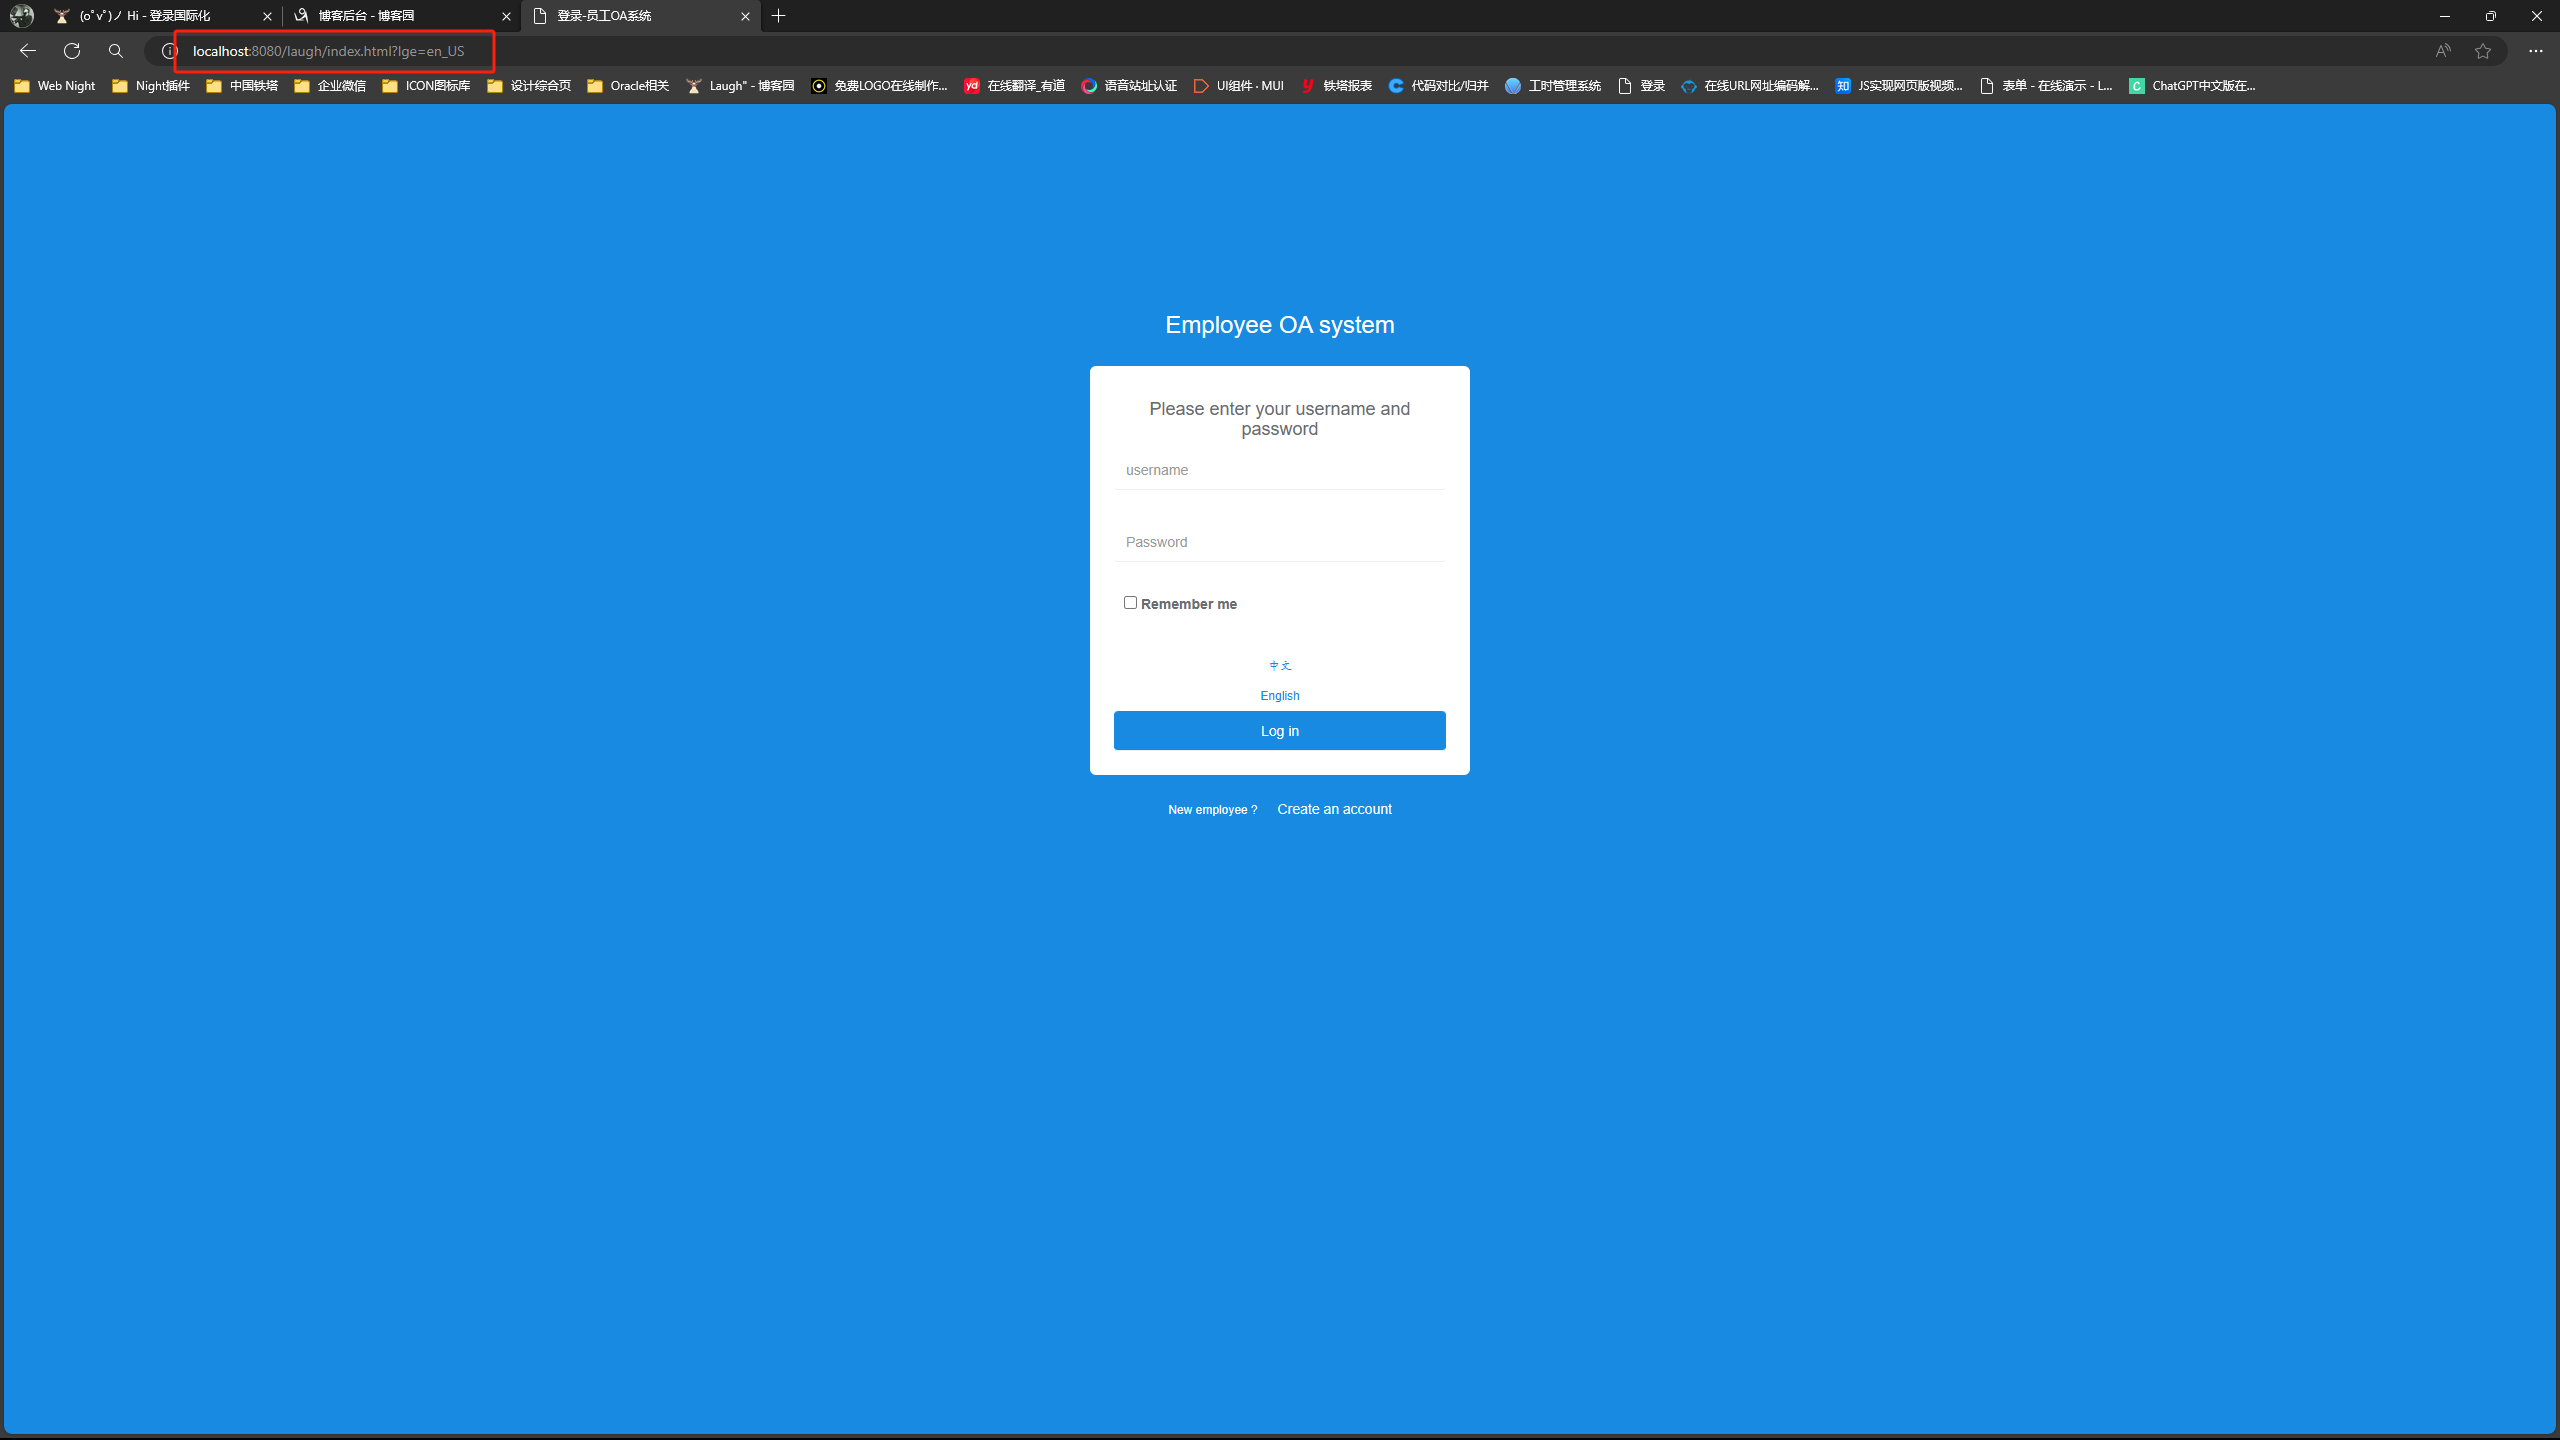
6.2): 英文展示
6.3): 中文展示
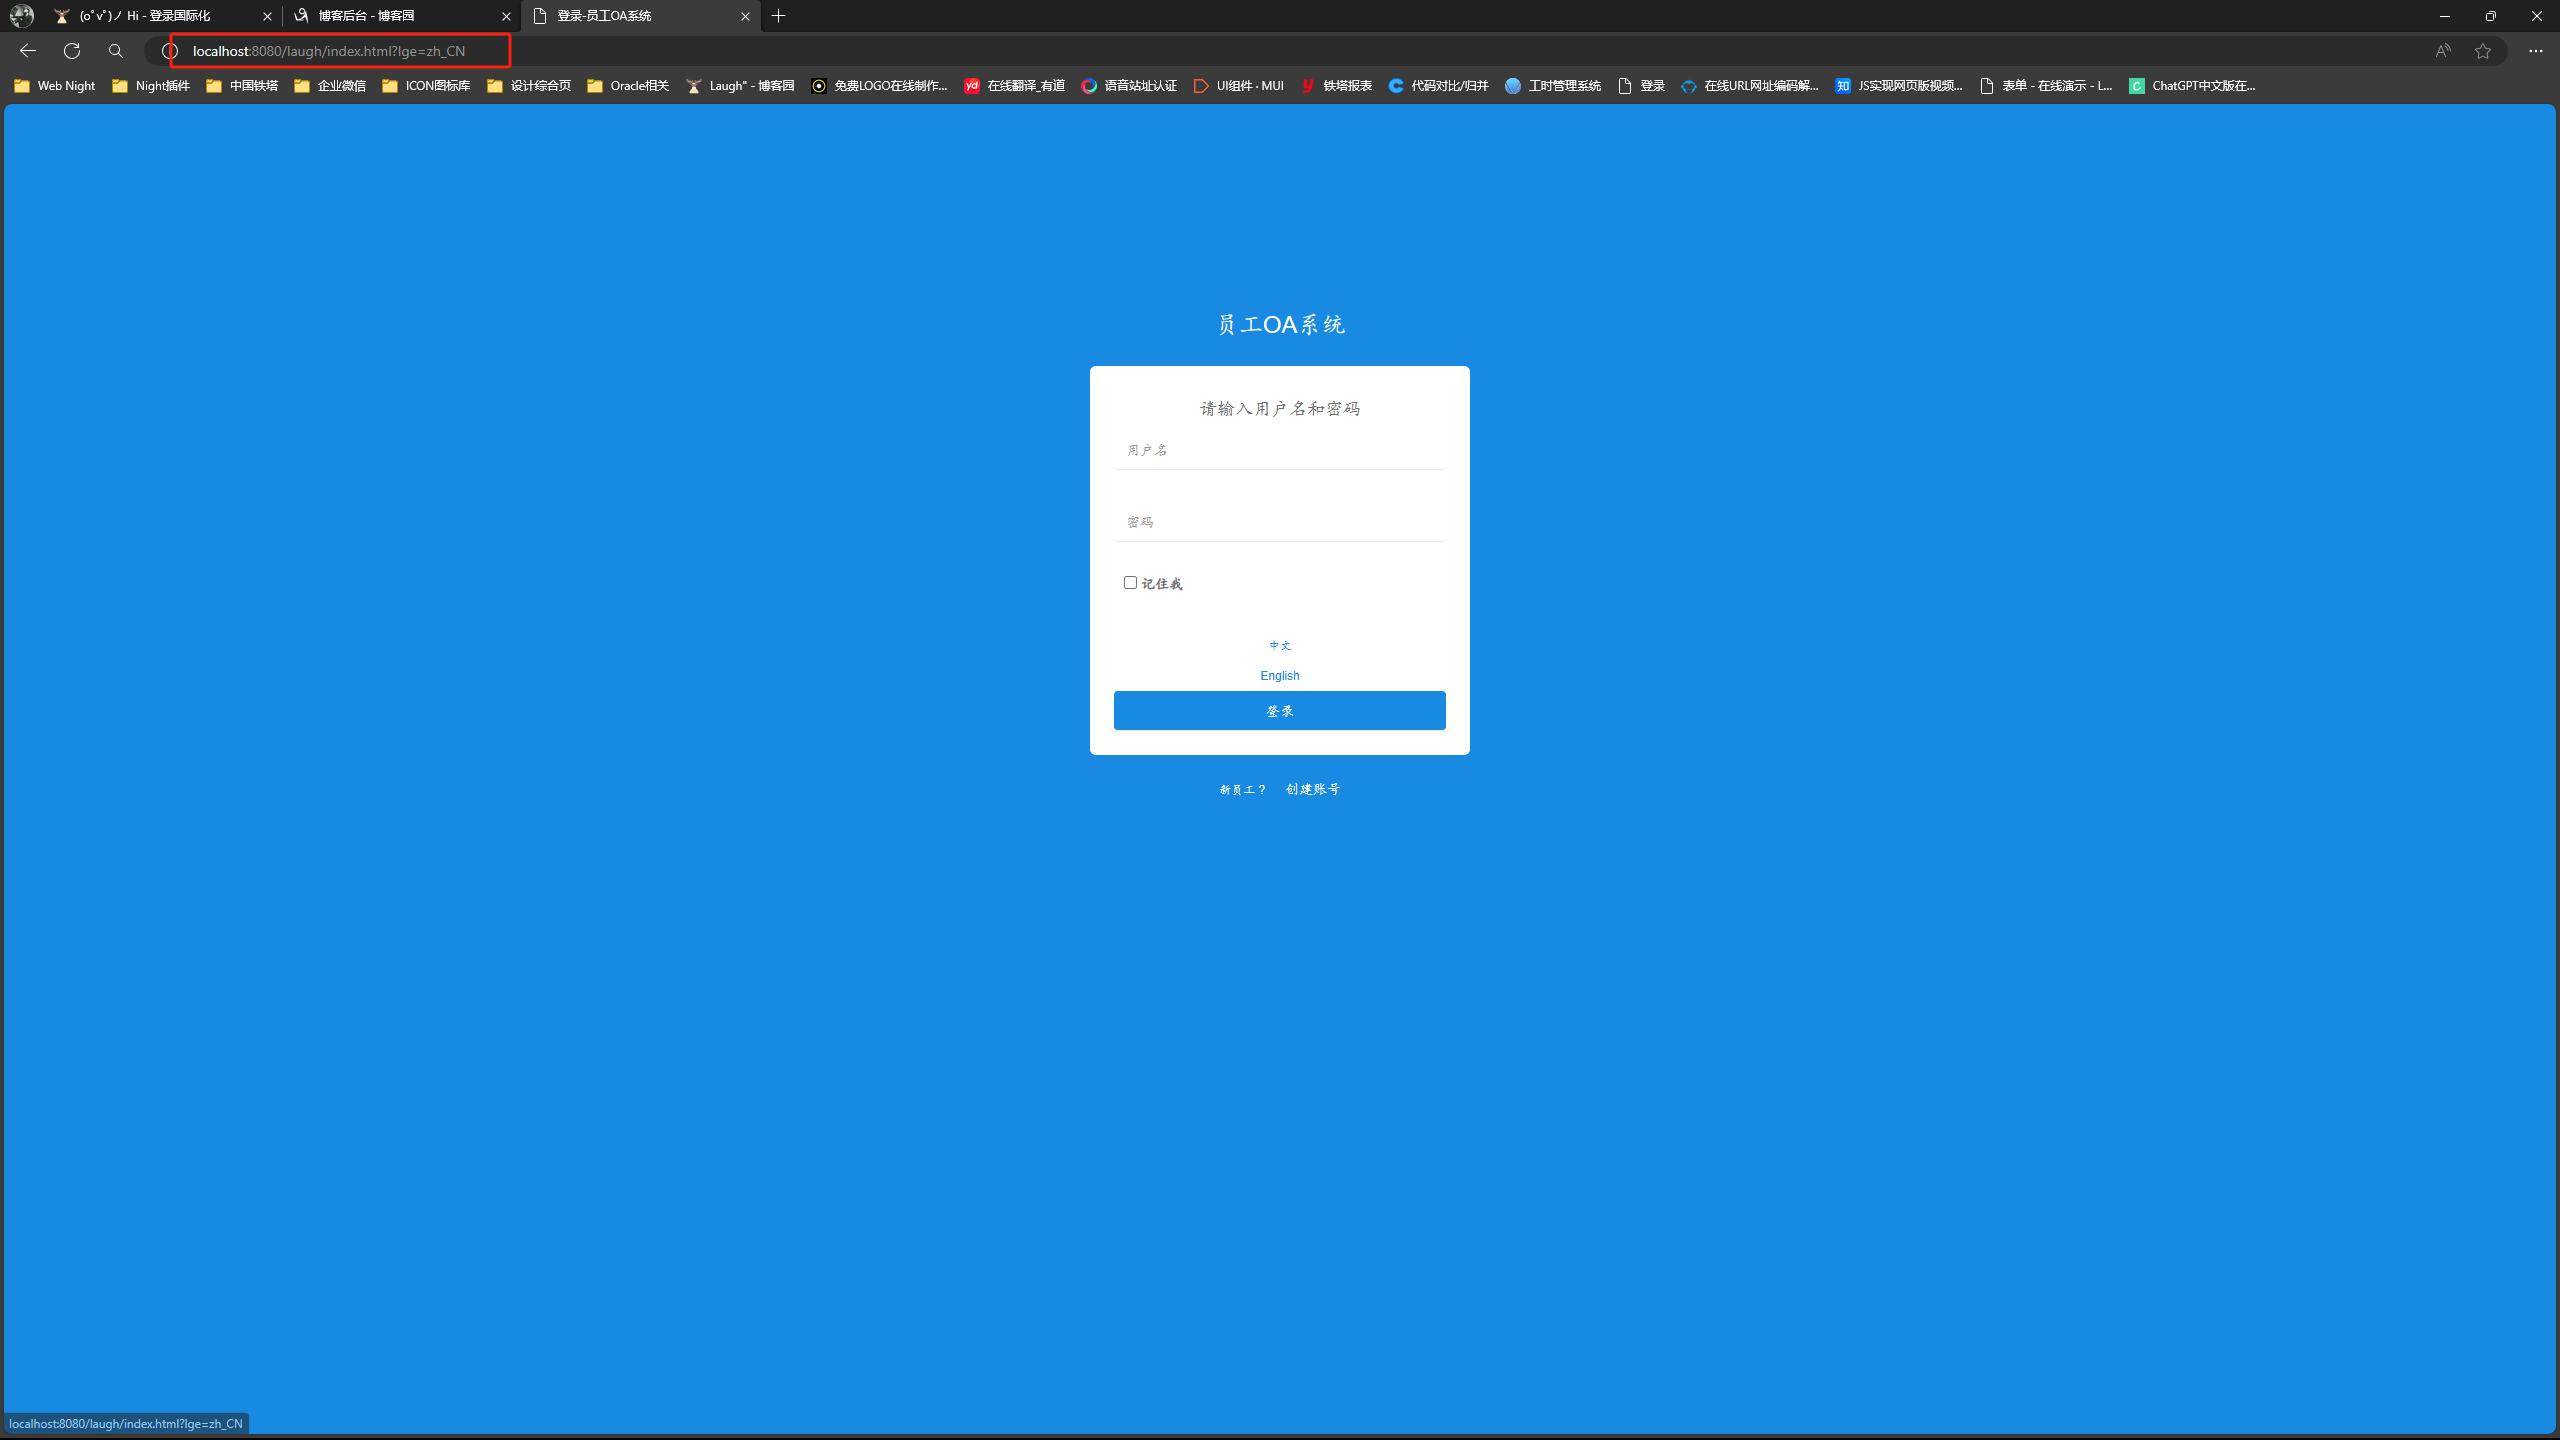
6.4): URL变化对比
默认路径:http://localhost:8080/laugh/index.html
英文路径:http://localhost:8080/laugh/index.html?lge=en_US
中文路径:http://localhost:8080/laugh/index.html?lge=zh_CN
争取摘到月亮,即使会坠落。


 浙公网安备 33010602011771号