
Strust2初之体验
Struts2的第一个案例
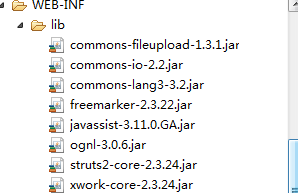
首先我们需要引入架包
entity:
package cn.happy.entity;
/**
 * Entity Object
 * @author Happy
 *
 */
public class UserInfo {
	private String name;
	private String pwd;
	public String getName() {
		return name;
	}
	public void setName(String name) {
		this.name = name;
	}
	public String getPwd() {
		return pwd;
	}
	public void setPwd(String pwd) {
		this.pwd = pwd;
	}

}
然后我们书写LoginAction.java
package cn.happy.action;

import java.util.Map;

import javax.security.auth.message.config.ServerAuthContext;
import javax.servlet.http.HttpSession;

import org.apache.struts2.ServletActionContext;
import org.omg.PortableServer.ServantActivator;

import cn.happy.entity.UserInfo;

import com.opensymphony.xwork2.Action;
import com.opensymphony.xwork2.ActionContext;
import com.opensymphony.xwork2.ModelDriven;

public class LoginAction implements Action,ModelDriven<UserInfo>{
    //前台输入的用户名和密码 在Action中如何捕获
    private UserInfo user=new UserInfo();
	public String execute() throws Exception {
		System.out.println("====LoginAction ==============+++execute");
		System.out.println("================="+user);
		if (user.getName().equals("admin")&&user.getPwd().equals("admin")) {
			//解耦
			/*Map<String, Object> session = ActionContext.getContext().getSession();
			session.put("name", user.getName());*/
			//耦合
			HttpSession session = ServletActionContext.getRequest().getSession();
			session.setAttribute("user",user.getName());
			return "success";
		}else {
			return "login";
		}
	}
	public UserInfo getUser() {
		return user;
	}
	public void setUser(UserInfo user) {
		this.user = user;
	}
	public UserInfo getModel() {
		return user;
	}


}
着这个类中我们用到了二个接口
一,Action
public abstract interface com.opensymphony.xwork2.Action {
public static final java.lang.String SUCCESS = "success";
public static final java.lang.String NONE = "none";
public static final java.lang.String ERROR = "error";
public static final java.lang.String INPUT = "input";
public static final java.lang.String LOGIN = "login";
public abstract java.lang.String execute() throws java.lang.Exception;
}
这个方法只有一个方法: execute()和一些有用的String常量
这些方法可以很方便地作execute()方法返回的控制字符串的值。真正的好处是框架内部也使用了这些常亮。这意味着使用这些预定的控制字符串允许你接入更多的智能默认的行为。
在这里我们先不做过深的讨论!
二、ModelDriven<T>
ModelDriven让你可以直接操作应用程序中的领域对象(模型对象),允许你在Web层和业务逻辑层使用相同的对象。
ModelDriven接口中只有一个方法,其方法的原型如下:
public abstract interface com.opensymphony.xwork2.ModelDriven {
public abstract java.lang.Object getModel();
}
该方法返回一个用于接收用户输入数据的模型对象
public UserInfo getModel() {
		return user;
	}
然后我们就需要去配置struts.xml文件了
<?xml version="1.0" encoding="UTF-8" ?>
<!DOCTYPE struts PUBLIC
	"-//Apache Software Foundation//DTD Struts Configuration 2.3//EN"
	"http://struts.apache.org/dtds/struts-2.3.dtd">

<struts>
   <!--
      constant:常量
      devMoode;开发模式:true: 我在Struts。xml文件中做了修改,tomcat不需要重启
   -->
    <constant name="struts.devMode" value="true" />

    <package name="default" namespace="/" extends="struts-default">
        <action name="loginAction" class="cn.happy.action.LoginAction">
            <result name="success">/login/success.jsp</result>
             <result name="login">/login/login.jsp</result>
        </action>
    </package>
</struts>
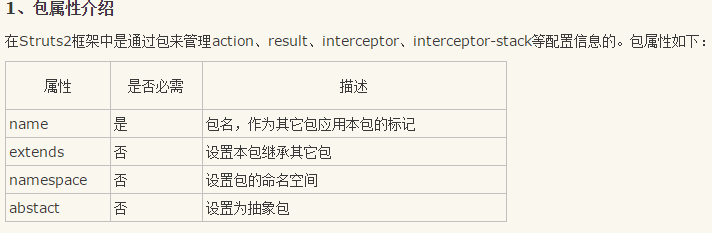
2、extends属性的详解
- 当一个包通过配置extends属性继承了另一个包的时候,该包将会继承父包中所有的配置,包括action、result、interceptor等。
- 由于包信息的获取是按照配置文件的先后顺序进行的,所以父包必须在子包之前被定义。
- 通常我们配置struts.xml的时候,都继承一个名为“struts-default.xml”的包,这是struts2中内置的包。
3、namespace的详解
namespace主要是针对大型项目中Action的管理,更重要的是解决Action重名问题,因为不在同一个命名空间的Action可以使用相同的Action名的
4、<action>与<result>
1、<action>属性介绍
|
属性名称 |
是否必须 |
功能描述 |
| name | 是 | 请求的Action名称 |
| class | 否 | Action处理类对应具体路径 |
| method | 否 | 指定Action中的方法名 |
| converter | 否 | 指定Action使用的类型转换器 |
如果没有指定method则默认执行Action中的execute方法。
2、<result>属性介绍
|
属性名称 |
是否必须 |
功能描述 |
| name | 否 | 对应Action返回逻辑视图名称,默认为success |
| type | 否 | 返回结果类型,默认为dispatcher |
3、访问Action方法的另一种实现方式
在Struts2中如果要访问Action中的指定方法,还可以通过改变URL请求来实现,将原本的“Action名称.action”改为“Action名称!方法名称.action”在struts.xml中就不需要指定方法名了。
5、<exception-mapping>与<global-exception-mapping>
这两个标签都是用来配置发生异常时对应的视图信息的,只不过一个是Action范围的,一个是包范围的,当同一类型异常在两个范围都被配置时,Action范围的优先级要高于包范围的优先级.这两个标签包含的属性也是一样的:
|
属性名称 |
是否必须 |
功能描述 |
| name | 否 | 用来表示该异常配置信息 |
| result | 是 | 指定发生异常时显示的视图信息,这里要配置为逻辑视图 |
| exception | 是 | 指定异常类型 |
在对struts.xml文件进行一个详细的分解后,我们该配置最后一道wed.xml了。
<?xml version="1.0" encoding="UTF-8"?>
<web-app version="2.5"
	xmlns="http://java.sun.com/xml/ns/javaee"
	xmlns:xsi="http://www.w3.org/2001/XMLSchema-instance"
	xsi:schemaLocation="http://java.sun.com/xml/ns/javaee
	http://java.sun.com/xml/ns/javaee/web-app_2_5.xsd">
  <display-name></display-name>

  <filter>
    <filter-name>struts2</filter-name>
    <filter-class>org.apache.struts2.dispatcher.ng.filter.StrutsPrepareAndExecuteFilter</filter-class>
  </filter>
  <filter-mapping>
   <filter-name>struts2</filter-name>
   <url-pattern>/*</url-pattern>

  </filter-mapping>

  <welcome-file-list>
    <welcome-file>index.jsp</welcome-file>
  </welcome-file-list>
</web-app>
这个没什么好说的,然后就是jsp页面
login
<%@ page language="java" import="java.util.*" pageEncoding="utf-8"%>
<%
String path = request.getContextPath();
String basePath = request.getScheme()+"://"+request.getServerName()+":"+request.getServerPort()+path+"/";
%>
<%@ taglib uri="/struts-tags" prefix="s" %>

<!DOCTYPE HTML PUBLIC "-//W3C//DTD HTML 4.01 Transitional//EN">
<html>
  <head>
    <base href="<%=basePath%>">
    <title>My JSP 'login.jsp' starting page</title>
  </head>

  <body>
     <s:form name="form1" namespace="/" method="post" action="loginAction">
     	  请输入用户名: <s:textfield name="name"></s:textfield> <br/>
        <s:textfield name="pwd"></s:textfield><br/>
        <s:submit value="登陆"></s:submit>
     </s:form>
  </body>
</html>
success
<%@ page language="java" import="java.util.*" pageEncoding="utf-8"%>
<%
String path = request.getContextPath();
String basePath = request.getScheme()+"://"+request.getServerName()+":"+request.getServerPort()+path+"/";
%>

<!DOCTYPE HTML PUBLIC "-//W3C//DTD HTML 4.01 Transitional//EN">
<html>
  <head>
    <base href="<%=basePath%>">
    <title>My JSP 'login.jsp' starting page</title>
  </head>
  <body>
    成功页面!</br>
 欢迎您:${name}!
  </body>
</html>
接下来是运行结果:
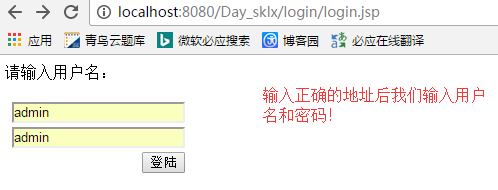
在用户名和密码输入都正确的情况下将会跳到success.jsp页面:

谢谢观看!!!!!!!!!!!!!!!!!!!!!!!!!!

 浙公网安备 33010602011771号