ubuntu22.04部署django+uwsgi+nginx上线站点
系统默认是3.10的python版本,不支持pip,需要先安装pip
常用的命令
pip install somepackage -i https://pypi.doubanio.com/simple/ #pip安装使用豆瓣源比较快

sudo chown ubuntu:ubuntu /opt/wwwroot/mysite -R #可更改文件夹对应的用户,避免总是提示无权限被禁止
项目默认部署在/opt/wwwroot下
1,安装虚拟环境,正常来说在虚拟环境下安装不需要使用sudo,直接使用pip来安装即可
pip3 install virtualenv
cd /opt/ #切换到目录
virtualenv pyweb #建立虚拟目录及文件
#######这里可能遇到WARNING: The script virtualenv is installed in '/home/huake/.local/bin' which is not on PATH.
#######Consider adding this directory to PATH or, if you prefer to suppress this warning, use --no-warn-script-location.
export PATH=$PATH:/home/huake/.local/bin
source  ~/.bashrc
source /opt/pyweb/bin/activate #激活虚拟环境
pip3 install django==4.2 #安装django
pip3 install uwsgi #安装uwsgi
这里也可以直接新建目录,然后防止网站,不然系统目录有权限限制,还得手工修正
mkdir wwwroot
cd wwwroot
virtualenv pyweb
2,设置uwsgi并启动服务
在manage.py同级建立一个uwsgi.ini文件,配置内容如下:
[uwsgi]
#使用 Nginx 连接时使用,Django程序所在服务器地址
socket=127.0.0.1:8000
#项目目录
chdir=/opt/wwwroot/mysite
#项目中wsgi.py文件的目录,相对于项目目录,就是和settings.py同级目录的那个文件夹
wsgi-file=mysite/wsgi.py
#方便结束进程
pidfile=uwsgi.pid
# 进程数
processes=1
# 指定依赖的虚拟环境, 路径到虚拟环境的名字即可(可以命令查看 which python)
virtualenv=/opt/pyweb/
#uwsgi启动及相关日志
daemonize=uwsgi.log
如何启动及结束进程
uwsgi --ini wusgi.ini #启动服务
uwsgi --stop wusgi.pid #结束服务
ps aux | grep uwsgi #查看进程
kill -INT 1234 #结束进程
kill -9 1234 #强制关闭
3,安装mariadb数据库
sudo apt-get install mariadb-server #安装数据库
service mysql status #查看是否运行
sudo service mysql restart #重启数据库
sudo systemctl enable mariadb #设置开机启动

#对于ubuntu系统安装
sudo apt-get update
sudo apt-get install pkg-config
sudo apt-get install libmysqlclient-dev
pip3 install mysqlclient
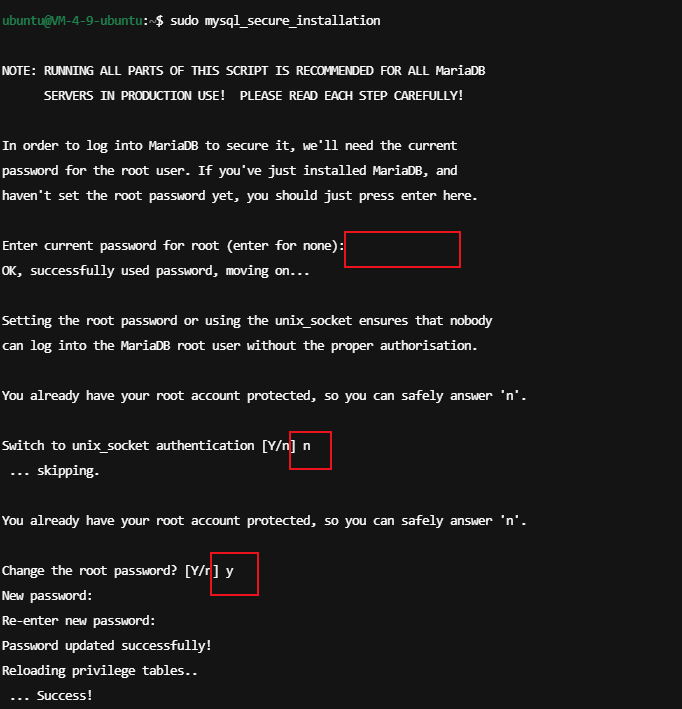
使用脚本设置,提高安全性
sudo mysql_secure_installation登录数据库及相关常用命令
mysql -u root -p推荐的方式就是创建一个管理员用户,可以访问所有的数据库:
GRANT ALL PRIVILEGES ON *.* TO 'administrator'@'%' IDENTIFIED BY 'very_strong_password';
FLUSH PRIVILEGES;#更新权限
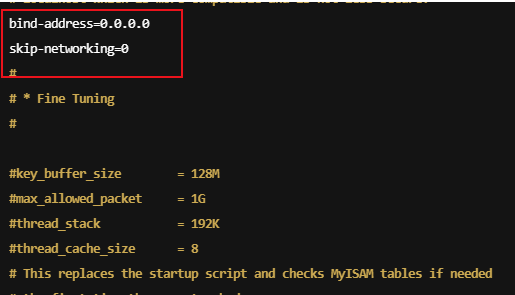
如果需要远程连接MariaDB,修改配置文件:/etc/mysql/mariadb.conf.d/50-server.cnf
创建数据库:
create database vipdatabase default charset utf8 collate utf8_general_ci; #创建数据库
create user 'vipuser'@'%' identified by '123456';#创建用户
flush privileges; #刷新
grant all privileges on vipdatabase.* to vipuser@'%'; #授权访问数据库
flush privileges; #刷新
delete from user where Host='localhost' and User=""; #删除某用户

use mysql;#进入mysql

show tables;

desc user;

select Host,User,Password from user;
4,安装nginx
sudo apt-get install nginx -y默认配置文件路径:/etc/nginx/nginx.conf
默认日志路径:/var/log/nginx/error.log
/var/log/nginx/access.log
常用命令:
systemctl start nginx#启动nginx
systemctl stop nginx#停止nginx
systemctl restart nginx#重启nginx
systemctl enable nginx#开机启动
sudo nginx -t   # 检查Nginx配置文件语法是否正确
sudo systemctl reload nginx   # 重新加载Nginx配置
nginx配置文件内容如:
user www-data;
worker_processes auto;
pid /run/nginx.pid;
include /etc/nginx/modules-enabled/*.conf;

events {
        worker_connections 768;
        # multi_accept on;
}

http {

        ##
        # Basic Settings
        ##

        sendfile on;
        tcp_nopush on;
        types_hash_max_size 2048;
        # server_tokens off;

        # server_names_hash_bucket_size 64;
        # server_name_in_redirect off;

        include /etc/nginx/mime.types;
        default_type application/octet-stream;
        server {
                listen 80;
                server_name test.hahado.cn;
        location / {
                # 使用 uwsgi_pass 转发基于 uwsgi 协议的一个请求
                uwsgi_pass 127.0.0.1:8000; # 与 uwsgi 配置一样
                include /etc/nginx/uwsgi_params;
        }
        location /static {
                #这个就是真实的静态文件路径
                alias /opt/wwwroot/mysite/static/;
        }
    }

        ##
        # SSL Settings
        ##

        ssl_protocols TLSv1 TLSv1.1 TLSv1.2 TLSv1.3; # Dropping SSLv3, ref: POODLE
        ssl_prefer_server_ciphers on;

        ##
        # Logging Settings
        ##

        access_log /var/log/nginx/access.log;
        error_log /var/log/nginx/error.log;

        ##
        # Gzip Settings
        ##

        gzip on;


        include /etc/nginx/conf.d/*.conf;
        include /etc/nginx/sites-enabled/*;
}
关于线上部署admin后台样式没有生效的问题:
方法一:
1、在settings.py尾部:
STATIC_ROOT  = os.path.join(BASE_DIR, 'static')#指定样式收集目录
#或
STATIC_ROOT = '/www/mysite/mysite/static'  #指定样式收集目录
2、收集CSS样式,在终端输入:
python manage.py collectstatic运行这个命令之后,就会自动把后台CSS样式收集到/static/目录下。刷新页面就能恢复样式!
注意:收集或复制前一定先在settings里配置并指定STATIC_ROOT路径,static/ 个目录可以自己定。指定的时候一定要在settings.py和nginx里指定新的路径。不然无法生效。
具体可参考:https://www.django.cn/article/show-4.html#yangsi
本文来自博客园,作者:super_ip,转载请注明原文链接:https://www.cnblogs.com/superip/p/18082066


【推荐】国内首个AI IDE,深度理解中文开发场景,立即下载体验Trae
【推荐】编程新体验,更懂你的AI,立即体验豆包MarsCode编程助手
【推荐】抖音旗下AI助手豆包,你的智能百科全书,全免费不限次数
【推荐】轻量又高性能的 SSH 工具 IShell:AI 加持,快人一步
· TypeScript + Deepseek 打造卜卦网站:技术与玄学的结合
· 阿里巴巴 QwQ-32B真的超越了 DeepSeek R-1吗?
· 【译】Visual Studio 中新的强大生产力特性
· 10年+ .NET Coder 心语 ── 封装的思维:从隐藏、稳定开始理解其本质意义
· 【设计模式】告别冗长if-else语句:使用策略模式优化代码结构