SpringBoot快速上手教程
IDEA社区版 + JDK1.8 + Maven3.9.6 + Spring2.7.18
SpringBoot3不兼容JDK1.8
新建SpringBoot项目
使用SpringBoot Initializr创建
IDEA专业版可以直接创建SpringBoot项目,社区版创建可以使用网页版SpringBoot Initializr创建
- 官方SpringBoot Initializr: https://start.spring.io (不支持SpringBoot3以下及JDK1.8)
- 阿里云SpringBoot Initializr:https://start.aliyun.com (支持单应用/MVC架构)
- 三方SpringBoot Initializr:https://springinitializrjava8.cc (支持JDK1.8)
如使用 https://springinitializrjava8.cc , 选择Maven,SpringBoot2.7.18,JDK8,依赖只添加SpringBoot Web插件,点击GENERATE按钮,生成项目并自动下载,如下图:
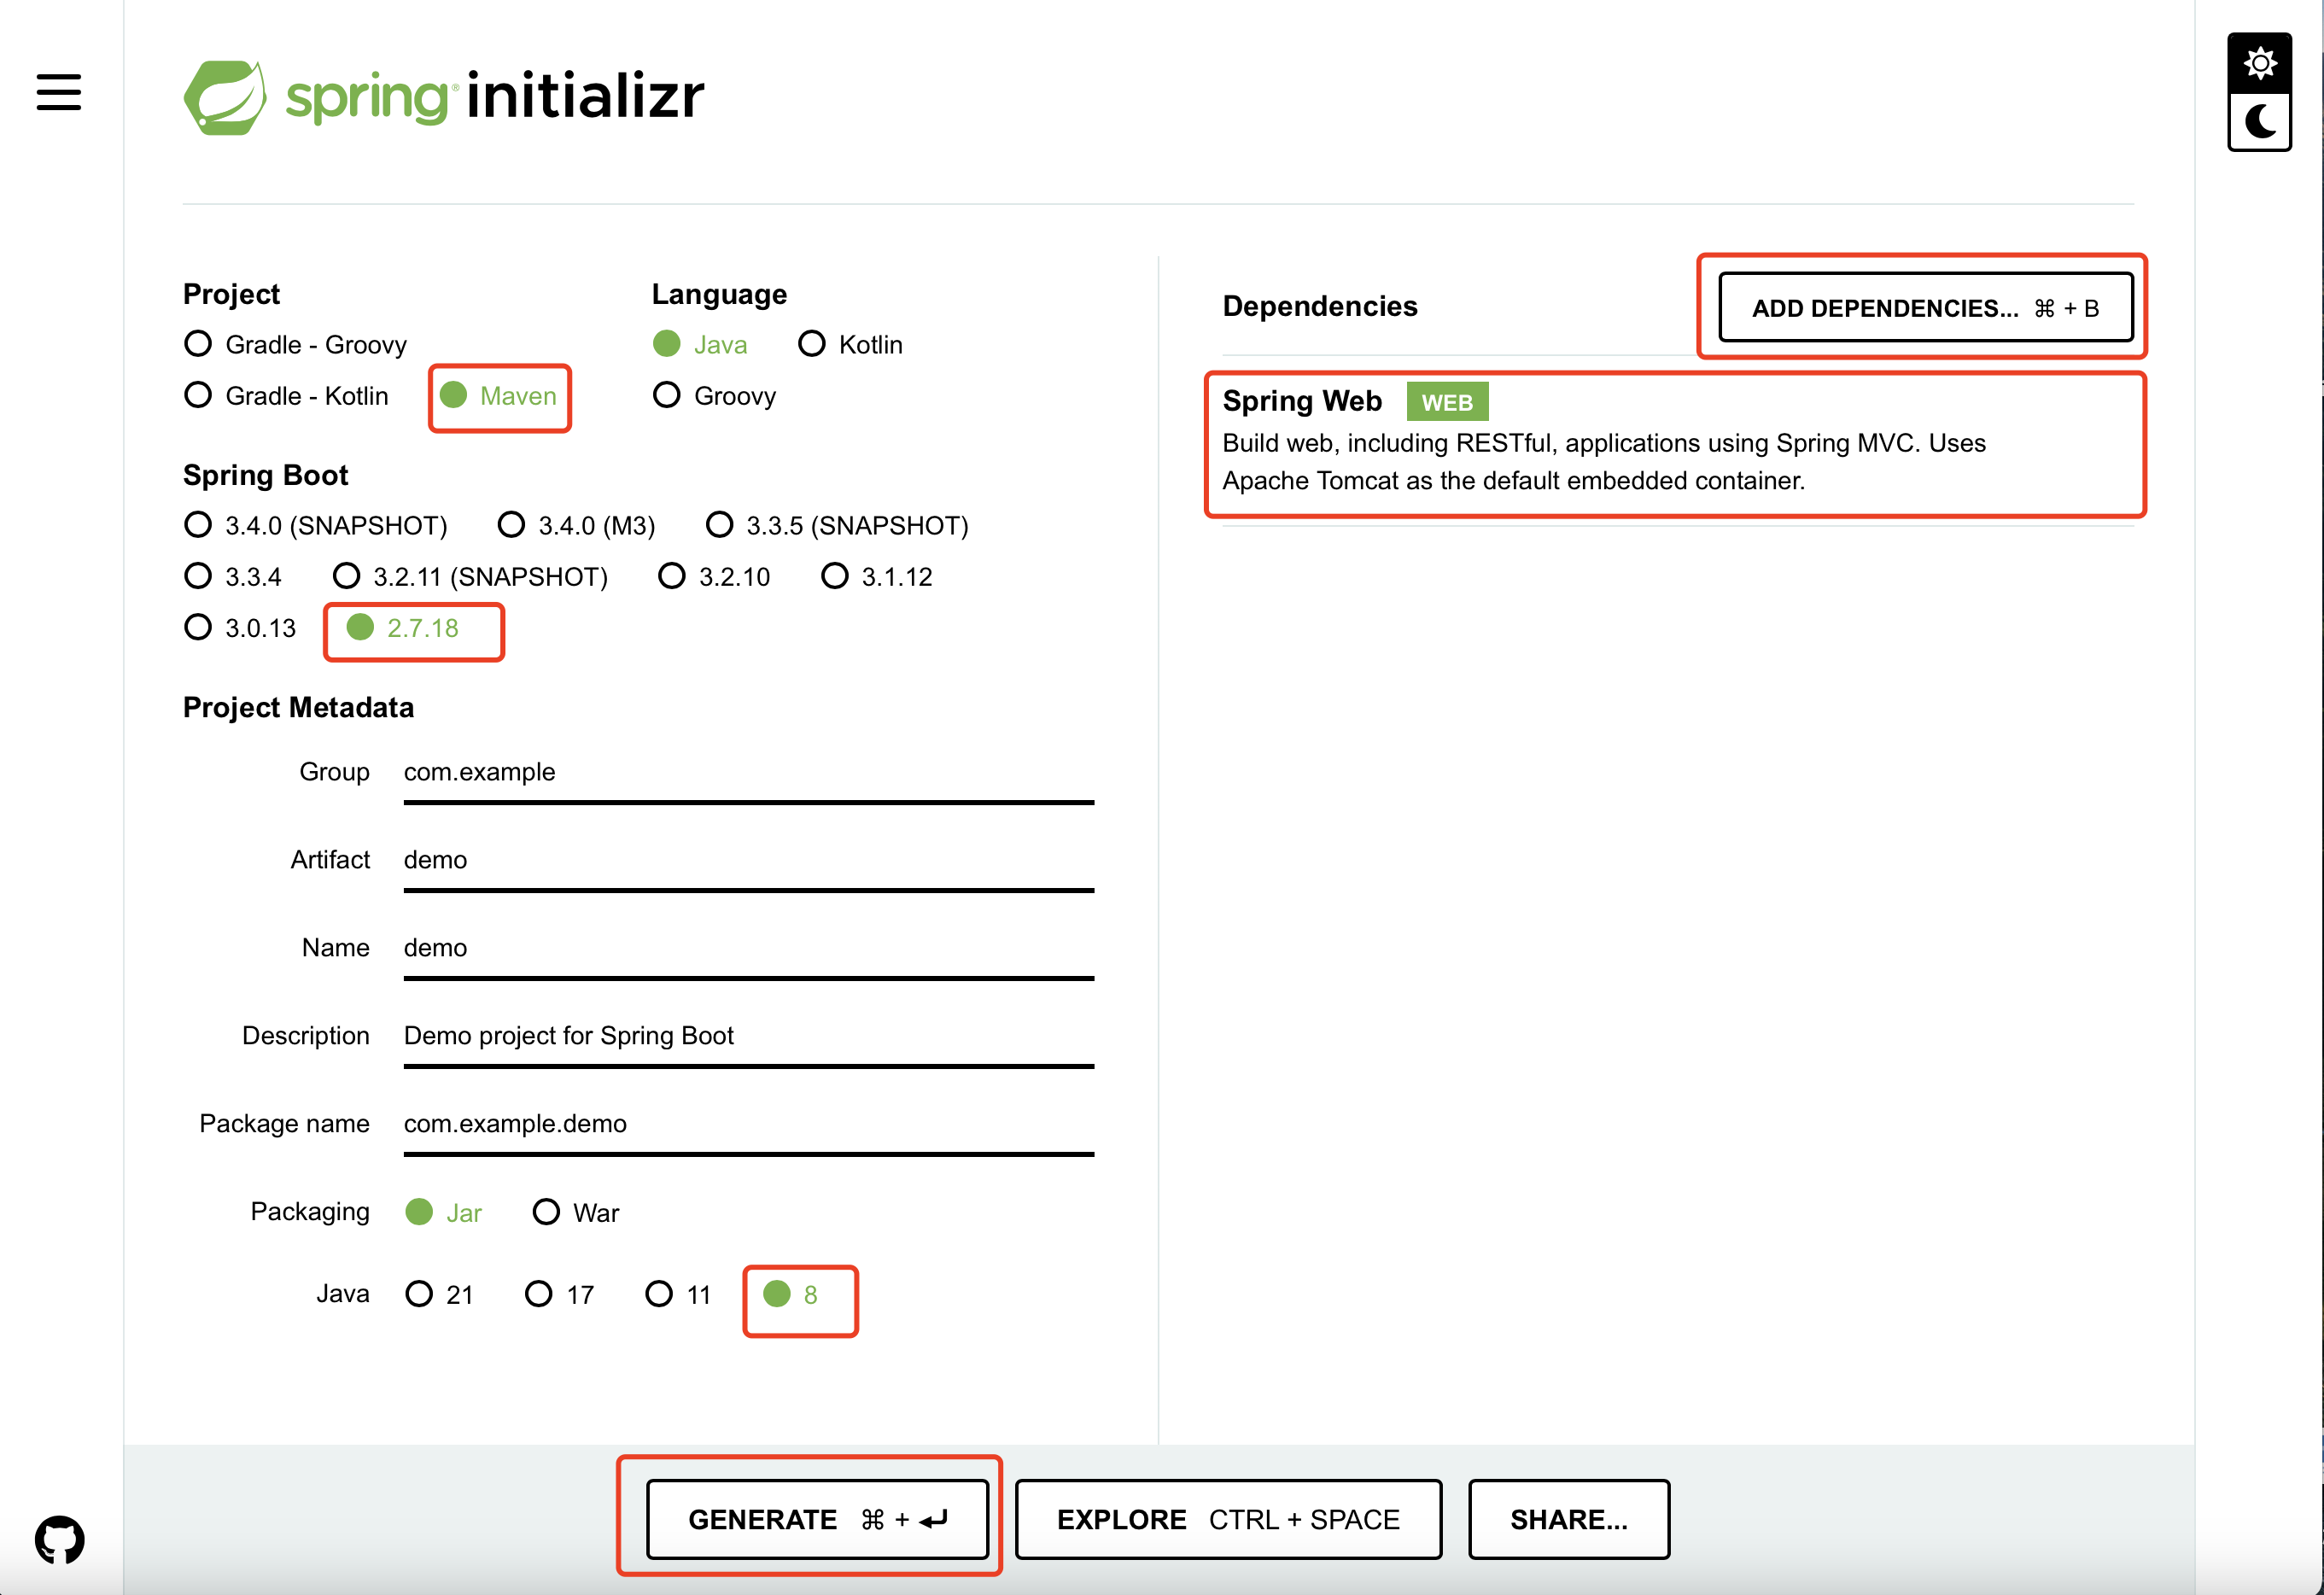
也可以根据需求自行修改项目信息
使用IDEA打开项目即可,项目结构如下图:

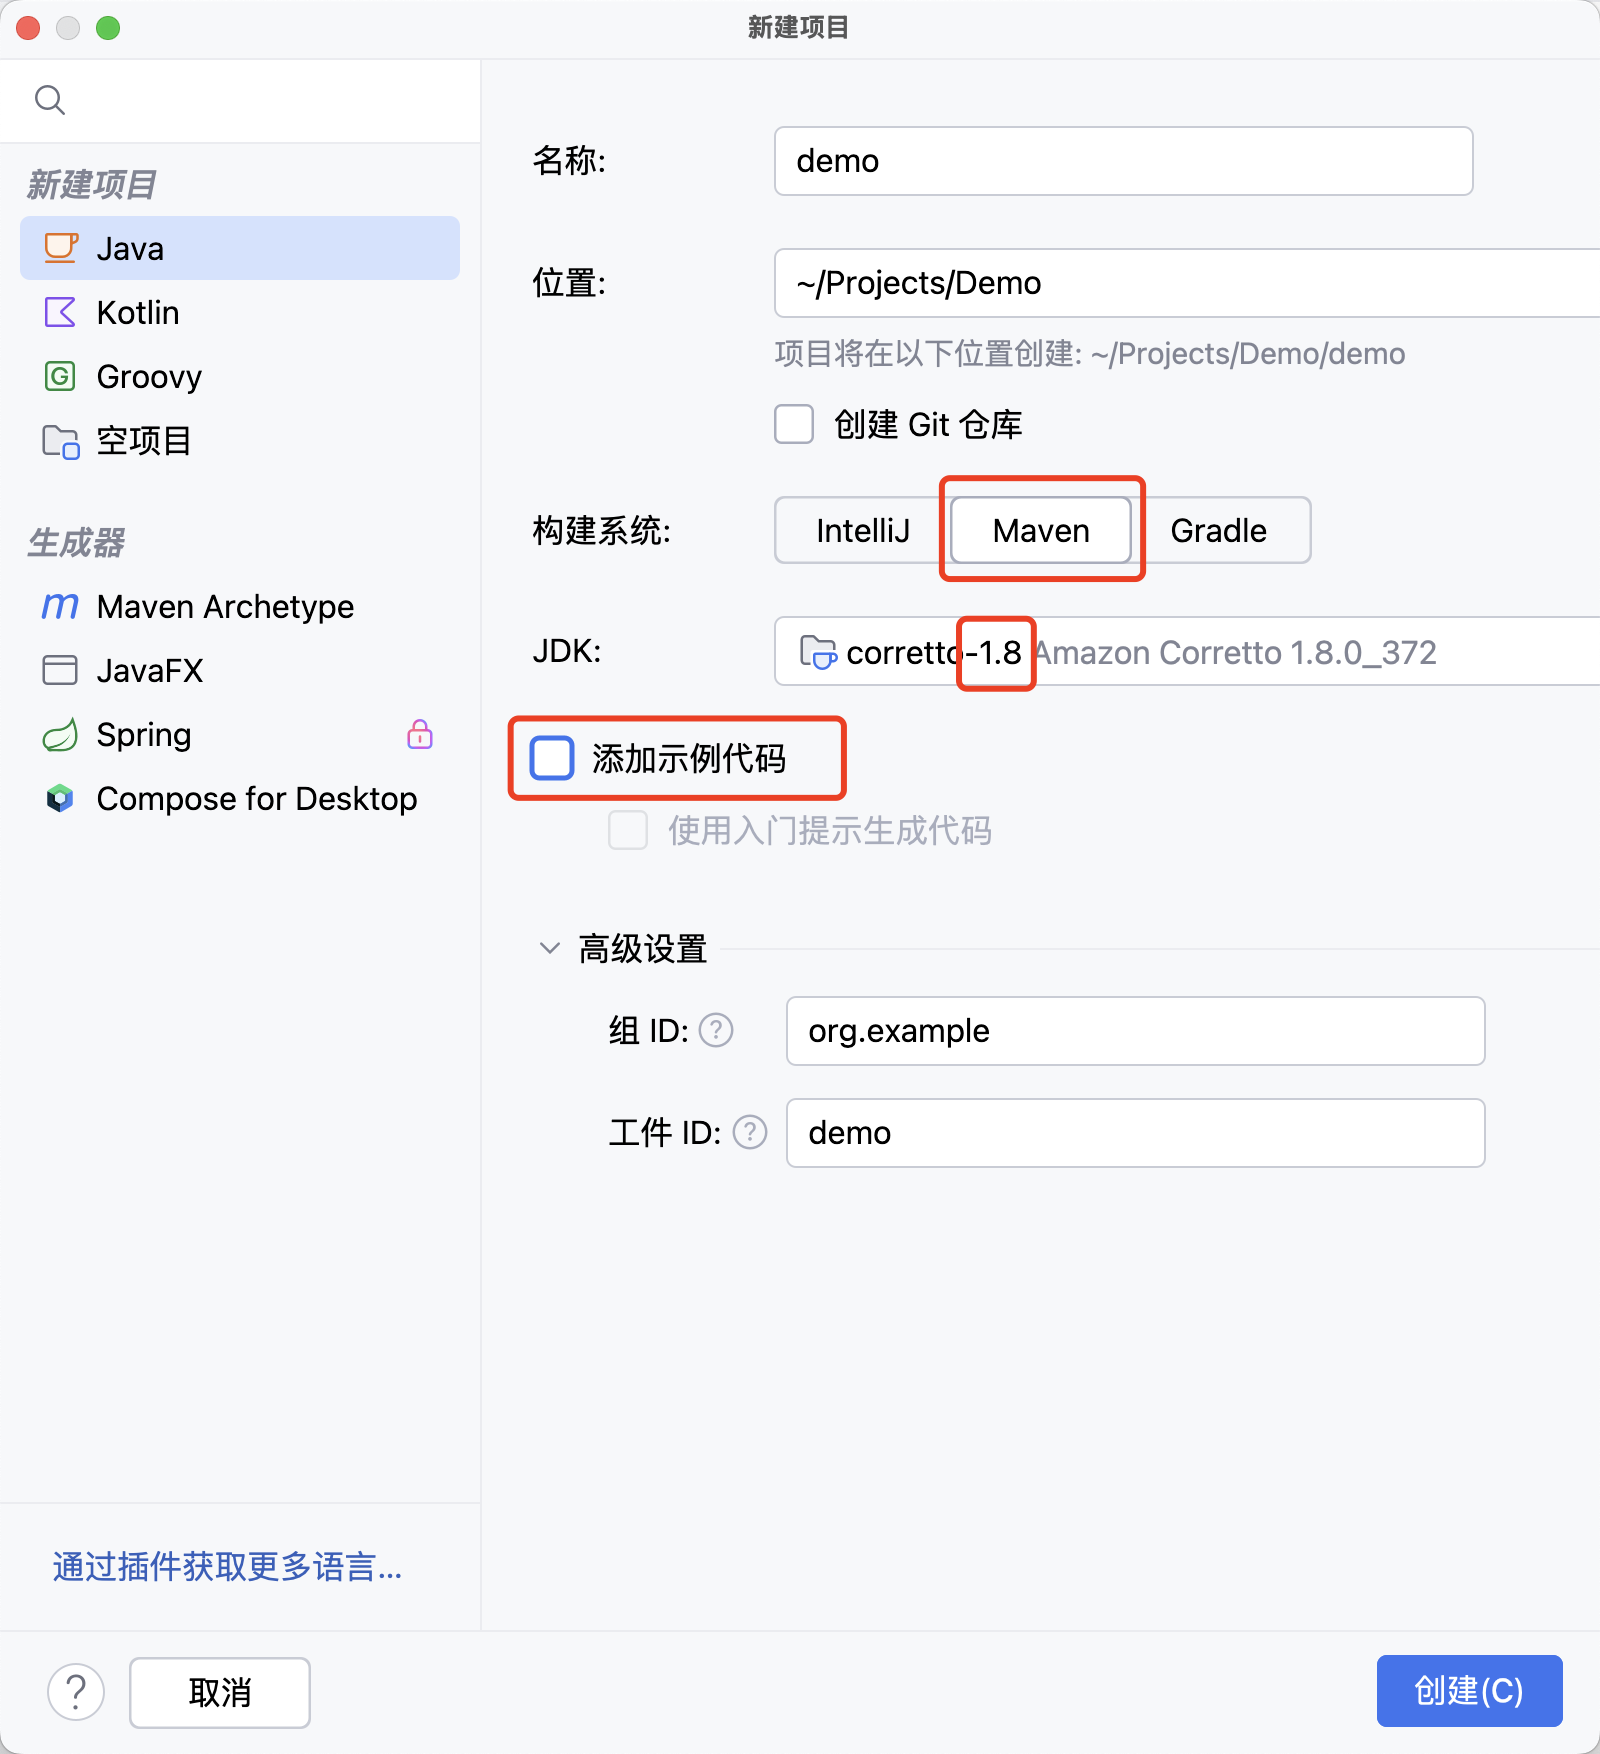
手动创建项目
其实SpringBoot Initializr程序只是添加了SpringBoot相关的依赖,并新建了一些基本目录以及应用启动的主函数而已,我们也可以手动创建
在IDEA中新建普通Java项目,选择Maven和JDK1.8,不使用示例代码,如下图:
添加spring-boot-starter-web依赖
 <dependencies>
        <dependency>
            <groupId>org.springframework.boot</groupId>
            <artifactId>spring-boot-starter-web</artifactId>
            <version>2.7.18</version>
        </dependency>
  </dependencies>
完整pom.xml
<?xml version="1.0" encoding="UTF-8"?>
<project xmlns="http://maven.apache.org/POM/4.0.0"
         xmlns:xsi="http://www.w3.org/2001/XMLSchema-instance"
         xsi:schemaLocation="http://maven.apache.org/POM/4.0.0 http://maven.apache.org/xsd/maven-4.0.0.xsd">
    <modelVersion>4.0.0</modelVersion>

    <groupId>org.example</groupId>
    <artifactId>demo</artifactId>
    <version>1.0-SNAPSHOT</version>

    <properties>
        <maven.compiler.source>8</maven.compiler.source>
        <maven.compiler.target>8</maven.compiler.target>
        <project.build.sourceEncoding>UTF-8</project.build.sourceEncoding>
    </properties>

    <dependencies>
        <dependency>
            <groupId>org.springframework.boot</groupId>
            <artifactId>spring-boot-starter-web</artifactId>
            <version>2.7.18</version>
        </dependency>
    </dependencies>

</project>
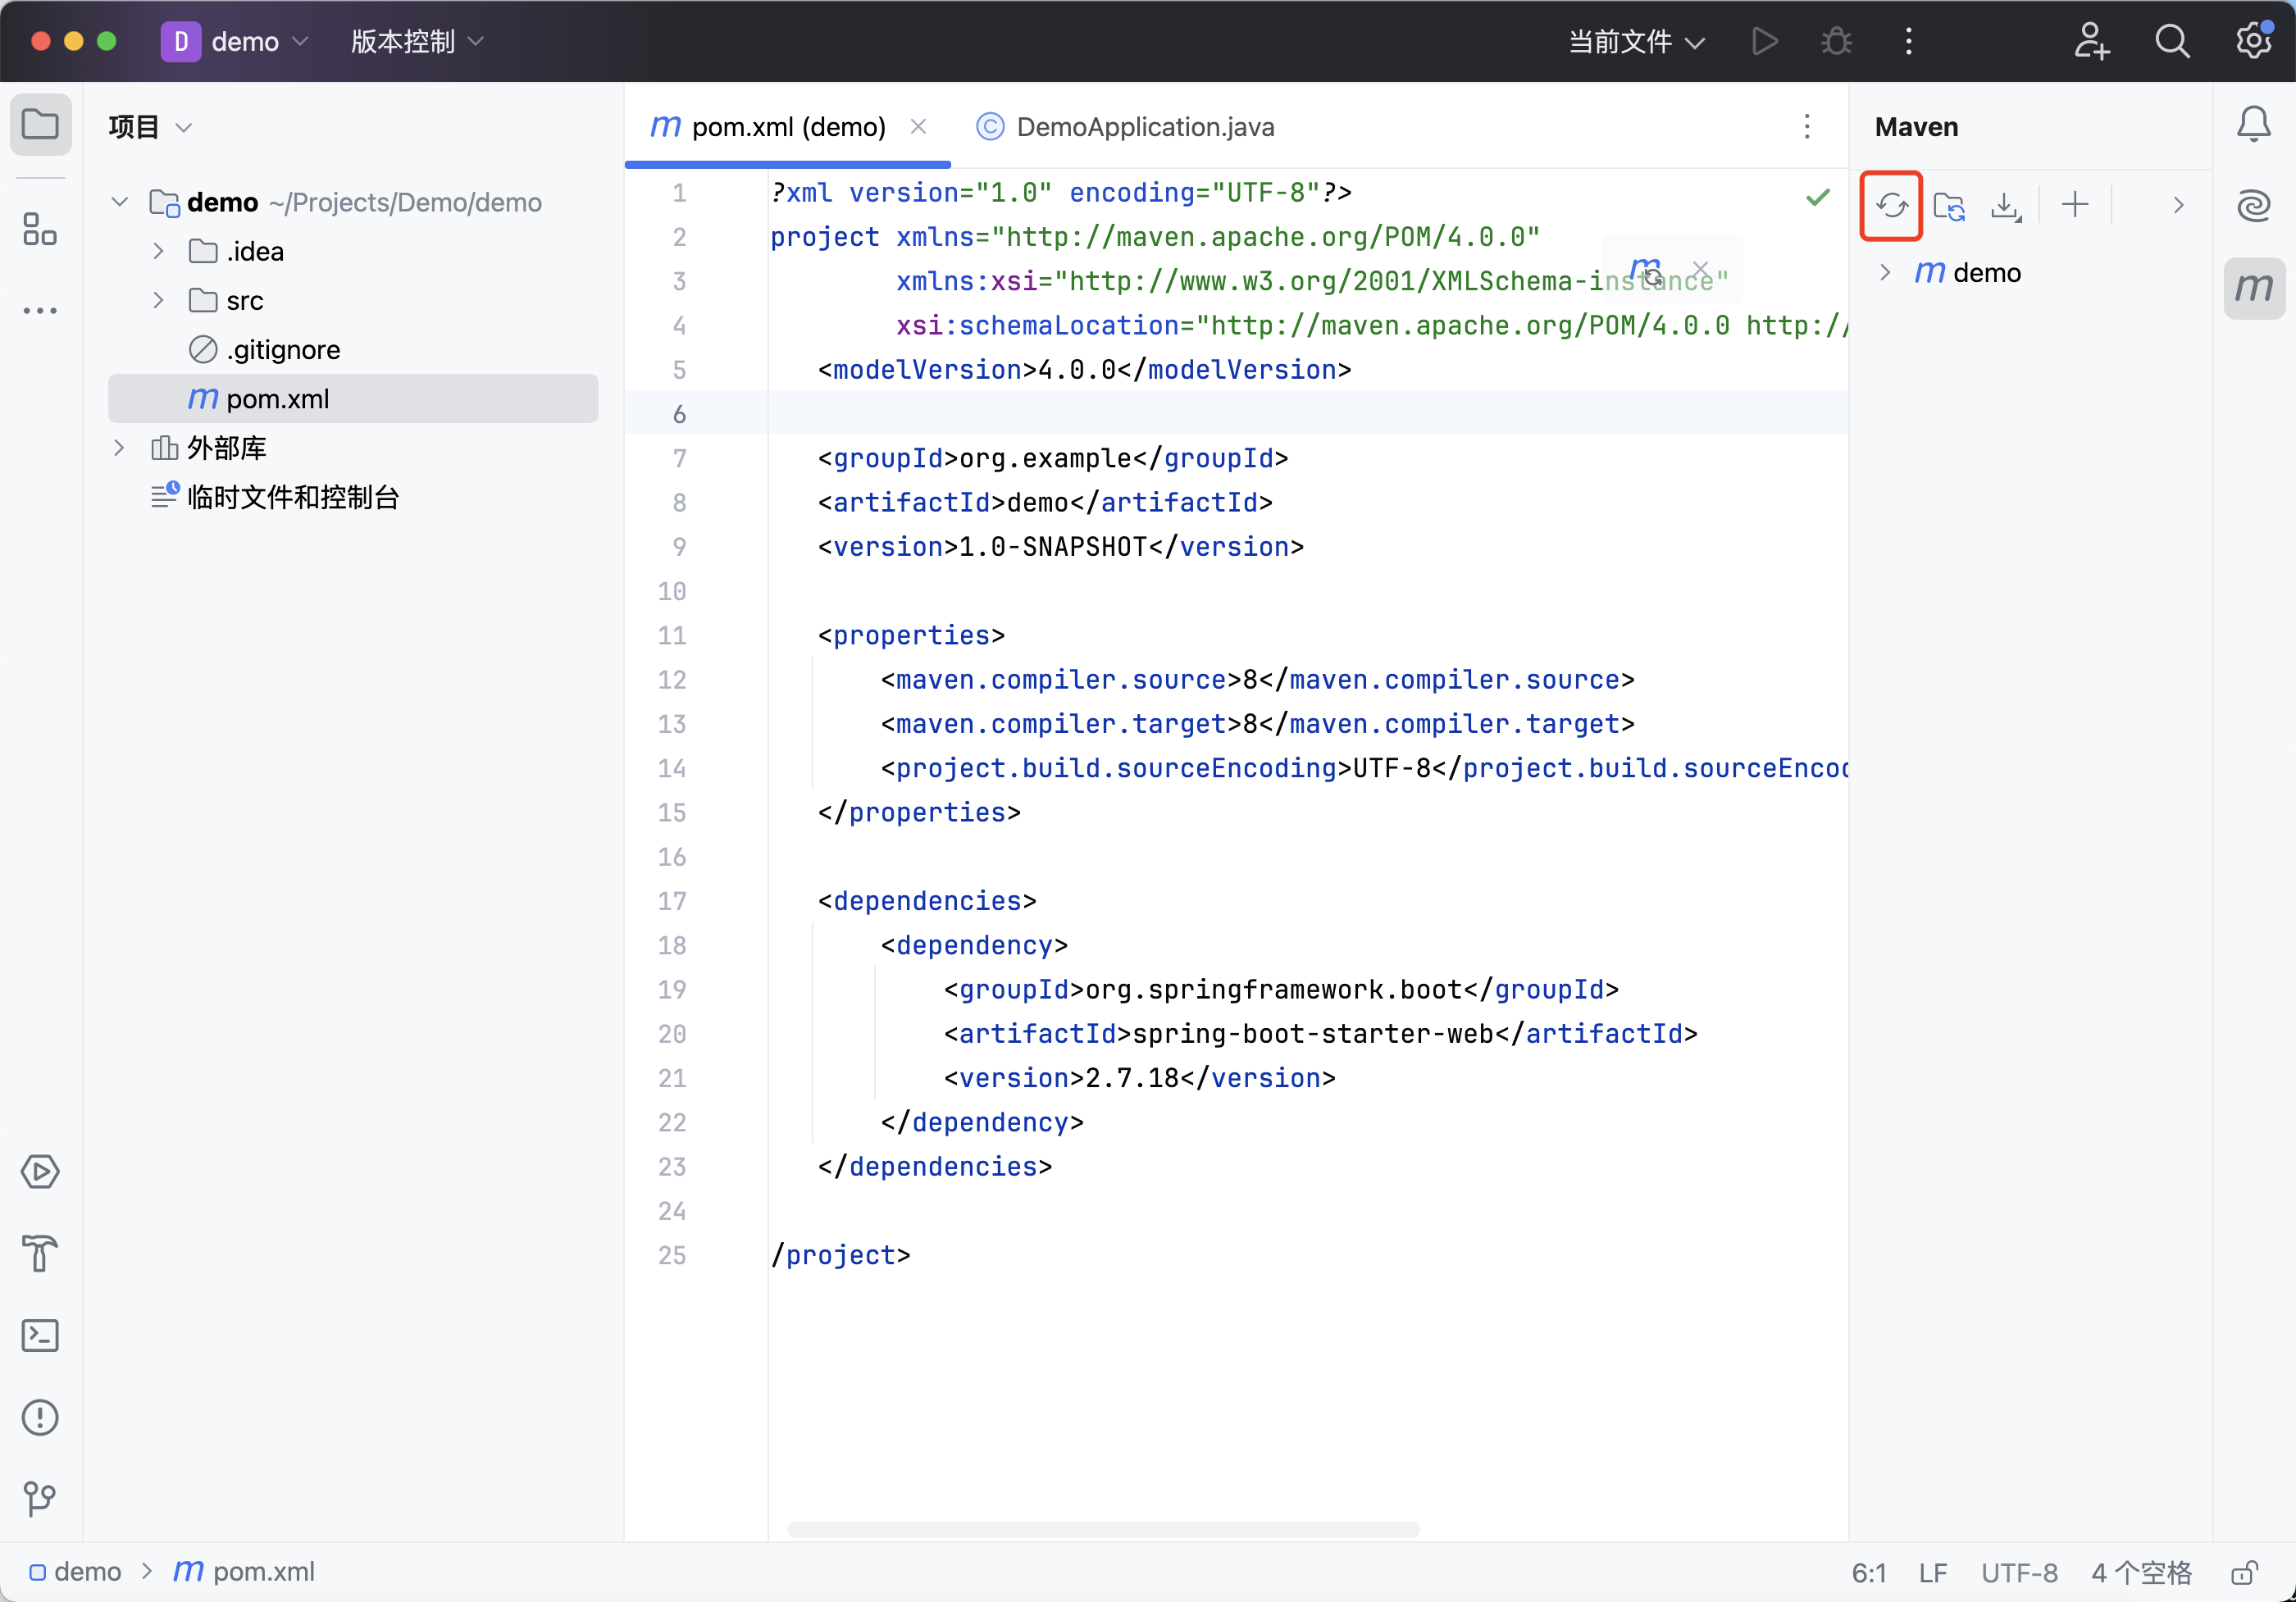
然后重新加载一下Maven依赖,如下图:
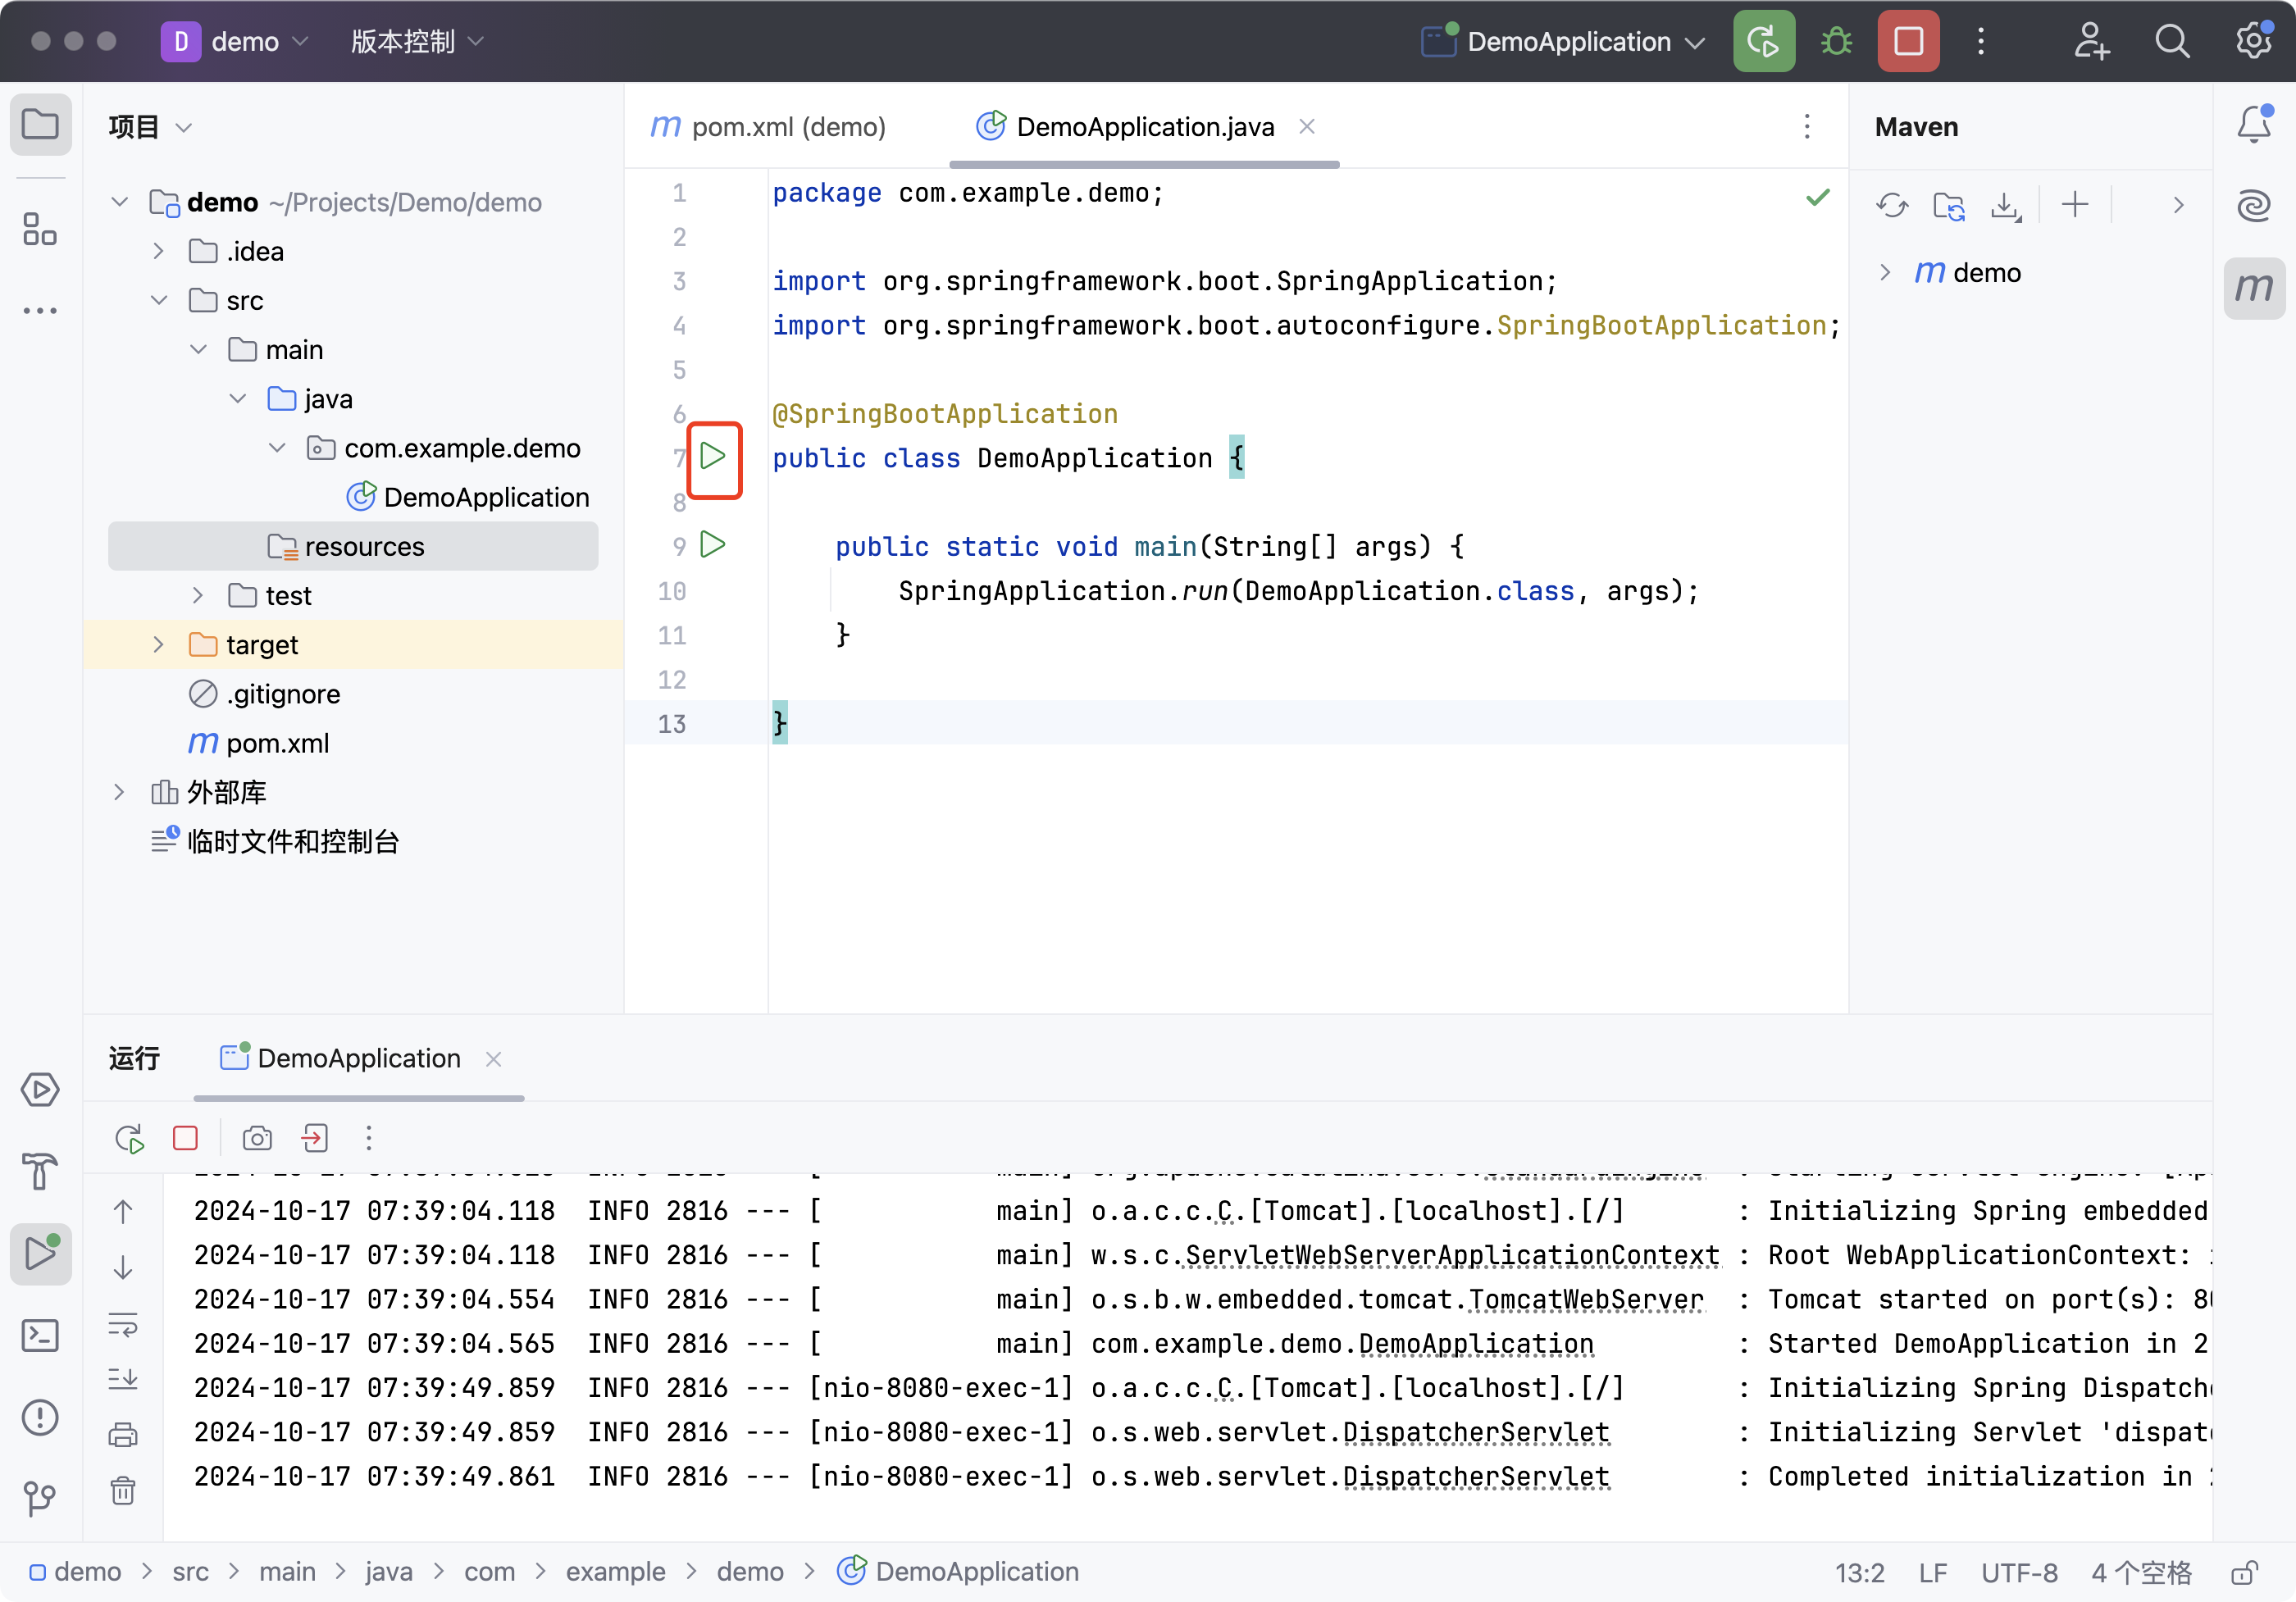
在src/main/java中创建包com.example.demo,在包中创建Java类DemoApplication
package com.example.demo;

import org.springframework.boot.SpringApplication;
import org.springframework.boot.autoconfigure.SpringBootApplication;

@SpringBootApplication
public class DemoApplication {

	public static void main(String[] args) {
		SpringApplication.run(DemoApplication.class, args);
	}

}
在DemoApplication中,点击左边的运行按钮可启动项目,如下图
访问 http://localhost:8080 ,由于还没有编写接口,显示如下页面是正常的:

编写接口
在com.example.demo包中新建Java类HelloController(在MVC模式中,一般接口逻辑类叫Controller,即控制器)
控制器上添加注解@RestController,表示是一个HTTP接口类,并返回HTTP响应。
在其中编写一个返回String的方法hello,并使用@GetMapping挂载接口到"/hello"路径下,代码如下:
package com.example.demo;

import org.springframework.web.bind.annotation.GetMapping;
import org.springframework.web.bind.annotation.RestController;

@RestController
public class HelloController {
    @GetMapping("/hello")
    public String hello(){
        return "<h1>Hello</h1>";
    }
}
重新启动应用,访问 http://localhost:8080/hello ,显示效果如下:

获取请求参数
在接口开发中,首先我们要获取到前端请求的各种参数才能进行处理,接口传入的参数是多样的,常见的方式如下:
- 路径参数:如 /hello/xxx
- URL参数:如/hello?name=xxx
- Post请求表单参数,如请求体中 name=xxx,对应Content-Type: application/x-www-urlencoded
- Post请求JSON类型参数,如请求体中{"name": "xxx"},对应Content-Type: application/json
获取路径参数
路径参数在接口路由如GetMapping中使用“{xxx}"标识,在接口方法参数前使用@PathVariable标识,例如:
修改HelloController接口代码如下:
package com.example.demo;

import org.springframework.web.bind.annotation.GetMapping;
import org.springframework.web.bind.annotation.PathVariable;
import org.springframework.web.bind.annotation.RestController;

@RestController
public class HelloController {
    @GetMapping("/hello/{name}")
    public String hello(@PathVariable String name){
        return "<h1>Hello, " + name + "</h1>";
    }
}
重启应用,访问:http://localhost:8080/hello/Cuctus ,显示如下:

获取Get请求URL参数
在接口方法参数中使用@RequestParam来标识URL参数,可以单独声明每一个参数,也可以使用Map接收所有参数。
单独标识每个参数
package com.example.demo;

import org.springframework.web.bind.annotation.GetMapping;
import org.springframework.web.bind.annotation.RequestParam;
import org.springframework.web.bind.annotation.RestController;

@RestController
public class HelloController {
    @GetMapping("/hello")
    public String hello(@RequestParam("name") String name,
                        @RequestParam("age") int age){
        return "<h1>Hello, " + age + "岁的"+ name + "</h1>";
    }
}
使用Map接收所有参数
package com.example.demo;

import org.springframework.web.bind.annotation.GetMapping;
import org.springframework.web.bind.annotation.RequestParam;
import org.springframework.web.bind.annotation.RestController;

import java.util.Map;

@RestController
public class HelloController {
    @GetMapping("/hello")
    public String hello(@RequestParam Map<String,String> params){
        String name = params.get("name");
        int age = Integer.parseInt((String) params.get("age"));
        return "<h1>Hello, " + age + "岁的"+ name + "</h1>";
    }
}
访问 http://localhost:8080/hello?name=Cactus&age=18 ,显示如下:

获取Post请求表单参数
对应的Content-Type: application/x-www-urlencoded
在Post请求方法中,同样可以使用@RequestParam来单独或使用Map接收请求体中的表单数据,例如:
package com.example.demo;

import org.springframework.web.bind.annotation.PostMapping;
import org.springframework.web.bind.annotation.RequestParam;
import org.springframework.web.bind.annotation.RestController;


@RestController
public class HelloController {
    @PostMapping("/hello")
    public String hello(@RequestParam("name") String name,
                        @RequestParam("age") int age){
        return "<h1>Hello, " + age + "岁的"+ name + "</h1>";
    }
}
重启应用,使用curl命令或Postman发送请求
$ curl -X POST -d 'name=Cactus&age=18' 'http://localhost:8080/hello'

<h1>Hello, 18岁的Cactus</h1>
获取Post请求JSON参数
使用@RequestBody可以标识请求体数据,可以使用Map或JSONObject来接收请求体数据,例如:
package com.example.demo;

import org.springframework.web.bind.annotation.*;

import java.util.Map;


@RestController
public class HelloController {
    @PostMapping("/hello")
    public String hello(@RequestBody Map<String, Object> data){
        String name = (String) data.get("name");
        int age = (int) data.get("age");
        return "{\"msg\": \"Hello, " + age +"岁的" + name+ "\"}";
    }
}
使用curl或Postman发送请求
curl -X POST -H 'content-type:application/json' -d '{"name":"Cactus","age":18}' 'http://localhost:8080/hello'
{"msg": "Hello, 18岁的Cactus"}
返回响应
返回字符串或HTML
如上面的例子,控制器标识为@RestController,接口方法中直接返回String即可,字符串中支持HTML代码。
返回JSON
在com.example.org中新建Java类User,内容如下:
package com.example.demo;

public class User {
    String name;
    int age;

    User(String name, int age) {
        this.name = name;
        this.age = age;
    }

    public String getName() {
        return this.name;
    }

    public int getAge() {
        return this.age;
    }
}
修改接口函数代码
package com.example.demo;

import org.springframework.web.bind.annotation.*;


@RestController
public class HelloController {
    @GetMapping("/hello")
    public User hello(){
        return new User("Cactus", 18);
    }
}
访问 http://localhost;8080/hello , 显示如下:

返回页面
TODO

 浙公网安备 33010602011771号