如何使用vuex
一、何为vuex?
vuex其实是一种状态管理模式,那么什么是状态管理模式呢?简单的理解就是把一些状态或者数据集中到一个地方管理,然后所有的组件共享这些数据,当数据改变时,用到这些数据的组件也会相应的改变,有点类似redux。
二、什么情况下用到vuex呢?
1.首先看你的项目大小,如何你开发的是一个小项目,数据结构不是那么复杂,如果需要存少量的共享数据,完全可以放到localstorage里边就好,或者可以起一个空的vue实例作为事件的总线,比如var abc=new Vue(),比如在A组件触发,abc.$emit("event1"),然后B组件监听abc.$on("event1")。
2.当你的项目是个单页面的大型应用,数据结构比较复杂,组件之间需要相互共享一些数据以及每个组件都可以更改这些数据的,或者当这些共享数据改变的时候其他用到这些数据的组件会自动的发生变化。这时候你就需要vuex来集中管理这些状态数据。
三、如何使用vuex
1.文档地址
vuex有专门的官方的详细文档,可以供大家查阅:https://vuex.vuejs.org/zh-cn/
2.安装依赖
npm install vuex --save
3.建立目录结构

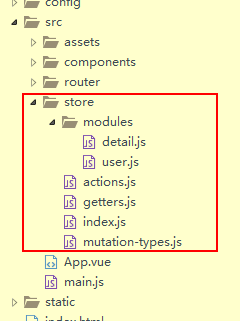
3.1 在项目src目录下新建一个store的文件夹,专门用于管理vuex的数据。
3.2 文件夹里边再新建一个modules的文件夹(模块文件夹),为了将store模块化切割,这样防止所有的对象集中到一个state下,造成store对象很臃肿,不利于维护,所有modules文件可以有效的解决这个问题,每个模块都拥有state,mutation,action,getter。
detail.js代码如下:
import * as types from '../mutation-types'

// initial state
const state = {
  activeId:0,
}

// getters
const getters = {
  getActiveId: state => state.activeId
}

// actions
const actions = {
      setDetailId ({ commit }) {
      commit(types.SET_DETAIL_ID, { id })
    }

}

// mutations
const mutations = {
  [types.SET_DETAIL_ID] (state, { id }) {
    state.activeId = id
  }
}

export default {
  state,
  getters,
  actions,
  mutations
}
user.js代码如下:
import * as types from '../mutation-types'

// initial state
const state = {
  username:'',
  count:0
}

// getters
const getters = {
  getUsername: state => state.username,
  getCount: state => state.count,
}

// actions
const actions = {
      loginInfoAction ({ commit },name) {
      commit(types.LOGIN_INFO,name)
    },
    addCount ({ commit }) {
      commit(types.ADD_COUNT)
    }
}

// mutations
const mutations = {
  [types.LOGIN_INFO] (state,name) {
    state.username = name
  },
  [types.ADD_COUNT] (state) {
    state.count++
  },
}

export default {
  state,
  getters,
  actions,
  mutations
}
3.3 新建一个mutation-types.js文件,用于管理所有的事件名称。
mutation-types.js代码如下:
export const GET_USER_INFO = 'GET_USER_INFO'
export const ADD_COUNT = 'ADD_COUNT'
export const LOGIN_INFO = 'LOGIN_INFO'
export const SET_DETAIL_ID = 'SET_DETAIL_ID'
3.4 新建一个getter.js,作为全局处理getter,对模块里边的state进行再处理
3.5 新建一个action.js ,作为全局事件处理,对模块里边的action进行再处理。
3.6 新建一个index.js的文件,用于对外输出store。代码如下:
import Vue from 'vue'
import Vuex from 'vuex'
import * as actions from './actions'
import * as getters from './getters'
import detail from './modules/detail'
import user from './modules/user'

Vue.use(Vuex)

const debug = process.env.NODE_ENV !== 'production'

export default new Vuex.Store({
  actions,
  getters,
  modules: {
    detail,
    user
  },
})
四、在main.js里边引用vuex
4.1 引入:import store from './store'
4.2 注册:
new Vue({
el: '#app',
router,
store,
template: '<App/>',
components: { App }
})
五、在组件中使用vuex
5.1 在components文件下新建一个login.vue,引用了两个action,点击登录按钮的时候调用loginInfoAction方法,点击+1按钮调用addCount方法。
<template>
    <div>
        用户名:<input type="text" v-model="user"/>
        <button @click="loginInfoAction(user)">登录</button>
        计数增加<button @click="addCount">+1</button>
    </div>
</template>

<script>
    import { mapGetters, mapActions } from 'vuex'
    export default{
        data(){
            return{
                user:''
            }
        },
        methods:{
            ...mapActions([
                  'loginInfoAction', // 将 `this.loginInfoAction(name)` 映射为 `this.$store.dispatch('loginInfoAction',name)`
                'addCount' // 将 `this.addCount` 映射为 `this.$store.dispatch('addCount')`
            ]),
        }
    }
</script>

<style>
</style>
5.2 在HelloWorld.vue里使用login.vue,以及用getter取getUsername,getCount这两个状态。
<template>
  <div class="hello">
      <div class="login">
          <h2>login:</h2>
          <login></login>
      </div>
    <h1>{{ msg }}</h1>
    <div>{{username}}</div>
    <div>{{count}}</div>
  </div>
</template>

<script>
import { mapGetters } from 'vuex'
import login from './login.vue'
export default {
  name: 'HelloWorld',
  data () {
    return {
      msg: 'Welcome to Your Vue.js App'
    }
  },
  computed: {
    ...mapGetters({
      username: 'getUsername',
      count: 'getCount'
    })
  },
  components:{
      login
  }
}
</script>

<!-- Add "scoped" attribute to limit CSS to this component only -->
<style scoped>
h1, h2 {
  font-weight: normal;
}
ul {
  list-style-type: none;
  padding: 0;
}
li {
  display: inline-block;
  margin: 0 10px;
}
a {
  color: #42b983;
}
</style>
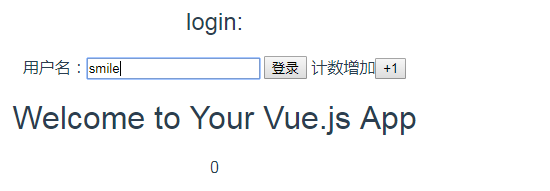
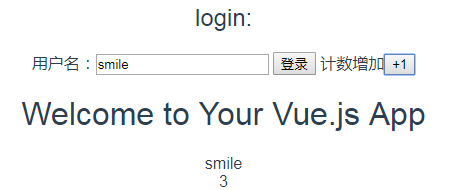
5.3 当我在login组件里边输入姓名以及点击加1按钮,HelloWorld组件使用state的地方就会相应的改变。


这里就简单的做了一个小demo说明了下怎么使用vuex,实际项目还得结合需求来使用,谢谢大家。

