Shell编程二
告警系统需求分析

1.(虽然之前我们学习了zabbix,但有时候也不能满足我们的需求,比如比较冷门的监控项目需要写自定义脚本,或者服务器网络有问题,没有办法将客户端的数据发送到服务端。)
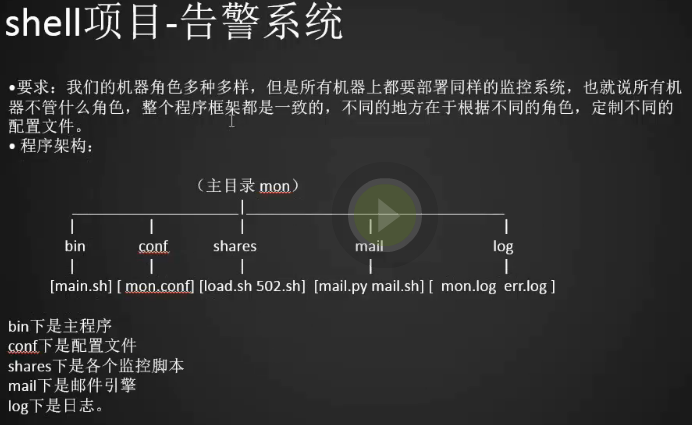
程序架构:
bin下是主程序文件
conf下是配置文件
shares下是各个监控脚本
mail下是邮件引擎
log下是日志
告警系统主脚本
主脚本
1.创建相应的目录
[root@centos-02 ~]# cd /usr/local/sbin/
[root@centos-02 sbin]# mkdir mon
[root@centos-02 sbin]# cd mon/
[root@centos-02 mon]# mkdir bin conf shares log mail
[root@centos-02 mon]#
2.编辑告警系统的主脚本
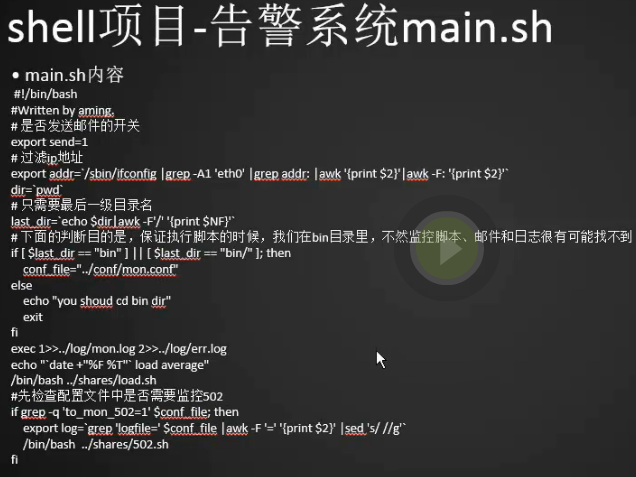
[root@centos-02 mon]# cd bin/
[root@centos-02 bin]# vim main.sh
#!/bin/bash
#Written by SYJ.
# 是否发送邮件的开关
# export 使子脚本都能用send变量(用于将shell变量输出为环境变量,或者将shell函数输出为环境变量)
export send=1
# 过滤ip地址
export addr=`/sbin/ifconfig |grep -A1 "ens33: "|awk '/inet/ {print $2}'`
dir=`pwd`
# 只需要最后一级目录名
last_dir=`echo $dir|awk -F'/' '{print $NF}'` (NF 表示的是浏览记录的域的个数 $NF表示的最后一个Field(列),即输出最后一个字段的内容 )
# 下面的判断目的是,保证执行脚本的时候,我们在bin目录里,不然监控脚本、邮件和日志很有可能
找不到
if [ $last_dir == "bin" ] || [ $last_dir == "bin/" ]; then
    conf_file="../conf/mon.conf"
else
    echo "you shoud cd bin dir"
    exit
fi
exec 1>>../log/mon.log 2>>../log/err.log
echo "`date +"%F %T"` load average"
/bin/bash ../shares/load.sh
#先检查配置文件中是否需要监控502
if grep -q 'to_mon_502=1' $conf_file; then
    export log=`grep 'logfile=' $conf_file |awk -F '=' '{print $2}' |sed 's/ //g'` (查找主配置中的log路径)
    /bin/bash  ../shares/502.sh
fi
告警系统配置文件
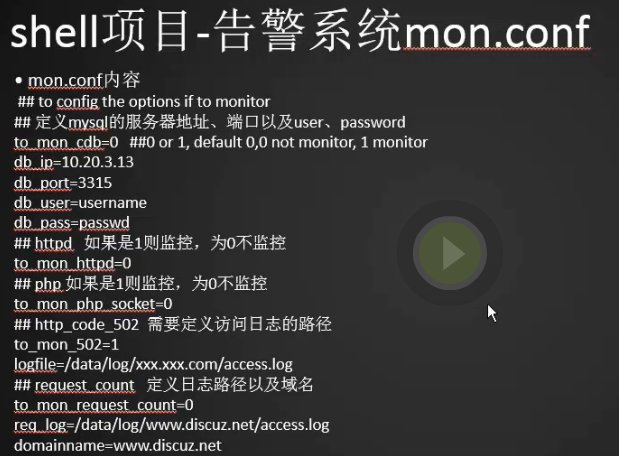
[root@bogon bin]# cd ../conf/
[root@bogon conf]# vim mon.conf
[root@bogon conf]#
## to config the options if to monitor
## 定义mysql的服务器地址、端口以及user、password
to_mon_cdb=0   ##0 or 1, default 0,0 not monitor, 1 monitor
db_ip=10.20.3.13
db_port=3315
db_user=username
db_pass=passwd
## httpd   如果是1则监控,为0不监控
to_mon_httpd=0
## php 如果是1则监控,为0不监控
to_mon_php_socket=0
## http_code_502  需要定义访问日志的路径
to_mon_502=1
logfile=/data/log/xxx.xxx.com/access.log
## request_count   定义日志路径以及域名
to_mon_request_count=0
req_log=/data/log/www.discuz.net/access.log
domainname=www.discuz.net
告警系统监控项目
1.Shell项目-子脚本,监控系统平均负载
[root@bogon conf]# cd ../
[root@bogon mon]# cd shares/
[root@bogon shares]# pwd
/usr/local/sbin/mon/shares
[root@bogon shares]# vim load.sh
[root@bogon shares]#
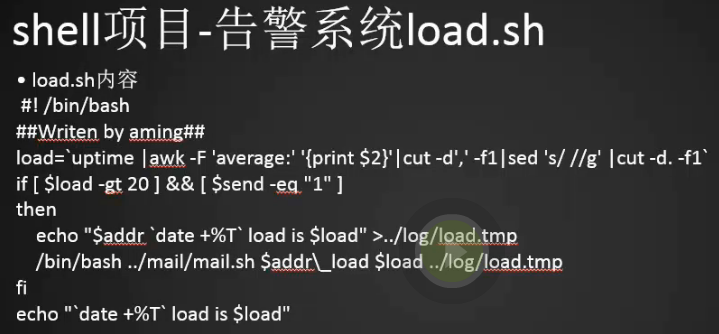
#! /bin/bash
##Writen by aming##
load=`uptime |awk -F 'average:' '{print $2}'|cut -d',' -f1|sed 's/ //g' |cut -d. -f1`
if [ $load -gt 10 ] && [ $send -eq "1" ] (如果负载大于10的时候并且可以发邮件)
then
echo "$addr `date +%T` load is $load" >../log/load.tmp
/bin/bash ../mail/mail.sh aming_test@163.com "$addr\_load:$load" `cat ../log/load.tmp`
fi
echo "`date +%T` load is $load"
2.测试负载
[root@bogon shares]# uptime |awk -F 'average:' '{print $2}'|cut -d',' -f1|sed 's/ //g' |cut -d. -f1
0
[root@bogon shares]#
3.监控nginx报错502
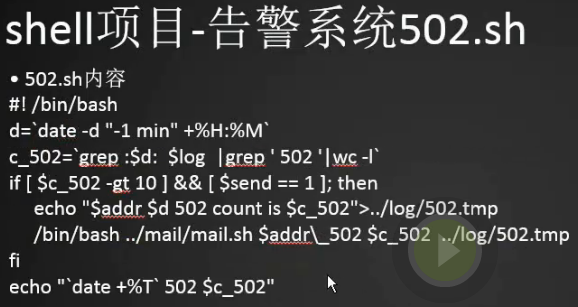
[root@bogon shares]# vim 502.sh
[root@bogon shares]#
#! /bin/bash
d=`date -d "-1 min" +%H:%M`
c_502=`grep :$d:  $log  |grep ' 502 '|wc -l` (找出一分钟以前的所有日志)
if [ $c_502 -gt 10 ] && [ $send == 1 ]; then
     echo "$addr $d 502 count is $c_502">../log/502.tmp
     /bin/bash ../mail/mail.sh $addr\_502 $c_502  ../log/502.tmp
fi
echo "`date +%T` 502 $c_502"
监控磁盘使用率

[root@bogon shares]# vim disk.sh
[root@bogon shares]#
#! /bin/bash
rm -f ../log/disk.tmp
LANG=en
for r in `df -h |awk -F '[ %]+' '{print $5}'|grep -v Use`  (以空格或者%分割)
do
    if [ $r -gt 90 ] && [ $send -eq "1" ]
then
    echo "$addr `date +%T` disk useage is $r" >>../log/disk.tmp
fi
if [ -f ../log/disk.tmp ]
then
    df -h >> ../log/disk.tmp
    /bin/bash ../mail/mail.sh $addr\_disk $r ../log/disk.tmp
    echo "`date +%T` disk useage is nook"
else
    echo "`date +%T` disk useage is ok"
awk处理文档的时候我们可以选择多个分割符,$3打印第三段
[root@centos-02 ~]# echo "12:aa#33:44#55" |awk -F '[:#]' '{print $3}'
33
[root@centos-02 ~]# echo "12:aa#33:44#55" |awk -F '[:#]' '{print NF}'
5
[root@centos-02 ~]#
告警系统邮件引擎
1.建立邮件服务器文件
#####脚本使用说明######
#1. 首先定义好脚本中的邮箱账号和密码
#2. 脚本执行命令为:python mail.py 目标邮箱 "邮件主题" "邮件内容"
[root@centos-02 shares]# pwd
/usr/local/sbin/mon/shares
[root@centos-02 shares]# cp /usr/lib/zabbix/alertscripts/mail.py ../mail/mail.py
[root@centos-02 shares]# cat /usr/lib/zabbix/alertscripts/mail.py
#!/usr/bin/env python
#-*- coding: UTF-8 -*-
import os,sys
reload(sys)
sys.setdefaultencoding('utf8')
import getopt
import smtplib
from email.MIMEText import MIMEText
from email.MIMEMultipart import MIMEMultipart
from subprocess import *
def sendqqmail(username,password,mailfrom,mailto,subject,content):
gserver = 'smtp.163.com'
gport = 25
try:
msg = MIMEText(unicode(content).encode('utf-8'))
msg['from'] = mailfrom
msg['to'] = mailto
msg['Reply-To'] = mailfrom
msg['Subject'] = subject
smtp = smtplib.SMTP(gserver, gport)
smtp.set_debuglevel(0)
smtp.ehlo()
smtp.login(username,password)
smtp.sendmail(mailfrom, mailto, msg.as_string())
smtp.close()
except Exception,err:
print "Send mail failed. Error: %s" % err
def main():
to=sys.argv[1]
subject=sys.argv[2]
content=sys.argv[3]
sendqqmail('sunyujun_de@163.com', 'sunyujun163','sunyujun_de@163.com',to,subject,content)
if __name__ == "__main__":
main()
[root@centos-02 shares]#
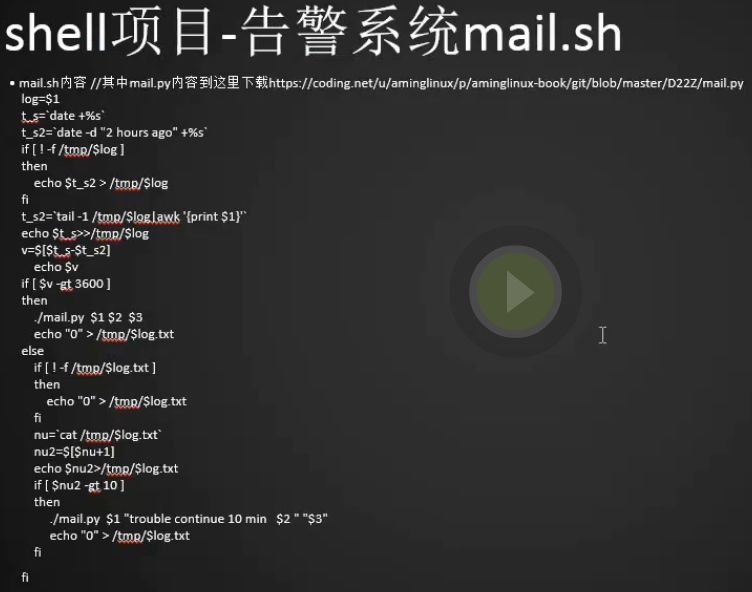
2.建立mail.sh文件
##在mail目录下创建脚本mail.sh ,当系统服务异常的时候就会调用mail.sh

#增加如下内容:(核心功能记时3600秒,记数10次)
[root@centos-02 shares]# cd ../mail/
[root@centos-02 mail]# vim mail.sh
[root@centos-02 mail]#
log=$1
t_s=`date +%s`
t_s2=`date -d "2 hours ago" +%s`
if [ ! -f /tmp/$log ]
then
echo $t_s2 > /tmp/$log
fi
t_s2=`tail -1 /tmp/$log|awk '{print $1}'`
echo $t_s>>/tmp/$log
v=$[$t_s-$t_s2]
echo $v
if [ $v -gt 3600 ]
then
./mail.py $1 $2 $3
echo "0" > /tmp/$log.txt
else
if [ ! -f /tmp/$log.txt ]
then
echo "0" > /tmp/$log.txt
fi
nu=`cat /tmp/$log.txt`
nu2=$[$nu+1]
echo $nu2>/tmp/$log.txt
if [ $nu2 -gt 10 ]
then
./mail.py $1 "trouble continue 10 min $2" "$3"
echo "0" > /tmp/$log.txt
fi
fi
#本脚本用于做告警收敛
#这个在main.sh主函数中定义了$log
log=$1
t_s=date +%s
#时间戳1
t_s2=date -d "2 hours ago" +%s
#时间戳2(两个小时之前的时间)
#定义该时间戳的目的是保证第一次执行该脚本时v大于一小时
#保证第一次执行的时候能报警
#因为只有发生故障的时候才会执行该脚本,所以第一次执行必须要报警
if [ ! -f /tmp/$log ]
then
echo $t_s2 > /tmp/$log
fi
#创建记录时间戳的日志文件
t_s2=tail -1 /tmp/$log|awk '{print $1}'
echo $t_s>>/tmp/$log
v=$[$t_s-$t_s2]
#两个时间戳的间隔时间
echo $v
#计时器:
if [ $v -gt 3600 ]
then
#如果时间间隔大于1小时,则启动报警系统
./mail.py $1 $2 $3
echo "0" > /tmp/$log.txt
#$log.txt为计数器文件:
else
if [ ! -f /tmp/$log.txt ]
then
echo "0" > /tmp/$log.txt
fi
#查看计数器文件中的数字
nu=cat /tmp/$log.txt
nu2=$[$nu+1]
echo $nu2>/tmp/$log.txt
#重置$log.txt数值
if [ $nu2 -gt 10 ]
then
#告警收敛:该故障持续十分钟,开始报警
./mail.py $1 "trouble continue 10 min $2" "$3"
echo "0" > /tmp/$log.txt
#告警结束后重新开始计数
fi
fi
最终的目录结构
[root@localhost ~]# tree /usr/local/sbin/mon
/usr/local/sbin/mon
├── bin
│   └── main.sh
├── conf
│   └── mon.conf
├── log
├── mail
│   ├── mail.py
│   └── mail.sh
└── shares
    ├── 502.sh
    ├── disk.sh
    └── load.sh
编写cron计划
# 每分钟执行一次,这样告警时间间隔收敛至10分钟,这里必须进入到/usr/local/sbin/mon/bin目录下
[root@localhost ~]# crontab -e
* * * * * cd /usr/local/sbin/mon/bin; bash main.sh
分发系统介绍(上线脚本)

1.场景:
业务越来越大,网站app,后端,编程语言是php,所以就需要配置lamp或者lnmp,最好还需要把代码上传到服务器上;但是因为业务增加,代码增加,多台机器,就会非常麻烦;这是只需要一个分发系统,就可以把每次更新的代码发布到需要更新的服务器上
expect:实现传输文件、远程执行命令、无需密码,它可以让一些需要交互的任务自动化地完成。相当于模拟了用户和命令行的交互操作。
一个具体的场景:远程登陆服务器,并执行命令
登录时输入密码需要交互,bash脚本无法完成,可以使用expect来完成。
expect脚本远程登录
1.安装expect
[root@bogon shares]# yum install -y expect
2.写experct的脚本,自动远程登录,并执行命令
[root@bogon ~]# vim 1.expect
[root@bogon ~]#
#! /usr/bin/expect
set host " 10.21.95.58"         //定义变量 host      被分发机器的IP
set passwd "root"              //定义变量 密码      被分发机器的密码
spawn ssh root@$host          //通过 shell 调用变量 host  远程登录被分发机器
expect {              //这里有两种情况,如果是第一次登录需要选择yes/no,第二次执行的话就走password了
"yes/no" { send "yes\r"; exp_continue}        //是否要建立连接
"password:" { send "$passwd\r" }                   //输入被分发机器的密码
}
interact                       //停留在远程机器,不退出(expect eof停留几秒钟退出)
3.首次用ssh登录远程机器会让用户选择yes or no,所以配置文件中会有这项配置,第二次登录就不会了,如果还想让出现需要清除known_hosts里面的内容
[root@bogon ~]# ssh 10.21.95.58
The authenticity of host '10.21.95.58 (10.21.95.58)' can't be established.
ECDSA key fingerprint is 18:59:d2:46:49:14:c3:70:66:09:7f:70:85:49:d8:c3.
Are you sure you want to continue connecting (yes/no)? no
Host key verification failed.
[root@bogon ~]#
[root@bogon ~]# vim /root/.ssh/known_hosts
4.给文件添加执行的权限并执行
[root@bogon ~]# chmod a+x 1.expect
[root@bogon ~]# ./1.expect
spawn ssh root@10.21.95.58
The authenticity of host '10.21.95.58 (10.21.95.58)' can't be established.
ECDSA key fingerprint is 18:59:d2:46:49:14:c3:70:66:09:7f:70:85:49:d8:c3.
Are you sure you want to continue connecting (yes/no)? yes
Warning: Permanently added '10.21.95.58' (ECDSA) to the list of known hosts.
root@10.21.95.58's password:
Last login: Wed Mar 21 10:06:52 2018 from 10.21.95.237
[root@sunyujun02 ~]#
[root@sunyujun02 ~]# exit
登出
Connection to 10.21.95.58 closed.
[root@bogon ~]#
5.自动远程登录后,执行命令并退出
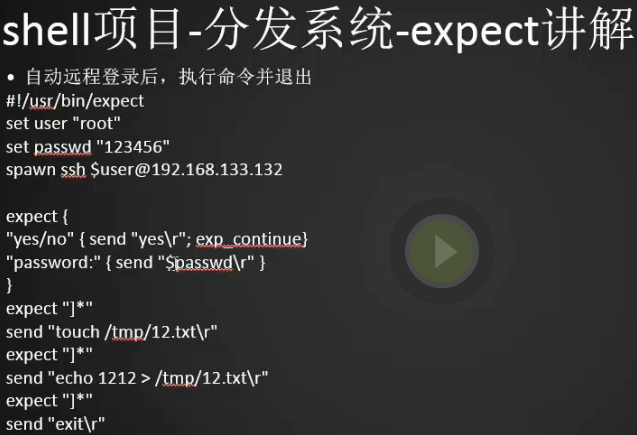
[root@bogon ~]# vim 2.expect
[root@bogon ~]#
#!/usr/bin/expect
set user "root"
set passwd "root"
spawn ssh $user@10.21.95.58

expect {
"yes/no" { send "yes\r"; exp_continue}
"password:" { send "$passwd\r" }
}
expect "]*"                                     //当遇到提示符为   ]* 也就是登录后的[root@bogon ~]#
send "touch /tmp/12.txt\r" // 则创建该文件
expect "]*"
send "echo 1212 > /tmp/12.txt\r" //然后在文件中输入文本信息
expect "]*"
send "exit\r" //退出
6.执行2.expect
[root@bogon ~]# vim 2.expect
[root@bogon ~]# chmod a+x 2.expect
[root@bogon ~]# ./2.expect
spawn ssh root@10.21.95.58
root@10.21.95.58's password:
Last login: Wed Mar 21 10:28:25 2018 from 10.21.95.122
[root@sunyujun02 ~]# touch /tmp/12.txt
echo 1212 > /tmp/12.txt
[root@sunyujun02 ~]# echo 1212 > /tmp/12.txt
[root@sunyujun02 ~]# [root@bogon ~]#
[root@bogon ~]#
7.登录到02服务器查看是否建立文件和写操作成功
[root@bogon ~]# ./1.expect
spawn ssh root@10.21.95.58
root@10.21.95.58's password:
Last login: Wed Mar 21 11:06:31 2018 from 10.21.95.122
[root@sunyujun02 ~]# ls -l /tmp/12.txt
-rw-r--r-- 1 root root 5 3月  21 11:06 /tmp/12.txt
[root@sunyujun02 ~]# cat /tmp/12.txt
1212
[root@sunyujun02 ~]#
[root@sunyujun02 ~]# logout
Connection to 10.21.95.58 closed.
[root@bogon ~]#
expect脚本传递参数

1. expect是可以传递参数的,就像shell我们有$1 $2
#!/usr/bin/expect
set user [lindex $argv 0]  # 第一个参数
set host [lindex $argv 1] # 第二个参数
set passwd "root"
set cm [lindex $argv 2]  #第三个参数,我就是我们要执行的命令
spawn ssh $user@$host
expect {
"yes/no" { send "yes\r"}
"password:" { send "$passwd\r" }
}
expect "]*"
send "$cm\r"
expect "]*"
send "exit\r"
2.给脚本权限并执行ls
[root@localhost ~]# chmod a+x 3.expect
[root@localhost ~]# ./3.expect root 10.21.95.58 ls
spawn ssh root@10.21.95.58
root@10.21.95.58's password:
Last login: Fri Mar 23 11:00:55 2018 from 10.21.95.122
[root@sunyujun02 ~]# ls
1.txt            do    linux             公共  图片  音乐
anaconda-ks.cfg  done  lnmp-install.log  模板  文档  桌面
a.txt            echo  rsyncd            视频  下载
[root@sunyujun02 ~]# [root@localhost ~]#
3.执行多条命令
[root@sunyujun02 ~]# [root@localhost ~]# ./3.expect root 10.21.95.58 "ls;w;vmstat 1"
spawn ssh root@10.21.95.58
root@10.21.95.58's password:
Last login: Fri Mar 23 11:05:34 2018 from 10.21.95.122
[root@sunyujun02 ~]# ls;w;vmstat 1
1.txt            do    linux             公共  图片  音乐
anaconda-ks.cfg  done  lnmp-install.log  模板  文档  桌面
a.txt            echo  rsyncd            视频  下载
w: 66 column window is too narrow
procs -----------memory---------- ---swap-- -----io---- -system-- ------cpu-----
 r  b   swpd   free   buff  cache   si   so    bi    bo   in   cs us sy id wa st
 3  0 197536 267956     40 263476    0    1    49     3   45   76  0  0 99  0  0
 0  0 197536 267972     40 263484    0    0     0     0   79  158  0  0 100  0  0
 0  0 197536 267940     40 263484    0    0     0     0   58  105  0  0 100  0  0
 0  0 197536 267940     40 263484    0    0     0     0   78  134  1  0 99  0  0
^C[root@localhost ~]#
expect脚本同步文件
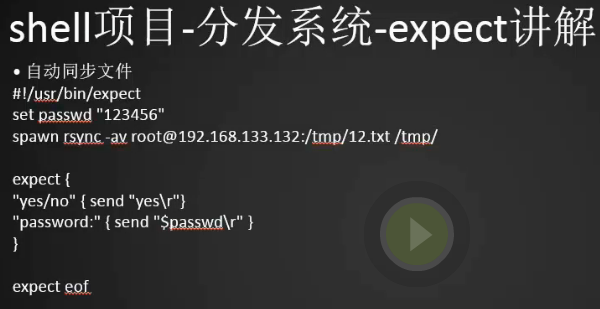
1.将远程58服务器上/tmp/12.txt文件同步到当前服务器122下的tmp目录下
#!/usr/bin/expect
set passwd "root"
spawn rsync -av root@10.21.95.58:/tmp/12.txt /tmp/
expect {
"yes/no" { send "yes\r"}
"password:" { send "$passwd\r" }
}
expect eof
2.在58服务器上建立12.txt文件
[root@sunyujun02 ~]# touch /tmp/12.txt
[root@sunyujun02 ~]# echo 12 > /tmp/12.txt
[root@sunyujun02 ~]# cat /tmp/12.txt
12
[root@sunyujun02 ~]#
3.给执行权限并执行脚本,12.txt文件同步成功
[root@localhost ~]# chmod a+x 4.expect
[root@localhost ~]# ./4.expect
spawn rsync -av root@10.21.95.58:/tmp/12.txt /tmp/
root@10.21.95.58's password:
receiving incremental file list
12.txt

sent 30 bytes  received 82 bytes  224.00 bytes/sec
total size is 3  speedup is 0.03
[root@localhost ~]# cat /tmp/12.txt
12
[root@localhost ~]#
4.我们将脚本中的expect eof注释掉看看有什么差异,发现还没有来得及传输呢就直接退出了,所以需要加上,尤其是在传输文件的时候一定要加上
[root@localhost ~]# vim 4.expect
#!/usr/bin/expect
set passwd "root"
spawn rsync -av root@10.21.95.58:/tmp/12.txt /tmp/
expect {
"yes/no" { send "yes\r"}
"password:" { send "$passwd\r" }
}
#expect eof
[root@localhost ~]# ./4.expect
spawn rsync -av root@10.21.95.58:/tmp/12.txt /tmp/
root@10.21.95.58's password: [root@localhost ~]#
expect脚本指定host和要同步的文件
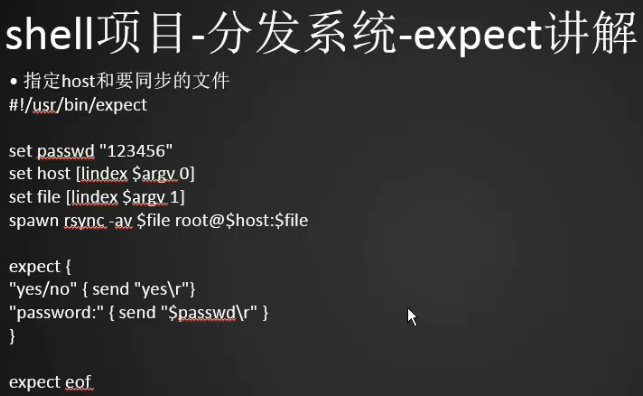
1.我们执行下面的命令会有默认10秒超时停止的情况,那么怎么在脚本中设置超时时间呢
[root@localhost ~]# ./3.expect root 10.21.95.58 "vmstat 1"
2.设置脚本超时时间单位秒,如果设置永不超时可以写-1,这样vmstat命令就可以一直执行了
#!/usr/bin/expect
set user [lindex $argv 0]
set host [lindex $argv 1]
set passwd "root"
set cm [lindex $argv 2]
spawn ssh $user@$host
expect {
"yes/no" { send "yes\r"}
"password:" { send "$passwd\r" }
}
expect "]*"
send "$cm\r"
set timeout 3
expect "]*"
send "exit\r"
3.将本地122服务器 /tmp/12.txt文件同步到58服务器的/tmp/12.txt
[root@localhost ~]# vim 5.expect
#!/usr/bin/expect
set passwd "root"
set host [lindex $argv 0]
set file [lindex $argv 1]
spawn rsync -av $file root@$host:$file
expect {
"yes/no" { send "yes\r"}
"password:" { send "$passwd\r" }
}
expect eof
[root@localhost ~]# chmod a+x 5.expect
[root@localhost ~]# ./5.expect 10.21.95.122 "/tmp/12.txt"
spawn rsync -av /tmp/12.txt root@10.21.95.122:/tmp/12.txt
root@10.21.95.122's password:
sending incremental file list

sent 31 bytes  received 12 bytes  28.67 bytes/sec
total size is 3  speedup is 0.07
[root@localhost ~]#
构建文件分发系统

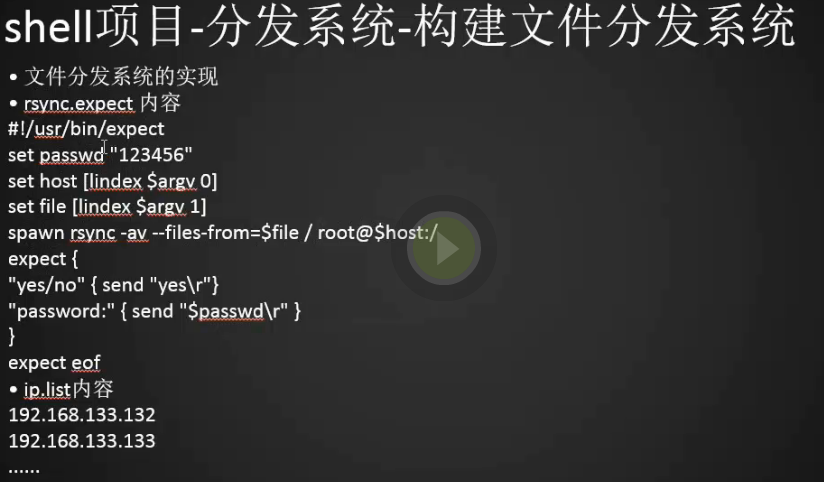
1.核心命令,执行这个命令就可以将文件列表里面的数据(需要将文件路径写到文件列表里面list.txt,里面的文件路径必须是绝对路径)同步到远程服务器
rsync -av --files-from=list.txt / root@host:/
2.创建rsync.expect文件
[root@centos-02 ~]# vim rsync.expect
[root@centos-02 ~]#
#!/usr/bin/expect
set passwd "root"
set host [lindex $argv 0]
set file [lindex $argv 1]  (指的是文件列表file.list)
spawn rsync -avR --files-from=$file / root@$host:/ (R是当目标服务器没有当前文件目录时会自动创建)
expect {
"yes/no" { send "yes\r"}
"password:" { send "$passwd\r" }
}
expect eof
3.创建file.list文件,并写上两个同步文件的路径,文件里面的内容为文件名
[root@centos-02 ~]# vim /tmp/file.list
[root@centos-02 ~]# cat /tmp/file.list
/tmp/123.txt
/tmp/456.txt
[root@centos-02 ~]#
4.可能同步到不止一台服务器,所以需要创建ip列表文件,前提是这两台机器的密码是一样的,如果不一样脚本中需要分别指定机器的密码(这样有一个问题,expect文件一旦暴露,密码将泄露,最好搞成秘钥认证登录,就不用输入密码这步脚本了),
[root@centos-02 ~]# vim /tmp/ip.list
[root@centos-02 ~]# cat /tmp/ip.list
127.0.0.1
192.168.133.66
[root@centos-02 ~]#
5.创建rsync.sh,作用就是遍历一下ip地址
[root@centos-02 ~]# vim rsync.sh
[root@centos-02 ~]# cat rsync.sh
#!/bin/bash
for ip in `cat /tmp/ip.list`
do
	./rsync.expect $ip /tmp/file.list
done
[root@centos-02 ~]# chmod a+x ./rsync.expect
[root@centos-02 ~]#
6.执行shell脚本(一定用保证两边都安装了rsync包)
[root@centos-02 ~]# sh -x rsync.sh
++ cat /tmp/ip.list
+ for ip in '`cat /tmp/ip.list`'
+ ./rsync.expect 192.168.133.66 /tmp/file.list
spawn rsync -avR --files-from=/tmp/file.list / root@192.168.133.66:/
root@192.168.133.66's password:
building file list ... done
tmp/
tmp/123.txt
tmp/456.txt

sent 165 bytes  received 53 bytes  145.33 bytes/sec
total size is 8  speedup is 0.04
+ for ip in '`cat /tmp/ip.list`'
+ ./rsync.expect 127.0.0.1 /tmp/file.list
spawn rsync -avR --files-from=/tmp/file.list / root@127.0.0.1:/
root@127.0.0.1's password:
building file list ... done

sent 68 bytes  received 12 bytes  53.33 bytes/sec
total size is 8  speedup is 0.10
[root@centos-02 ~]#
7.查看远程服务器上是否同步了文件
[root@centos-03 /]# ls -l /tmp/
总用量 8
-rw-r--r-- 1 root root  4 3月  23 23:36 123.txt
-rw-r--r-- 1 root root  4 3月  23 23:37 456.txt
drwx------ 3 root root 17 3月  23 23:24 systemd-private-7b6b3a19f79e438685bb4af38b25fb33-vmtoolsd.service-722O8i
[root@centos-03 /]#
批量远程执行命令
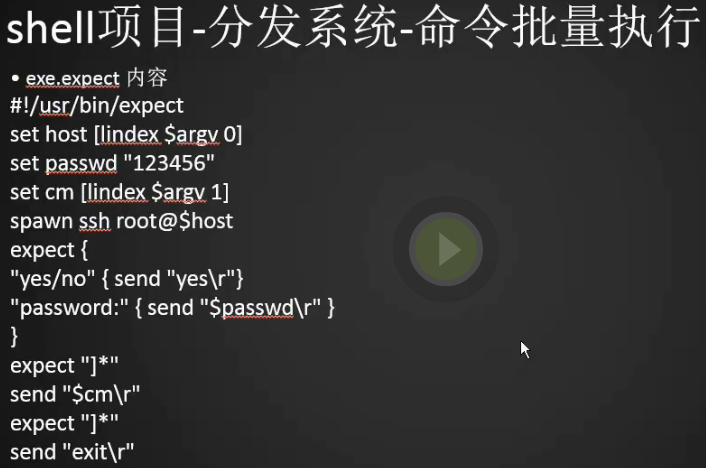
1.定义expect脚本
[root@centos-02 ~]# vim exec.expect
[root@centos-02 ~]# cat exec.expect
#!/usr/bin/expect
set host [lindex $argv 0]
set passwd "root"
set cm [lindex $argv 1]
spawn ssh root@$host
expect {
"yes/no" { send "yes\r"}
"password:" { send "$passwd\r" }
}
expect "]*"
send "$cm\r"
expect "]*"
send "exit\r"
[root@centos-02 ~]#
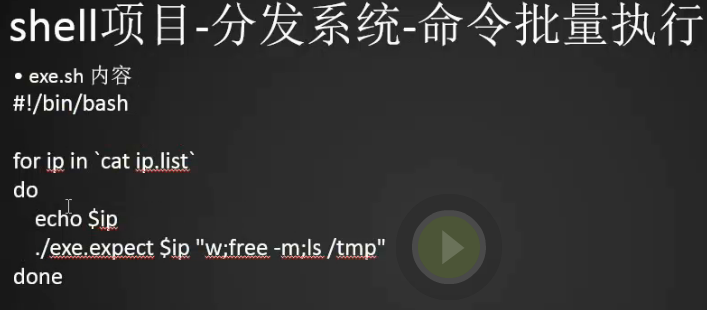
2.定义shell脚本
[root@centos-02 ~]# cat exec.sh
#!/bin/bash
for ip in `cat /tmp/ip.list`
do
	./exec.expect $ip "hostname"
done
3.给权限并执行shell
[root@centos-02 ~]# chmod a+x exec.expect
[root@centos-02 ~]#
[root@centos-02 ~]# sh exec.sh
spawn ssh root@192.168.133.66
root@192.168.133.66's password:
Last login: Sat Mar 24 01:45:07 2018 from 192.168.133.88
[root@centos-03 ~]# spawn ssh root@127.0.0.1
root@127.0.0.1's password:
Last login: Sat Mar 24 01:45:08 2018 from localhost
[root@centos-02 ~]# hostname
centos-02
[root@centos-02 ~]# [root@centos-02 ~]#

 浙公网安备 33010602011771号