Shell编程
Shell脚本介绍
Shell是一种脚本语言,和传统语言C,Python...相比还是比较简单的。
可以使用逻辑判断,循环等语法
可以自定义函数
shell是系统命令的集合
shell脚本可以实现自动化运维,能大大增加我们的运维效率

Shell脚本结构和执行方法

1.开头必须要#!/bin/bash 解释器(如果shell中执行的命令在本机有,不加也能执行,但是还是建议加上这段)命令,下面的命令是通过bin/bash解释器执行的
我们发现sh其实只是bash的软连接(bin/bash就是bin/sh)
[root@bogon ~]# mkdir shell
[root@bogon ~]# cd shell/
[root@bogon shell]# ls
[root@bogon shell]# ll /bin/sh
lrwxrwxrwx. 1 root root 4 2月  10 2017 /bin/sh -> bash
[root@bogon shell]# ll /bin/bash
-rwxr-xr-x. 1 root root 960376 11月 20 2015 /bin/bash
[root@bogon shell]#
[root@bogon shell]# vim 01.sh
#!/bin/bash
echo "123"
w
ls
[root@bogon shell]# sh 01.sh
123
 10:18:18 up 4 days, 19:01,  3 users,  load average: 0.85, 0.79, 0.53
USER     TTY      FROM             LOGIN@   IDLE   JCPU   PCPU WHAT
root     :0       :0               262月18 ?xdm?   5:54m  2.43s gdm-session-worker [pam/gdm-p
root     pts/0    :0               262月18 19:29m  0.13s  0.13s /bin/bash
root     pts/1    10.21.95.237     三14    2.00s  0.35s  0.21s -bash
01.sh
2.除过第一行,剩下以#开头的大多只是作为解释说明用
3..脚本的名字通常以.sh结尾,用于区分这是一个shell脚本。
4.执行方法有两种
[root@bogon shell]# ./01.sh
-bash: ./01.sh: 权限不够
[root@bogon shell]#
[root@bogon shell]# ll
总用量 4
-rw-r--r--. 1 root root 28 3月  15 10:18 01.sh
[root@bogon shell]# chmod +x 01.sh;
[root@bogon shell]# ./01.sh
123
 10:26:47 up 4 days, 19:09,  3 users,  load average: 0.01, 0.22, 0.36
USER     TTY      FROM             LOGIN@   IDLE   JCPU   PCPU WHAT
root     :0       :0               262月18 ?xdm?   5:55m  2.44s gdm-session-worker [pam/gdm-p
root     pts/0    :0               262月18 19:38m  0.13s  0.13s /bin/bash
root     pts/1    10.21.95.237     三14    7.00s  0.29s  0.23s -bash
01.sh
[root@bogon shell]#
[root@bogon shell]# ll
总用量 4
-rwxr-xr-x. 1 root root 28 3月  15 10:18 01.sh
[root@bogon shell]#
(1)chmod +x 01.sh;./01.sh 先给脚本执行权限,然后用相对路径执行(因为$PATH里有/bin/的路径)
(2)bash 01.sh 或者 sh 01.sh
[root@bogon shell]# bash 01.sh
123
 10:31:34 up 4 days, 19:14,  3 users,  load average: 0.08, 0.14, 0.29
USER     TTY      FROM             LOGIN@   IDLE   JCPU   PCPU WHAT
root     :0       :0               262月18 ?xdm?   5:55m  2.44s gdm-session-worker [pam/gdm-p
root     pts/0    :0               262月18 19:43m  0.13s  0.13s /bin/bash
root     pts/1    10.21.95.237     三14    6.00s  0.30s  0.24s -bash
01.sh
[root@bogon shell]# sh 01.sh
123
 10:31:38 up 4 days, 19:14,  3 users,  load average: 0.08, 0.14, 0.29
USER     TTY      FROM             LOGIN@   IDLE   JCPU   PCPU WHAT
root     :0       :0               262月18 ?xdm?   5:55m  2.44s gdm-session-worker [pam/gdm-p
root     pts/0    :0               262月18 19:43m  0.13s  0.13s /bin/bash
root     pts/1    10.21.95.237     三14    2.00s  0.26s  0.25s -bash
01.sh
[root@bogon shell]#
5.查看脚本执行过程
sh -x + 脚本 (每一个+表示一个动作)
[root@bogon shell]# sh -x 01.sh
+ echo 123
123
+ w
 10:36:34 up 4 days, 19:19,  3 users,  load average: 0.20, 0.13, 0.24
USER     TTY      FROM             LOGIN@   IDLE   JCPU   PCPU WHAT
root     :0       :0               262月18 ?xdm?   5:56m  2.44s gdm-session-worker [pam/gdm-p
root     pts/0    :0               262月18 19:48m  0.13s  0.13s /bin/bash
root     pts/1    10.21.95.237     三14    2.00s  0.26s  0.25s -bash
+ ls
01.sh
[root@bogon shell]#
6.查看脚本是否语法错误
[root@bogon shell]# sh -n 01.sh
[root@bogon shell]#
(我们为了看到实验效果,故意写一个错的脚本,在for循环的结尾少写一个done)
[root@bogon shell]# vim 01.sh
[root@bogon shell]# cat 01.sh
#!/bin/bash

for i in `seq 1 10`

do

   echo $i
[root@bogon shell]# sh -n 01.sh
01.sh:行8: 语法错误: 未预期的文件结尾
[root@bogon shell]#
date命令用法

1.在shell里直接输入date,会显示时间信息。
[root@bogon shell]# date
2018年 03月 15日 星期四 10:44:29 CST
[root@bogon shell]#
2.日期显示成英文
[root@bogon shell]# LANG=en
[root@bogon shell]# date
Thu Mar 15 10:51:31 CST 2018
[root@bogon shell]#
3.标记四位的年
[root@bogon shell]# date +%Y
2018
[root@bogon shell]#
4.标记两位的年
[root@bogon shell]# date +%y
18
[root@bogon shell]#
5.显示月份
[root@bogon shell]# date +%m
03
6.显示分钟
[root@bogon shell]# date +%M
54
[root@bogon shell]#
7.显示日期
[root@bogon shell]# date +%d
15
[root@bogon shell]#
8.外国日期显示法
[root@bogon shell]# date +%D
03/15/18
[root@bogon shell]#
9.显示年月日
[root@bogon shell]# date +%Y%m%d
20180315
[root@bogon shell]#
[root@bogon shell]# date +%F
2018-03-15
[root@bogon shell]#
10.显示小时
[root@bogon shell]# date +%H
11
[root@bogon shell]#
11.显示时间戳
[root@bogon shell]# date +%s
1521083272
[root@bogon shell]#
12.显示秒
[root@bogon shell]# date +%S
50
[root@bogon shell]#
13.显示时间
[root@bogon shell]# date +%T
11:10:04
[root@bogon shell]#
[root@bogon shell]# date +%H:%M:%S
11:12:15
[root@bogon shell]#
14.英文的月
[root@bogon shell]# date +%h
Mar
[root@bogon shell]#
15.显示周几
[root@bogon shell]# date +%w
4
[root@bogon shell]#
16.显示今年的第几周
[root@bogon shell]# date +%W
11
[root@bogon shell]#
17.显示日期cal
[root@bogon shell]# cal
     March 2018
Su Mo Tu We Th Fr Sa
             1  2  3
 4  5  6  7  8  9 10
11 12 13 14 15 16 17
18 19 20 21 22 23 24
25 26 27 28 29 30 31

[root@bogon shell]#
18.显示年月日时分秒
[root@bogon shell]# date +%Y-%m-%d/%H:%M:%S
2018-03-15/11:19:47
[root@bogon shell]#
[root@bogon shell]# date +%F/%T
2018-03-15/11:20:49
[root@bogon shell]#
19.所以我们得出结论
date +%Y-%m-%d = date +%F
date +/%H:%M:%S = date +%T
20.现在有一个实例,今天是1月11日,你要写一个切割日志脚本,在每天的0点切割日志,但是我们都知道,一到0点,时间就会显示后一天。所以我们要学会增加减少,我们以减少为例。
显示昨天的日期
[root@bogon shell]# date -d "-1 day"
Wed Mar 14 11:25:30 CST 2018
[root@bogon shell]# date -d "-1 day" +%F
2018-03-14
[root@bogon shell]#
21.显示一个月前的今天
[root@bogon shell]# date -d "-1 month" +%F
2018-02-15
[root@bogon shell]#
22.显示去年的今天
[root@bogon shell]# date -d "-1 years" +%F
2017-03-15
[root@bogon shell]#
23.前一小时
[root@bogon shell]# date -d "-1 hour" +%T
10:29:41
[root@bogon shell]#
24.将时间戳显示为日期形式
[root@bogon shell]# date -d @1521084694
Thu Mar 15 11:31:34 CST 2018
[root@bogon shell]#
25.将日期显示为时间戳
[root@bogon shell]# date +%s -d "2018-03-15 00:00:00"
1521043200
[root@bogon shell]#
Shell脚本中的变量
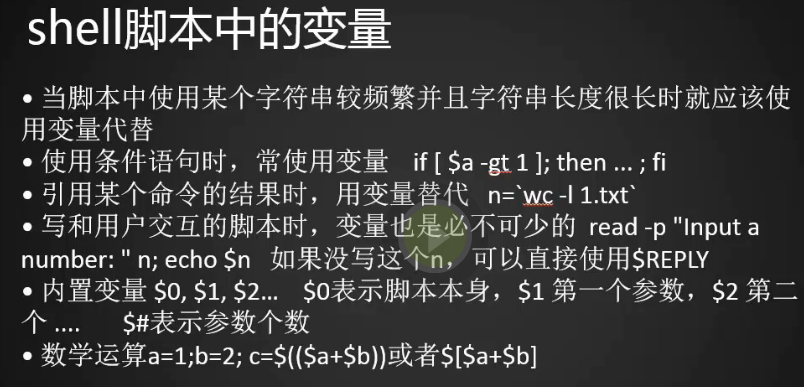
当脚本中使用某个字符串比较频繁,并且字符串长度很长时间,就应该使用变量代替,使脚本变的简单明了
使用条件语句时,尝试用变量 if[$a -gt 1];then...;fi
引用某个命令时,用变量替代 n='wc -l 1.txt'
写用户交互脚本时,变量也是必不可少的
内置变量$1,$2,$3...$0表示脚本本身,$1第一个参数,$2第二个,...$#表示参数个数
数学运算a=1;b=2;c=$(($a+$b))或者$[$a+$b]
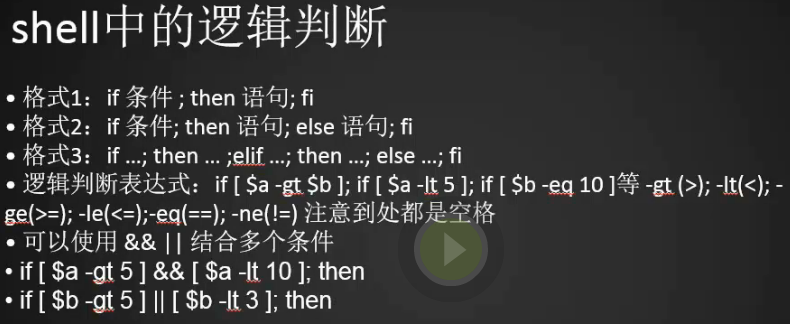
Shell脚本中的逻辑判断
1.for循环用;和不用;号,seq用于产生从某个数到另外一个数之间的所有整数
例一:
# seq 1 10
[root@bogon shell]# for i in `seq 1 5`; do echo $i; done
1
2
3
4
5
[root@bogon shell]#
[root@bogon shell]# for i in `seq 1 5`
> do
> echo $i
> done
1
2
3
4
5
[root@bogon shell]#
2.如果a大于3然后输出ok(用空格分隔开)
[root@bogon shell]# a=5
[root@bogon shell]# if [ $a -gt 3 ]; then echo ok; fi
ok
[root@bogon shell]#
3.逻辑判断表达式:
-gt = 大于 -lt = 小于 -ge = 大于等于 -le = 小于等于 -eq = 恒等于 -ne = 不等于
4.格式1:if条件;then语句;fi (如果...然后...)
[root@bogon shell]# vi if1.sh
[root@bogon shell]# sh if1.sh
ok
[root@bogon shell]# cat if1.sh
#!/bin/bash
a=5
if [ $a -gt 3 ]
then
        echo ok
fi
[root@bogon shell]#
5.格式2:if条件;then语句;else语句;fi (如果...然后...;不满足条件...然后....)
[root@bogon shell]# vi if1.sh
[root@bogon shell]# sh if1.sh
no ok
[root@bogon shell]# cat if1.sh
#!/bin/bash
a=1
if [ $a -gt 3 ]
then
        echo ok
else
        echo no ok
fi
[root@bogon shell]#
6.格式3:if...;then...;elif...;then...;else...;fi (如果...然后...;还有...然后...,不满足条件...然后...)
[root@bogon shell]# vi if1.sh
[root@bogon shell]# sh if1.sh
<6 && >=1
[root@bogon shell]# cat if1.sh
#!/bin/bash
a=5
if [ $a -lt 1 ]
then
        echo '<1'
elif [ $a -lt 6 ]
then
        echo '<6 && >=1'
else
        echo no ok
fi
[root@bogon shell]#
7.用数学符号的> < 也可以,需要改书写格式
[root@bogon shell]# a=3
[root@bogon shell]# if (($a>1)); then echo ok; fi
ok
[root@bogon shell]#
8.也可以用&&和||结合多个条件
[root@bogon shell]# vi if1.sh
[root@bogon shell]# sh if1.sh
<6=5
[root@bogon shell]# cat if1.sh
#!/bin/bash
a=5
if [ $a -lt 6 ] && [ $a -eq 5 ]
then
        echo '<6=5'
else
        echo no ok
fi
[root@bogon shell]#
文件目录属性判断
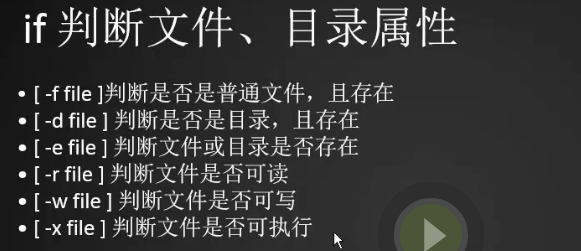
1.[-f file]判断是否是普通文件,是否存在
[root@bogon shell]# vi file1.sh
[root@bogon shell]# cat file1.sh
#!/bin/bash
f="/tmp/testfile"
if [ -f $f ]
then
        echo $f exist
else
        touch $f
fi
第一次执行
[root@bogon shell]# sh -x file1.sh
+ f=/tmp/testfile
+ '[' -f /tmp/testfile ']'
+ touch /tmp/testfile
第二次执行
[root@bogon shell]# sh -x file1.sh
+ f=/tmp/testfile
+ '[' -f /tmp/testfile ']'
+ echo /tmp/testfile exist
/tmp/testfile exist
[root@bogon shell]#
2.判断是否是普通目录,是否存在
[root@bogon shell]# vi file2.sh
[root@bogon shell]# cat file2.sh
#!/bin/bash
d="/tmp/files"
if [ -d $d ]
then
        echo $d exist
else
        mkdir $d
fi
[root@bogon shell]# sh -x file2.sh
+ d=/tmp/files
+ '[' -d /tmp/files ']'
+ mkdir /tmp/files
[root@bogon shell]# sh -x file2.sh
+ d=/tmp/files
+ '[' -d /tmp/files ']'
+ echo /tmp/files exist
/tmp/files exist
[root@bogon shell]#
3.[-e file]只是判断文件或者目录是否存在
[root@bogon shell]# vi file3.sh
[root@bogon shell]# cat file3.sh
#!/bin/bash
f="/tmp/efile"
if [ -e $f ]
then
        echo $f exsit
else
        touch $f
fi
[root@bogon shell]# sh -x file3.sh
+ f=/tmp/efile
+ '[' -e /tmp/efile ']'
+ touch /tmp/efile
[root@bogon shell]# sh -x file3.sh
+ f=/tmp/efile
+ '[' -e /tmp/efile ']'
+ echo /tmp/efile exsit
/tmp/efile exsit
[root@bogon shell]#
4.[ -r $f ] [ -w $f ] [ -x $f ]分别表示辨别一个文件是否可读,可写,可执行
可读
[root@centos-02 ~]# vi file4.sh
[root@centos-02 ~]# cat file4.sh
#!/bin/bash
f="/tmp/file"
if [ -r $f ]
then
	echo $f readable
else
	touch $f
fi
[root@centos-02 ~]# sh -x file4.sh
+ f=/tmp/file
+ '[' -r /tmp/file ']'
+ echo /tmp/file readable
/tmp/file readable
[root@centos-02 ~]#
可写
[root@centos-02 ~]# vi file4.sh
[root@centos-02 ~]# cat file4.sh
#!/bin/bash
f="/tmp/file"
if [ -w $f ]
then
	echo $f writeable
else
	touch $f
fi
[root@centos-02 ~]# sh -x file4.sh
+ f=/tmp/file
+ '[' -w /tmp/file ']'
+ echo /tmp/file writeable
/tmp/file writeable
[root@centos-02 ~]#
可执行
[root@centos-02 ~]# vi file4.sh
[root@centos-02 ~]# cat file4.sh
#!/bin/bash
f="/tmp/file"
if [ -x $f ]
then
	echo $f exeable
else
	touch $f
fi
[root@centos-02 ~]# sh -x file4.sh
+ f=/tmp/file
+ '[' -x /tmp/file ']'
+ touch /tmp/file
[root@centos-02 ~]#
2.另外一种if判断写法
[root@centos-02 ~]# vi file5.sh
[root@centos-02 ~]# cat file5.sh
#!/bin/bash
f="/tmp/file"
[ -f $f ] && rm -f $f (如果前面成立,执行后面的)
等于
if [ -f $f ]
then
	rm -f $f
fi


[ -f $f ] || touch $f  (如果前面的不成立,执行后面的)
[ ! -f $f] (如果$f文件不存在)

[root@centos-02 ~]#
if特殊用法
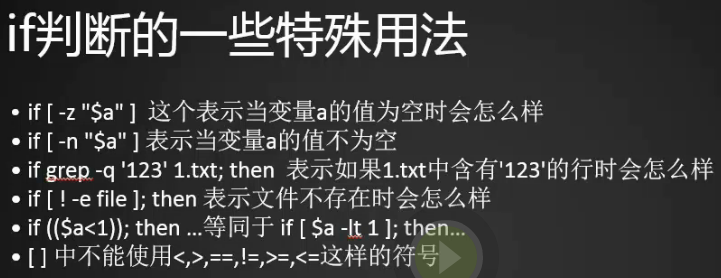
1.-z 判断变量值为空时
[root@centos-02 ~]# vim file5.sh
[root@centos-02 ~]# cat file5.sh
#!/bin/bash
n=`wc -l /tmp/file11111`

if [ -z "$n" ]
then
	echo empty
fi
[root@centos-02 ~]# sh -x file5.sh
++ wc -l /tmp/file11111
wc: /tmp/file11111: 没有那个文件或目录
+ n=
+ '[' -z '' ']'
+ echo empty
empty
[root@centos-02 ~]#
2.-n 判断变量值不为空的时候
[root@centos-02 ~]# vim file5.sh
[root@centos-02 ~]# cat file5.sh
#!/bin/bash
n=`wc -l /tmp/file`

if [ -n "$n" ]
then
	echo noempty
fi
[root@centos-02 ~]# sh -x file5.sh
++ wc -l /tmp/file
+ n='0 /tmp/file'
+ '[' -n '0 /tmp/file' ']'
+ echo noempty
noempty
[root@centos-02 ~]#
3.还可以判断文件是否为空(变量的时候需要用双引号引起来,如果是文件的话就不用了)
[root@centos-02 ~]# ls
123  anaconda-ks.cfg  dir  dir1  file4.sh  file5.sh
[root@centos-02 ~]# if [ -n anaconda-ks.cfg ]; then echo ok; fi
ok
[root@centos-02 ~]#
[root@centos-02 ~]# echo $b

[root@centos-02 ~]# if [ -n "$b" ]; then echo $b; else echo "null"; fi
null
[root@centos-02 ~]#
4.使用命令的结果作为判断条件(-w是精准匹配单词,-q是仅仅做过滤,但是不把过滤的内容显示出来)
[root@centos-02 ~]# grep -w 'user1' /etc/passwd
user1:x:1004:1002::/home/user1:/bin/bash
[root@centos-02 ~]# if grep -wq 'user1' /etc/passwd; then echo "user1 exist"; fi
user1 exist
[root@centos-02 ~]#
5.如果不存在user1就创建一个
[root@centos-02 ~]# if ! grep -wq 'user1' /etc/passwd; then useradd user1; fi
[root@centos-02 ~]#
case判断
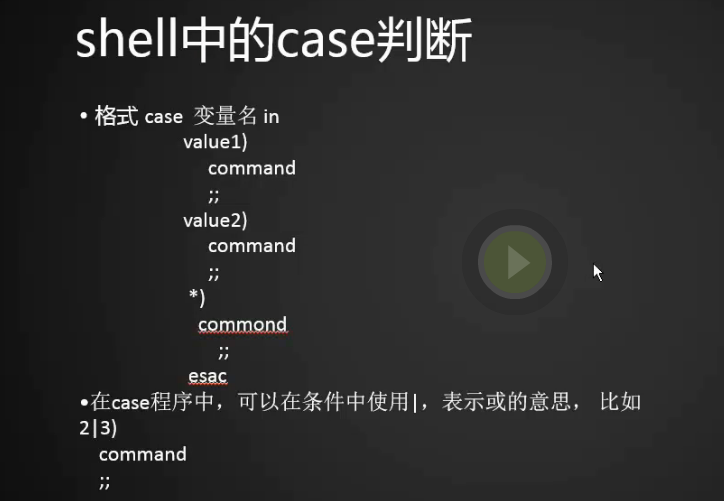
1. (;;)双分号表示,这个条件执行结束,进入下个判断


2.我们在介绍case这个命令之前,先解释一个read -p命令。
[root@bogon shell]# read -p "Please input a number:" n
Please input a number:5
[root@bogon shell]# echo $n
5
[root@bogon shell]#
3.通过上面的实验我们可以发现,read -p 可以和用户实现一个交互,并赋给变量一个值n。
我们等会写一个关于case的脚本。我们把它分成2部分来解析。首先看第一部分:
#!/bin/bash
read -p "Please input a number:" n
if [ -z "$n" ]
then
        echo "Please input a number."
        exit 1
fi
4.首先,我们让用户输入一个数字,-z表示如果变量为空,那么会返回一个Please input a number.的字符串,并且exit退出。
还记得我们编译时,如果失败了,当我们用echo $?查询时,发现返回值为1,这里的1就是这个意思。
[root@bogon shell]# vim sh1.sh
[root@bogon shell]# cat sh1.sh
#!/bin/bash
read -p "Please input a number:" n
if [ -z "$n" ]
then
        echo "Please input a number."
        exit 1
fi

[root@bogon shell]# sh sh1.sh
Please input a number:
Please input a number.
[root@bogon shell]# echo $?
1
[root@bogon shell]#
5.如果用户输入的值不为空,那么跳入这一步,首先会把用户输入的变量拿出来,做一个过滤,sed命令把所有数字全部清空,-n表示如果sed清空数字后,字符不为空,则表示用户输入了一个不是数字的字符,则会返回,Please input a number!,这里加一个!和上面的做区分。
n1=`echo $n|sed 's/[0-9]//g'`

if [ -n(或者! -z) "$n1" ]

then

 echo "Please input a number."

 exit 1

fi
6.执行结果:
[root@bogon shell]# vim sh1.sh
[root@bogon shell]# sh -x sh1.sh
+ read -p 'Please input a number:' n
Please input a number:5
+ '[' -z 5 ']'
++ echo 5
++ sed 's/[-0-9]//g'
+ n1=
+ '[' '!' -z ']'
+ '[' 5 -lt 60 ']'
+ '[' 5 -ge 0 ']'
+ tag=1
+ case $tag in
+ echo 'not ok'
not ok
[root@bogon shell]# sh -x sh1.sh
+ read -p 'Please input a number:' n
Please input a number:80
+ '[' -z 80 ']'
++ echo 80
++ sed 's/[-0-9]//g'
+ n1=
+ '[' '!' -z ']'
+ '[' 80 -lt 60 ']'
+ '[' 80 -ge 60 ']'
+ '[' 80 -lt 80 ']'
+ '[' 80 -ge 80 ']'
+ '[' 80 -lt 90 ']'
+ tag=3
+ case $tag in
+ echo ook
ook
[root@bogon shell]#
完整代码
#!/bin/bash
read -p "Please input a number:" n
if [ -z "$n" ]
then
        echo "Please input a number."
        exit 1
fi

n1=`echo $n|sed 's/[-0-9]//g'`
if [ ! -z $n1 ]
then
        echo "Please input a number."
        exit 1
fi

if [ $n -lt 60 ] && [ $n -ge 0 ]
then
        tag=1
elif [ $n -ge 60 ] && [ $n -lt 80 ]
then
        tag=2
elif [ $n -ge 80 ] && [ $n -lt 90 ]
then
        tag=3
elif [ $n -ge 90 ] && [ $n -le 100 ]
then
        tag=4
else
        tag=0
fi

case $tag in
        1)
        echo "not ok"
        ;;
        2)
        echo "ok"
        ;;
        3)
        echo "ook"
        ;;
        4)
        echo "oook"
        ;;
        *)
        echo "The number range 0-100"
        ;;
esac
第二部分:使用了if...then...;elif...then...;eles....
如果变量是n大于等于0,小于等于60,则变量tag=1。
如果变量n大于等于60,小于等于80,则变量tag=2。
如果变量n大于等于80,小于等于90,则变量tag=3。
如果变量n大于等于90,小于等于100,则变量tag=4。
if [ $n -lt 60 ] && [ $n -ge 0 ]
then
        tag=1
elif [ $n -ge 60 ] && [ $n -lt 80 ]
then
        tag=2
elif [ $n -ge 80 ] && [ $n -lt 90 ]
then
        tag=3
elif [ $n -ge 90 ] && [ $n -le 100 ]
then
        tag=4
else
        tag=0
fi
第三部分,就是我们要说的case循环了.注意格式,case 变量 in ,1)...;; 2)...;; 3)...;;,最后结尾用esac,我们也可以|来表示并列,例如,3|4),就是当变量等于3或者4时,返回下面的命令。
case $tag in
        1)
        echo "not ok"
        ;;
        2)
        echo "ok"
        ;;
        3)
        echo "ook"
        ;;
        4)
        echo "oook"
        ;;
        *)
        echo "The number range 0-100"
        ;;
esac
for循环
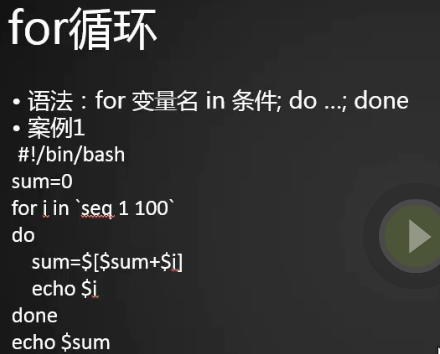
1.计算1-10所有数字的和
执行过程:
0+1
1+2
3+3
6+4
10+5
15+6
……
[root@bogon shell]# vim for.sh
[root@bogon shell]# cat for.sh
#!/bin/bash
sum=0
for i in `seq 1 10`
do
        sum=$[$sum+$i]
done
echo $sum
[root@bogon shell]# sh -x for.sh
+ sum=0
++ seq 1 10
+ for i in '`seq 1 10`'
+ sum=1
+ for i in '`seq 1 10`'
+ sum=3
+ for i in '`seq 1 10`'
+ sum=6
+ for i in '`seq 1 10`'
+ sum=10
+ for i in '`seq 1 10`'
+ sum=15
+ for i in '`seq 1 10`'
+ sum=21
+ for i in '`seq 1 10`'
+ sum=28
+ for i in '`seq 1 10`'
+ sum=36
+ for i in '`seq 1 10`'
+ sum=45
+ for i in '`seq 1 10`'
+ sum=55
+ echo 55
55
[root@bogon shell]#
2.列出/etc/sysconfig下所有子目录,并且使用ls -d命令查看。
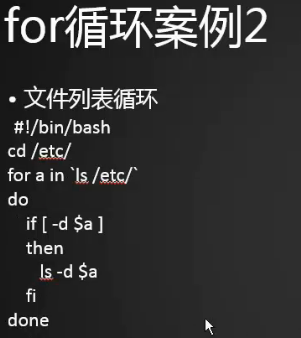
[root@centos-02 etc]# vim etcsh.sh
[root@centos-02 etc]# cat etcsh.sh
#!/bin/bash
cd /etc/sysconfig
for a in `ls /etc/sysconfig`
do
	if [ -d $a ]
	then
		echo $a
		ls $a
	fi
done
[root@centos-02 etc]# sh -x etcsh.sh
+ cd /etc/sysconfig
++ ls /etc/sysconfig
+ for a in '`ls /etc/sysconfig`'
+ '[' -d authconfig ']'
+ for a in '`ls /etc/sysconfig`'
+ '[' -d cbq ']'
+ echo cbq
cbq
+ ls cbq
avpkt  cbq-0000.example
+ for a in '`ls /etc/sysconfig`'
+ '[' -d console ']'
+ echo console
console
+ ls console
+ for a in '`ls /etc/sysconfig`'
+ '[' -d cpupower ']'
+ for a in '`ls /etc/sysconfig`'
+ '[' -d crond ']'
+ for a in '`ls /etc/sysconfig`'
+ '[' -d ebtables-config ']'
+ for a in '`ls /etc/sysconfig`'
+ '[' -d firewalld ']'
+ for a in '`ls /etc/sysconfig`'
+ '[' -d grub ']'
+ for a in '`ls /etc/sysconfig`'
+ '[' -d htcacheclean ']'
+ for a in '`ls /etc/sysconfig`'
+ '[' -d httpd ']'
+ for a in '`ls /etc/sysconfig`'
+ '[' -d init ']'
+ for a in '`ls /etc/sysconfig`'
+ '[' -d ip6tables ']'
+ for a in '`ls /etc/sysconfig`'
+ '[' -d ip6tables-config ']'
+ for a in '`ls /etc/sysconfig`'
+ '[' -d iptables ']'
+ for a in '`ls /etc/sysconfig`'
+ '[' -d iptables-config ']'
+ for a in '`ls /etc/sysconfig`'
+ '[' -d iptables.save ']'
+ for a in '`ls /etc/sysconfig`'
+ '[' -d irqbalance ']'
+ for a in '`ls /etc/sysconfig`'
+ '[' -d kdump ']'
+ for a in '`ls /etc/sysconfig`'
+ '[' -d keepalived ']'
+ for a in '`ls /etc/sysconfig`'
+ '[' -d kernel ']'
+ for a in '`ls /etc/sysconfig`'
+ '[' -d man-db ']'
+ for a in '`ls /etc/sysconfig`'
+ '[' -d modules ']'
+ echo modules
modules
+ ls modules
+ for a in '`ls /etc/sysconfig`'
+ '[' -d netconsole ']'
+ for a in '`ls /etc/sysconfig`'
+ '[' -d network ']'
+ for a in '`ls /etc/sysconfig`'
+ '[' -d network-scripts ']'
+ echo network-scripts
network-scripts
+ ls network-scripts
ifcfg-ens33  ifdown-isdn      ifup	    ifup-plip	   ifup-tunnel
ifcfg-lo     ifdown-post      ifup-aliases  ifup-plusb	   ifup-wireless
ifdown	     ifdown-ppp       ifup-bnep     ifup-post	   init.ipv6-global
ifdown-bnep  ifdown-routes    ifup-eth	    ifup-ppp	   network-functions
ifdown-eth   ifdown-sit       ifup-ib	    ifup-routes    network-functions-ipv6
ifdown-ib    ifdown-Team      ifup-ippp     ifup-sit
ifdown-ippp  ifdown-TeamPort  ifup-ipv6     ifup-Team
ifdown-ipv6  ifdown-tunnel    ifup-isdn     ifup-TeamPort
+ for a in '`ls /etc/sysconfig`'
+ '[' -d rdisc ']'
+ for a in '`ls /etc/sysconfig`'
+ '[' -d readonly-root ']'
+ for a in '`ls /etc/sysconfig`'
+ '[' -d rsyslog ']'
+ for a in '`ls /etc/sysconfig`'
+ '[' -d run-parts ']'
+ for a in '`ls /etc/sysconfig`'
+ '[' -d selinux ']'
+ for a in '`ls /etc/sysconfig`'
+ '[' -d sshd ']'
+ for a in '`ls /etc/sysconfig`'
+ '[' -d wpa_supplicant ']'
[root@centos-02 etc]#
2.for循环另外一种写法`seq 1 3` == 1 2 3
[root@centos-02 ~]# for i in `seq 1 3`; do echo $i; done
1
2
3
[root@centos-02 ~]# for i in 1 2 3; do echo $i; done
1
2
3
[root@centos-02 ~]#
3.建立三个文件1 2 3空格4.txt
[root@centos-02 ~]# touch 1 2 3\ 4.txt
[root@centos-02 ~]# ls -l
总用量 12
-rw-r--r--  1 root root        0 3月  18 14:56 1
lrwxrwxrwx. 1 root root       11 11月 15 21:32 123 -> dir/123.txt
-rw-r--r--  1 root root        0 3月  18 14:56 2
-rw-r--r--  1 root root        0 3月  18 14:56 3 4.txt
-rw-------. 1 root root     1422 11月  5 06:16 anaconda-ks.cfg
drwxr-sr-x. 2 root sunyujun   44 11月 15 23:34 dir
drwxr-xr-x. 3 root root       38 11月 12 16:24 dir1
-rw-r--r--  1 root root       79 3月  15 22:27 file4.sh
-rw-r--r--  1 root root       72 3月  15 23:19 file5.sh
4.最终循环出来了1 2 3 4.txt,将3 4.txt一个文件分成了两个文件了,它会已空格或者回车进行分割
[root@centos-02 ~]# for i in `ls ./`; do echo $i ; done
1
123
2
3
4.txt
anaconda-ks.cfg
dir
dir1
file4.sh
file5.sh
[root@centos-02 ~]#
while循环
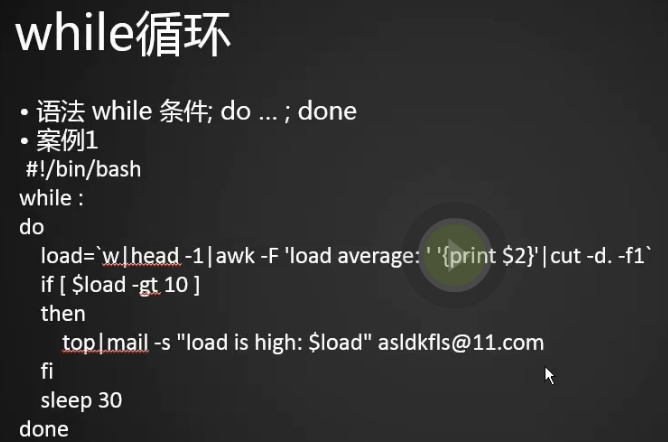
语法 while条件;do...;done
写一个脚本来监控系统负载,当系统负载大于10时,发邮箱警告
[root@centos-02 ~]# vim while1.sh
[root@centos-02 ~]# cat while1.sh
while : (:号可以换成true)
do
    load=`w|head -1|awk -F 'load average: ' '{print $2}'|cut -d. -f1`
    if [ $load -gt 10 ]
    then
        /usr/local/sbin/mail.py xxx@qq.com "load high" "$load"
    fi
    sleep 30
done
[root@centos-02 ~]#
[root@centos-02 ~]# w (查看系统负载)
 15:15:13 up  2:24,  3 users,  load average: 0.04, 0.08, 0.09
USER     TTY      FROM             LOGIN@   IDLE   JCPU   PCPU WHAT
root     tty1                      六17   21:33m  0.06s  0.06s -bash
root     pts/0    192.168.133.1    六17   20:16m  3.16s  3.16s -bash
root     pts/1    192.168.133.1    14:50    1.00s  0.22s  0.05s w
[root@centos-02 ~]# uptime (查看负载信息的第一行,等于w|head -1)
 15:15:18 up  2:24,  3 users,  load average: 0.04, 0.08, 0.09
[root@centos-02 ~]#
[root@centos-02 ~]# uptime|awk -F 'load average:' '{print $2}' (awk -F 指定一个分割符load average:,打印出第二段)
 0.11, 0.07, 0.08
[root@centos-02 ~]# [root@centos-02 ~]# uptime|awk -F 'load average:' '{print $2}'|cut -d . -f1 (cut -d . -f1 继续已点为分隔符截取第一段)
 0
[root@centos-02 ~]#
[root@centos-02 ~]# uptime|awk -F 'load average:' '{print $2}'|cut -d . -f1|sed 's/ //'(sed 's/ //' 去掉0前面的空格)
0
[root@centos-02 ~]#
3.监控测试
[root@centos-02 ~]# sh -x while1.sh
+ :
++ head -1
++ w
++ awk -F 'load average: ' '{print $2}'
++ cut -d. -f1
+ load=0
+ '[' 0 -gt 10 ']'
+ sleep 30
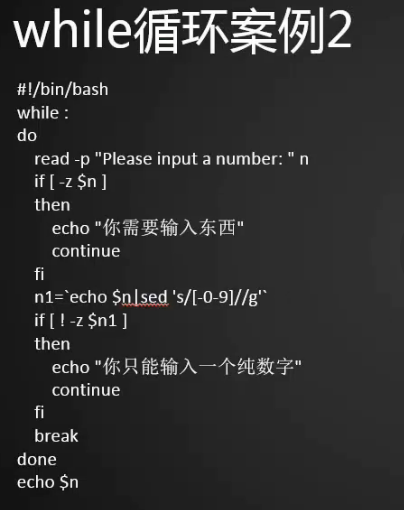
类似于之前写过的for循环的脚本,输入一个数字,如果不是数字返回一个字符串,如果输入为空返回一个字符串,如果是数字返回。
在看脚本之前,我们需要知道continue和break的意思。
continue是继续的意思,也就是当运行结果不满足条件时,在从头循环一遍。
break是跳出循环的意思。
[root@centos-02 ~]# vim while2.sh
[root@centos-02 ~]# cat while2.sh
#/bin/bash
while :
do
    read -p "please input a number: " n
    if [ -z "$n" ]
    then
       echo "你需要输入东西."
       continue
    fi
    n1=`echo $n|sed 's/[0-9]//g'`
    if [ ! -z "$n1" ]
    then
       echo "你只能输入一个纯数字."
       continue
    fi
    break
done
echo $n
[root@centos-02 ~]# sh -x while2.sh
+ :
+ read -p 'please input a number: ' n
please input a number: 8
+ '[' -z 8 ']'
++ echo 8
++ sed 's/[0-9]//g'
+ n1=
+ '[' '!' -z '' ']'
+ break
+ echo 8
8
[root@centos-02 ~]# sh -x while2.sh
+ :
+ read -p 'please input a number: ' n
please input a number: a
+ '[' -z a ']'
++ echo a
++ sed 's/[0-9]//g'
+ n1=a
+ '[' '!' -z a ']'
+ echo $'\344\275\240\345\217\252\350\203\275\350\276\223\345\205\245\344\270\200\344\270\252\347\272\257\346\225\260\345\255\227.'
你只能输入一个纯数字.
+ continue
+ :
+ read -p 'please input a number: ' n
please input a number: 8
+ '[' -z 8 ']'
++ echo 8
++ sed 's/[0-9]//g'
+ n1=
+ '[' '!' -z '' ']'
+ break
+ echo 8
8
[root@centos-02 ~]#
break跳出循环
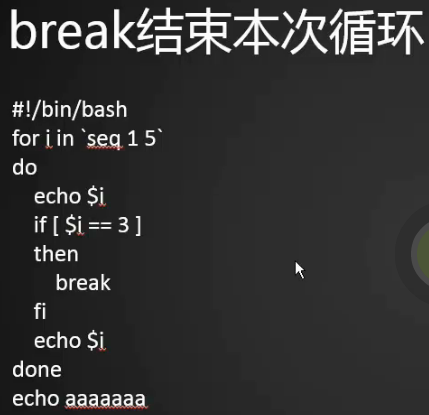
break在while循环中,我们提到了,这里来写一个脚本,加深印象
如果输入的数字等于3,则跳出循环,则输出aaaa
[root@bogon sunyujun]# vim break.sh
[root@bogon sunyujun]# cat break.sh
#!/bin/bash
for i in `seq 1 5`
do
        echo $i
        if [ $i -eq 3 ]
        then
                break
        fi
        echo $i
done
echo aaa
[root@bogon sunyujun]# sh -x break.sh
++ seq 1 5
+ for i in '`seq 1 5`'
+ echo 1
1
+ '[' 1 -eq 3 ']'
+ echo 1
1
+ for i in '`seq 1 5`'
+ echo 2
2
+ '[' 2 -eq 3 ']'
+ echo 2
2
+ for i in '`seq 1 5`'
+ echo 3
3
+ '[' 3 -eq 3 ']'
+ break
+ echo aaa
aaa
[root@bogon sunyujun]# sh break.sh
1
1
2
2
3
aaa
[root@bogon sunyujun]#
continue结束本次循环
[root@bogon sunyujun]# vim continue.sh
[root@bogon sunyujun]# cat continue.sh
#!/bin/bash
for i in `seq 1 5`
do
        echo $i
        if [ $i -eq 3 ]
        then
                continue
        fi
        echo $i
done
echo aaa
[root@bogon sunyujun]# sh -x continue.sh
++ seq 1 5
+ for i in '`seq 1 5`'
+ echo 1
1
+ '[' 1 -eq 3 ']'
+ echo 1
1
+ for i in '`seq 1 5`'
+ echo 2
2
+ '[' 2 -eq 3 ']'
+ echo 2
2
+ for i in '`seq 1 5`'
+ echo 3
3
+ '[' 3 -eq 3 ']'
+ continue
+ for i in '`seq 1 5`'
+ echo 4
4
+ '[' 4 -eq 3 ']'
+ echo 4
4
+ for i in '`seq 1 5`'
+ echo 5
5
+ '[' 5 -eq 3 ']'
+ echo 5
5
+ echo aaa
aaa
[root@bogon sunyujun]# sh continue.sh
1
1
2
2
3
4
4
5
5
aaa
[root@bogon sunyujun]#
exit退出整个脚本
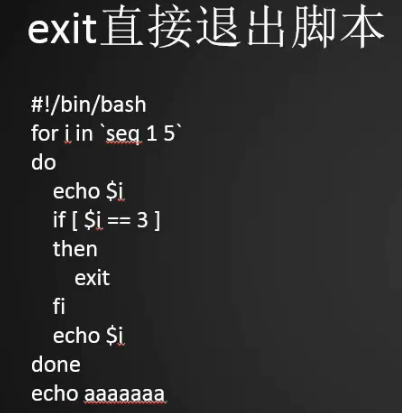
1.exit 直接退出程序,aaa都不输出了
[root@bogon sunyujun]# vim exit.sh
[root@bogon sunyujun]# cat exit.sh
#!/bin/bash
for i in `seq 1 5`
do
        echo $i
        if [ $i -eq 3 ]
        then
                exit
        fi
        echo $i
done
echo aaa
[root@bogon sunyujun]# sh -x exit.sh
++ seq 1 5
+ for i in '`seq 1 5`'
+ echo 1
1
+ '[' 1 -eq 3 ']'
+ echo 1
1
+ for i in '`seq 1 5`'
+ echo 2
2
+ '[' 2 -eq 3 ']'
+ echo 2
2
+ for i in '`seq 1 5`'
+ echo 3
3
+ '[' 3 -eq 3 ']'
+ exit
[root@bogon sunyujun]# sh exit.sh
1
1
2
2
3
[root@bogon sunyujun]#
2.我们也可以将exit退出时加一个数字
[root@bogon sunyujun]# vim exit.sh
[root@bogon sunyujun]# cat exit.sh
#!/bin/bash
for i in `seq 1 5`
do
        echo $i
        if [ $i -eq 3 ]
        then
                exit 3
        fi
        echo $i
done
echo aaa
[root@bogon sunyujun]# sh exit.sh
1
1
2
2
3
[root@bogon sunyujun]# echo $?
3
[root@bogon sunyujun]#
shell中的函数

1.注意$10并不能打印出第10个函数,当n>=10时,用{10}来获取函数。$0表示脚本名字。$#表示多少个参数。
[root@centos-02 ~]# vim function.sh
[root@centos-02 ~]# cat function.sh
#!/bin/bash
function inp(){
	echo $0 $1 $2 $3 $#
}

inp 1 2 3 4
[root@centos-02 ~]# sh -x function.sh
+ inp 1 2 3 4
+ echo function.sh 1 2 3 4
function.sh 1 2 3 4
[root@centos-02 ~]#
2.执行脚本的时候直接传参数
[root@centos-02 ~]# vim function.sh
[root@centos-02 ~]# cat function.sh
#!/bin/bash
function inp(){
	echo $0 $1 $#
}

inp $1 (外面传进来的参数)
[root@centos-02 ~]# sh function.sh 5
function.sh 5 1
[root@centos-02 ~]#
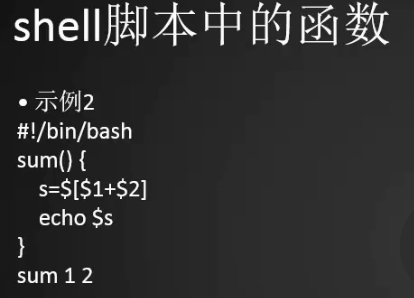
用来定义一个加法
[root@centos-02 ~]# vim function2.sh
[root@centos-02 ~]# cat function2.sh
#!/bin/bash
sum(){
	s=$[$1+$2]
	echo $s
}

sum 1 10
[root@centos-02 ~]# sh -x function2.sh
+ sum 1 10
+ s=11
+ echo 11
11
[root@centos-02 ~]#

打印ip地址的最后一段,我这里是88,-A1指查找关键词所在的行和关键词所在行下面的一行
[root@centos-02 ~]# ifconfig |grep -A1 "ens33" |tail -1 |awk '{print $2}' |awk -F '.' '{print $4}'
写一个脚本,输入网卡名字则显示该网卡上的ip。
[root@centos-02 ~]# vim function4.sh
[root@centos-02 ~]# cat function4.sh
#!/bin/bash
ip(){
	ifconfig |grep -A1 "$1: " |grep 'inet' |awk '{print $2}'
}

read -p "Please input the eth name: " eth
ip $eth
[root@centos-02 ~]# sh -x function4.sh
+ read -p 'Please input the eth name: ' eth
Please input the eth name: ens33
+ ip ens33
+ ifconfig
+ grep -A1 'ens33: '
+ grep inet
+ awk '{print $2}'
192.168.133.88
[root@centos-02 ~]# sh -x function4.sh
+ read -p 'Please input the eth name: ' eth
Please input the eth name: lo
+ ip lo
+ ifconfig
+ grep -A1 'lo: '
+ grep inet
+ awk '{print $2}'
127.0.0.1
[root@centos-02 ~]#
三种获取ip的方法
[root@centos-02 ~]# ifconfig |grep -A1 "ens33: " |tail -1 |awk '{print $2}'
192.168.133.88
[root@centos-02 ~]# ifconfig |grep -A1 "ens33: " |awk '/inet/ {print $2}'
192.168.133.88
[root@centos-02 ~]# ifconfig |grep -A1 "ens33: " |grep 'inet' |awk '{print $2}'
192.168.133.88
[root@centos-02 ~]#
shell中的数组
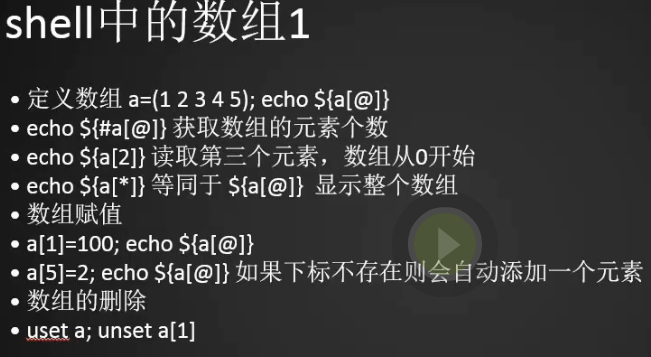
1.定义数组并查看数组全部值
[root@centos-02 ~]# b=(1 2 3)
[root@centos-02 ~]# echo ${b[*]}
1 2 3
[root@centos-02 ~]# echo ${b[@]}
1 2 3
[root@centos-02 ~]#
2.查看数组单一的值:(从零开始)
[root@centos-02 ~]# echo ${b[0]}
1
[root@centos-02 ~]#
3.获取数组个数
[root@centos-02 ~]# echo ${#b[*]}
3
[root@centos-02 ~]#
4.给数组赋值或更改
[root@centos-02 ~]# b[3]=a
[root@centos-02 ~]# echo ${b[*]}
1 2 3 a
[root@centos-02 ~]#
[root@centos-02 ~]# b[3]=b
[root@centos-02 ~]# echo ${b[*]}
1 2 3 b
[root@centos-02 ~]#
5.删除元素unset
[root@centos-02 ~]# unset b[3]
[root@centos-02 ~]# echo ${b[*]}
1 2 3
[root@centos-02 ~]#
[root@centos-02 ~]# unset b
[root@centos-02 ~]# echo ${b[*]}

[root@centos-02 ~]#
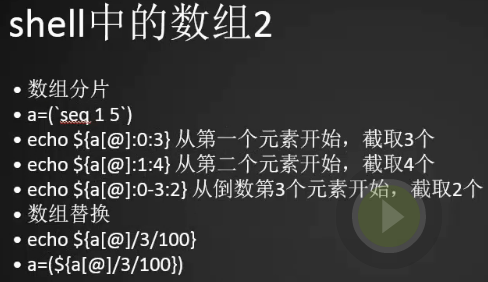
1.数组分片(需求1到10,要求取从4-7)
[root@centos-02 ~]# a=(`seq 1 10`)
[root@centos-02 ~]# echo ${a[*]}
1 2 3 4 5 6 7 8 9 10
[root@centos-02 ~]# echo ${a[@]:3:4}
4 5 6 7
[root@centos-02 ~]#
2.从倒数第三个开始截,取两个
格式:echo ${数组名称[@]:0-倒数第几个元素:截取几个}
[root@centos-02 ~]# echo ${a[@]:0-3:2}
8 9
[root@centos-02 ~]#
3.数组替换
临时替换,将8改成6
[root@centos-02 ~]# echo ${a[@]/8/6}
1 2 3 4 5 6 7 6 9 10
[root@centos-02 ~]#
永久替换
[root@centos-02 ~]# a=(${a[@]/8/6})
[root@centos-02 ~]# echo ${a[@]}
1 2 3 4 5 6 7 6 9 10
[root@centos-02 ~]#

 浙公网安备 33010602011771号