LNMP架构二
Nginx默认虚拟主机
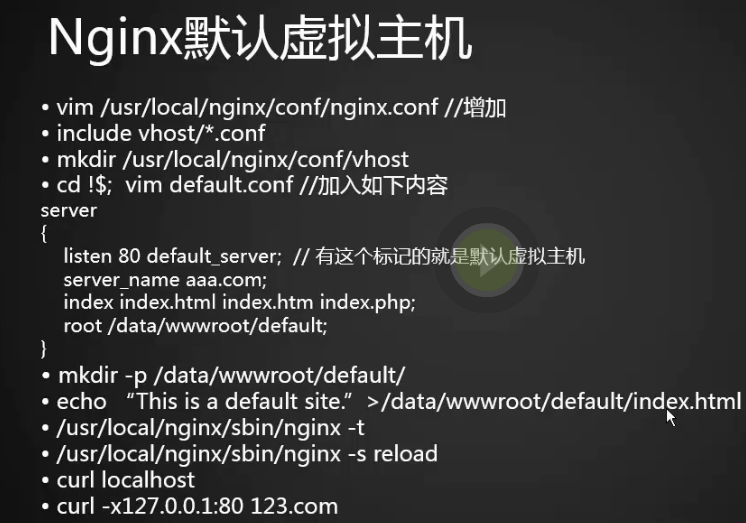
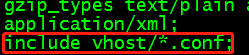
1.首先修改nginx.conf文件,删除server及下面的,在http最后添加include vhost/*.conf; (指定虚拟主机目录,并读取以.conf结尾的文件)
删除
添加
[root@bogon conf]# vim nginx.conf
[root@bogon conf]# pwd
/usr/local/nginx/conf
[root@bogon conf]# mkdir vhost
[root@bogon conf]# cd vhost/
[root@bogon vhost]# ls
[root@bogon vhost]# vim aaa.com.conf
2.编辑配置文件aaa.com.conf
server
{
    listen 80 default_server;                 (红色的字表示设置这个虚拟主机为默认虚拟主机)
    server_name aaa.com;
    index index.html index.htm index.php;
    root /data/wwwroot/default;
}
3.创建default目录并新建index.html文件写入this
[root@bogon vhost]# mkdir /data/wwwroot/default
[root@bogon vhost]# cd /data/wwwroot/default/
[root@bogon default]# ls
[root@bogon default]# vim index.html
[root@bogon default]#
4.检查配置是否有错用户
[root@bogon default]# /usr/local/nginx/sbin/nginx -t
nginx: the configuration file /usr/local/nginx/conf/nginx.conf syntax is ok
nginx: configuration file /usr/local/nginx/conf/nginx.conf test is successful
[root@bogon default]# /usr/local/nginx/sbin/nginx -s reload  或  /etc/init.d/nginx restart
[root@bogon default]#
5.测试是否成功,不管啥域名只要解析过来指向当前服务器都能访问到default站点
[root@bogon default]# curl localhost
this
[root@bogon default]# curl -x127.0.0.1:80 aaa.com
this
[root@bogon default]# curl -x127.0.0.1:80 bb.com
this
[root@bogon default]#
6.!!:还有一个需要注意的是,如果不加红色字体的字段,再找server时会根据文件名排序,比如:aaa.com.cnf和bbb.com.cnf,aaa肯定是在前,所以aaa.com.cnf是默认虚拟主机
Nginx用户认证
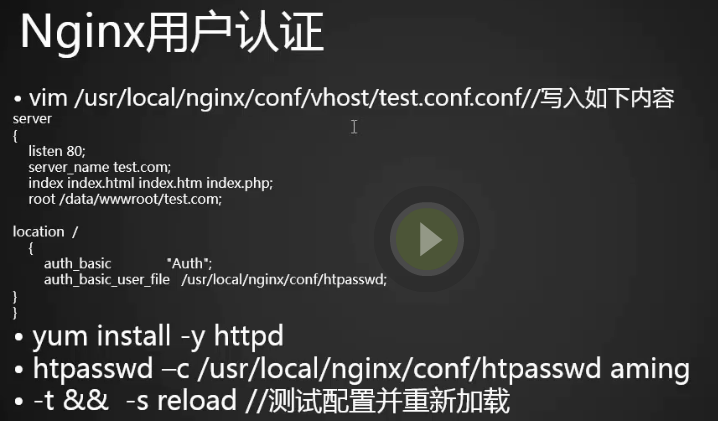
1.nginx用户认证,用到了之前httpd的htpasswd功能。
2.创建一个虚拟主机 test.com.conf
[root@bogon conf]# cd vhost/
[root@bogon vhost]# ls
aaa.com.conf
[root@bogon vhost]# vim test.com.conf
[root@bogon vhost]#
server
{
    listen 80;
    server_name test.com;
    index index.html index.htm index.php;
    root /data/wwwroot/test.com;

location  /
    {
        auth_basic              "Auth";                   (定义用户认证的名字)
        auth_basic_user_file   /usr/local/nginx/conf/htpasswd;         (定义用户名密码文件)
    }
}
3.因为要使用到httpd的htpasswd功能,则需要安装httpd,可以直接yum安装,直接敲htpasswd命令,
4.c是生成用户文件,若要添加则不需要,否则会覆盖原文件
[root@bogon vhost]# /usr/local/apache2.4/bin/htpasswd -c /usr/local/nginx/conf/htpasswd user1
New password:
Re-type new password:
Adding password for user user1
[root@bogon vhost]# cat /usr/local/nginx/conf/htpasswd
user1:$apr1$FTaFXOGV$T92wNqOEk.1kiCUTm0HPn/
[root@bogon vhost]# /usr/local/apache2.4/bin/htpasswd /usr/local/nginx/conf/htpasswd user2
New password:
Re-type new password:
Adding password for user user2
[root@bogon vhost]#
5.查看htpasswd文件,测试配置文件语法
[root@bogon vhost]# !cat
cat /usr/local/nginx/conf/htpasswd
user1:$apr1$FTaFXOGV$T92wNqOEk.1kiCUTm0HPn/
user2:$apr1$oNyABDKG$oLzE8MbjvtgC7TmuXDlUO0
[root@bogon vhost]# /usr/local/nginx/sbin/nginx -t
nginx: the configuration file /usr/local/nginx/conf/nginx.conf syntax is ok
nginx: configuration file /usr/local/nginx/conf/nginx.conf test is successful
6.重新加载配置文件,不加用户发现401,需要用户认证
[root@bogon vhost]# /usr/local/nginx/sbin/nginx -s reload
[root@bogon vhost]# curl -x127.0.0.1 test.com
curl: (7) Failed connect to 127.0.0.1:1080; 拒绝连接
[root@bogon vhost]# curl -x127.0.0.1:80 test.com
<html>
<head><title>401 Authorization Required</title></head>
<body bgcolor="white">
<center><h1>401 Authorization Required</h1></center>
<hr><center>nginx/1.12.2</center>
</body>
</html>
[root@bogon vhost]#
7.-u指定用户和密码后,返回值
[root@bogon vhost]# curl -x127.0.0.1:80 test.com -I
HTTP/1.1 401 Unauthorized
Server: nginx/1.12.2
Date: Fri, 09 Feb 2018 06:48:21 GMT
Content-Type: text/html
Content-Length: 195
Connection: keep-alive
WWW-Authenticate: Basic realm="Auth"

[root@bogon vhost]# man curl
[root@bogon vhost]# curl -uuser1:user1 -x127.0.0.1:80 test.com
<html>
<head><title>404 Not Found</title></head>
<body bgcolor="white">
<center><h1>404 Not Found</h1></center>
<hr><center>nginx/1.12.2</center>
</body>
</html>
[root@bogon vhost]#
8.没有创建test.com目录,测试成功
[root@bogon vhost]# mkdir /data/wwwroot/test.com
[root@bogon vhost]# echo "test.com" > /data/wwwroot/test.com/index.html
[root@bogon vhost]# curl -uuser1:user1 -x127.0.0.1:80 test.com
test.com
[root@bogon vhost]#
9.需求;访问一个目录(admin)或者文件时,才需要用户认证。
[root@bogon vhost]# vim /usr/local/nginx/conf/vhost/test.com.conf
[root@bogon vhost]#
10.用户认证时加上admin目录
server
{
    listen 80;
    server_name test.com;
    index index.html index.htm index.php;
    root /data/wwwroot/test.com;

location  /admin
    {
        auth_basic              "Auth";
        auth_basic_user_file   /usr/local/nginx/conf/htpasswd;
    }
}
11.重新加载配置文件 访问test.com 正常,访问test.com/admin/提示401
[root@bogon vhost]# /usr/local/nginx/sbin/nginx -t
nginx: the configuration file /usr/local/nginx/conf/nginx.conf syntax is ok
nginx: configuration file /usr/local/nginx/conf/nginx.conf test is successful
[root@bogon vhost]# /usr/local/nginx/sbin/nginx -s reload
[root@bogon vhost]# curl -x127.0.0.1:80 test.com
test.com
[root@bogon vhost]# curl -x127.0.0.1:80 test.com/admin/
<html>
<head><title>401 Authorization Required</title></head>
<body bgcolor="white">
<center><h1>401 Authorization Required</h1></center>
<hr><center>nginx/1.12.2</center>
</body>
</html>
[root@bogon vhost]#
12.针对一个访问的url(admin.php)做权限验证
[root@bogon vhost]# !vi
vim /usr/local/nginx/conf/vhost/test.com.conf
[root@bogon vhost]# /usr/local/nginx/sbin/nginx -t
nginx: the configuration file /usr/local/nginx/conf/nginx.conf syntax is ok
nginx: configuration file /usr/local/nginx/conf/nginx.conf test is successful
[root@bogon vhost]# /usr/local/nginx/sbin/nginx -s reload
[root@bogon vhost]# curl -x127.0.0.1:80 test.com/admin/
<html>
<head><title>404 Not Found</title></head>
<body bgcolor="white">
<center><h1>404 Not Found</h1></center>
<hr><center>nginx/1.12.2</center>
</body>
</html>
[root@bogon vhost]# curl -x127.0.0.1:80 test.com/admin.php
<html>
<head><title>401 Authorization Required</title></head>
<body bgcolor="white">
<center><h1>401 Authorization Required</h1></center>
<hr><center>nginx/1.12.2</center>
</body>
</html>
[root@bogon vhost]#
修改的配置文件
server
{
    listen 80;
    server_name test.com;
    index index.html index.htm index.php;
    root /data/wwwroot/test.com;

location  ~ admin.php
    {
        auth_basic              "Auth";
        auth_basic_user_file   /usr/local/nginx/conf/htpasswd;
    }
}
Nginx域名重定向

1.httpd配置文件里server_name后面不支持写多个域名,就算写了多个,也默认识别第一个,nginx的配置文件server_name后面则支持写多个域名。
[root@bogon vhost]# vim /usr/local/nginx/conf/vhost/test.com.conf
server
{
    listen 80;
    server_name test.com test2.com;
    index index.html index.htm index.php;
    root /data/wwwroot/test.com;
      if ($host != 'test.com' ) {
         rewrite  ^/(.*)$  http://test.com/$1  permanent; (rewrite到test.com,permanent301报错  redirect302报错)
      }
location  ~ admin.php
    {
        auth_basic              "Auth";
        auth_basic_user_file   /usr/local/nginx/conf/htpasswd;
    }
}
2.测试提示301
[root@bogon vhost]# /usr/local/nginx/sbin/nginx -t
nginx: the configuration file /usr/local/nginx/conf/nginx.conf syntax is ok
nginx: configuration file /usr/local/nginx/conf/nginx.conf test is successful
[root@bogon vhost]# /usr/local/nginx/sbin/nginx -s reload
[root@bogon vhost]# curl -x127.0.0.1:80 test2.com/index.html -I
HTTP/1.1 301 Moved Permanently
Server: nginx/1.12.2
Date: Fri, 09 Feb 2018 07:49:08 GMT
Content-Type: text/html
Content-Length: 185
Connection: keep-alive
Location: http://test.com/index.html

[root@bogon vhost]#
Nginx访问日志

1.修改Nginx的配置文件,搜索/log_format (log_format后面跟的combined_realip是一个自定义名字,用来定义整个日志格式,这里写什么,虚拟配置文件后面就可以加上什么,我这里不做修改)
[root@bogon vhost]# vim /usr/local/nginx/conf/nginx.conf
log_format combined_realip '$remote_addr $http_x_forwarded_for [$time_local]'
    ' $host "$request_uri" $status'
    ' "$http_referer" "$http_user_agent"';
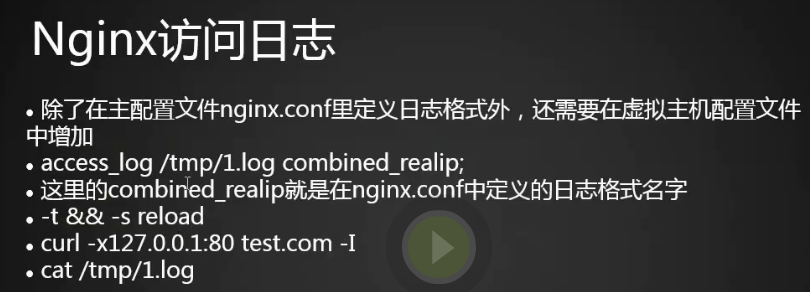
2.编辑添加access_log配置
[root@bogon vhost]# vim /usr/local/nginx/conf/vhost/test.com.conf
[root@bogon vhost]#
server
{
    listen 80;
    server_name test.com test2.com;
    index index.html index.htm index.php;
    root /data/wwwroot/test.com;
      if ($host != 'test.com' ) {
         rewrite  ^/(.*)$  http://test.com/$1  permanent;
      }
    access_log /tmp/test.com.log combined_realip;
location  ~ admin.php
    {
        auth_basic              "Auth";
        auth_basic_user_file   /usr/local/nginx/conf/htpasswd;
    }
}
3.检查语法错误并且重新加载配置文件
[root@bogon vhost]# /usr/local/nginx/sbin/nginx -t
nginx: the configuration file /usr/local/nginx/conf/nginx.conf syntax is ok
nginx: configuration file /usr/local/nginx/conf/nginx.conf test is successful
[root@bogon vhost]# /usr/local/nginx/sbin/nginx -s reload
[root@bogon vhost]# !curl
curl -x127.0.0.1:80 test2.com/index.html -I
HTTP/1.1 301 Moved Permanently
Server: nginx/1.12.2
Date: Fri, 09 Feb 2018 08:22:43 GMT
Content-Type: text/html
Content-Length: 185
Connection: keep-alive
Location: http://test.com/index.html

[root@bogon vhost]# curl -x127.0.0.1:80 test.com/index.html -I
HTTP/1.1 200 OK
Server: nginx/1.12.2
Date: Fri, 09 Feb 2018 08:23:02 GMT
Content-Type: text/html
Content-Length: 9
Last-Modified: Fri, 09 Feb 2018 06:56:11 GMT
Connection: keep-alive
ETag: "5a7d460b-9"
Accept-Ranges: bytes

[root@bogon vhost]#
4.查看日志
[root@bogon vhost]# cat /tmp/test.com.log
127.0.0.1 - [09/Feb/2018:16:22:43 +0800] test2.com "/index.html" 301 "-" "curl/7.29.0"
127.0.0.1 - [09/Feb/2018:16:23:02 +0800] test.com "/index.html" 200 "-" "curl/7.29.0"
[root@bogon vhost]#
Nginx日志切割
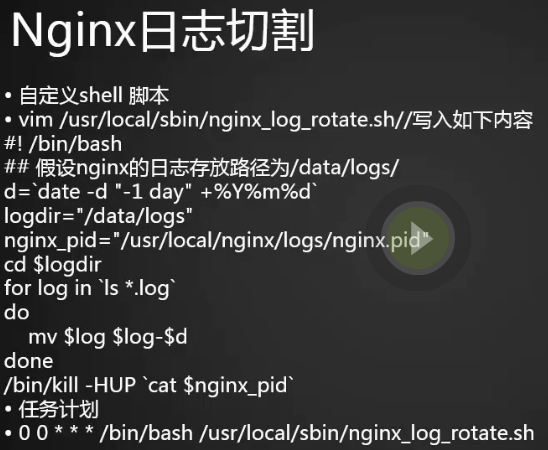
1.nginx没有像httpd一样,自己带有切割工具,则需要借助系统的切割工具或者自己写一个切割的脚本
#!/bin/bash
#假设nginx的日志存放路径为/data/logs/
d=`date -d "-1 day" +%Y%m%d`                   (生成一个年月日day -1的日期,(昨天的日期))
logdir="/tmp/"                          (定义logdir为/tmp)
nginx_pid="/usr/local/nginx/logs/nginx.pid"        (给Nginx.pid定义一个变量,为下面命令做准备)
cd $logdir                               (进入到logdir中)
for log in `ls *.log`                        (做一个for循环,ls当前目录下所有以.log文件为结尾的文件)
do
    mv $log $log-$d                         (把以log为结尾的日志名都改成log---日期)
done
/bin/kill -HUP `cat $nginx_pid`                 (重新启动nginx_pid进程,重新生成一个test.com.log文件)
2.f是变量的名字 in在哪个序列里循环 $f 就是 aaa.com.conf和test.com.conf
[root@bogon vhost]# for f in `ls `;do ls -l $f; done
-rw-r--r--. 1 root root 141 2月   9 13:23 aaa.com.conf
-rw-r--r--. 1 root root 457 2月   9 16:19 test.com.conf
[root@bogon vhost]#
3.执行脚本
[root@bogon vhost]# sh -x /usr/local/sbin/nginx_logrotate.sh
++ date -d '-1 day' +%Y%m%d
+ d=20180210
+ logdir=/tmp/
+ nginx_pid=/usr/local/nginx/logs/nginx.pid
+ cd /tmp/
++ ls php_errors.log test.com.log
+ for log in '`ls *.log`'
+ mv php_errors.log php_errors.log-20180210
+ for log in '`ls *.log`'
+ mv test.com.log test.com.log-20180210
++ cat /usr/local/nginx/logs/nginx.pid
+ /bin/kill -HUP 1726
[root@bogon vhost]# ls /tmp/
hogsuspend
mongodb-27017.sock
mysql.sock
pear
php_errors.log-20180210
php-fcgi.sock
ssh-VkkK9OKJsW89
systemd-private-b091a55929414513a9b7db2f688afef6-colord.service-B5wa5w
systemd-private-b091a55929414513a9b7db2f688afef6-cups.service-RpVATe
systemd-private-b091a55929414513a9b7db2f688afef6-rtkit-daemon.service-gDlUSL
systemd-private-b091a55929414513a9b7db2f688afef6-vmtoolsd.service-TLnArm
test.com.log
test.com.log-20180210
tracker-extract-files.0
yum_save_tx.2018-02-11.10-01.d_miLu.yumtx
[root@bogon vhost]#
4.需要定时清理(30天以前的文件)
[root@bogon vhost]# find /tmp/ -name *.log-* -type f -mtime +30 |xargs rm -rf {} ;
5.加入任务计划
[root@bogon vhost]# crontab -e
0 0 * * * /bin/bash /usr/local/sbin/nginx_logrotate.sh
静态文件不记录日志和过期时间
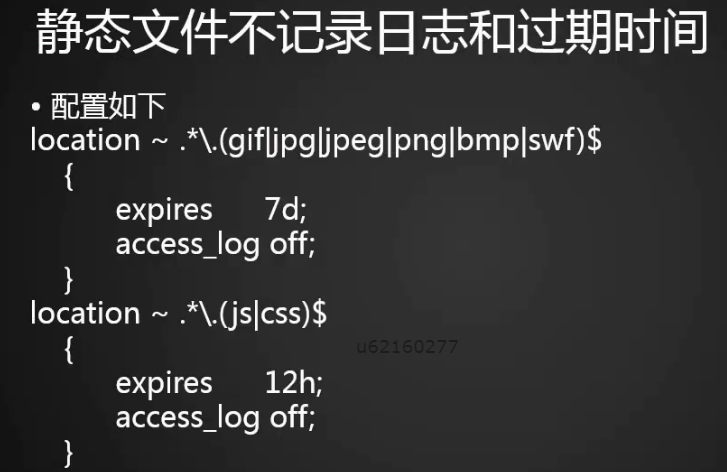
1.编辑配置文件
[root@bogon vhost]# vim test.com.conf
2.添加配置
location ~ .*\.(gif|jpg|jpeg|png|bmp|swf)$    (以gif,jpg,jpeg,png,bmp,swf结尾的文件保存7天,并且不记录日志)
    {
          expires      7d;
          access_log off;
    }
location ~ .*\.(js|css)$
    {
          expires      12h;   (以js,css结尾的文件保存12小时,并且不记录日志)
          access_log off;
    }
3.检查语法,重新加载配置文件
[root@bogon vhost]# /usr/local/nginx/sbin/nginx -t
nginx: the configuration file /usr/local/nginx/conf/nginx.conf syntax is ok
nginx: configuration file /usr/local/nginx/conf/nginx.conf test is successful
[root@bogon vhost]# /usr/local/nginx/sbin/nginx -s reload
[root@bogon vhost]#
4.进入网站根目录创建两个文件,分别输入内容11111111和2222222
[root@bogon vhost]# cd /data/wwwroot/test.com/
[root@bogon test.com]# ls
index.html
[root@bogon test.com]# vim 1.gif
[root@bogon test.com]# vim 2.js
[root@bogon test.com]#
5.分别访问了以gif,js,html为结尾的3个文件,发现日志里只记录了html为结尾的访问信息。
[root@bogon test.com]# curl -x127.0.0.1:80 test.com/1.gif
11111111111111
[root@bogon test.com]# curl -x127.0.0.1:80 test.com/2.js
222222222222222222222222222222
[root@bogon test.com]# curl -x127.0.0.1:80 test.com/index.html
test.com
[root@bogon test.com]# cat /tmp/test.com.log
127.0.0.1 - [11/Feb/2018:19:24:29 +0800] test.com "/index.html" 200 "-" "curl/7.29.0"
[root@bogon test.com]#
6.加上-I 查看过期时间,过期时间已经加上
[root@bogon test.com]# curl -x127.0.0.1:80 -I test.com/2.js
HTTP/1.1 200 OK
Server: nginx/1.12.2
Date: Sun, 11 Feb 2018 11:28:36 GMT
Content-Type: application/javascript
Content-Length: 31
Last-Modified: Sun, 11 Feb 2018 11:07:18 GMT
Connection: keep-alive
ETag: "5a8023e6-1f"
Expires: Sun, 11 Feb 2018 23:28:36 GMT
Cache-Control: max-age=43200
Accept-Ranges: bytes

[root@bogon test.com]#
Nginx防盗链
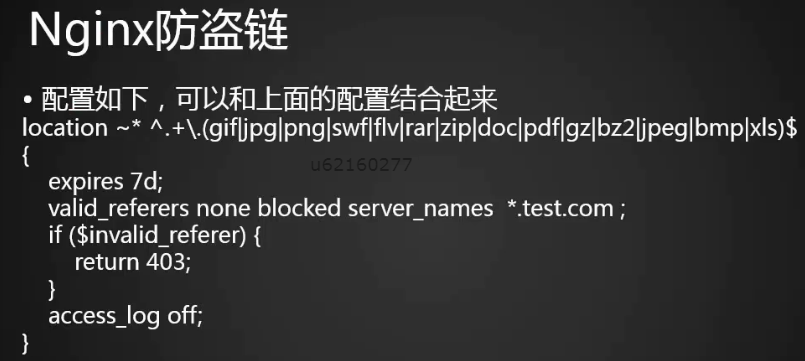
1.增加配置文件 ~* 指小括号内的扩展名不区分大小写
server
{
    listen 80;
    server_name test.com test2.com;
    index index.html index.htm index.php;
    root /data/wwwroot/test.com;
      if ($host != 'test.com' ) {
         rewrite  ^/(.*)$  http://test.com/$1  permanent;
      }

location ~* ^.+\.(gif|jpg|png|swf|flv|rar|zip|doc|pdf|gz|bz2|jpeg|bmp|xls)$
{
    expires 7d;
    valid_referers none blocked server_names  *.test.com ;
    if ($invalid_referer) {
        return 403;
    }
    access_log off;
}


#location ~ .*\.(gif|jpg|jpeg|png|bmp|swf)$
#    {
#          expires      7d;
#          access_log off;
#    }
location ~ .*\.(js|css)$
    {
#          expires      12h;
          access_log off;
    }

    access_log /tmp/test.com.log combined_realip;
}
2.-e选项模仿refer请求,第一次模仿百度访问返回403,第二次test域名访问返回200,防盗链成功
[root@bogon test.com]# /usr/local/nginx/sbin/nginx -t
nginx: the configuration file /usr/local/nginx/conf/nginx.conf syntax is ok
nginx: configuration file /usr/local/nginx/conf/nginx.conf test is successful
[root@bogon test.com]# /usr/local/nginx/sbin/nginx -s reload
[root@bogon test.com]# curl -e "http://www.baidu.com/1.txt" -x127.0.0.1:80 -I test.com/1.gif
HTTP/1.1 403 Forbidden
Server: nginx/1.12.2
Date: Sun, 11 Feb 2018 11:48:56 GMT
Content-Type: text/html
Content-Length: 169
Connection: keep-alive

[root@bogon test.com]# curl -e "http://www.test.com/1.txt" -x127.0.0.1:80 -I test.com/1.gif
HTTP/1.1 200 OK
Server: nginx/1.12.2
Date: Sun, 11 Feb 2018 11:49:26 GMT
Content-Type: image/gif
Content-Length: 15
Last-Modified: Sun, 11 Feb 2018 11:07:06 GMT
Connection: keep-alive
ETag: "5a8023da-f"
Expires: Sun, 18 Feb 2018 11:49:26 GMT
Cache-Control: max-age=604800
Accept-Ranges: bytes

[root@bogon test.com]#
Nginx访问控制
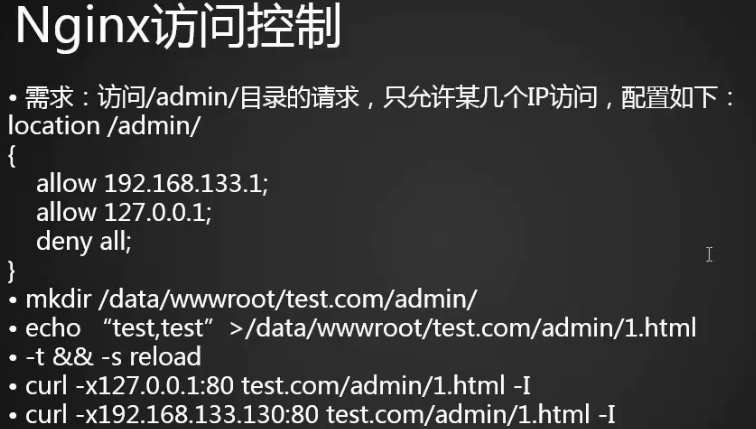
1.编辑配置文件,添加配置访问只允许127.0.0.1和10.21.95.218可以访问admin目录
server
    listen 80;
    index index.html index.htm index.php;
    root /data/wwwroot/test.com;
         rewrite  ^/(.*)$  http://test.com/$1  permanent;
      }
location ~* ^.+\.(gif|jpg|png|swf|flv|rar|zip|doc|pdf|gz|bz2|jpeg|bmp|xls)$
{
    expires 7d;
    if ($invalid_referer) {
        return 403;
    access_log off;
}


#location ~ .*\.(gif|jpg|jpeg|png|bmp|swf)$
#    {
#          expires      7d;
#          access_log off;
#    }
location ~ .*\.(js|css)$
    {
#          expires      12h;
          access_log off;
    }

    location /admin/
    {
        allow 127.0.0.1;
        allow 10.21.95.122;
        deny all;
    }

    access_log /tmp/test.com.log combined_realip;
}
2.测试
[root@bogon admin]# vim /usr/local/nginx/conf/vhost/test.com.conf
[root@bogon admin]# /usr/local/nginx/sbin/nginx -t
nginx: the configuration file /usr/local/nginx/conf/nginx.conf syntax is ok
nginx: configuration file /usr/local/nginx/conf/nginx.conf test is successful
[root@bogon admin]# /usr/local/nginx/sbin/nginx -s reload
[root@bogon admin]# curl -e "http://www.baidu.com/1.txt" -x127.0.0.1:80 -I test.com/admin/
HTTP/1.1 200 OK
Server: nginx/1.12.2
Date: Sun, 11 Feb 2018 12:30:39 GMT
Content-Type: application/octet-stream
Content-Length: 6
Last-Modified: Sun, 11 Feb 2018 12:29:33 GMT
Connection: keep-alive
ETag: "5a80372d-6"
Accept-Ranges: bytes
[root@bogon admin]# curl -x10.21.95.122:80 -I test.com/admin/
HTTP/1.1 200 OK
Server: nginx/1.12.2
Date: Sun, 11 Feb 2018 12:42:02 GMT
Content-Type: application/octet-stream
Content-Length: 6
Last-Modified: Sun, 11 Feb 2018 12:29:33 GMT
Connection: keep-alive
ETag: "5a80372d-6"
Accept-Ranges: bytes

[root@bogon admin]#
3.查看日志
[root@bogon admin]# cat /tmp/test.com.log
127.0.0.1 - [11/Feb/2018:20:30:39 +0800] test.com "/admin/" 200 "http://www.baidu.com/1.txt" "curl/7.29.0"
10.21.95.122 - [11/Feb/2018:20:42:02 +0800] test.com "/admin/" 200 "-" "curl/7.29.0"
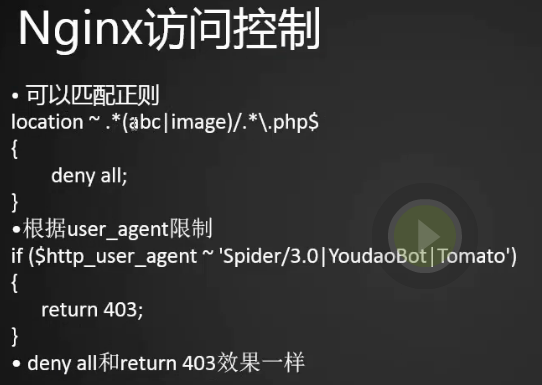
4.配置文件中添加
location ~ .*(upload|image)/.*\.php$
    {
        deny all;
    }
5.创建upload目录
[root@bogon admin]# vim /usr/local/nginx/conf/vhost/test.com.conf
[root@bogon admin]# /usr/local/nginx/sbin/nginx -t
nginx: the configuration file /usr/local/nginx/conf/nginx.conf syntax is ok
nginx: configuration file /usr/local/nginx/conf/nginx.conf test is successful
[root@bogon admin]# /usr/local/nginx/sbin/nginx -s reload
[root@bogon admin]# mkdir /data/wwwroot/test.com/upload
[root@bogon admin]# echo "upload" > /data/wwwroot/test.com/upload/1.php
[root@bogon admin]#
6.测试被拒绝
[root@bogon admin]# curl -x127.0.0.1:80 test.com/upload/1.php
<html>
<head><title>403 Forbidden</title></head>
<body bgcolor="white">
<center><h1>403 Forbidden</h1></center>
<hr><center>nginx/1.12.2</center>
</body>
</html>
[root@bogon admin]#
7.限制蜘蛛,添加配置
1、变量的完整比较可以使用=或!=操作符
2、 部分匹配可以使用正则表达式来表示,~或~*
3、~表示区分大小写
4、~*表示不区分大小写(firefox与FireFox是一样的)
5、!~与!~* 是取反操作,也就是不匹配的意思
6、检查文件是否存在使用 -f 或 !-f 操作符
7、检查目录是否存在使用-d或!-d操作符
8、检查文件,目录或符号连接是否存在使用-e或!-e操作符
9、检查文件是否可执行使用-x或!-x操作符
10、正则表达式的部分匹配可以使用括号,匹配的部分在后面可以用$1~$9变量代替,这些和apache一致。
 if( $http_user_agent ~ 'YoudaoBot|Baidu' )
    {
        return 403;
    }
8.测试,用百度蜘蛛访问403 -A 设置用户代理发送给服务器
[root@bogon admin]# /usr/local/nginx/sbin/nginx -t
nginx: the configuration file /usr/local/nginx/conf/nginx.conf syntax is ok
nginx: configuration file /usr/local/nginx/conf/nginx.conf test is successful
[root@bogon admin]# /usr/local/nginx/sbin/nginx -s reload
[root@bogon admin]# echo 1111 > /data/wwwroot/test.com/upload/1.txt
[root@bogon admin]# curl -x127.0.0.1:80 test.com/upload/1.txt -I
HTTP/1.1 200 OK
Server: nginx/1.12.2
Date: Mon, 12 Feb 2018 01:39:30 GMT
Content-Type: text/plain
Content-Length: 5
Last-Modified: Mon, 12 Feb 2018 01:39:05 GMT
Connection: keep-alive
ETag: "5a80f039-5"
Accept-Ranges: bytes

[root@bogon admin]#
[root@bogon admin]# curl -A "Baidu" -x127.0.0.1:80 test.com/upload/1.txt -I
HTTP/1.1 403 Forbidden
Server: nginx/1.12.2
Date: Mon, 12 Feb 2018 01:40:51 GMT
Content-Type: text/html
Content-Length: 169
Connection: keep-alive

[root@bogon admin]#
Nginx解析php相关配置
1.外网访问nginx失败很有可能是防火墙没有开启80端口,开启方法
命令含义:
–zone #作用域
–add-port=80/tcp #添加端口,格式为:端口/通讯协议
–permanent #永久生效,没有此参数重启后失效
2.重启防火墙
[root@bogon conf]# firewall-cmd --zone=public --add-port=80/tcp --permanent
success
[root@bogon conf]#
[root@bogon conf]# systemctl restart firewalld.service
3.将解析php的配置文件添加到nginx配置文件中
[root@bogon /]# vim /usr/local/nginx/conf/vhost/test.com.conf
server
{
listen 80;
server_name test.com test2.com;
index index.html index.htm index.php;
root /data/wwwroot/test.com;
if ($host != 'test.com' ) {
rewrite ^/(.*)$ http://test.com/$1 permanent;
}
location ~* ^.+\.(gif|jpg|png|swf|flv|rar|zip|doc|pdf|gz|bz2|jpeg|bmp|xls)$
{
expires 7d;
valid_referers none blocked server_names *.test.com ;
if ($invalid_referer) {
return 403;
}
access_log off;
}
#location ~ .*\.(gif|jpg|jpeg|png|bmp|swf)$
# {
# expires 7d;
# access_log off;
# }
location ~ .*\.(js|css)$
{
access_log off;
}
location /admin/
{
server
{
listen 80;
server_name test.com test2.com;
index index.html index.htm index.php;
root /data/wwwroot/test.com;
if ($host != 'test.com' ) {
rewrite ^/(.*)$ http://test.com/$1 permanent;
}
location ~* ^.+\.(gif|jpg|png|swf|flv|rar|zip|doc|pdf|gz|bz2|jpeg|bmp|xls)$
{
expires 7d;
valid_referers none blocked server_names *.test.com ;
if ($invalid_referer) {
return 403;
}
access_log off;
}
#location ~ .*\.(gif|jpg|jpeg|png|bmp|swf)$
# {
# expires 7d;
# access_log off;
# }
location ~ .*\.(js|css)$
{
# expires 12h;
access_log off;
}
location /admin/
{
allow 127.0.0.1;
allow 10.21.95.122;
deny all;
}
location ~ .*(upload|image)/.*\.php$
{
deny all;
}
if ( $http_user_agent ~ 'YoudaoBot|Baidu' )
{
return 403;
}
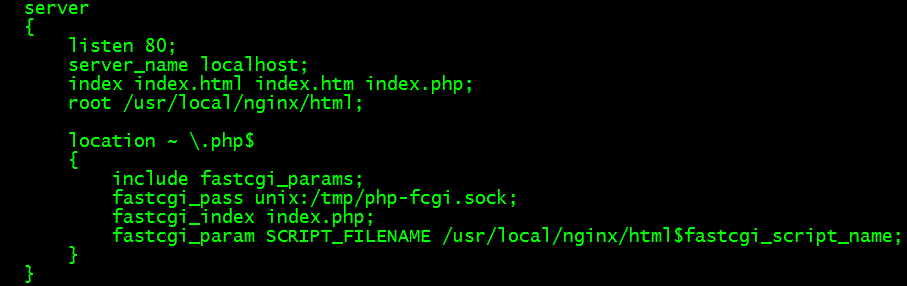
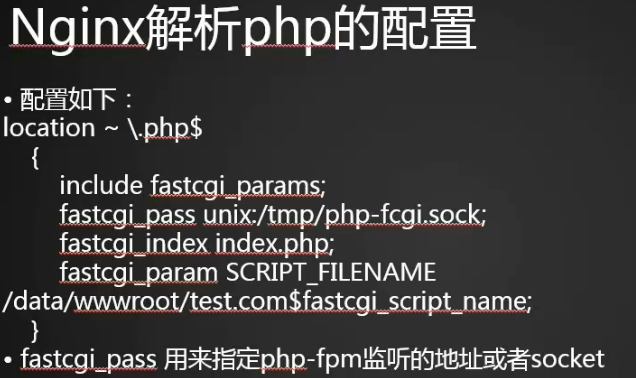
location ~ \.php$
{
include fastcgi_params;
fastcgi_pass unix:/tmp/php-fcgi.sock; (用来监听php-fpm的地址或者socket,这里怎么写取决于/usr/local/php-fpm/etc/php-fpm.conf里的listen怎么写,如果不一样,则curl会报502错误,)
fastcgi_index index.php;
fastcgi_param SCRIPT_FILENAME /data/wwwroot/test.com$fastcgi_script_name; (这个路径要写对,对应上面的root路径)
}
access_log /tmp/test.com.log combined_realip;
}
4.创建文件3.php,写入phpinfo(),重新加载配置文件,curl访问可以正确解析php文件
[root@bogon /]# vim /data/wwwroot/test.com/3.php
[root@bogon /]# /usr/local/nginx/sbin/nginx -s reload
[root@bogon /]# curl -x127.0.0.1:80 test.com/3.php
5.这里可以对比一下php-ftm的配置文件
[global]
pid = /usr/local/php-fpm/var/run/php-fpm.pid
error_log = /usr/local/php-fpm/var/log/php-fpm.log
[www]
listen = /tmp/php-fcgi.sock(这里也可以写成监听端口,例如)
#listen = 127.0.0.1:9000             (如果这里写成端口,则虚拟配置文件里也要写成:fastcgi_pass 127.0.0.1:9000)

listen.mode = 666 (如果用的sock,定义php-fcgi.sock的权限必须是666(默认是440只用root用户能读,其它用户将提示to unix:/tmp/php-fcgi.sock failed(13:Permission denied)),否则nginx解析不了)
user = php-fpm
group = php-fpm
pm = dynamic
pm.max_children = 50
pm.start_servers = 20
pm.min_spare_servers = 5
pm.max_spare_servers = 35
pm.max_requests = 500
rlimit_files = 1024
6.php读sock文件是以nobody用户的身份读的,如果用的是默认权限,需要将文件php-fcgi.sock的属组改为nobody ,再访问php文件就可以解析了,因为nobody用户有读sock文件的权限了
[root@bogon /]# ps aux|grep nginx
root       1726  0.0  0.1  21276  1484 ?        Ss   2月11   0:00 nginx: master process /usr/local/nginx/sbin/nginx -c /usr/local/nginx/conf/nginx.conf
nobody    51088  0.0  0.3  25240  3432 ?        S    11:45   0:00 nginx: worker process
nobody    51089  0.0  0.3  25240  3940 ?        S    11:45   0:00 nginx: worker process
root      69197  0.0  0.0 112684   976 pts/1    S+   16:04   0:00 grep --color=auto nginx
[root@bogon /]#
[root@bogon /]# chown nobody /tmp/php-fcgi.sock

 浙公网安备 33010602011771号