Android studio 基本布局-底部按钮
在使用Android studio 的时候,准备弄的基本的布局出来,底部按钮,按了中间会显示。
来上代码:
页面menu_main.xml
这里弄控件的浮动耗费了点我的时间。原因是因为对其各种问题,
后来发现个好用的属性
这里控件FrameLayout的属性:表示
app:layout_constraintTop_toBottomOf="@+id/relativeLayout1" 顶部对其到relativeLayout1底部
app:layout_constraintBottom_toTopOf="@+id/linearLayout2" 底部对其到linearLayout2的顶部
加上之后,每一个区域都能很好的和前后的衔接好。
<?xml version="1.0" encoding="utf-8"?>
<android.support.constraint.ConstraintLayout xmlns:android="http://schemas.android.com/apk/res/android"
    xmlns:app="http://schemas.android.com/apk/res-auto"
    xmlns:tools="http://schemas.android.com/tools"
    android:layout_width="match_parent"
    android:layout_height="match_parent"
    tools:context=".MenuActivity">


    <RelativeLayout
        android:id="@+id/relativeLayout1"
        android:layout_width="match_parent"
        android:layout_height="48dp"
        app:layout_constraintBottom_toTopOf="@+id/linearLayout3"
        app:layout_constraintEnd_toEndOf="parent"
        app:layout_constraintTop_toTopOf="parent"
        app:layout_constraintVertical_chainStyle="spread_inside">

        <View
            android:id="@+id/view"
            android:layout_width="wrap_content"
            android:layout_height="wrap_content"
            android:background="@android:color/holo_green_light" />

        <TextView
            android:id="@+id/textView2"
            android:layout_width="267dp"
            android:layout_height="53dp"
            android:layout_alignParentBottom="true"
            android:layout_alignParentStart="true"
            android:layout_marginStart="76dp"
            android:gravity="center"
            android:text="信息"
            android:textSize="30sp" />
    </RelativeLayout>

    <FrameLayout
        android:id="@+id/linearLayout3"
        android:layout_width="match_parent"
        android:layout_height="0dp"
        android:background="@android:color/holo_purple"
        app:layout_constraintTop_toBottomOf="@+id/relativeLayout1"
        app:layout_constraintBottom_toTopOf="@+id/linearLayout2"
        >

    </FrameLayout>


    <LinearLayout
        android:id="@+id/linearLayout2"
        android:layout_width="match_parent"
        android:layout_height="56dp"
        android:orientation="horizontal"
        app:layout_constraintBottom_toBottomOf="parent"
        app:layout_constraintEnd_toEndOf="parent"
        app:layout_constraintStart_toStartOf="parent">

        <TextView
            android:id="@+id/textView6"
            android:layout_width="0dp"
            android:layout_height="match_parent"
            android:layout_weight="1"
            android:background="@android:color/holo_blue_light"
            android:drawablePadding="3dp"
            android:gravity="center"
            android:text="发现" />

        <TextView
            android:id="@+id/textView7"
            android:layout_width="0dp"
            android:layout_height="match_parent"
            android:layout_weight="1"
            android:background="@android:color/holo_blue_bright"
            android:drawablePadding="3dp"
            android:gravity="center"
            android:text="我的" />

        <TextView
            android:id="@+id/textView9"
            android:layout_width="0dp"
            android:layout_height="match_parent"
            android:layout_weight="1"
            android:background="@android:color/holo_blue_bright"
            android:drawablePadding="3dp"
            android:gravity="center"
            android:text="我的" />

        <TextView
            android:id="@+id/textView8"
            android:layout_width="0dp"
            android:layout_height="match_parent"
            android:layout_weight="1"
            android:background="@android:color/holo_blue_bright"
            android:drawablePadding="3dp"
            android:gravity="center"
            android:text="设置" />

    </LinearLayout>

    <!--  <FrameLayout
        android:id="@+id/frameLayout"
        android:layout_width="match_parent"
        android:layout_height="match_parent"
        android:background="@android:color/holo_orange_dark">

    </FrameLayout>-->


</android.support.constraint.ConstraintLayout>
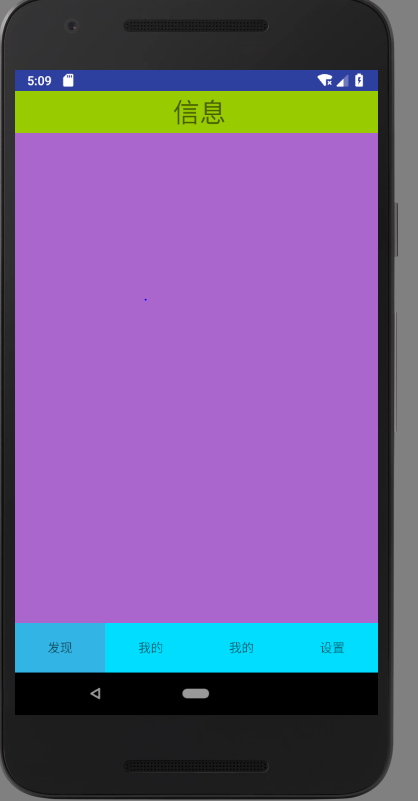
上面的效果图:

下面来实现点击底部按钮,切换中间的内容页面:
添加一个背景xml,控制选择后的变化
menu_button_bg.xml
<?xml version="1.0" encoding="utf-8"?>
<selector xmlns:android="http://schemas.android.com/apk/res/android">

    <item android:state_selected="true">
        <shape>
            <solid android:color="#FFC4C4C4"/>
        </shape>
    </item>
    <item>
        <shape>
            <solid android:color="@android:color/holo_blue_bright" />
        </shape>
    </item>

</selector>
在按钮的样式上,将样式添加menu_main.xml 到 进去:
        <TextView
            android:id="@+id/textView9"
            android:layout_width="0dp"
            android:layout_height="match_parent"
            android:layout_weight="1"
            android:background="@drawable/menu_button_bg"
            android:drawablePadding="3dp"
            android:gravity="center"
            android:text="关于" />
创建一个类,控制view的初始化:
package com.example.administrator.myapplication.until;

import android.graphics.drawable.Drawable;
import android.support.annotation.Nullable;
import android.app.Fragment;
import android.view.LayoutInflater;
import android.view.View;
import android.view.ViewGroup;
import android.widget.TextView;
import android.os.Bundle;
import com.example.administrator.myapplication.R;

public class FirstFragment extends Fragment {
    private String context="xxxxxxxxxxxxx";
    private TextView mTextView;
    public  FirstFragment(){

    }
    public  static FirstFragment newInstance(String context){
        FirstFragment myFragment = new FirstFragment();
        myFragment.context = context;
        return  myFragment;
    }

    @Nullable
    @Override
    public View onCreateView(LayoutInflater inflater, ViewGroup container, Bundle savedInstanceState) {
        this.context = context;
        View view = inflater.inflate(R.layout.found_main,container,false);
        mTextView = (TextView)view.findViewById(R.id.textView6);
        //mTextView = (TextView)getActivity().findViewById(R.id.txt_content);
        mTextView.setText(context);
        mTextView.setBackgroundColor(20);
        return view;
    }
}
在menu页面添加监听时间,监听选项的点击,然后进行逻辑的执行 代码:
package com.example.administrator.myapplication;

import android.app.Activity;
import android.app.FragmentTransaction;
import android.content.Intent;
import android.os.Bundle;
import android.app.FragmentManager;
import android.support.v7.app.AppCompatActivity;
import android.util.Log;
import android.view.View;
import android.view.Window;
import android.widget.FrameLayout;
import android.widget.TextView;

import com.example.administrator.myapplication.until.FirstFragment;

import java.util.Timer;
import java.util.TimerTask;

public class MenuActivity extends Activity implements View.OnClickListener{
    String msg = "Android : ";
    //继承Activity 不会显示APP头上的标题
    private TextView topfound;
    private TextView tabmy;
    private TextView tababout;
    private TextView tabsetting;

    private FrameLayout ly_content;

    private FirstFragment f1,f2,f3,f4;
    private FragmentManager fragmentManager;

    @Override
    protected void onCreate(Bundle savedInstanceState) {
        Log.d(msg, "StartActivity-onCreate: ");
        super.onCreate(savedInstanceState);
        requestWindowFeature(Window.FEATURE_NO_TITLE);
        //配置加载的xml页面
        setContentView(R.layout.menu_main);

        bindView();
    }


    //UI组件初始化与事件绑定
    private void bindView() {
        topfound = (TextView)this.findViewById(R.id.textView6);
        tabmy = (TextView)this.findViewById(R.id.textView7);
        tababout = (TextView)this.findViewById(R.id.textView8);
        tabsetting = (TextView)this.findViewById(R.id.textView9);
       // tabMore = (TextView)this.findViewById(R.id.txt_more);
        ly_content = (FrameLayout) findViewById(R.id.linearLayout3);

        topfound.setOnClickListener(this);
        tabmy.setOnClickListener(this);
        tababout.setOnClickListener(this);
        tabsetting.setOnClickListener(this);

    }

    @Override
    public void onClick(View v) {
        //FragmentTransaction transaction = getFragmentManager().beginTransaction();
        FragmentTransaction transaction = getFragmentManager().beginTransaction();
        hideAllFragment(transaction);
        switch(v.getId()){
            case R.id.textView6:
                selected();
                topfound.setSelected(true);
                if(f1==null){
                    f1 = FirstFragment.newInstance("发现");
                    transaction.add(R.id.linearLayout3,f1);
                }else{
                    transaction.show(f1);
                }
                break;

            case R.id.textView7:
                selected();
                tabmy.setSelected(true);
                if(f2==null){
                    f2 =FirstFragment.newInstance("我的");//"第二个Fragment"
                    transaction.add(R.id.linearLayout3,f2);
                }else{
                    transaction.show(f2);
                }
                break;

            case R.id.textView8:
                selected();
                tababout.setSelected(true);
                if(f3==null){
                    f3 = FirstFragment.newInstance("关于");//"第三个Fragment"
                    transaction.add(R.id.linearLayout3,f3);
                }else{
                    transaction.show(f3);
                }
                break;

            case R.id.textView9:
                selected();
                tabsetting.setSelected(true);
                if(f4==null){
                    f4 =  FirstFragment.newInstance("设置");//"第四个Fragment"
                    transaction.add(R.id.linearLayout3,f4);
                }else{
                    transaction.show(f4);
                }
                break;
        }

        transaction.commit();
        Log.d(msg, "xxxxx ");
    }

    //重置所有文本的选中状态
    public void selected(){
        topfound.setSelected(false);
        tabmy.setSelected(false);
        tababout.setSelected(false);
        tabsetting.setSelected(false);
    }

    //隐藏所有Fragment
    public void hideAllFragment(FragmentTransaction transaction){
        if(f1!=null){
            transaction.hide(f1);
        }
        if(f2!=null){
            transaction.hide(f2);
        }
        if(f3!=null){
            transaction.hide(f3);
        }
        if(f4!=null){
            transaction.hide(f4);
        }
    }
}
创建一个页面,用来展示选择的选项的内容found_main.xml
<?xml version="1.0" encoding="utf-8"?>
<android.support.constraint.ConstraintLayout xmlns:android="http://schemas.android.com/apk/res/android"
    xmlns:app="http://schemas.android.com/apk/res-auto"
    xmlns:tools="http://schemas.android.com/tools"
    android:layout_width="match_parent"
    android:layout_height="match_parent"
    tools:context=".FoundActivity">

    <LinearLayout
        android:id="@+id/linearLayout2"
        android:layout_width="match_parent"
        android:layout_height="match_parent"
        android:orientation="horizontal"
        app:layout_constraintBottom_toBottomOf="parent"
        app:layout_constraintEnd_toEndOf="parent"
        app:layout_constraintStart_toStartOf="parent">

        <TextView
            android:id="@+id/textView6"
            android:layout_width="0dp"
            android:layout_height="match_parent"
            android:layout_weight="1"
            android:background="#de3679"
            android:drawablePadding="3dp"
            android:gravity="center"
            android:text="发现" />


    </LinearLayout>


</android.support.constraint.ConstraintLayout>
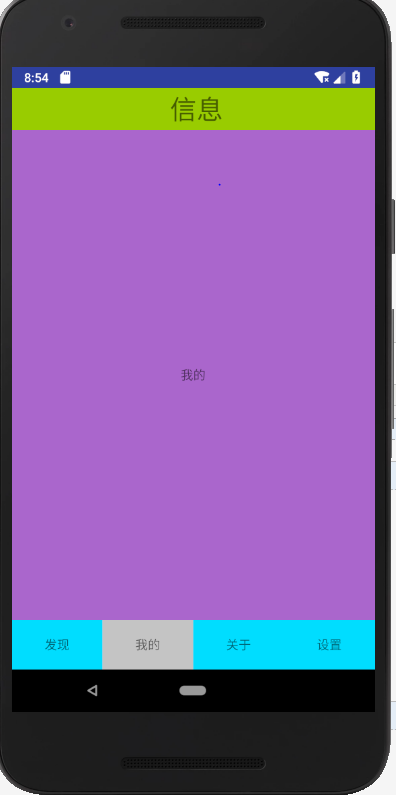
效果图:

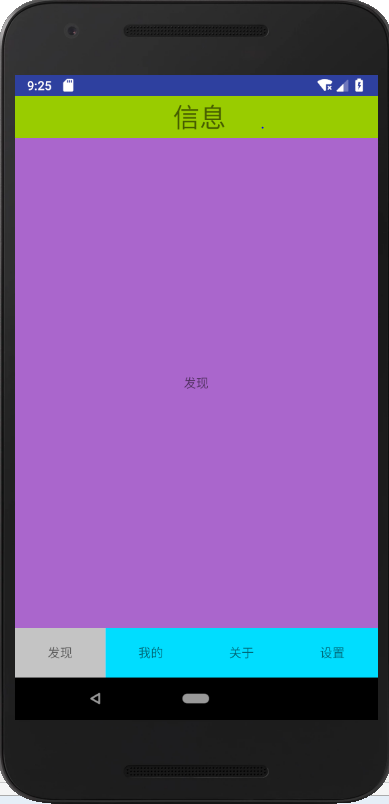
这里会发现默认进来的时候,是原来这是的menu 的页面,如果要默认进来就是发现页面的话,需要加点代码:
在初始化加载的时候,让发现页面也加载。见下面的 SetDefultView 方法
package com.example.administrator.myapplication;

import android.app.Activity;
import android.app.FragmentTransaction;
import android.content.Intent;
import android.os.Bundle;
import android.app.FragmentManager;
import android.support.v7.app.AppCompatActivity;
import android.util.Log;
import android.view.View;
import android.view.Window;
import android.widget.FrameLayout;
import android.widget.TextView;

import com.example.administrator.myapplication.until.FirstFragment;

import java.util.Timer;
import java.util.TimerTask;

public class MenuActivity extends Activity implements View.OnClickListener{
    String msg = "Android : ";
    //继承Activity 不会显示APP头上的标题
    private TextView topfound;
    private TextView tabmy;
    private TextView tababout;
    private TextView tabsetting;

    private FrameLayout ly_content;

    private FirstFragment f1,f2,f3,f4;
    private FragmentManager fragmentManager;

    @Override
    protected void onCreate(Bundle savedInstanceState) {
        Log.d(msg, "StartActivity-onCreate: ");
        super.onCreate(savedInstanceState);
        requestWindowFeature(Window.FEATURE_NO_TITLE);
        //配置加载的xml页面
        setContentView(R.layout.menu_main);

        bindView();
    }


    //UI组件初始化与事件绑定
    private void bindView() {
        topfound = (TextView)this.findViewById(R.id.textView6);
        tabmy = (TextView)this.findViewById(R.id.textView7);
        tababout = (TextView)this.findViewById(R.id.textView8);
        tabsetting = (TextView)this.findViewById(R.id.textView9);
       // tabMore = (TextView)this.findViewById(R.id.txt_more);
        ly_content = (FrameLayout) findViewById(R.id.linearLayout3);

        //首页设定
        SetDefultView();

        topfound.setOnClickListener(this);
        tabmy.setOnClickListener(this);
        tababout.setOnClickListener(this);
        tabsetting.setOnClickListener(this);

    }

    @Override
    public void onClick(View v) {
        //FragmentTransaction transaction = getFragmentManager().beginTransaction();
        FragmentTransaction transaction = getFragmentManager().beginTransaction();
        hideAllFragment(transaction);
        switch(v.getId()){
            case R.id.textView6:
                selected();
                topfound.setSelected(true);
                if(f1==null){
                    f1 = FirstFragment.newInstance("发现");
                    transaction.add(R.id.linearLayout3,f1);
                }else{
                    transaction.show(f1);
                }
                break;

            case R.id.textView7:
                selected();
                tabmy.setSelected(true);
                if(f2==null){
                    f2 =FirstFragment.newInstance("我的");//"第二个Fragment"
                    transaction.add(R.id.linearLayout3,f2);
                }else{
                    transaction.show(f2);
                }
                break;

            case R.id.textView8:
                selected();
                tababout.setSelected(true);
                if(f3==null){
                    f3 = FirstFragment.newInstance("关于");//"第三个Fragment"
                    transaction.add(R.id.linearLayout3,f3);
                }else{
                    transaction.show(f3);
                }
                break;

            case R.id.textView9:
                selected();
                tabsetting.setSelected(true);
                if(f4==null){
                    f4 =  FirstFragment.newInstance("设置");//"第四个Fragment"
                    transaction.add(R.id.linearLayout3,f4);
                }else{
                    transaction.show(f4);
                }
                break;
        }

        transaction.commit();
        Log.d(msg, "xxxxx ");
    }

    //重置所有文本的选中状态
    public void selected(){
        topfound.setSelected(false);
        tabmy.setSelected(false);
        tababout.setSelected(false);
        tabsetting.setSelected(false);
    }

    //隐藏所有Fragment
    public void hideAllFragment(FragmentTransaction transaction){
        if(f1!=null){
            transaction.hide(f1);
        }
        if(f2!=null){
            transaction.hide(f2);
        }
        if(f3!=null){
            transaction.hide(f3);
        }
        if(f4!=null){
            transaction.hide(f4);
        }
    }

    public  void  SetDefultView(){
        FragmentTransaction transaction = getFragmentManager().beginTransaction();
        hideAllFragment(transaction);
        selected();
        if(f1==null){
            f1 = FirstFragment.newInstance("发现");
            transaction.add(R.id.linearLayout3,f1);
        }else{
            transaction.show(f1);
        }
        topfound.setSelected(true);
        transaction.commit();

    }
}
效果:

以上源码:链接:https://pan.baidu.com/s/1RlkTStyR7oihr7mAgtWZMg 密码:puug
还有一种方法:在Android Studio 新建项目的时候,可以选择底部导航栏 Bottom Navigaton 去实现,更加的简单和好用
可以去看里面的代码实现,这个我觉得挺方便的。就不细说了,
https://blog.csdn.net/xiaoyangsavvy/article/details/70213537
这个博客写的挺好的


