前后端分离但人不分离:IDEA+VUE创建springboot项目和对应的前端项目
参考链接:
- 尚硅谷IDEA安装idea实战教程(百万播放,新版来袭)_哔哩哔哩_bilibili
- IntelliJ IDEA的使用指南,最简单的idea使用教程【适合初学者小白】_哔哩哔哩_bilibili
- SpringBoot项目后端开发逻辑梳理总结_一个springboot 项目,解释目录bean 、controller 、dao 、service-CSDN博客
- Springboot极简入门教程,5分钟写一个http接口_哔哩哔哩_bilibili
- Springboot+vue入门课程之增删改查_哔哩哔哩_bilibili
环境要求:
- 安装IDEA
- 安装mysql、Navicat
- 配置好maven
- 安装vue-cli
- 安装postman
思想:
- 用IDEA创建springboot项目,并同时勾选依赖 springboot web, mysql, mybatics, lombok
- 设置连接数据库,写一个测试接口 hello,用浏览器测试成功后开始写对数据库的crud接口
- 在后端测试成功后,写前端项目,在前端项目中用axios访问get、post请求,并返回结果
- 在前端测试成功后,打包前端项目,并把打包后的dist文件夹中的内容放到idea项目的 src/main/resources/static 目录下
- idea服务器重启,即可用后端的地址正常访问。
- 因为图片太多,所以展示时选择了缩小,看不清可以 右键 | 在新标签页打开图片
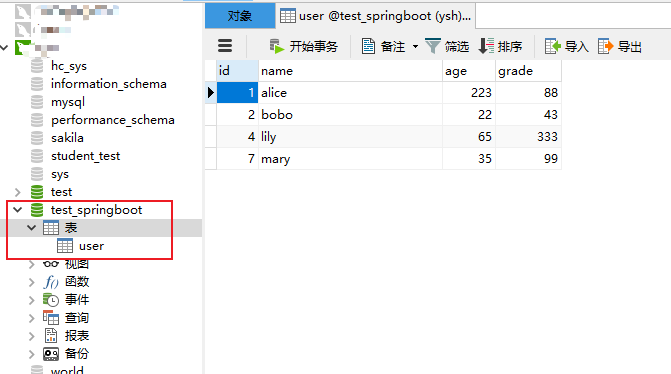
一、查看要操作的数据库
user表
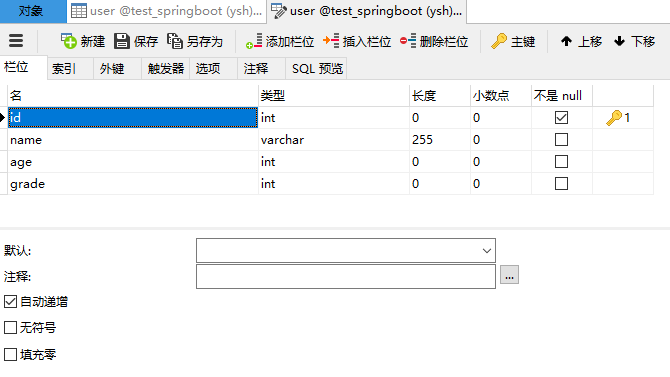
选中表user,右键“设计表”可以看到属性类型
二、用idea创建springboot项目
File | New | Project
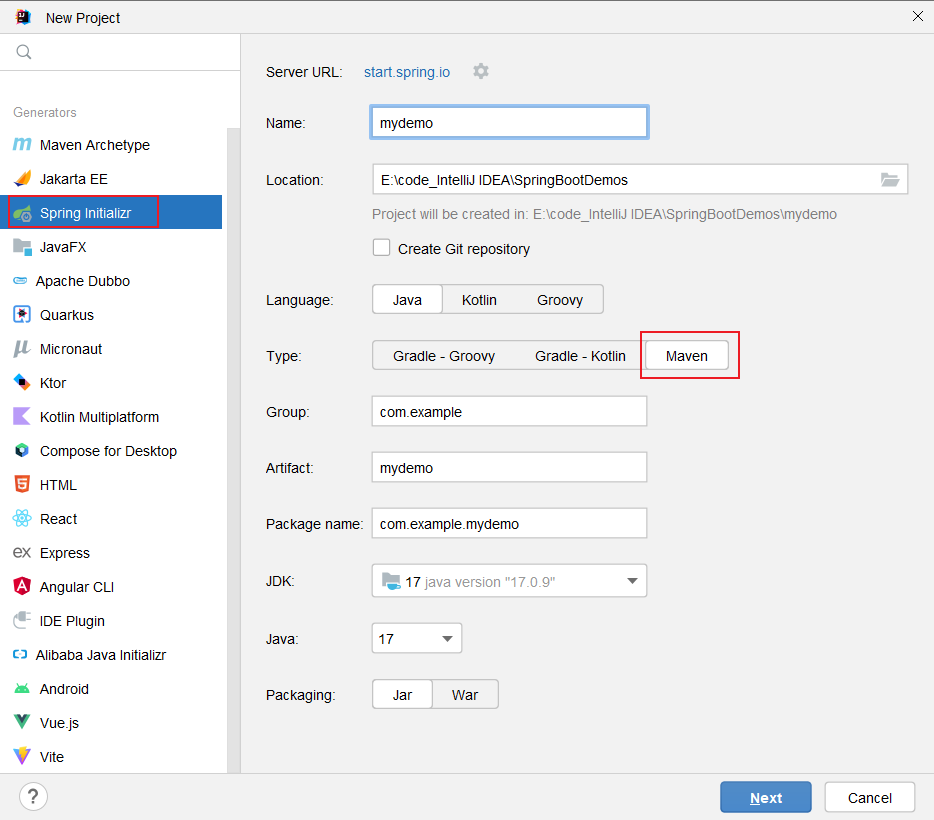
Next
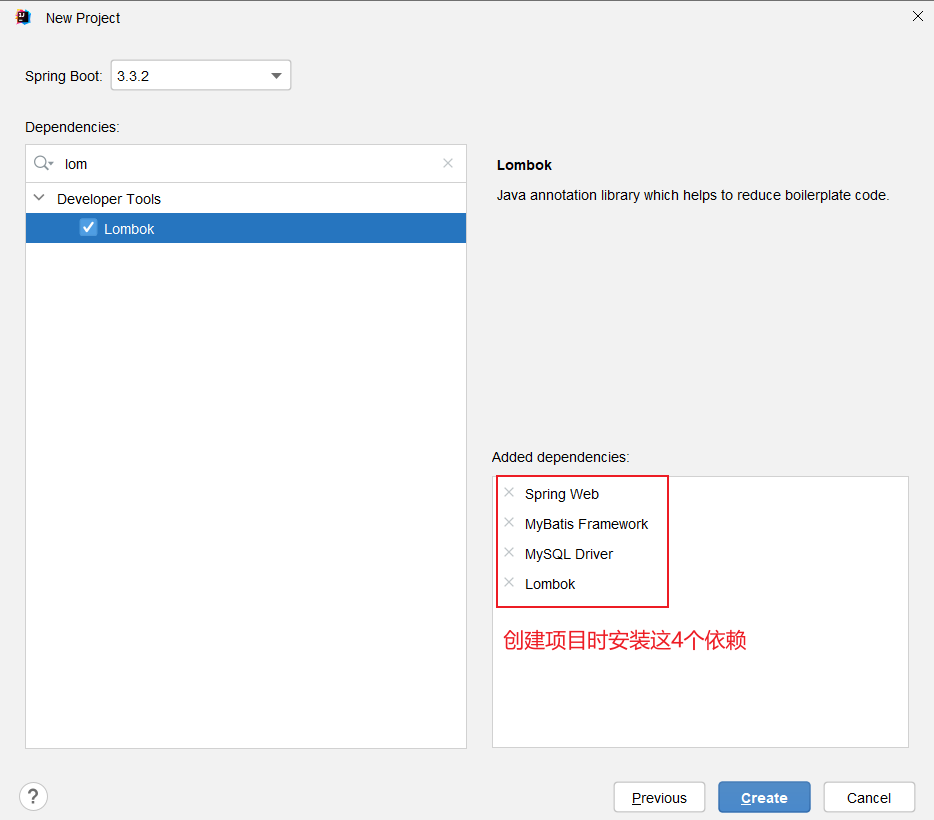
Create,等待项目下载完成

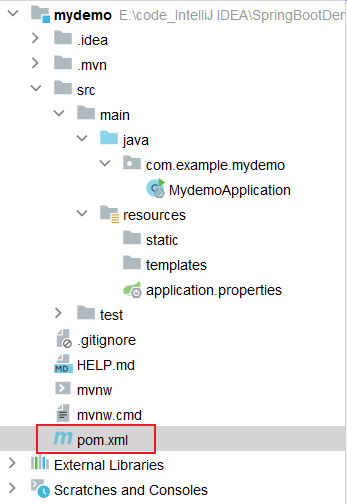
项目下载完成后,目录如下。关掉无关页面,双击打开 pom.xml。如果有忘记安装的依赖可以在这里写入,然后刷新maven安装。

打开 application.properties 默认内容如下
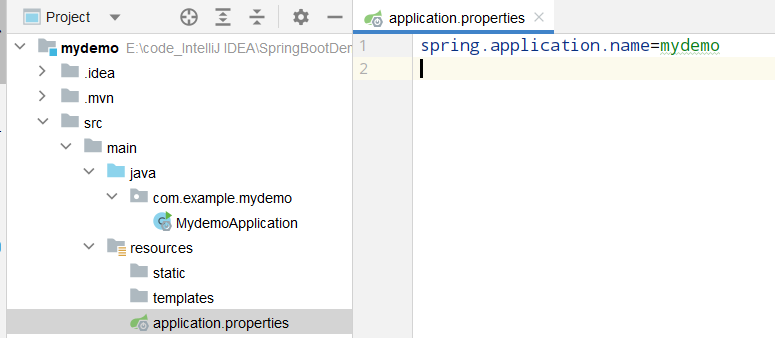
添加连接数据库的配置

spring.application.name=mydemo
server.port=8081

spring.datasource.url=jdbc:mysql://localhost:3306/test_springboot?useSSL=false&useUnicode=true&characterEncoding=utf-8
spring.datasource.username=root
spring.datasource.password=1234
spring.datasource.driverClassName = com.mysql.cj.jdbc.Driver
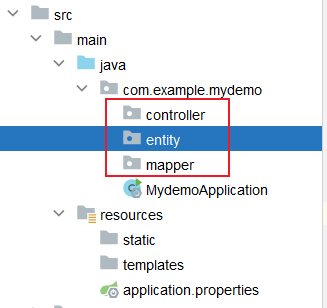
开始写后端代码:在com.example.mydemo 下新建3个包 controller、mapper、entity
然后 entity 中新建一个 User类,按照数据库user表的列属性声明变量,并引入 @Data 注解
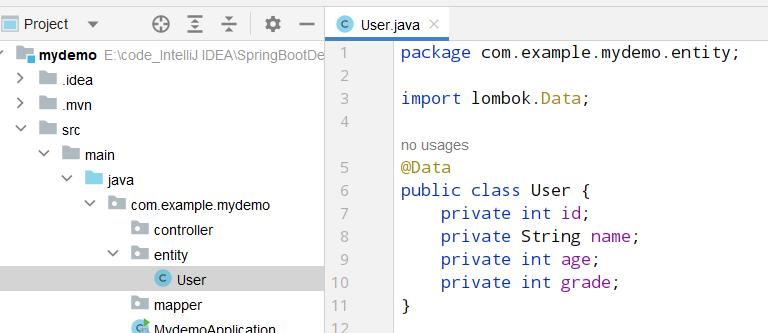
import lombok.Data;

@Data
public class User {
    private int id;
    private String name;
    private int age;
    private int grade;
}
在mapper中新建 UserMapper 接口(暂时先不写内容)
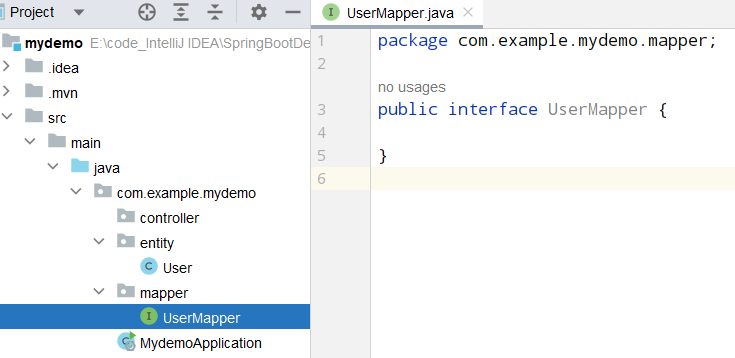
在 controller 中新建 UserController.java, 并写一个测试接口
import org.springframework.web.bind.annotation.GetMapping;
import org.springframework.web.bind.annotation.RestController;

@RestController
public class UserController {
    @GetMapping("/hello")
    public String hello() {
        return "HELLO";
    }
}
双击 MydemoApplication.java 打开,右键 Run,启动服务器
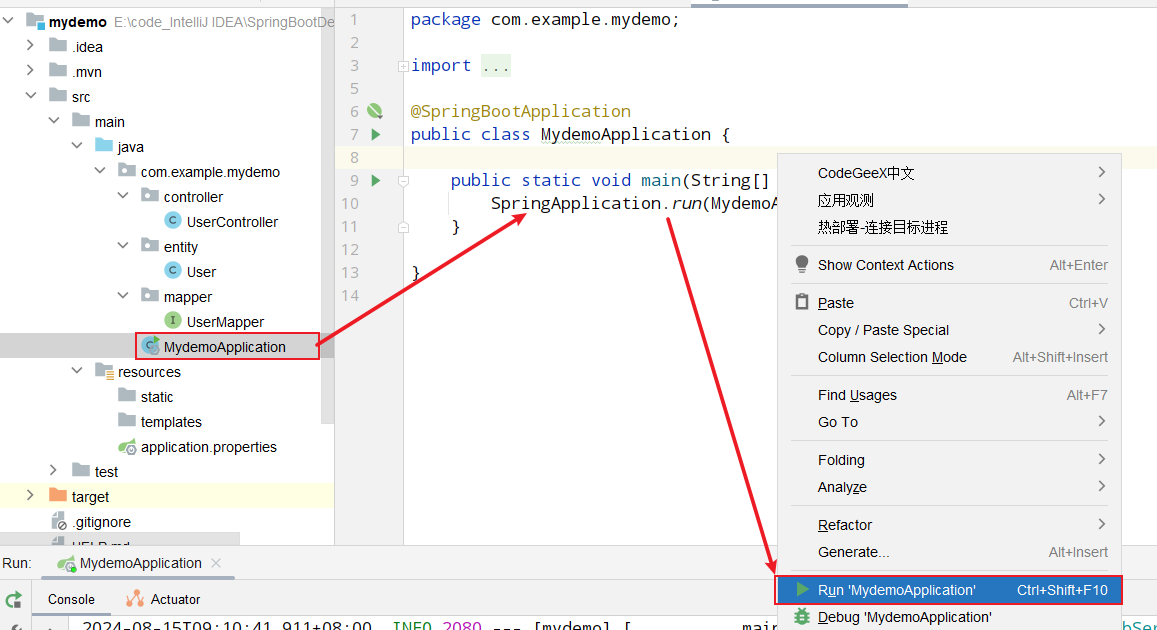
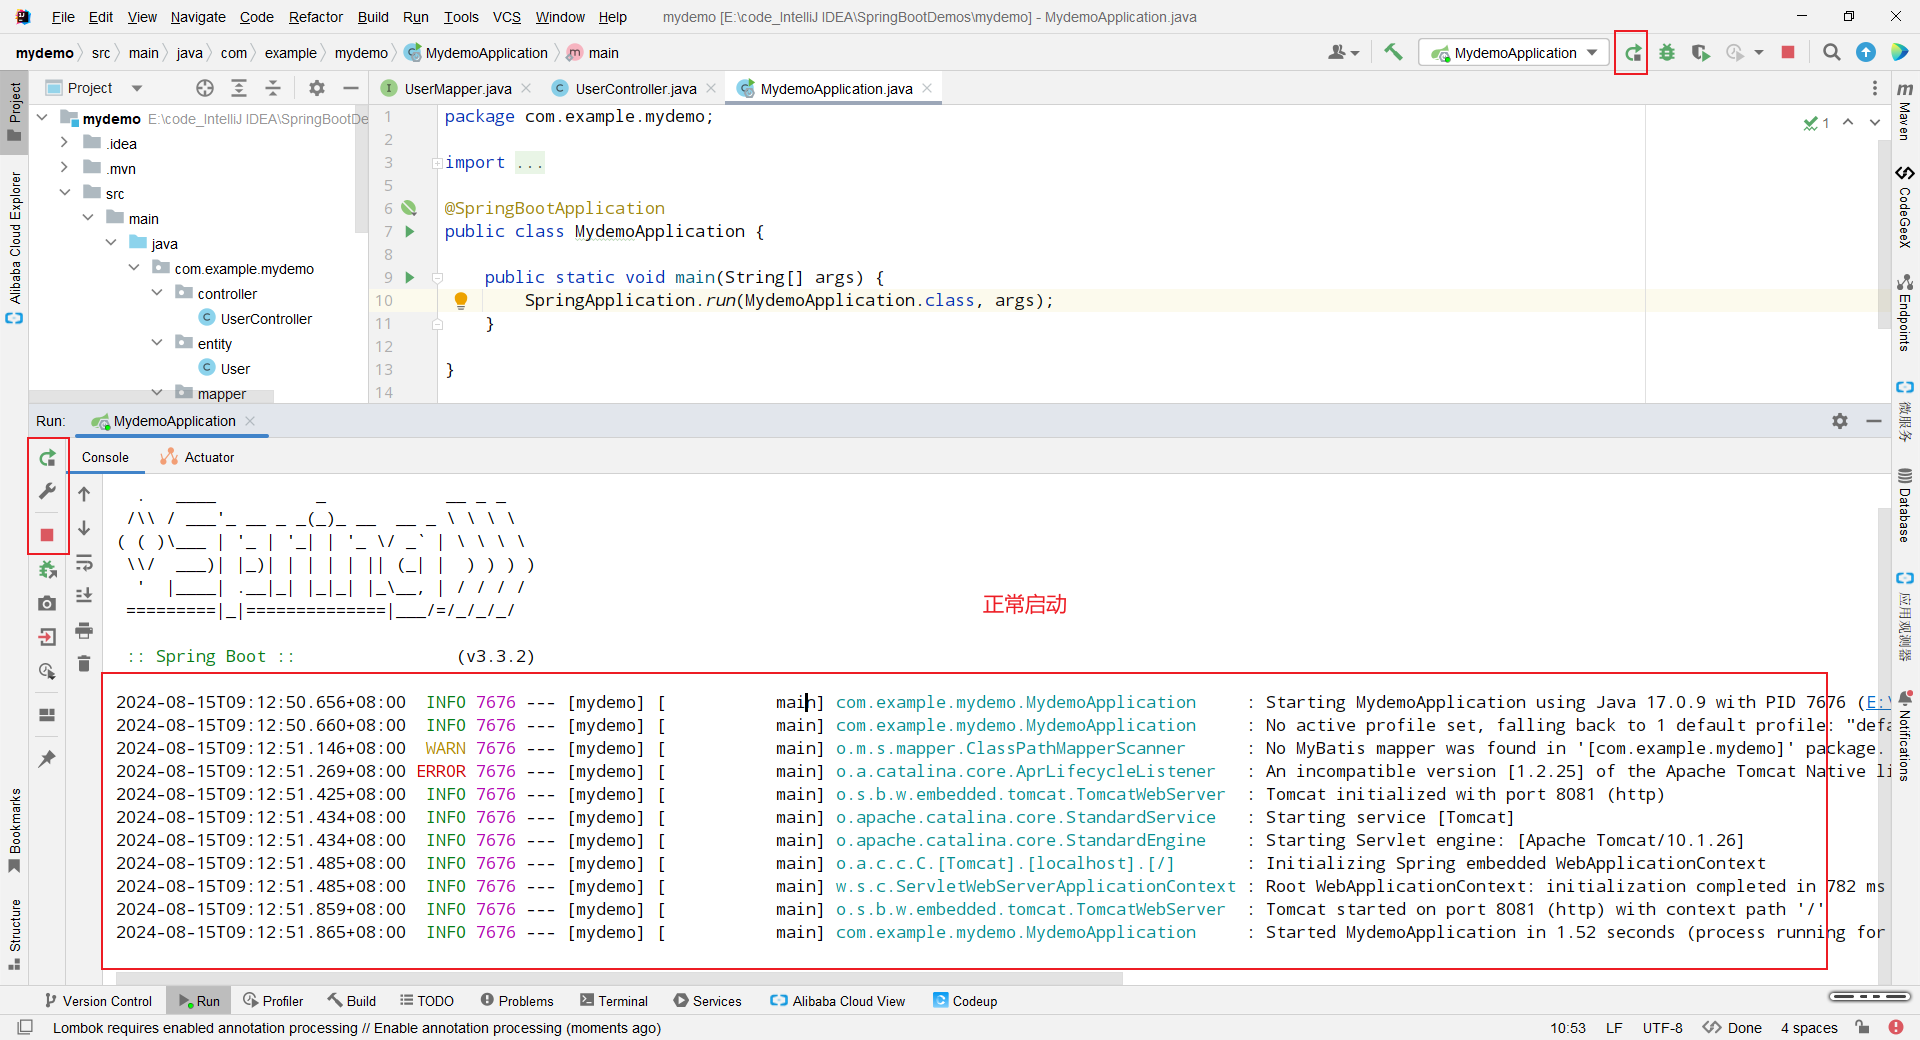
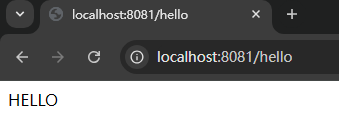
在浏览器地址栏输入 http://localhost:8081/hello ,页面显示 HELLO 表示正确。
三、写对数据库操作的接口
先在 MydemoApplication.java 上加注解扫描mapper类
@MapperScan("com.example.mydemo.mapper")
然后在 UserMapper.java 中编写第一个查询接口
import com.example.mydemo.entity.User;
import org.apache.ibatis.annotations.Select;

import java.util.List;

public interface UserMapper {
    @Select("select * from user")
    List<User> queryAll();
}
在UserController.java中调用 queryAll 并添加对应注解
import com.example.mydemo.mapper.UserMapper;
import lombok.RequiredArgsConstructor;
import org.springframework.web.bind.annotation.GetMapping;
import org.springframework.web.bind.annotation.RestController;

import java.util.List;

@RestController
@RequiredArgsConstructor
public class UserController {
    private final UserMapper userMapper;

    @GetMapping("/hello")
    public String hello() {
        return "HELLO";
    }

    @GetMapping("/findAll")
    public List<User> findAllUser() {
        return userMapper.queryAll();
    }
}
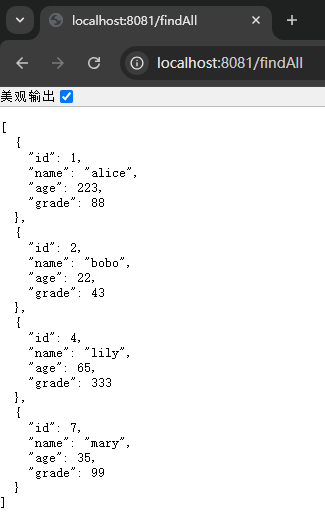
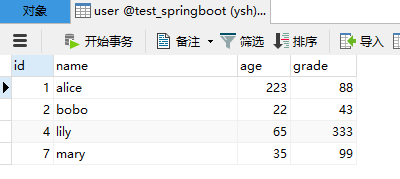
重启服务器,在浏览器输入 http://localhost:8081/findAll (注意大小写)就查到了数据,和数据库表中的数据一样。
四、在vue项目中调用 http://localhost:8081/findAll 接口
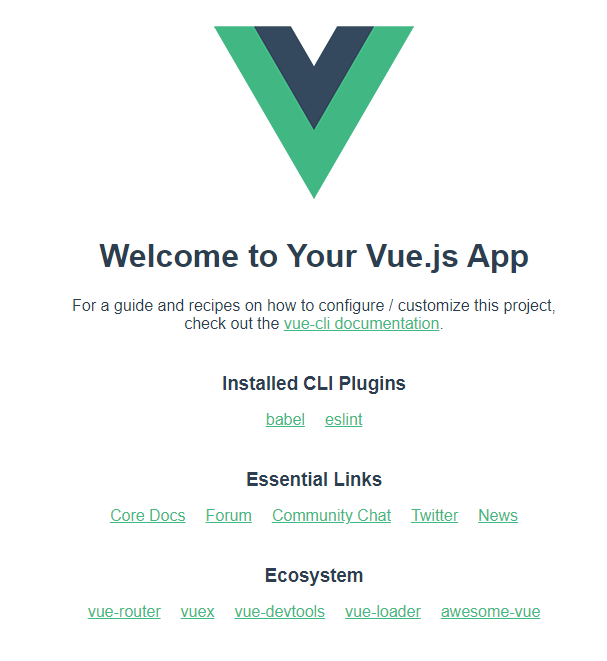
新建一个vue2项目,npm run serve 运行
安装 axios 详细过程可以参考 https://www.cnblogs.com/sunshine233/p/18334975
然后在HelloWorld.vue 中删除无用的代码,写布局和axios访问接口
<template>
  <div class="hello">
    <h2>测试和 springboot 项目配合使用接口</h2>
  </div>
</template>

<script>
import axios from "axios";

export default {
  name: 'HelloWorld',
  data() {
    return {
      baseUrl: "http://localhost:8081"
    }
  },
  mounted() {
    this.testHello();
  },
  methods: {
    testHello() {
      const url = this.baseUrl + "/hello";
      axios.get(url).then(res => {
        console.log('res', res.data);
      }).catch(err => {
        console.log('err', err);
      })
    }
  }
}
</script>

<style scoped></style>
但是运行后发现报错 has been blocked by CORS policy: No 'Access-Control-Allow-Origin' header is present on the requested resource.

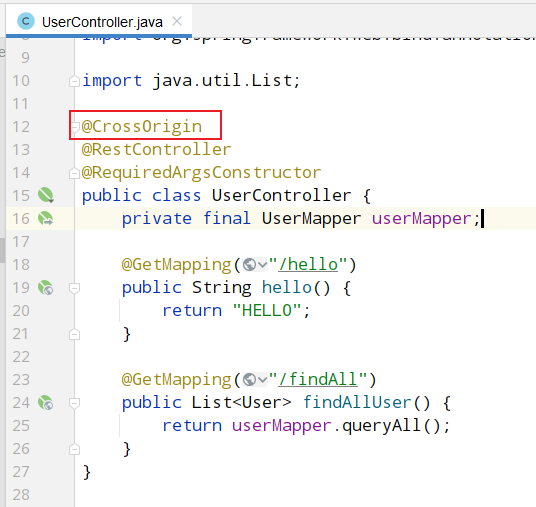
这是因为跨域了。跨域有很多种解决办法,这里我使用最简单的一种:后端代码controller类上加注解 @CrossOrigin 然后重启服务器。
刷新前端页面,没有报错并返回 HELLO

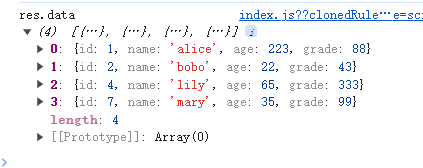
然后在前端页面中调用 /findAll 接口,成功返回数据。
  /**
     * 访问"查询所有信息"接口
     * 成功返回 所有信息json
     */
    testGetAllRecords() {
      const url = this.baseUrl + "/findAll";
      axios.get(url).then(res => {
        console.log('res.data', res.data);
      }).catch(err => {
        console.log('err', err);
      })
    }
五、编写、测试post接口
在mapper中编写插入、修改接口
package com.example.mydemo.mapper;

import com.example.mydemo.entity.User;
import org.apache.ibatis.annotations.Select;
import org.apache.ibatis.annotations.Update;
import org.springframework.transaction.annotation.Transactional;

import java.util.List;

public interface UserMapper {
    @Select("select * from user")
    List<User> queryAll();

    @Update("insert into user(name, age,grade) values(#{name}, #{age}, #{grade})")
    @Transactional
    void insertRecord(User user);

    @Update("update user set name=#{name}, age=#{age}, grade=#{grade} where id=#{id}")
    @Transactional
    void updateRecordById(User user);
}
在controller中调用mapper接口
package com.example.mydemo.controller;

import com.example.mydemo.entity.User;
import com.example.mydemo.mapper.UserMapper;
import lombok.RequiredArgsConstructor;
import org.springframework.web.bind.annotation.*;

import java.util.List;

@CrossOrigin
@RestController
@RequiredArgsConstructor
public class UserController {
    private final UserMapper userMapper;

    @GetMapping("/hello")
    public String hello() {
        return "HELLO";
    }

    @GetMapping("/findAll")
    public List<User> findAllUser() {
        return userMapper.queryAll();
    }

    @PostMapping("/insertRecord")
    public String insertUser(@RequestBody User user) {
        userMapper.insertRecord(user);
        return "插入数据成功!";
    }

    @PostMapping("/updateRecord")
    public String updateUser(@RequestBody User user) {
        userMapper.updateRecordById(user);
        return "更新数据成功!";
    }
}
重启服务器。因为浏览器不能模拟post请求,所以需要用postman进行post请求。
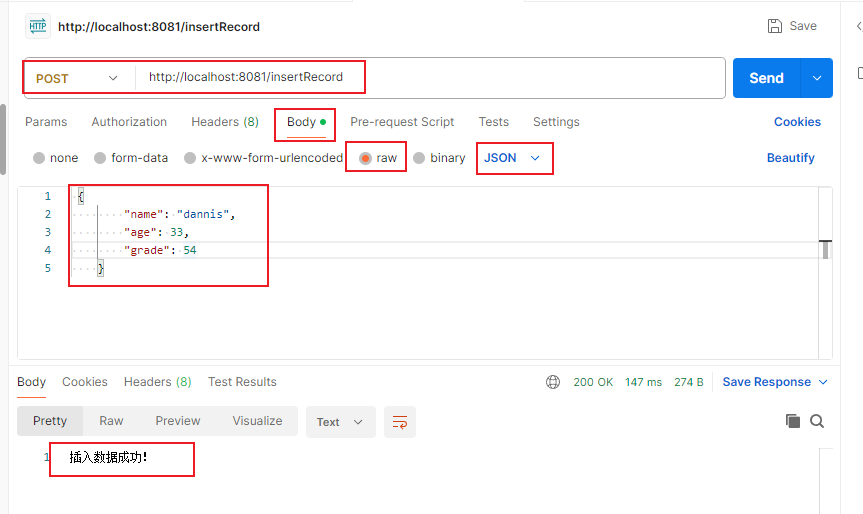
注意body类型,数据插入成功。
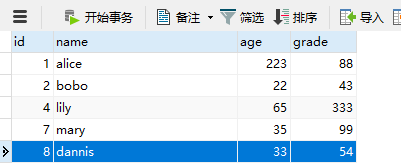
然后在前端测试插入数据。
    /**
     * 访问"插入数据"接口
     * 成功返回 “插入数据成功!”
     */
    testPostInsertRecord() {
      const url = this.baseUrl + "/insertRecord";
      const newRecord = {
        "name": "dannis",
        "age": 33,
        "grade": 54
      };

      axios({
        url: url,
        method: 'post',
        "content-type": "application/x-www-form-urlencoded",
        data: newRecord
      }).then((res) => {
        console.log("res.data:", res.data);
      }).catch((err) => {
        console.log("err:", err);
      });
    },
运行后插入成功。

刷新数据库又多了一条新数据
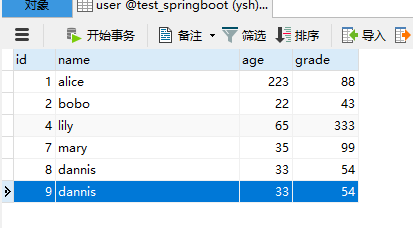
但此时插入的数据是写死的,为了能插入动态的数据,我们需要再前端页面增加输入框。
<template>
  <div class="hello">
    <h2>测试和 springboot 项目配合使用接口</h2>
    <div>
      <div class="input-box">
        <p>name:</p>
        <input v-model="userInfo.name" />
        <br>
        <p>age:</p>
        <input v-model="userInfo.age" />
        <br>
        <p>grade:</p>
        <input v-model="userInfo.grade" />
      </div>
      <button @click="testPostInsertRecord">插入数据</button>
    </div>
  </div>
</template>

<script>
import axios from "axios";

export default {
  name: 'HelloWorld',
  data() {
    return {
      baseUrl: "http://localhost:8081",
      userInfo: {
        name: "",
        age: null,
        grade: null
      }
    }
  },
  mounted() {
    // this.testPostInsertRecord();
  },
  methods: {
    /**
     * 访问测试接口
     * 成功返回 HELLO
     */
    testHello() {
      const url = this.baseUrl + "/hello";
      axios.get(url).then(res => {
        console.log('res.data', res.data);
      }).catch(err => {
        console.log('err', err);
      })
    },
    /**
     * 访问"查询所有信息"接口
     * 成功返回 所有信息json
     */
    testGetAllRecords() {
      const url = this.baseUrl + "/findAll";
      axios.get(url).then(res => {
        console.log('res.data', res.data);
      }).catch(err => {
        console.log('err', err);
      })
    },
    /**
     * 访问"插入数据"接口
     * 成功返回 “插入数据成功!”
     */
    testPostInsertRecord() {
      const url = this.baseUrl + "/insertRecord";
      // const newRecord = {
      //   "name": "dannis",
      //   "age": 33,
      //   "grade": 54
      // };

      axios({
        url: url,
        method: 'post',
        "content-type": "application/x-www-form-urlencoded",
        data: this.userInfo
      }).then((res) => {
        console.log("res.data:", res.data);
      }).catch((err) => {
        console.log("err:", err);
      });
    },
  }
}
</script>

<style scoped>
.input-box p {
  display: inline-block;
  width: 60px;
}
</style>
插入数据成功
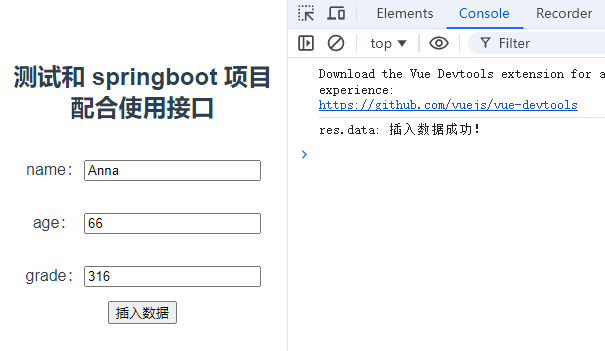
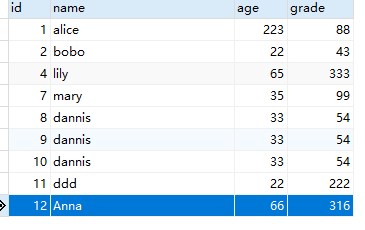
为了方便查看,在前端把查到的所有用户信息显示出来。
<template>
  <div class="hello">
    <h2>测试和 springboot 项目配合使用接口</h2>
    <div class="input-box">
      <p>name:</p>
      <input v-model="userInfo.name" />
      <br>
      <p>age:</p>
      <input v-model="userInfo.age" />
      <br>
      <p>grade:</p>
      <input v-model="userInfo.grade" />
    </div>
    <button @click="testPostInsertRecord">插入数据</button>

    <table cellspacing="10">
      <tr>
        <th>id</th>
        <th>name</th>
        <th>age</th>
        <th>grade</th>
      </tr>
      <tr v-for="record in allRecords" :key="record.id">
        <td>{{ record.id }}</td>
        <td>{{ record.name }}</td>
        <td>{{ record.age }}</td>
        <td>{{ record.grade }}</td>
      </tr>
    </table>
  </div>
</template>

<script>
import axios from "axios";

export default {
  name: 'HelloWorld',
  data() {
    return {
      baseUrl: "http://localhost:8081",
      allRecords: [],
      userInfo: {
        name: "",
        age: null,
        grade: null
      }
    }
  },
  mounted() {
    this.testGetAllRecords();
  },
  methods: {
    /**
     * 访问测试接口
     * 成功返回 HELLO
     */
    testHello() {
      const url = this.baseUrl + "/hello";
      axios.get(url).then(res => {
        console.log('res.data', res.data);
      }).catch(err => {
        console.log('err', err);
      })
    },
    /**
     * 访问"查询所有信息"接口
     * 成功返回 所有信息json
     */
    testGetAllRecords() {
      const url = this.baseUrl + "/findAll";
      axios.get(url).then(res => {
        console.log('res.data', res.data);

        this.allRecords = res.data;
      }).catch(err => {
        console.log('err', err);
      })
    },
    /**
     * 访问"插入数据"接口
     * 成功返回 “插入数据成功!”
     */
    testPostInsertRecord() {
      const url = this.baseUrl + "/insertRecord";
      axios({
        url: url,
        method: 'post',
        "content-type": "application/x-www-form-urlencoded",
        data: this.userInfo
      }).then((res) => {
        console.log("res.data:", res.data);
        // 插入成功后刷新数据
        this.testGetAllRecords();
      }).catch((err) => {
        console.log("err:", err);
      });
    },
  }
}
</script>

<style scoped>
.input-box p {
  display: inline-block;
  width: 60px;
}

table {
  background-color: aqua;
  margin: 20px auto;

}
</style>
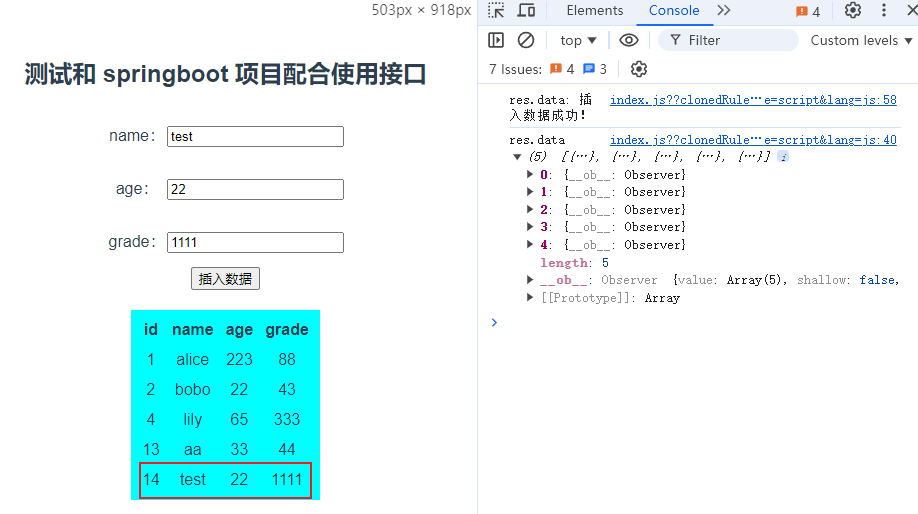
插入成功后自动刷新结果
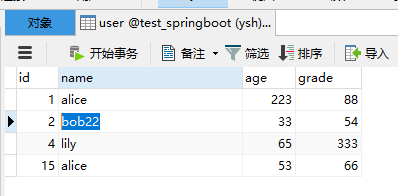
更新、删除以此类推

六、全部代码
全部代码如下(点击展开):
后端代码:
pom.xml

<?xml version="1.0" encoding="UTF-8"?>
<project xmlns="http://maven.apache.org/POM/4.0.0" xmlns:xsi="http://www.w3.org/2001/XMLSchema-instance"
         xsi:schemaLocation="http://maven.apache.org/POM/4.0.0 https://maven.apache.org/xsd/maven-4.0.0.xsd">
    <modelVersion>4.0.0</modelVersion>
    <parent>
        <groupId>org.springframework.boot</groupId>
        <artifactId>spring-boot-starter-parent</artifactId>
        <version>3.3.2</version>
        <relativePath/> <!-- lookup parent from repository -->
    </parent>
    <groupId>com.example</groupId>
    <artifactId>CRUD</artifactId>
    <version>0.0.1-SNAPSHOT</version>
    <name>CRUD</name>
    <description>CRUD</description>
    <url/>
    <licenses>
        <license/>
    </licenses>
    <developers>
        <developer/>
    </developers>
    <scm>
        <connection/>
        <developerConnection/>
        <tag/>
        <url/>
    </scm>
    <properties>
        <java.version>17</java.version>
    </properties>
    <dependencies>
        <dependency>
            <groupId>org.springframework.boot</groupId>
            <artifactId>spring-boot-starter-web</artifactId>
        </dependency>
        <dependency>
            <groupId>org.mybatis.spring.boot</groupId>
            <artifactId>mybatis-spring-boot-starter</artifactId>
            <version>3.0.3</version>
        </dependency>

        <dependency>
            <groupId>com.mysql</groupId>
            <artifactId>mysql-connector-j</artifactId>
            <scope>runtime</scope>
        </dependency>
        <dependency>
            <groupId>org.projectlombok</groupId>
            <artifactId>lombok</artifactId>
            <optional>true</optional>
        </dependency>
        <dependency>
            <groupId>org.springframework.boot</groupId>
            <artifactId>spring-boot-starter-test</artifactId>
            <scope>test</scope>
        </dependency>
        <dependency>
            <groupId>org.mybatis.spring.boot</groupId>
            <artifactId>mybatis-spring-boot-starter-test</artifactId>
            <version>3.0.3</version>
            <scope>test</scope>
        </dependency>

        <!-- 运行单元测试需要的依赖 -->
        <dependency>
            <groupId>junit</groupId>
            <artifactId>junit</artifactId>
            <version>4.12</version>
            <scope>test</scope>
        </dependency>
    </dependencies>

    <build>
        <plugins>
            <plugin>
                <groupId>org.springframework.boot</groupId>
                <artifactId>spring-boot-maven-plugin</artifactId>
                <configuration>
                    <excludes>
                        <exclude>
                            <groupId>org.projectlombok</groupId>
                            <artifactId>lombok</artifactId>
                        </exclude>
                    </excludes>
                </configuration>
            </plugin>
        </plugins>
    </build>

</project>
UserController.java

package com.example.mydemo.controller;

import com.example.mydemo.entity.User;
import com.example.mydemo.mapper.UserMapper;
import lombok.RequiredArgsConstructor;
import org.springframework.web.bind.annotation.*;

import java.util.List;

@CrossOrigin
@RestController
@RequiredArgsConstructor
public class UserController {
    private final UserMapper userMapper;

    @GetMapping("/hello")
    public String hello() {
        return "HELLO";
    }

    @GetMapping("/findAll")
    public List<User> findAllUser() {
        return userMapper.queryAll();
    }

    @PostMapping("/insertRecord")
    public String insertUser(@RequestBody User user) {
        userMapper.insertRecord(user);
        return "插入数据成功!";
    }

    @PostMapping("/updateRecord")
    public String updateUser(@RequestBody User user) {
        userMapper.updateRecordById(user);
        return "更新数据成功!";
    }

    @DeleteMapping("/deleteRecord/{id}")
    public String deleteUser(@PathVariable int id) {
        userMapper.delRecordById(id);
        return "删除数据成功!";
    }
}
UserMapper.java

package com.example.mydemo.mapper;

import com.example.mydemo.entity.User;
import org.apache.ibatis.annotations.Delete;
import org.apache.ibatis.annotations.Select;
import org.apache.ibatis.annotations.Update;
import org.springframework.transaction.annotation.Transactional;

import java.util.List;

public interface UserMapper {
    @Select("select * from user")
    List<User> queryAll();

    @Update("insert into user(name, age,grade) values(#{name}, #{age}, #{grade})")
    @Transactional
    void insertRecord(User user);

    @Update("update user set name=#{name}, age=#{age}, grade=#{grade} where id=#{id}")
    @Transactional
    void updateRecordById(User user);

    @Delete("delete from user where id=#{id}")
    @Transactional
    void delRecordById(int id);
}
User.java

package com.example.mydemo.entity;

import lombok.Data;

@Data
public class User {
    private int id;
    private String name;
    private int age;
    private int grade;
}
MydemoApplication.java

package com.example.mydemo;

import org.mybatis.spring.annotation.MapperScan;
import org.springframework.boot.SpringApplication;
import org.springframework.boot.autoconfigure.SpringBootApplication;

@SpringBootApplication
@MapperScan("com.example.mydemo.mapper")
public class MydemoApplication {

    public static void main(String[] args) {
        SpringApplication.run(MydemoApplication.class, args);
    }

}
application.properties

spring.application.name=mydemo
server.port=8081

spring.datasource.url=jdbc:mysql://localhost:3306/test_springboot?useSSL=false&useUnicode=true&characterEncoding=utf-8
spring.datasource.username=root
spring.datasource.password=1234
spring.datasource.driverClassName = com.mysql.cj.jdbc.Driver
前端代码
HelloWorld.vue

<template>
  <div class="hello">
    <h2>测试和 springboot 项目配合使用接口</h2>
    <div class="input-box">
      <p>name:</p>
      <input v-model="userInfo.name" />
      <br>
      <p>age:</p>
      <input v-model="userInfo.age" />
      <br>
      <p>grade:</p>
      <input v-model="userInfo.grade" />
    </div>
    <button @click="testPostInsertRecord">插入数据</button>
    <hr>

    <table cellspacing="10">
      <tr>
        <th>id</th>
        <th>name</th>
        <th>age</th>
        <th>grade</th>
        <th>操作</th>
      </tr>
      <tr v-for="record in allRecords" :key="record.id">
        <td>{{ record.id }}</td>
        <td>{{ record.name }}</td>
        <td>{{ record.age }}</td>
        <td>{{ record.grade }}</td>
        <td>
          <button @click="startUpdate(record)">更新</button>
          <button @click="testDelRecord(record)">删除</button>
        </td>
      </tr>
    </table>

    <div class="input-box" style="background-color: aquamarine;">
      <h4>在这里输入更新后的数据!</h4>
      <p>id:</p>
      <input v-model="updateRecord.id" disabled />
      <br>
      <p>name:</p>
      <input v-model="updateRecord.name" />
      <br>
      <p>age:</p>
      <input v-model="updateRecord.age" />
      <br>
      <p>grade:</p>
      <input v-model="updateRecord.grade" />
      <br>
      <button @click="testPostUpdateRecord()">确认更新</button>
    </div>
  </div>
</template>

<script>
import axios from "axios";

export default {
  name: 'HelloWorld',
  data() {
    return {
      baseUrl: "http://localhost:8081",
      allRecords: [],
      // 插入信息绑定的变量
      userInfo: {
        name: "",
        age: null,
        grade: null
      },
      // 更新信息绑定的变量
      updateRecord: {}
    }
  },
  mounted() {
    this.testGetAllRecords();
  },
  watch: {
    allRecords(newvalue, oldvalue) {
      console.log({ newvalue });
      console.log({ oldvalue });
    }
  },
  methods: {
    /**
     * 访问测试接口
     * 成功返回 HELLO
     */
    testHello() {
      const url = this.baseUrl + "/hello";
      axios.get(url).then(res => {
        console.log('res.data', res.data);
      }).catch(err => {
        console.log('err', err);
      })
    },
    /**
     * 访问"查询所有信息"接口
     * 成功返回 所有信息json
     */
    testGetAllRecords() {
      const url = this.baseUrl + "/findAll";
      axios.get(url).then(res => {
        console.log('res.data', res.data);

        this.allRecords = res.data;
      }).catch(err => {
        console.log('err', err);
      })
    },
    /**
     * 访问"插入数据"接口
     * 成功返回 “插入数据成功!”
     */
    testPostInsertRecord() {
      const url = this.baseUrl + "/insertRecord";
      axios({
        url: url,
        method: 'post',
        "content-type": "application/x-www-form-urlencoded",
        data: this.userInfo
      }).then((res) => {
        console.log("res.data:", res.data);
        // 插入成功后刷新数据
        this.testGetAllRecords();
      }).catch((err) => {
        console.log("err:", err);
      });
    },
    /**
     * 选中一行数据,准备进行更新
     */
    startUpdate(record) {
      this.updateRecord = record;
    },
    /**
     * 更新选中的记录
     */
    testPostUpdateRecord() {
      const url = this.baseUrl + "/updateRecord";

      axios({
        url: url,
        method: 'post',
        "content-type": "application/x-www-form-urlencoded",
        data: this.updateRecord
      }).then((res) => {
        console.log("res.data:", res.data);
        // this.testGetAllRecords();
      }).catch((err) => {
        console.log("err:", err);
      });
    },
    /**
     * 删除选中的记录
     */
    testDelRecord(record) {
      const url = this.baseUrl + "/deleteRecord/" + record.id;
      axios({
        url: url,
        method: 'delete',
      }).then((res) => {
        console.log("res.data:", res.data);
        this.testGetAllRecords();
      }).catch((err) => {
        console.log("err:", err);
      });
    }
  }
}
</script>

<style scoped>
.input-box p {
  display: inline-block;
  width: 60px;
}

table {
  background-color: aqua;
  margin: 20px auto;

}
</style>
七、 打包放到服务器上
前端项目运行 npm run build 生成dist文件夹
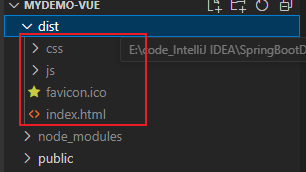
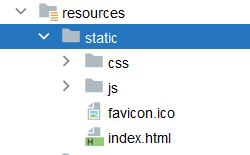
复制文件夹内容,粘贴到 src/main/resources/static 下
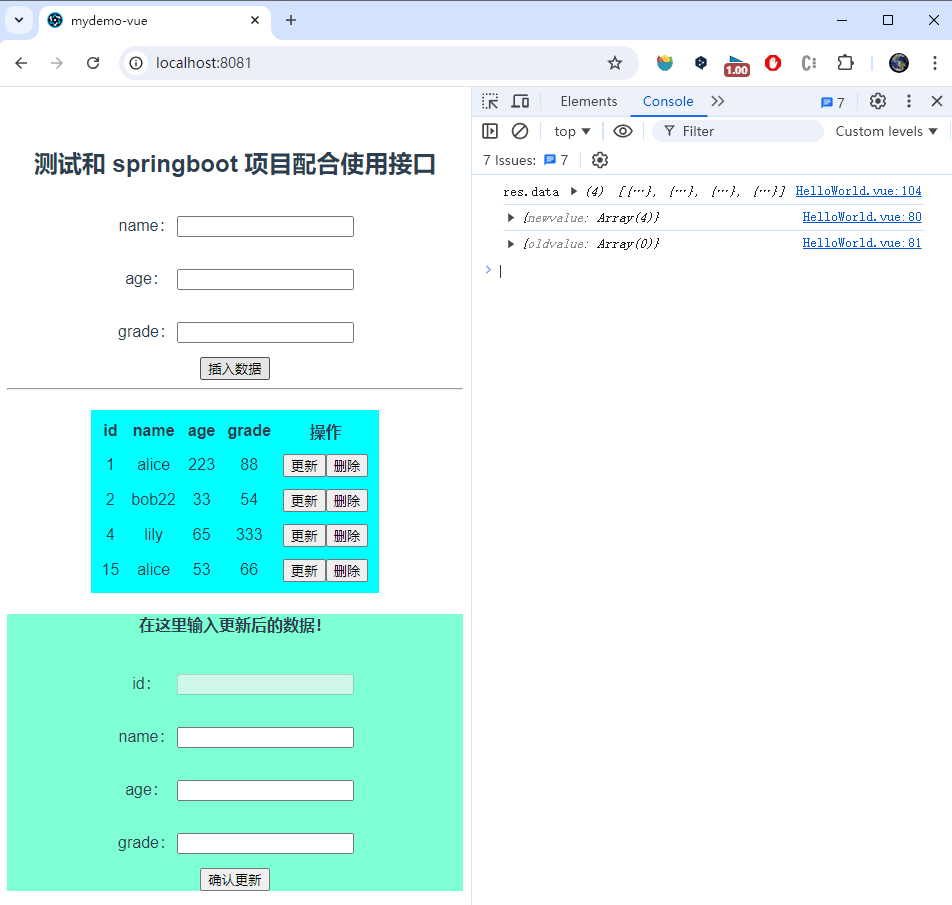
重启服务器,访问 http://localhost:8081/ 可以看到和前端项目一样的页面,并可以执行功能。


 浙公网安备 33010602011771号