uniapp 微信小程序使用新旧版本 canvas 对比、消除锯齿、处理重绘
微信小程序使用canvas时,分为旧版和新版。https://developers.weixin.qq.com/miniprogram/dev/component/canvas.html
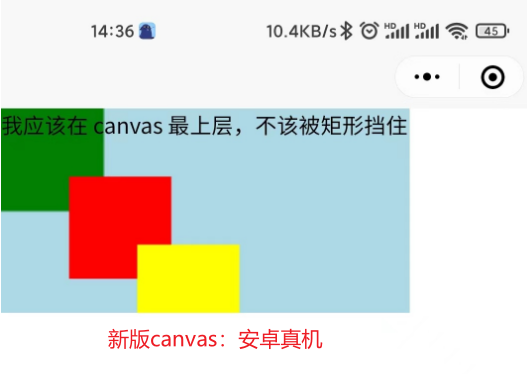
旧版:不支持同层渲染,使用canvas的图层总在最上层。模拟器可能表现正常,但真机的canvas图层一定在最上层,设置了 z-index 也无效。
新版:2.9.0 起支持一套新 Canvas 2D 接口(需指定 type 属性),同时支持同层渲染,原有接口不再维护。
注意1:因为内容较多,所以代码都折叠了,需要代码的小伙伴请注意。
注意2:canvas 涉及到的单位都是 px
旧版 canvas:

<template>
    <view id="app">
        <canvas canvas-id="myCanvas" />
        <view class="content">
            我应该在 canvas 最上层,不该被矩形挡住
        </view>
    </view>
</template>

<script>
    export default {
        data() {
            return {

            }
        },
        mounted() {
            this.drawCanvas();
        },
        methods: {
            /**
             * canvas 的单位都是 px
             * 默认尺寸 300px*150px
             * 先画的层级较低,后画的层级较高
             * 超出画布的部分不会显示
             * **/
            drawCanvas() {
                const ctx = wx.createCanvasContext('myCanvas');
                ctx.setStrokeStyle("rgba(0, 128, 0,1)");
                ctx.strokeRect(0, 0, 75, 75);
                ctx.setFillStyle("rgba(0, 128, 0,1)");
                ctx.fillRect(0, 0, 75, 75);

                ctx.setFillStyle("red");
                ctx.fillRect(50, 50, 75, 75);

                ctx.setFillStyle("yellow");
                ctx.fillRect(100, 100, 75, 75);

                ctx.draw(); //一定要调用 draw(),否则不能画出图形
            }
        }
    }
</script>

<style>
    #app {
        position: relative;
    }

    canvas {
        position: absolute;
        z-index: 0;
        background-color: lightblue;
    }

    .content {
        position: absolute;
        z-index: 1;
    }
</style>
旧版效果图:h5 和微信开发者工具正常显示,但是真机(安卓)上canvas 中画的矩形在最上层,挡住了文字。
解决办法:改成新版 canvas: https://developers.weixin.qq.com/miniprogram/dev/framework/ability/canvas-legacy-migration.html


新版canvas:
组件介绍:https://developers.weixin.qq.com/miniprogram/dev/framework/ability/canvas.html
api: https://developers.weixin.qq.com/miniprogram/dev/api/canvas/CanvasContext.arc.html

<template>
    <view id="app">
        <canvas id="myCanvas" type="2d" />
        <view class="content">我应该在 canvas 最上层,不该被矩形挡住</view>
    </view>
</template>

<script>
    export default {
        data() {
            return {

            }
        },
        mounted() {
            this.drawCanvas();
        },
        methods: {
            /**
             * canvas 的单位都是 px
             * 默认尺寸 300px*150px
             * 先画的层级较低,后画的层级较高
             * 超出画布的部分不会显示
             * **/
            drawCanvas() {
                wx.createSelectorQuery()
                    .select('#myCanvas') // 在 WXML 中填入的 id
                    .node(({
                        node: canvas
                    }) => {
                        const ctx = canvas.getContext('2d');

                        ctx.strokeStyle = "rgba(0, 128, 0,1)";
                        ctx.strokeRect(0, 0, 75, 75);
                        ctx.fillStyle = "rgba(0, 128, 0,1)";
                        ctx.fillRect(0, 0, 75, 75);

                        ctx.fillStyle = "red";// 设置的方式从 ctx.setFillStyle("red") 改成了 ctx.fillStyle = "red";
                        ctx.fillRect(50, 50, 75, 75);

                        ctx.fillStyle = "yellow";
                        ctx.fillRect(100, 100, 75, 75);

                        // ctx.draw(); //新版 canvas 不需要调用 draw()
                    })
                    .exec()
            }
        }
    }
</script>

<style>
    #app {
        position: relative;
    }

    canvas {
        position: absolute;
        z-index: 0;
        background-color: lightblue;
    }

    .content {
        position: absolute;
        z-index: 1;
    }
</style>
旧版效果图:微信开发者工具上canvas 中画的矩形在最上层,挡住了文字,但是真机(安卓)正常显示。
注意:
- 设置 strokeStyle 和 fillStyle 的方法都变了,从 ctx.setFillStyle("red") 改成了 ctx.fillStyle = "red"; 从 (“参数”)的形式改成了 “用 = 赋值” 的形式。其她类似的api如果使用时报错,都要修改为用=赋值的形式。
- 不需要再调用 ctx.draw() 了。
- 新版 canvas 的文档写的不好(微信文档和uniapp文档写的都不好),有很多问题需要查看社区提问的回答,比如 创建'2d'canvas出现Cannot read 'node' of null的问题?


新版canvas绘制消除锯齿:
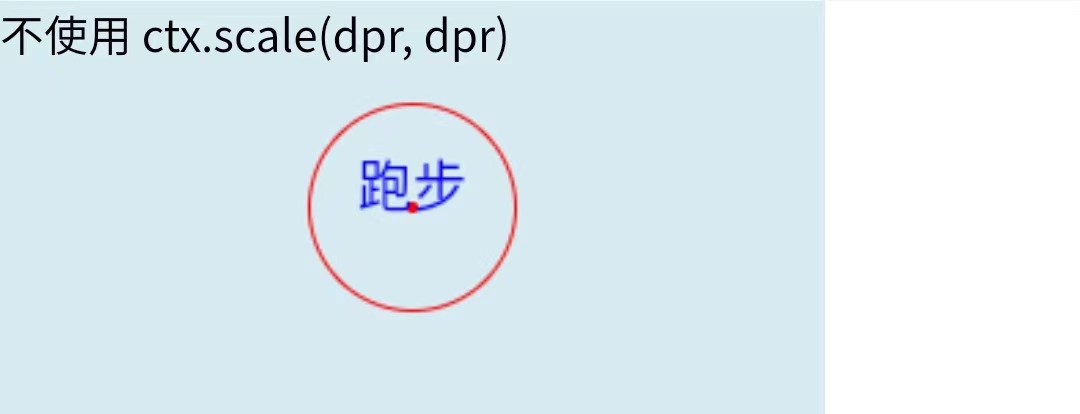
- 不同的设备上,存在物理像素和逻辑像素不相等的情况,所以一般我们需要用 wx.getWindowInfo 获取设备的像素比,乘上 canvas 的渲染大小,作为画布的逻辑大小。
- wx.getWindowInfo()
- canvas.width、canvas.height 和 css 中width、height属性区别可以看:https://segmentfault.com/a/1190000020189168
不使用 ctx.scale(dpr, dpr) 代码:

<template>
    <view id="app">
        <canvas type="2d" id="canvasCircle" :style="{ width: styleWidth + 'px', height: styleHeight + 'px'}">
        </canvas>
        <view class="content">不使用 ctx.scale(dpr, dpr) </view>
    </view>
</template>

<script>
    export default {
        data() {
            return {
                canvasWidth: 300, //画布尺寸px
                canvasHeight: 150, //画布尺寸 px
                styleWidth: 300, //画板尺寸 px
                styleHeight: 150, //画板尺寸 px
                defaultCanvasW: 300,
                defaultCanvasH: 150,
            };
        },
        mounted() {
            this.setCanvasSize();
            this.drawCircle();
        },
        methods: {
            /**
             * 如何正确设置canvas尺寸,以及如何在高分辨率屏幕上清晰显示canvas图形 :
             *         -- https://segmentfault.com/a/1190000020189168
             * */
            setCanvasSize() {

            },
            drawCircle() {
                let radius = this.canvasHeight / 4;
                let pointO = {
                    x: this.canvasWidth / 2,
                    y: this.canvasHeight / 2
                };
                wx.createSelectorQuery()
                    .in(this)
                    .select('#canvasCircle')
                    .fields({
                        node: true,
                        size: true
                    })
                    .exec((res) => {
                        const canvas = res[0].node
                        const ctx = canvas.getContext('2d');

                        // // Canvas 画布的实际绘制宽高
                        // const width = res[0].width; //画布尺寸 300
                        // const height = res[0].height; //画布尺寸 150
                        // // 初始化画布大小
                        // const dpr = wx.getWindowInfo().pixelRatio;
                        // console.log({dpr});
                        // canvas.width = width * dpr;//设置画布尺寸
                        // canvas.height = height * dpr;//设置画布尺寸
                        // ctx.scale(dpr, dpr);//必须有

                        drawCircle(ctx);
                        drawText(ctx);
                    })

                function drawCircle(ctx) {
                    // 画圆心
                    ctx.beginPath();
                    ctx.arc(pointO.x, pointO.y, 2, 0, 2 * Math.PI);
                    ctx.fillStyle = "red";
                    ctx.fill();

                    // 画圆
                    ctx.beginPath();
                    ctx.arc(pointO.x, pointO.y, radius, 0, 2 * Math.PI);
                    ctx.strokeStyle = "red";
                    ctx.stroke();
                }

                function drawText(ctx) {
                    ctx.fillStyle = 'blue';
                    ctx.font = "20px Verdana";
                    ctx.textAlign = 'center';
                    ctx.translate(pointO.x, pointO.y); //对当前坐标系的原点(0, 0)进行变换,默认的坐标系原点为页面左上角。
                    ctx.fillText("跑步", 0, 0);
                }
            }
        }
    }
</script>

<style scoped>
    #app {
        position: relative;
    }

    canvas {
        position: absolute;
        z-index: 0;
        top: 0;
        left: 0;
        background-color: rgba(173, 216, 230, 0.5);
    }

    .content {
        position: absolute;
        z-index: 1;
        /* right: 0; */
    }
</style>
使用 ctx.scale(dpr, dpr) 代码:

<template>
    <view id="app">
        <canvas type="2d" id="canvasCircle" :style="{ width: styleWidth + 'px', height: styleHeight + 'px'}">
        </canvas>
        <view class="content">使用了 ctx.scale(dpr, dpr) </view>
    </view>
</template>

<script>
    export default {
        data() {
            return {
                canvasWidth: 300, //画布尺寸px
                canvasHeight: 150, //画布尺寸 px
                styleWidth: 300, //画板尺寸 px
                styleHeight: 150, //画板尺寸 px
                defaultCanvasW: 300,
                defaultCanvasH: 150,
            };
        },
        mounted() {
            this.setCanvasSize();
            this.drawCircle();
        },
        methods: {
            /**
             * 如何正确设置canvas尺寸,以及如何在高分辨率屏幕上清晰显示canvas图形 :
             *         -- https://segmentfault.com/a/1190000020189168
             * */
            setCanvasSize() {

            },
            drawCircle() {
                let radius = this.canvasHeight / 4;
                let pointO = {
                    x: this.canvasWidth / 2,
                    y: this.canvasHeight / 2
                };
                wx.createSelectorQuery()
                    .in(this)
                    .select('#canvasCircle')
                    .fields({
                        node: true,
                        size: true
                    })
                    .exec((res) => {
                        const canvas = res[0].node
                        const ctx = canvas.getContext('2d');

                        // Canvas 画布的实际绘制宽高
                        const width = res[0].width; //画布尺寸 300
                        const height = res[0].height; //画布尺寸 150
                        // 初始化画布大小
                        const dpr = wx.getWindowInfo().pixelRatio;
                        console.log({dpr});
                        canvas.width = width * dpr; //设置画布尺寸
                        canvas.height = height * dpr; //设置画布尺寸
                        ctx.scale(dpr, dpr); //必须有

                        drawCircle(ctx);
                        drawText(ctx);
                    })

                function drawCircle(ctx) {
                    // 画圆心
                    ctx.beginPath();
                    ctx.arc(pointO.x, pointO.y, 2, 0, 2 * Math.PI);
                    ctx.fillStyle = "red";
                    ctx.fill();

                    // 画圆
                    ctx.beginPath();
                    ctx.arc(pointO.x, pointO.y, radius, 0, 2 * Math.PI);
                    ctx.strokeStyle = "red";
                    ctx.stroke();
                }

                function drawText(ctx) {
                    ctx.fillStyle = 'blue';
                    ctx.font = "20px Verdana";
                    ctx.textAlign = 'center';
                    ctx.translate(pointO.x, pointO.y); //对当前坐标系的原点(0, 0)进行变换,默认的坐标系原点为页面左上角。
                    ctx.fillText("跑步", 0, 0);
                }
            }
        }
    }
</script>

<style scoped>
    #app {
        position: relative;
    }

    canvas {
        position: absolute;
        z-index: 0;
        top: 0;
        left: 0;
        background-color: rgba(173, 216, 230, 0.5);
    }

    .content {
        position: absolute;
        z-index: 1;
        /* right: 0; */
    }
</style>
效果图对比:


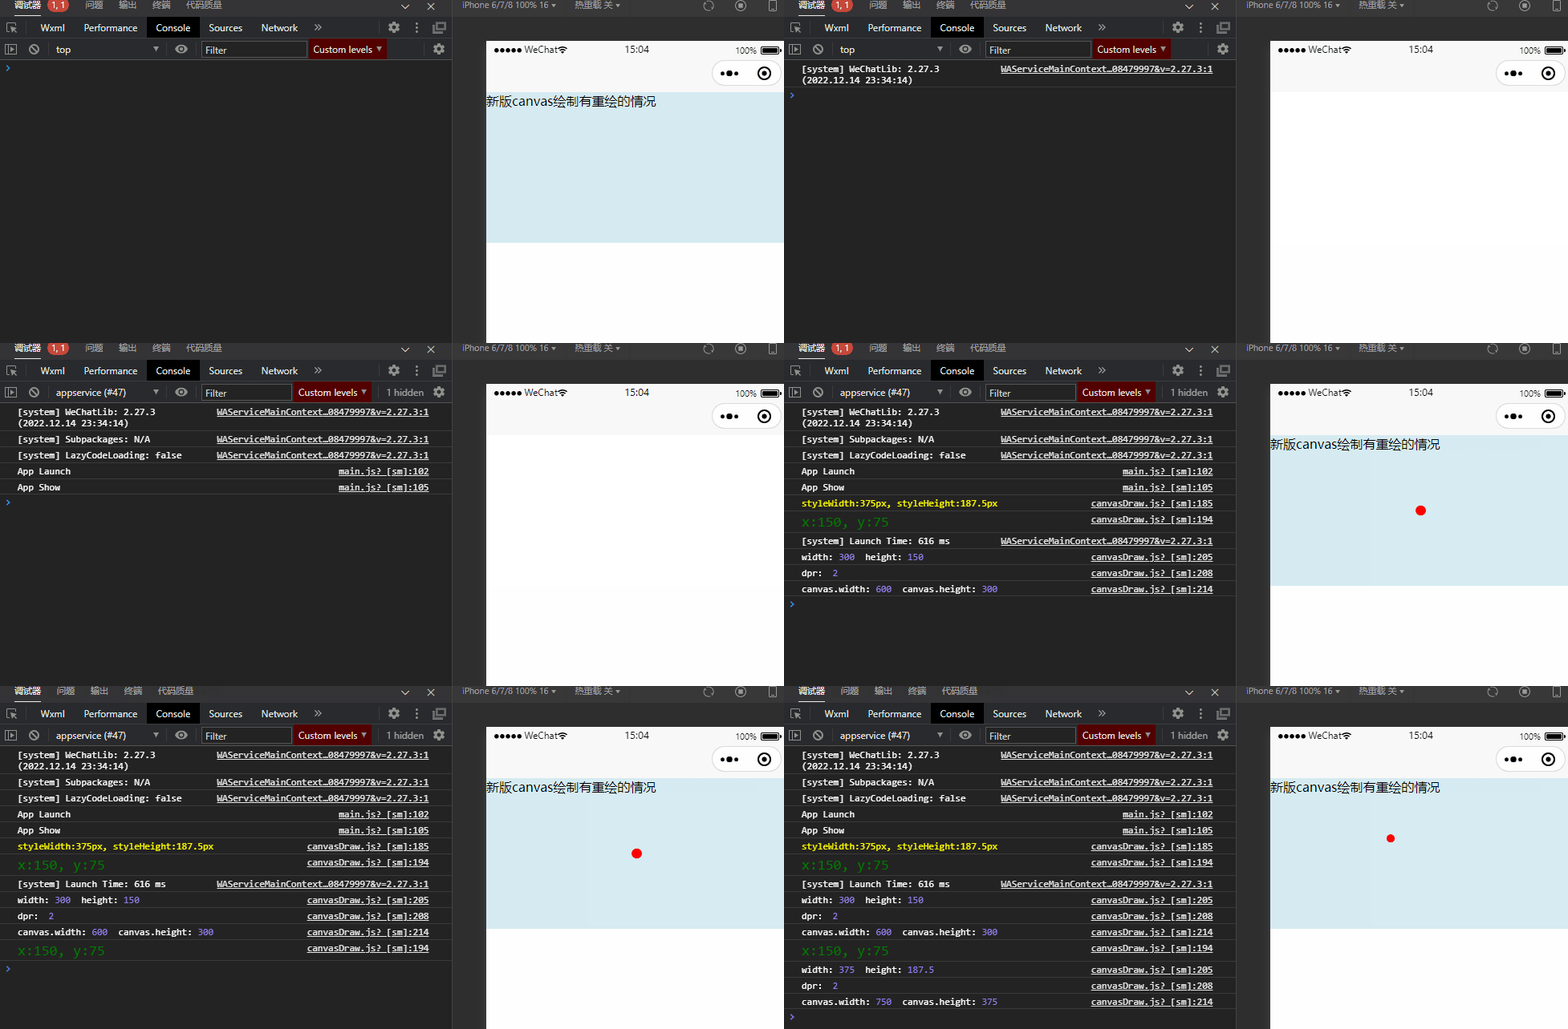
新版canvas绘制有重绘的情况:
- 点的坐标要用 canvasWidth 确定,而不是 styleWidth
- 如果有重绘的话, res[0].width 会变,所以用 canvas.width = this.defaultCanvasW * dpr; 而不是 canvas.width = width * dpr;
- console.log(`%cx:${pointO.x}, y:${pointO.y}`, "color:green;font-size:large"); // %c 是改变 console.log 样式的。
- 设置画布尺寸代码为: canvas.width = this.defaultCanvasW * dpr; canvas.height = this.defaultCanvasH * dpr;

<template>
    <view id="app">
        <canvas type="2d" id="canvasCircle" :style="{ width: styleWidth + 'px', height: styleHeight + 'px'}">
        </canvas>
        <view class="content">新版canvas绘制有重绘的情况</view>
    </view>
</template>

<script>
    export default {
        data() {
            return {
                canvasWidth: 300, //画布尺寸px
                canvasHeight: 150, //画布尺寸 px
                styleWidth: 300, //画板尺寸 px
                styleHeight: 150, //画板尺寸 px
                defaultCanvasW: 300,
                defaultCanvasH: 150,
            };
        },
        mounted() {
            this.setCanvasStyleSize();
            this.drawCircle();
            setTimeout(() => {
                this.drawCircle();
            }, 2000)
        },
        methods: {
            /**
             * 如何正确设置canvas尺寸,以及如何在高分辨率屏幕上清晰显示canvas图形 :
             *         -- https://segmentfault.com/a/1190000020189168
             * */
            setCanvasStyleSize() {
                let windowInfo = uni.getWindowInfo();
                let ratio = windowInfo.windowWidth / 300; //计算屏幕宽度和 canvas 默认尺寸的比例
                this.styleWidth = windowInfo.windowWidth;
                this.styleHeight *= ratio;
                console.log(`%cstyleWidth:${this.styleWidth}px, styleHeight:${this.styleHeight}px`, "color:yellow");
            },
            drawCircle() {
                // 点的坐标要用 canvasWidth 确定,而不是 styleWidth
                // 如果有重绘的话,canvas.width 会变,而点的坐标固定的和300*150比较,所以点的坐标最好另存一个变量
                let pointO = {
                    x: this.defaultCanvasW / 2,
                    y: this.defaultCanvasH / 2
                };
                console.log(`%cx:${pointO.x}, y:${pointO.y}`, "color:green;font-size:large");

                wx.createSelectorQuery()
                    .in(this)
                    .select('#canvasCircle')
                    .fields({
                        node: true,
                        size: true
                    })
                    .exec((res) => {
                        const canvas = res[0].node;
                        const ctx = canvas.getContext('2d');

                        // Canvas 画布的实际绘制宽高
                        const width = res[0].width; //画布尺寸 300
                        const height = res[0].height; //画布尺寸 150
                        console.log("width:", width, " height:", height);
                        // 初始化画布大小
                        const dpr = wx.getWindowInfo().pixelRatio;
                        console.log("dpr:", dpr);
                        canvas.width = this.defaultCanvasW * dpr; //设置画布尺寸
                        canvas.height = this.defaultCanvasH * dpr; //设置画布尺寸
                        ctx.scale(dpr, dpr);
                        console.log("canvas.width:", canvas.width, " canvas.height:", canvas.height);

                        drawCircle(ctx);//一定要放在 ctx.scale(dpr, dpr); 之后,
                    })

                function drawCircle(ctx) {
                    // 画圆心
                    ctx.beginPath();
                    ctx.arc(pointO.x, pointO.y, 5, 0, 2 * Math.PI);
                    ctx.fillStyle = "red";
                    ctx.fill();
                }
            }
        }
    }
</script>

<style scoped>
    #app {
        position: relative;
    }

    canvas {
        position: absolute;
        z-index: 0;
        top: 0;
        left: 0;
        background-color: rgba(173, 216, 230, 0.5);
    }

    .content {
        position: absolute;
        z-index: 1;
        /* right: 0; */
    }
</style>
运行效果:


如果设置画布尺寸仍用 canvas.width = width * dpr; 则重绘的时候结果如下:
const canvas = res[0].node;
const ctx = canvas.getContext('2d');

// Canvas 画布的实际绘制宽高
const width = res[0].width; //画布尺寸 300
const height = res[0].height; //画布尺寸 150
console.log("width:", width, " height:", height);
// 初始化画布大小
const dpr = wx.getWindowInfo().pixelRatio;
console.log("dpr:", dpr);
// canvas.width = this.defaultCanvasW * dpr; //设置画布尺寸
// canvas.height = this.defaultCanvasH * dpr; //设置画布尺寸
canvas.width = width * dpr;
canvas.height = height * dpr;
ctx.scale(dpr, dpr);
console.log("canvas.width:", canvas.width, " canvas.height:", canvas.height);

drawCircle(ctx);//一定要放在 ctx.scale(dpr, dpr); 之后,


 浙公网安备 33010602011771号