一文讲清楚win10中关于vmware,virtualbox,hyper-v,wsl,docker等虚拟化技术共存和嵌套虚拟化的问题
虚拟机共存问题与解决
win10中关于vmware,virtualbox,hyper-v,wsl,docker等虚拟化技术共存和嵌套虚拟化的问题
这里的wsl指的是wsl2,docker指的是基于wsl2的docker,wsl1不再讨论范围之内。
先说结论,最新版(截止日期2022-9-23)的vmware,virtualbox,可以和wsl,docker,hyper-v共存,这也是默认的情况。这种情况在于使用了基于虚拟化安全技术技术 基于虚拟化的安全(简称 VBS)使用硬件虚拟化功能来创建内存的安全区域,并将其与常规操作系统隔离开来。
详细信息参考微软官网:
https://learn.microsoft.com/zh-cn/windows-hardware/design/device-experiences/oem-vbs
但这里面有个小问题,那就是vmware和virtualbox的嵌套虚拟化不能使用,这里以vmware官方文档举例,virtualbox应该也一样。
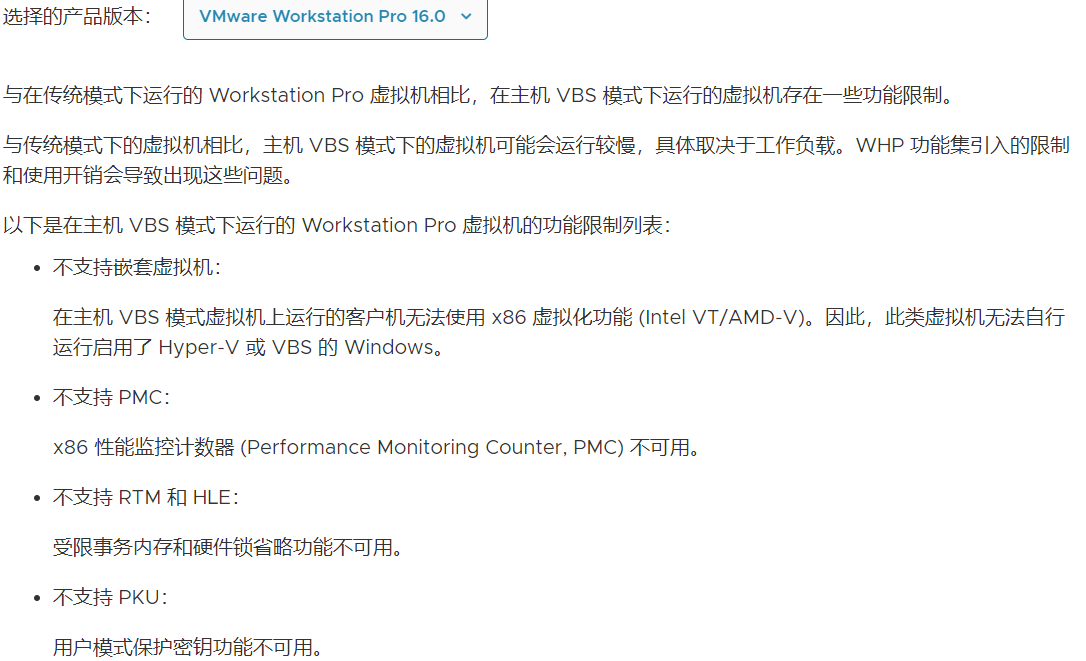
参考网址:
https://docs.vmware.com/cn/VMware-Workstation-Pro/16.0/com.vmware.ws.using.doc/GUID-778DD0ED-6FC9-415F-B071-0CEC127BE719.html
所以结论是存在2中情况:
1)打开基于虚拟化的安全,vmware, virtualbox,wsl,hyper-v,docker可以共存。但是vmware和virtualbox不支持嵌套虚拟化。通过如下命令开启基于虚拟化的安全(假设你其他条件都具备),并重启。
bcdedit /set hypervisorlaunchtype Auto
2)关闭基于虚拟化的安全,vmware和virtualbox支持嵌套虚拟化,性能也会有些提升。但是wsl2,hyper-v,以及基于wsl2的docker无法使用。方法如下,重启后生效。
bcdedit /set hypervisorlaunchtype off
那么对于1,怎么使用嵌套虚拟化呢?有两种解决方案:
1)通过hyper-v来新建虚拟机,使用嵌套虚拟化。
2)wsl2默认支持嵌套虚拟化,需要win11以上。
具体如何设置,参考下文。
vmware,virtualbox等虚拟化软件开启嵌套虚拟化。
在最新版的vmware和virtualbox中,可以和wsl2共存。但是这样一来vmware和virtualbox就都不能支持嵌套虚拟化了。想要让他们支持嵌套虚拟化,则需要临时禁用wsl2,最简单的方法是禁用虚拟机监控程序,如下:
bcdedit /set hypervisorlaunchtype off
然后重启,即可。
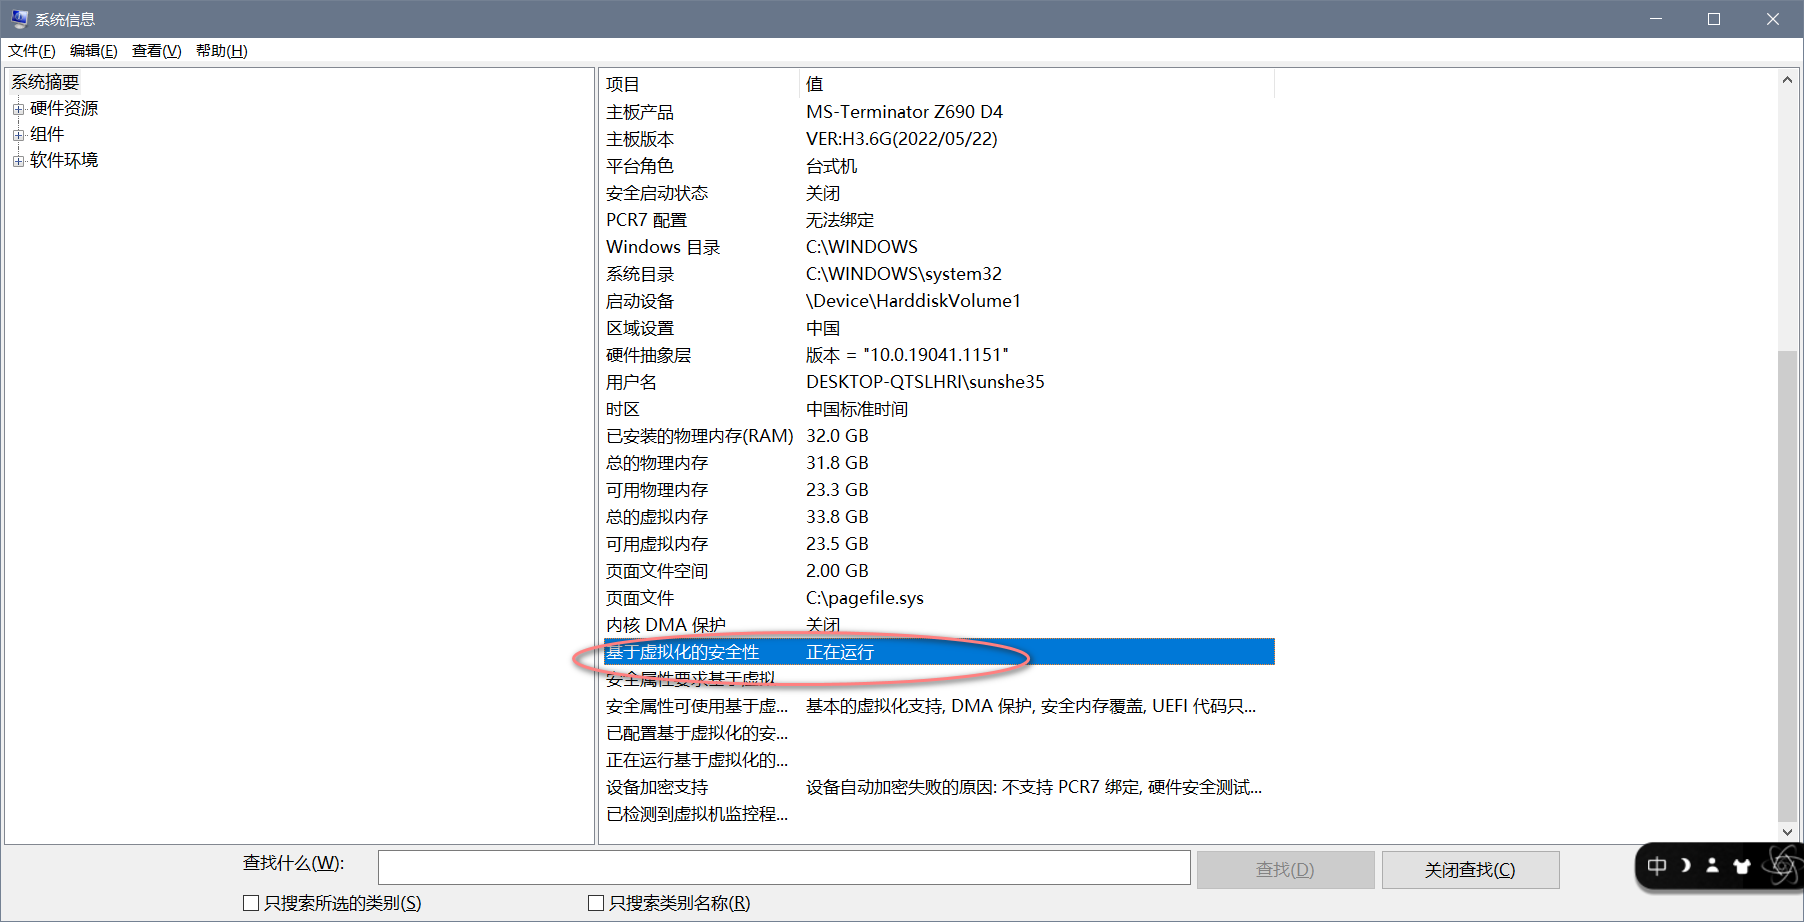
重启后,确保下图中基于虚拟化的安全已经关闭(打开方式:msinfo32.exe)。
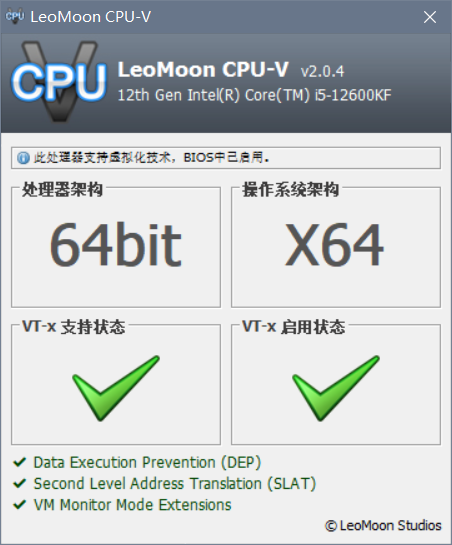
如果关闭了基于虚拟化的安全,这时候打开cpu-v,就会显示支持嵌套虚拟化了(vt-t启用状态是可用的)。
这时候打开vmware,开启嵌套虚拟化功能,打开虚拟机。
发现虚拟机已经支持嵌套虚拟化。
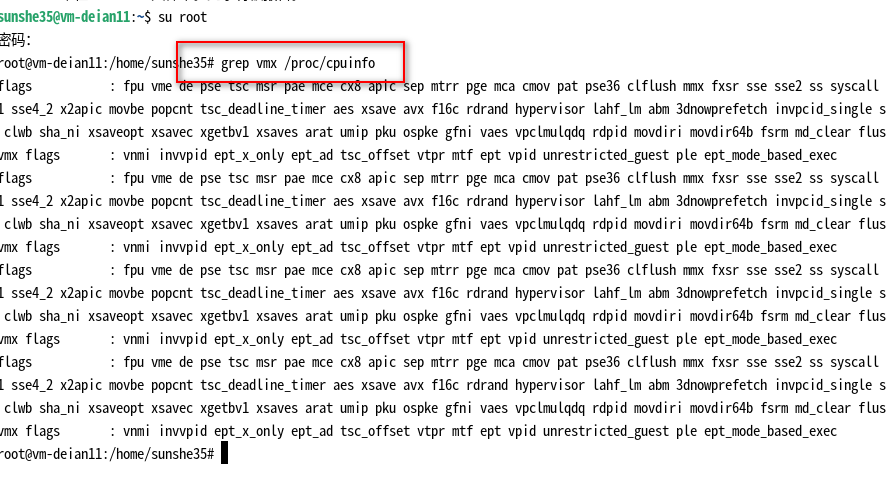
嵌套虚拟化的好处是可以在虚拟机里面安装虚拟机,比如,在docker里面安装安卓。
总结是开启wsl2之后就无法使用vmware或virtualbox的嵌套虚拟化了,自己需要取舍。
基于hyper-v的虚拟机开启嵌套虚拟化。
之前说开启wsl2之后vmware和virtualbox不能开启嵌套虚拟化,这时候我们可以通过hyper-v开启嵌套虚拟化。
需要打开hyper-v,并创建虚拟机。
我们这里创建了名为hyper-debian10的虚拟机。
PS C:\Users\sunshe35> get-vm

Name           State CPUUsage(%) MemoryAssigned(M) Uptime   Status   Version
----           ----- ----------- ----------------- ------   ------   -------
hyper-debian10 Off   0           0                 00:00:00 正常运行 9.0
完了之后,要关机。然后通过如下命令对hyper-debian10开启嵌套虚拟化(true是开启,false是关闭)。
Set-VMProcessor -VMName hyper-debian10 -ExposeVirtualizationExtensions $true
之后启动虚拟机,这时候虚拟机的嵌套虚拟化就可以使用了,这里不再截图。
对wsl2开启嵌套虚拟化。
可以配置文件%UserProfile%/.wslconfig,通过 nestedVirtualization=true 选项开启嵌套虚拟化,但是这项技术仅仅适用于win10以上。这里放弃,要用嵌套虚拟化还是使用hyper-v虚拟机吧。参考官方网址:
https://learn.microsoft.com/zh-cn/windows/wsl/wsl-config
WSL 的安装与配置
0-安装
安装一路默认next。
1-更新镜像
使用如下命令自动替换默认镜像为清华,下载速度更快:
sudo sed -i "s@http://.*archive.ubuntu.com@https://mirrors.tuna.tsinghua.edu.cn@g" /etc/apt/sources.list
sudo sed -i "s@http://.*security.ubuntu.com@https://mirrors.tuna.tsinghua.edu.cn@g" /etc/apt/sources.list
也可以手动替换,请自行修改 /etc/apt/sources.list 文件进行替换,最好做好备份
# 默认注释了源码镜像以提高 apt update 速度,如有需要可自行取消注释
deb https://mirrors.tuna.tsinghua.edu.cn/ubuntu/ jammy main restricted universe multiverse
# deb-src https://mirrors.tuna.tsinghua.edu.cn/ubuntu/ jammy main restricted universe multiverse
deb https://mirrors.tuna.tsinghua.edu.cn/ubuntu/ jammy-updates main restricted universe multiverse
# deb-src https://mirrors.tuna.tsinghua.edu.cn/ubuntu/ jammy-updates main restricted universe multiverse
deb https://mirrors.tuna.tsinghua.edu.cn/ubuntu/ jammy-backports main restricted universe multiverse
# deb-src https://mirrors.tuna.tsinghua.edu.cn/ubuntu/ jammy-backports main restricted universe multiverse
deb https://mirrors.tuna.tsinghua.edu.cn/ubuntu/ jammy-security main restricted universe multiverse
# deb-src https://mirrors.tuna.tsinghua.edu.cn/ubuntu/ jammy-security main restricted universe multiverse

# 预发布软件源,不建议启用
# deb https://mirrors.tuna.tsinghua.edu.cn/ubuntu/ jammy-proposed main restricted universe multiverse
# deb-src https://mirrors.tuna.tsinghua.edu.cn/ubuntu/ jammy-proposed main restricted universe multiverse
2-更新系统
sudo apt update
sudo apt upgrade
若出现错误:
Failed to retrieve available kernel versions.
Failed to check for processor microcode upgrades.
这个报错是neetrestart模块的输出信息,留着也不会有什么影响,可以不用处理,如果想处理的话参考如下:
那么可以通过修改 needrestart 的配置去消去这类报错1:
sudo -e /etc/needrestart/needrestart.conf
在配置文件中找到 kernelhints 和 ucodehints 这两行,取消注释并将值改成 0:
$nrconf{kernelhints} = 0;
$nrconf{ucodehints} = 0;
这样再使用 APT 时就不会有之前的报错了。
直接卸载此软件包也可以:
sudo apt purge needrestart
3-配置桌面环境
首先要安装xfce4模块
sudo apt install xfce4
然后需要修改~/.bashrc文件,主要是添加display的ip。
echo -e "\n##DISPLAY Configuration" >> ~/.bashrc
echo "export DISPLAY=$(cat /etc/resolv.conf | grep nameserver | awk '{print $2}'):0" >> ~/.bashrc
source ~/.bashrc #生效配置
上面前两行代码会在~/.bashrc文件末尾中添加如下内容:
##DISPLAY Configuration
export DISPLAY=172.23.192.1:0
第三行代码会让.bashrc文件立刻生效。
那这个ip 172.23.192.1 是怎么来的呢?在win10下cmd窗口中输入ipconfig就可以看到这个地址:
以太网适配器 vEthernet (WSL):

   连接特定的 DNS 后缀 . . . . . . . :
   本地链接 IPv6 地址. . . . . . . . : fe80::483b:963e:3d9b:341e%66
   IPv4 地址 . . . . . . . . . . . . : 172.23.192.1
   子网掩码  . . . . . . . . . . . . : 255.255.240.0
   默认网关. . . . . . . . . . . . . :
网上也有人在.bashrc文件末尾添加了 export LIBGL_ALWAYS_INDIRECT=1 ,我们这里不配置也不影响。
4-下载和安装VcXsrv软件
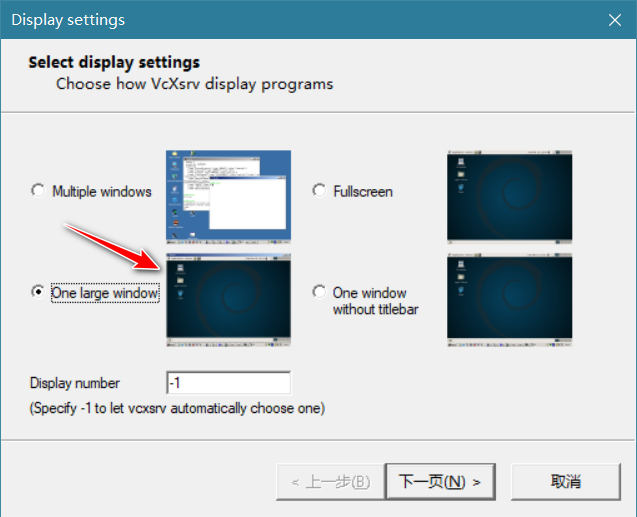
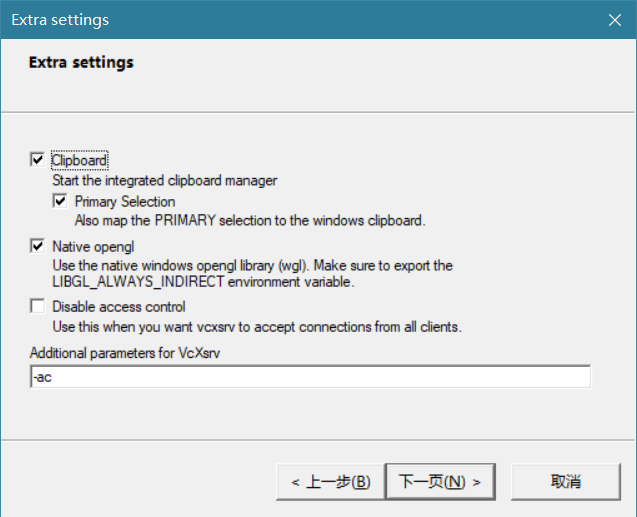
下载安装VcXsrv软件,有两点需要注意,见下图:
1、display setting选择的时候选择One large window:
2、额外选择添加参数-ac
也可以保存配置(在最后一步),方便后面直接连接。
5-连接wsl
1、通过上面的方式打开VcXsrv软件
2、进入ubuntu控制台,输入 startxfce4 ,然后等待连接即可。稍后就会在VcXsrv软件中看到linux。
最终效果见下图:

wsl2错误排查
如果想关闭,请把enable-feature换成disable-feature
启动 系统虚拟机平台
dism.exe /online /enable-feature /featurename:VirtualMachinePlatform /all /norestart
下载linux内核安装包:下载地址,这个不知道是否真的需要下载。
启用"适用于 Linux 的 Windows 子系统"这个功能
dism.exe /online /enable-feature /featurename:Microsoft-Windows-Subsystem-Linux /all /norestart
确保在启动配置中启用了虚拟机监控程序启动。 可以通过运行(提升的 PowerShell)来对此进行验证:
bcdedit /enum | findstr -i hypervisorlaunchtype
如果看到 hypervisorlaunchtype Off ,则会禁用虚拟机监控程序。 使其在提升的 PowerShell 中运行:
bcdedit /set hypervisorlaunchtype Auto
设置wsl版本为2
wsl --set-default-version 2
其他命令
# 开启telnet功能
dism.exe /online /enable-feature /featurename:TelnetClient /all /norestart

# 开启smb服务, 这种方式会自动开启SMB1Protocol-Client和SMB1Protocol-Server服务。
dism.exe /online /enable-feature /featurename:SMB1Protocol /all /norestart

# 开启hyper
dism.exe /online /enable-feature /featurename:Microsoft-Hyper-V /all /norestart


 浙公网安备 33010602011771号