


Blazor Server访问Identity Server 4-手机验证码登录
手机验证码登录是目前非常主流的登录方式,毕竟,谁记得住那么多账号密码呢?
相比传统的账号密码登录页面,手机验证码登录页面前后台交互比较多,有一个动态提示倒计时的功能。用Blazor Server实现一个手机验证码登录页面不难,但是如果想要兼容Identity Server 4登录,还是有点麻烦的。
我曾经尝试过创建一个Blazor Server项目,集成Identity Server 4类库,结果发现无法实现登录跳转功能,所以还是要基于MVC项目去实现Identity Server 4服务器。但是我不想写JavaScript代码,我的子系统都是Blazor Server项目,我可以写一个登录页面组件类库,让所有Blazor Server子系统项目去引用即可。这个方案不用写JavaScript代码,但是要把GrantTypes.Code认证方式改为自定义验证登录。
我的系统解决方案中还有PC软件和移动APP客户端,他们也要用手机验证码方式访问Identity Server 4服务器登录,因此,编写一个手机验证码自定义登录模块还是非常有必要的。
准备种子数据
继续沿用之前的AspNetId4Web项目。
Blazor Server访问Identity Server 4单点登录2-集成Asp.Net角色
给种子用户增加手机号,为了简单起见,直接删除AspIdUsers.db,修改Main函数,每次运行都执行SeedData.EnsureSeedData,context.Database.Migrate判断到没有AspIdUsers.db就会自动创建数据库。
1 2 3 4 5 6 7 8 9 | //if (seed){ Log.Information("Seeding database..."); var config = host.Services.GetRequiredService<IConfiguration>(); var connectionString = config.GetConnectionString("DefaultConnection"); SeedData.EnsureSeedData(connectionString); Log.Information("Done seeding database."); //return 0;} |
给种子数据加手机号
1 2 3 4 5 6 7 | alice = new ApplicationUser{ UserName = "alice", Email = "AliceSmith@email.com", EmailConfirmed = true, PhoneNumber = "13512345001",}; |
增加自定义手机验证码认证处理器
自定义手机验证码认证处理流程很简单,就是根据手机号,去MemoryCache查找验证码。MemoryCache自带过期管理,验证码有效期可以设置为10分钟。
1 2 3 4 5 6 7 8 9 10 11 12 13 14 15 16 17 18 19 20 21 22 23 24 25 26 27 28 29 30 31 32 33 34 35 36 37 38 39 40 41 42 43 44 45 46 47 48 49 50 51 52 53 54 55 56 57 58 59 60 61 62 63 64 65 66 67 68 69 70 71 72 73 74 75 76 77 78 79 80 81 82 83 84 85 86 87 88 89 90 91 92 93 94 95 96 97 | /// <summary>/// 自定义手机验证码认证处理器/// </summary>public class PhoneCodeGrantValidator : IExtensionGrantValidator{ /// <summary> /// 认证方式 /// </summary> public string GrantType => "PhoneCodeGrantType"; private readonly IMemoryCache _memoryCache; private readonly ApplicationDbContext _context; private readonly ILogger _logger; public PhoneCodeGrantValidator( IMemoryCache memoryCache, ApplicationDbContext context, ILogger<PhoneCodeGrantValidator> logger) { _memoryCache = memoryCache; _context = context; _logger = logger; } /// <summary> /// 验证自定义授权请求 /// </summary> /// <param name="context"></param> /// <returns></returns> public async Task ValidateAsync(ExtensionGrantValidationContext context) { try { //获取登录参数 string phoneNumber = context.Request.Raw["PhoneNumber"]; string verificationCode = context.Request.Raw["VerificationCode"]; //获取手机号对应的缓存验证码 if (!_memoryCache.TryGetValue(phoneNumber, out string cacheVerificationCode)) { //如果获取不到缓存验证码,说明手机号不存在,或者验证码过期,但是发送验证码时已经验证过手机号是存在的,所以只能是验证码过期 context.Result = new GrantValidationResult() { IsError = true, Error = "验证码过期", }; return; } if (verificationCode != cacheVerificationCode) { context.Result = new GrantValidationResult() { IsError = true, Error = "验证码错误", }; return; } //根据手机号获取用户信息 var appUser = await GetUserByPhoneNumberAsync(phoneNumber); if (appUser == null) { context.Result = new GrantValidationResult() { IsError = true, Error = "手机号无效", }; return; } //授权通过返回 context.Result = new GrantValidationResult(appUser.Id.ToString(), "custom"); } catch (Exception ex) { context.Result = new GrantValidationResult() { IsError = true, Error = ex.Message }; } } //根据手机号获取用户信息 private async Task<ApplicationUser> GetUserByPhoneNumberAsync(string phoneNumber) { var appUser = await _context.Users.AsNoTracking() .FirstOrDefaultAsync(x => x.PhoneNumber == phoneNumber); return appUser; }} |
startup增加注册PhoneCodeGrantValidator。
1 2 3 4 5 6 7 8 9 10 11 12 13 14 15 16 | var builder = services.AddIdentityServer(options =>{ options.Events.RaiseErrorEvents = true; options.Events.RaiseInformationEvents = true; options.Events.RaiseFailureEvents = true; options.Events.RaiseSuccessEvents = true; // see https://identityserver4.readthedocs.io/en/latest/topics/resources.html options.EmitStaticAudienceClaim = true;}) .AddInMemoryIdentityResources(Config.IdentityResources) .AddInMemoryApiScopes(Config.ApiScopes) .AddInMemoryClients(Config.Clients) .AddExtensionGrantValidator<PhoneCodeGrantValidator>() //.AddInMemoryApiResources(Config.ApiResources) .AddAspNetIdentity<ApplicationUser>(); |
config增加一个客户端配置,允许的认证方式就是自定义的手机验证码方式。
1 2 3 4 5 6 7 8 9 10 11 12 13 | new Client(){ ClientId="PhoneCode", ClientName = "PhoneCode", ClientSecrets=new []{new Secret("PhoneCode.Secret".Sha256())}, AllowedGrantTypes = new string[]{ "PhoneCodeGrantType" }, //效果等同客户端项目配置options.GetClaimsFromUserInfoEndpoint = true //AlwaysIncludeUserClaimsInIdToken = true, AllowedScopes = { "openid", "profile", "scope1", "role", }}, |
增加获取手机验证码的Web Api
客户端需要首先访问Web Api发送手机验证码短信,然后再通过自定义手机验证码方式登录,这里写一个模拟发送验证码短信的功能,创建验证码之后丢到MemoryCache里缓存10分钟。
1 2 3 4 5 6 7 8 9 10 11 12 13 14 15 16 17 18 19 20 21 22 23 24 25 26 27 28 29 30 31 32 33 34 35 36 | /// <summary>/// 发送验证码到手机号/// </summary>/// <param name="phoneNumber"></param>/// <returns></returns>[ProducesResponseType(StatusCodes.Status200OK)][AllowAnonymous][HttpGet("SendPhoneCode")]public async Task<string> SendPhoneCode(string phoneNumber){ //根据手机号获取用户信息 var appUser = await GetUserByPhoneNumberAsync(phoneNumber); if (appUser == null) { return "手机号无效"; } //发送验证码到手机号,需要调用短信服务平台Web Api,这里模拟发送 string verificationCode = (new Random()).Next(1000, 9999).ToString(); //验证码缓存10分钟 _memoryCache.Set(phoneNumber, verificationCode, TimeSpan.FromMinutes(10)); _logger.LogInformation($"发送验证码{verificationCode}到手机号{phoneNumber}, 有效期{DateTime.Now.AddMinutes(10)}"); return "发送验证码成功";}//根据手机号获取用户信息private async Task<ApplicationUser> GetUserByPhoneNumberAsync(string phoneNumber){ var appUser = await _context.Users.AsNoTracking() .FirstOrDefaultAsync(x => x.PhoneNumber == phoneNumber); return appUser;} |
给AspNetId4Web项目增加一个http端口,便于调试,修改launchSettings.json
"applicationUrl": "https://localhost:5001;http://localhost:5000"
F5调试运行AspNetId4Web,打开浏览器,测试一下获取手机验证码Web Api
http://localhost:5000/api/PhoneCodeLogin/SendPhoneCode?phoneNumber=13512345001
可以看到AspNetId4Web控制台打印了发送的验证码,确认功能正确。
[10:44:24 Information] AspNetId4Web.Controllers.PhoneCodeLoginController
发送验证码6745到手机号13512345001, 有效期2021/9/21 10:54:24
至此,Identity Server 4支持手机验证码的功能添加完毕。
增加手机验证码登录Blazor Server客户端
参考之前的BlzWeb1新建Blazor Server网站项目PhoneCodeLoginBlzWeb,在Index主页提供登录按钮,显示登录用户信息。
增加手机验证码登录功能模块Ids4Client。Identity Server 4提供了IdentityModel类库,封装了通过HttpClient访问Identity Server 4服务器的代码,可以简化客户端代码。
1 2 3 4 5 6 7 8 9 10 11 12 13 14 15 16 17 18 19 20 21 22 23 24 25 26 27 28 29 30 31 32 33 34 35 36 37 38 39 40 41 42 43 44 45 46 47 48 49 50 51 52 53 54 55 56 57 58 59 60 61 62 63 64 65 66 67 68 69 70 71 72 73 74 75 76 77 78 79 80 81 82 83 84 85 86 87 88 89 90 91 92 93 94 | /// <summary>/// 手机验证码登录功能模块/// </summary>public class Ids4Client{ private readonly HttpClient _client; public Ids4Client(HttpClient httpClient) { _client = httpClient; } /// <summary> /// 发送验证码到手机号 /// </summary> /// <param name="phoneNumber"></param> /// <returns></returns> public async Task<string> SendPhoneCodeAsync(string phoneNumber) { string url = $"api/PhoneCodeLogin/SendPhoneCode?phoneNumber={phoneNumber}"; string result = await _client.GetStringAsync(url); return result; } /// <summary> /// 手机验证码登录 /// </summary> /// <param name="phoneNumber">手机号</param> /// <param name="verificationCode">验证码</param> /// <returns></returns> public async Task<(TokenResponse tokenResponse, string userInfoJson)> PhoneCodeLogin(string phoneNumber, string verificationCode) { var request = new DiscoveryDocumentRequest() { Policy = new DiscoveryPolicy() { //本地调试抓包 RequireHttps = false } }; //发现端点 var discovery = await _client.GetDiscoveryDocumentAsync(request); if (discovery.IsError) { Console.WriteLine($"访问Identity Server 4服务器失败, Error={discovery.Error}"); return (null, null); } //填写登录参数,必须跟Identity Server 4服务器Config.cs定义一致 var requestParams = new Dictionary<string, string> { ["client_Id"] = "PhoneCode", ["client_secret"] = "PhoneCode.Secret", ["grant_type"] = "PhoneCodeGrantType", ["scope"] = "openid profile scope1 role", ["PhoneNumber"] = phoneNumber, ["VerificationCode"] = verificationCode }; //请求获取token var tokenResponse = await _client.RequestTokenRawAsync(discovery.TokenEndpoint, requestParams); if (tokenResponse.IsError) { Console.WriteLine($"请求获取token失败, Error={tokenResponse.Error}"); return (null, null); } string userInfoJson = ""; //设置Http认证头 _client.SetBearerToken(tokenResponse.AccessToken); //获取用户信息 var userInfoResponse = await _client.GetAsync(discovery.UserInfoEndpoint); if (!userInfoResponse.IsSuccessStatusCode) { //scope必须包含profile才能获取到用户信息 //如果客户端请求scope没有profile,返回403拒绝访问 Console.WriteLine($"获取用户信息失败, StatusCode={userInfoResponse.StatusCode}"); } else { // {"sub":"d2f64bb2-789a-4546-9107-547fcb9cdfce","name":"Alice Smith","given_name":"Alice","family_name":"Smith","website":"http://alice.com","role":["Admin","Guest"],"preferred_username":"alice"} userInfoJson = await userInfoResponse.Content.ReadAsStringAsync(); Console.WriteLine($"获取用户信息成功, {userInfoJson}"); } return (tokenResponse, userInfoJson); }} |
在startup注册它
1 2 3 | //访问Identity Server 4服务器的HttpClientservices.AddHttpClient<Ids4Client>() .ConfigureHttpClient(c => c.BaseAddress = new Uri("http://localhost:5000")); |
Startup注册认证方案只有cookies
1 2 3 4 | //默认采用cookie认证方案services.AddAuthentication("cookies") //配置cookie认证 .AddCookie("cookies"); |
添加一个PhoneCodeLogin.razor手机验证码登录页面,拿到token和用户信息json之后,需要跳转到MVC控制器去登录SignIn,如果直接登录razor页面SignIn,会报错Headers are read-only, response has already started,很烦。
1 2 3 4 5 6 7 8 9 10 11 12 13 14 15 16 17 18 19 20 21 22 23 24 25 26 27 28 29 30 31 32 33 34 35 36 37 38 39 40 41 42 43 44 45 46 47 48 49 50 51 52 53 54 55 56 57 58 59 60 61 62 63 64 65 66 67 68 69 70 71 72 73 74 75 76 77 78 79 80 81 82 83 84 85 86 87 88 89 90 91 92 93 94 95 96 97 98 99 100 101 102 103 104 105 | @page "/phonecodelogin"@using PhoneCodeLoginBlzWeb.Data<div class="card" style="width:500px"> <div class="card-header"> <h5> 手机验证码登录 </h5> </div> <div class="card-body"> <div class="form-group form-inline"> <label for="PhoneNumber" class="control-label">手机号</label> <input id="PhoneNumber" @bind="PhoneNumber" class="form-control" placeholder="请输入手机号" /> </div> <div class="form-group form-inline"> <label for="VerificationCode" class="control-label">验证码</label> <input id="VerificationCode" @bind="VerificationCode" class="form-control" placeholder="请输入验证码" /> @if (CanGetVerificationCode) { <button type="button" class="btn btn-link" @onclick="GetVerificationCode"> 获取验证码 </button> } else { <label>@GetVerificationCodeMsg</label> } </div> </div> <div class="card-footer"> <button type="button" class="btn btn-primary" @onclick="Login"> 登录 </button> </div></div>@code { [Inject] private Ids4Client ids4Client { get; set; } [Inject] private IJSRuntime jsRuntime { get; set; } private string PhoneNumber; private string VerificationCode; //获取验证码按钮当前状态 private bool CanGetVerificationCode = true; private string GetVerificationCodeMsg; //获取验证码 private async void GetVerificationCode() { if (CanGetVerificationCode) { //发送验证码到手机号 string result = await ids4Client.SendPhoneCodeAsync(PhoneNumber); if (result != "发送验证码成功") return; CanGetVerificationCode = false; //1分钟倒计时 for (int i = 60; i >= 0; i--) { GetVerificationCodeMsg = $"获取验证码({i})"; await Task.Delay(1000); //通知页面更新 StateHasChanged(); } CanGetVerificationCode = true; //通知页面更新 StateHasChanged(); } } //登录 private async void Login() { //登录 var (tokenResponse, userInfoJson) = await ids4Client.PhoneCodeLogin(PhoneNumber, VerificationCode); string tokenResponseJson = Newtonsoft.Json.JsonConvert.SerializeObject(tokenResponse); string uri = $"Account/Login?tokenResponseJson={Uri.EscapeDataString(tokenResponseJson)}&userInfoJson={Uri.EscapeDataString(userInfoJson)}"; await jsRuntime.InvokeVoidAsync("window.location.assign", uri); }} |
添加AccountController控制器,注意用户信息Json的用户名和角色名是需要转换的,必须使用Asp.Net内置的角色名http://schemas.microsoft.com/ws/2008/06/identity/claims/role,不能使用Identity Server 4简化的角色名role,否则razor页面的授权不对。
1 2 3 4 5 6 7 8 9 10 11 12 13 14 15 16 17 18 19 20 21 22 23 24 25 26 27 28 29 30 31 32 33 34 35 36 37 38 39 40 41 42 43 44 45 46 47 48 49 50 51 52 53 54 55 56 57 58 59 60 61 62 63 64 65 66 67 68 69 70 71 72 73 74 75 76 77 78 79 80 81 82 83 84 85 | public class AccountController : Controller { private readonly ILogger _logger; public AccountController(ILogger<AccountController> logger) { _logger = logger; } /// <summary> /// 解析token创建用户clamis,SignIn到当前会话实现登录 /// </summary> /// <param name="tokenResponseJson">Identity Server 4服务器返回包含token的响应</param> /// <param name="userInfoJson">用户信息Json</param> /// <param name="returnUrl">登录成功后,返回之前的网页路由</param> /// <returns></returns> [HttpGet] public async Task<IActionResult> Login(string tokenResponseJson, string userInfoJson, string returnUrl = "") { if (string.IsNullOrEmpty(returnUrl)) returnUrl = "/"; //TokenResponse属性都是只读的,无法反序列化 //TokenResponse tokenResponse = System.Text.Json.JsonSerializer.Deserialize<TokenResponse>(tokenResponseJson); dynamic tokenResponse = Newtonsoft.Json.JsonConvert.DeserializeObject(tokenResponseJson); var jwtSecurityToken = new JwtSecurityToken($"{tokenResponse.AccessToken}"); var claims = jwtSecurityToken.Claims.ToList(); dynamic userInfo = Newtonsoft.Json.JsonConvert.DeserializeObject(userInfoJson); //提取name //claims.Add(new Claim(JwtClaimTypes.Name, $"{userInfo.name}")); claims.Add(new Claim(ClaimTypes.Name, $"{userInfo.name}")); //提取角色 //id4返回的角色是字符串数组或者字符串,blazor server的角色是字符串,需要转换,不然无法获取到角色 var roleElement = userInfo.role; if (roleElement is Newtonsoft.Json.Linq.JArray roleAry) { var roles = roleAry.Select(e => e.ToString()); //claims.AddRange(roles.Select(r => new Claim(JwtClaimTypes.Role, r))); claims.AddRange(roles.Select(r => new Claim(ClaimTypes.Role, r))); } else { //claims.Add(new Claim(JwtClaimTypes.Role, roleElement.ToString())); claims.Add(new Claim(ClaimTypes.Role, roleElement.ToString())); } var claimsIdentity = new ClaimsIdentity(claims, "Cookies"); var claimsPrincipal = new ClaimsPrincipal(claimsIdentity); var properties = new AuthenticationProperties { //记住登录状态 IsPersistent = true, RedirectUri = returnUrl }; await HttpContext.SignInAsync("Cookies", claimsPrincipal, properties); _logger.LogInformation($"token登录, returnUrl={returnUrl}"); return Redirect(returnUrl); } /// <summary> /// 退出登录 /// </summary> /// <returns></returns> [HttpGet] public async Task<IActionResult> Logout() { var userName = HttpContext.User.Identity?.Name; _logger.LogInformation($"{userName}退出登录。"); //删除登录状态cookies await HttpContext.SignOutAsync("Cookies"); return Redirect("/"); } } |
修改App.Razor,如果当前页面需要认证,就自动跳转到手机验证码razor登录页面
1 2 3 4 5 6 7 8 9 10 11 12 13 14 15 16 17 18 19 20 21 22 23 24 25 26 27 28 29 30 31 | @inject IJSRuntime _jsRuntime@inject NavigationManager _navManager<CascadingAuthenticationState> <Router AppAssembly="@typeof(Program).Assembly" PreferExactMatches="@true"> <Found Context="routeData"> <AuthorizeRouteView RouteData="@routeData" DefaultLayout="@typeof(MainLayout)"> <NotAuthorized> @if (!context.User.Identity.IsAuthenticated) { //如果用户未登录,跳转到手机验证码登录页面,发起登录 _jsRuntime.InvokeVoidAsync("window.location.assign", $"phonecodelogin?returnUrl={Uri.EscapeDataString(_navManager.Uri)}"); } else { <h4 class="text-danger">Sorry</h4> <p>You're not authorized to reach this page.</p> <p>You may need to log in as a different user.</p> <a href="/account/login" class="btn btn-primary">Login</a> } </NotAuthorized> </AuthorizeRouteView> </Found> <NotFound> <LayoutView Layout="@typeof(MainLayout)"> <p>Sorry, there's nothing at this address.</p> </LayoutView> </NotFound> </Router></CascadingAuthenticationState> |
同时运行AspNetId4Web项目和PhoneCodeLoginBlzWeb项目,输入alice的手机号,获取验证码
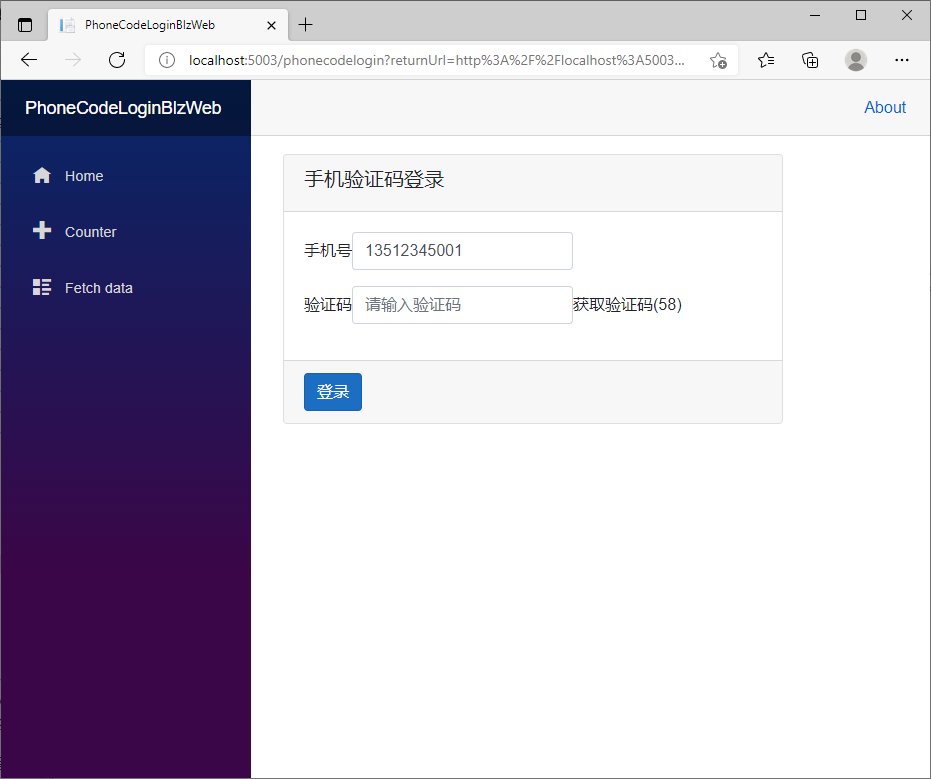
然后查看AspNetId4Web项目的控制台信息,获得模拟的验证码,进行登录。
可以看到,成功获取都了alice的用户角色等信息,测试Counter和Fetch Data页面授权都是对的。

查看Identity Server 4控制台,可以看到客户端获取的token的信息,以及用户资料的信息。

写了这么多代码,感觉还是很麻烦的,从Identity Server 4服务器拿到了登录的token和用户信息,还要自行解析、拼接再写入浏览器cookies,跳来跳去,累死了。如果可以直接用token对Blazor Server客户端的razor页面进行认证和授权,能够省很多事。
DEMO代码地址:https://gitee.com/woodsun/blzid4


【推荐】国内首个AI IDE,深度理解中文开发场景,立即下载体验Trae
【推荐】编程新体验,更懂你的AI,立即体验豆包MarsCode编程助手
【推荐】抖音旗下AI助手豆包,你的智能百科全书,全免费不限次数
【推荐】轻量又高性能的 SSH 工具 IShell:AI 加持,快人一步
· AI与.NET技术实操系列:基于图像分类模型对图像进行分类
· go语言实现终端里的倒计时
· 如何编写易于单元测试的代码
· 10年+ .NET Coder 心语,封装的思维:从隐藏、稳定开始理解其本质意义
· .NET Core 中如何实现缓存的预热?
· 分享一个免费、快速、无限量使用的满血 DeepSeek R1 模型,支持深度思考和联网搜索!
· 基于 Docker 搭建 FRP 内网穿透开源项目(很简单哒)
· ollama系列01:轻松3步本地部署deepseek,普通电脑可用
· 25岁的心里话
· 按钮权限的设计及实现