积累js里有用的函数库
一.兼容地获取非行间样式(兼容火狐,ie,chrome)
function getStyle(obj,name)
{
    if(obj.currentStyle){
        return obj.currentStyle[name];
    }else{
        return getComputedStyle(obj,false)[name];
    }
}

//调用
window.onload=function ()
{
    var oDiv=document.getElementById('div1');
    alert(getStyle(oDiv,'width'));

};
说明:只能获取单一样式,不能获取复合样式。
单一样式:width、height、position
复合样式:background、border。例如,如果想取背景颜色,可以用backgroundColor
二.封装getByClass
function getByClass(oParent,sClass){
    var aEle=oParent.getElementsByTagName('*');
    var aResult=[];

    for(var i=0;i<aEle.length;i++){
        if(aEle[i].className==sClass){
            aResult.push(aEle[i]);
        }
    }
    return aResult;
}
三.比较完美的运动框架
1.支持多物体,对任意属性值,链式运动,以及多个值同时运动的情况,满足80%的运动情况。
调用:startMove(obj,json,fnEnd)。第一个参数是运动的物体。中间一个参数是传一个包含希望运动的属性的json,例如想要同时变高和宽和透明度,可以var json={'height':300,'width':300,'opacity':100};,最后一个参数是传一个函数,即执行完该运动后,想要接着执行的运动。
2.代码:

// JavaScript Document
window.onload=function (){
    var oDiv1=document.getElementById('div1');

    oDiv1.onmouseover=function (){

        startMove(this,'opacity',100);
    };
        oDiv1.onmouseout=function (){

        startMove(this,'opacity',30);
    };

};

function getStyle(obj,name){
        if(obj.currentStyle){
            return obj.currentStyle[name];
        }else{
            return getComputedStyle(obj,false)[name];
        }
}

//例如startMove(oDiv,{width:400,height:400})
function startMove(obj,json,fnEnd){
    clearInterval(obj.timer);
    obj.timer=setInterval(function (){
        var bStop=true;    //假设所有的值都已经到了

        for(var attr in json){
            var cur=0;

            if(attr=='opacity'){
                cur=Math.round(100*parseFloat(getStyle(obj,attr)));
            }else{
                cur=parseInt(getStyle(obj,attr));
            }
            var speed=(json[attr]-cur)/6;
            speed=speed>0?Math.ceil(speed):Math.floor(speed);

            if(cur!=json[attr])
                bStop=false;


            if(attr=='opacity'){
                obj.style.filter='alpha(opacity:'+(cur+speed)+')';
                obj.style.opacity=(cur+speed)/100;

            }else{
                obj.style[attr]=cur+speed+'px';
            }
        }

        if(bStop){
            clearInterval(obj.timer);

            if(fnEnd) fnEnd();
        }
    },30);
}
四.获取鼠标在页面的绝对位置,消除滚动条的影响
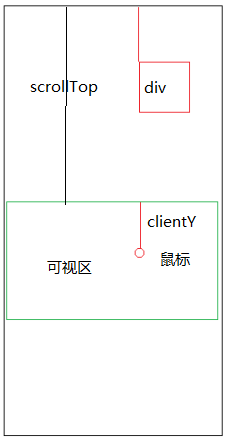
1.如图所示:当存在滚动条时,不能用oDiv.style.top=oEvent.clientY+'px',因为clientY是可视区的坐标,运用clientY+scrollTop即可得到鼠标的绝对坐标,将其封装为函数。

2.代码如下:

function getPos(ev){
    var scrollTop=document.documentElement.scrollTop||document.body.scrollTop;
    var scrollLeft=document.documentElement.scrollLeft||document.body.scrollLeft;

    return {x:ev.clientX+scrollLeft,y:ev.clientY+scrollTop};
}

<!DOCTYPE html PUBLIC "-//W3C//DTD XHTML 1.0 Transitional//EN" "http://www.w3.org/TR/xhtml1/DTD/xhtml1-transitional.dtd">
<html xmlns="http://www.w3.org/1999/xhtml">
<head>
<meta http-equiv="Content-Type" content="text/html; charset=utf-8" />
<title>无标题文档</title>
<style>
#div1 {width:200px;height:200px;background:red;position:absolute;}
</style>
<script>
function getPos(ev){
    var scrollTop=document.documentElement.scrollTop||document.body.scrollTop;
    var scrollLeft=document.documentElement.scrollLeft||document.body.scrollLeft;

    return {x:ev.clientX+scrollLeft,y:ev.clientY+scrollTop};
}

document.onmousemove=function (){
    var oEvent=event||ev;
    var oDiv=document.getElementById('div1');

    var pos=getPos(oEvent);

    oDiv.style.left=pos.x+'px';
    oDiv.style.top=pos.y+'px';
};
</script>
</head>

<body style="height:2000px;">
<div id="div1"></div>
</body>
</html>
3.存在的问题:移动鼠标时还是会有卡顿。
五.兼容性的绑定事件
1.attachEvent(事件名,函数)适合于ie10及以下版本,addEventListener(事件名,函数,捕获)适合于谷歌,火狐和ie9及以上版本。
还有一个区别在于事件名,前者是完整的事件名,如'onclick',后者是不带on的事件名,如‘click’
2.代码:

function myAddEvent(obj,ev,fn){
    if(obj.attachEvent){
        obj.attachEvent('on'+ev,fn);
    }else{
        obj.addEventListener(ev,fn,false);
    }
}
说明:依次传入obj,不带on的事件名和函数即可。
六.Ajax的库函数
1.主要有4步:创建Ajax对象,连接到服务器,发送请求,接收返回值
2.代码:

function ajax(url, fnSucc, fnFailed)
{
    //1.创建Ajax对象
    if(window.XMLHttpRequest)
    {
        var oAjax=new XMLHttpRequest();
    }
    else
    {
        var oAjax=new ActiveXObject("Microsoft.XMLHTTP");
    }

    //2.连接服务器(打开和服务器的连接)
    oAjax.open('GET', url, true);


    //3.发送
    oAjax.send();

    //4.接收
    oAjax.onreadystatechange=function ()
    {
        if(oAjax.readyState==4)
        {
            if(oAjax.status==200)
            {
                //alert('成功了:'+oAjax.responseText);
                fnSucc(oAjax.responseText);
            }
            else
            {
                //只有传入失败,才调用
                if(fnFailed)
                {
                    fnFailed();
                }
            }
        }
    };
}
调用:

window.onload=function (){
    var oBtn=document.getElementById('btn1');

    oBtn.onclick=function (){
        ajax('a1.txt?t='+new Date().getTime(),function (str){
            alert(str);
        },function (){alert('失败');});
    };
};
其中第三个参数(失败的参数)可以省略。
七.封装cookie。
1.代码:(包括设置cookie(包括过期时间),读取cookie和删除cookie)

//设置cookie的过期时间
function setCookie(name,value,iDay){
    var oDate=new Date();
    oDate.setDate(oDate.getDate()+iDay);

    document.cookie=name+'='+value+    ';expires='+oDate;
}

//读取cookie
function getCookie(name){
    //cookie的格式:username=cx; password=11
    //注意这里的空格
    var arr=document.cookie.split('; ');
    for(var i=0;i<arr.length;i++){
        var arr2=arr[i].split('=');
        if(arr2[0]==name){
            return arr2[1];
        }
    }
    return '';
}

//删除cookie
function removeCookie(name){
    setCookie(name,1,-1);
}
测试

//测试读取cookie
//alert(getCookie('sex'));

//测试设置cookie
//setCookie('username','cx',12);
//setCookie('password','11',1);

//测试删除cookie
removeCookie('username');
alert(document.cookie);
依次打开火狐浏览器->右键查看页面信息->安全->查看cookie,可以看到下图,即设置cookie成功。


