LAJP系列教程-第四部分-增删改查示例程序
常见的B/S的程序结构都有和数据库的交互,本示例中通过一个简单的增删改查的列子,介绍LAJP的通常使用方式。
一、创建库表结构,使用Mysql:
1. 先创建用户:
下面两条语句创建用户’ali’,其登录密码’ali’,可以从本地和网络登录,拥有数据库所有权限:
1. mysql> GRANT ALL PRIVILEGES ON *.* TO ‘ali’@‘localhost’ IDENTIFIED BY ‘ali’ WITH GRANTOPTION;
2. mysql> GRANT ALL PRIVILEGES ON *.* TO ‘ali’@‘%’ IDENTIFIED BY ‘ali’ WITH GRANT OPTION;
2. 使用用户ali登录Mysql:
1. $ mysql -u ali -pali
3. 创建数据库demo_users, 使用utf8字符集
1. mysql> CREATE DATABASE demo_users CHARACTER SET utf8;
4. 创建表
1. mysql> CREATE TABLE demo(
2. id MEDIUMINT NOT NULL AUTO_INCREMENT,
3. login varchar(20) NOT NULL,
4. passwd varchar(20) NOT NULL,
5. userName varchar(10) NOT NULL,
6. age SMALLINT NOT NULL,
7. sex TINYINT NOT NULL,
8. PRIMARY KEY(id));
demo中字段含义如下:
id: 主键,自增序列
login: 用户帐号
passwd: 用户密码
userName: 用户名称
age: 用户年龄
sex: 用户性别,0女性 1男性
二、Java端
在LAJP架构中,Java负责和数据库交互,这里使用开源的组件搭建Java和数据库的连接:
* 数据库JDBC驱动:Mysql官方提供的mysql-connector-java
* 数据库连接池:使用开源的c3p0
* 日志组件:最常用的log4j
1. 首先,编写获得数据库交互的工具类
1.
2. package com.googlecode.lajp.mysqldemo;
3. import java.beans.PropertyVetoException;
4. import java.sql.Connection;
5. import java.sql.SQLException;
6. import org.apache.log4j.Logger;
7. import com.mchange.v2.c3p0.ComboPooledDataSource;
8.
9. public class DBUtil
10. {
11. static Logger log = Logger.getLogger(DBUtil.class);
12.
13. private static ComboPooledDataSource cpds;
14.
15. public static final void init()
16. {
17. cpds = new ComboPooledDataSource();
18. try
19. {
20. cpds.setDriverClass("com.mysql.jdbc.Driver");
21. }
22. catch (PropertyVetoException e)
23. {
24. log.error("加载数据库驱动异常", e);
25. throw new RuntimeException("Can’t load Driver: om.mysql.jdbc.Driver" );
26. }
27. cpds.setJdbcUrl("jdbc:mysql://127.0.0.1/demo_users?characterEncoding=utf-8");
28. cpds.setUser("ali");
29. cpds.setPassword("ali");
30. }
31.
32. public static Connection getConn() throws SQLException
33. {
34. return cpds.getConnection();
35. }
36. }
在类DBUtil中,编写了两个方法,init()用来初始化c3p0数据库连接池,20行加载JDBC驱动,027~029行声明连接参数,”jdbc:mysql://127.0.0.1/demo_users?characterEncoding=utf-8″表示连接到本机的 demo_users库,字符集为utf-8。getConn()方法是公用的获取数据库连接的方法。
2. JavaBean对象
对于Java面向对象语言,习惯以对象方式映射数据库表,这里编写一个和表demo映射的JavaBean类:
1.
2. package com.googlecode.lajp.mysqldemo;
3.
4. public class User
5. {
6. /** ID */
7. private int id;
8. /** 帐号 */
9. private String login;
10. /** 密码 */
11. private String passwd;
12. /** 用户名 */
13. private String userName;
14. /** 年龄 */
15. private int age;
16. /** 性别(true:女) */
17. private boolean girl;
18.
19. ……getter 和 setter 方法
20. }
User中的每个属性和demo表的字段对应,并具有同业务含义相符合的数据类型。
3. 服务方法
最后编写PHP调用的服务方法,代码比较长,这里只将第一个方法(增加方法)显示完整,其他方法只显示主要逻辑代码:
1.
2. package com.googlecode.lajp.mysqldemo;
3.
4. import java.sql.Connection;
5. import java.sql.PreparedStatement;
6. import java.sql.ResultSet;
7. import java.sql.SQLException;
8. import java.util.ArrayList;
9.
10. import org.apache.log4j.Logger;
11.
12. /**
13. * Java服务
14. * @author diaoyf
15. *
16. */
17. public class JavaService
18. {
19. static Logger log = Logger.getLogger(JavaService.class);
20.
21. /**
22. * 增加用户服务
23. * @param newUser 用户对象
24. * @throws Exception
25. */
26. public static final void addUser(User newUser) throws Exception
27. {
28. Connection conn = null;
29. PreparedStatement stmt = null;
30. try
31. {
32. conn = DBUtil.getConn();
33.
34. StringBuffer sql = new StringBuffer();
35. sql.append("insert into demo");
36. sql.append("(");
37. sql.append(" login,");
38. sql.append(" passwd,");
39. sql.append(" userName,");
40. sql.append(" age,");
41. sql.append(" sex ");
42. sql.append(")values(");
43. sql.append(" ?,");
44. sql.append(" ?,");
45. sql.append(" ?,");
46. sql.append(" ?,");
47. sql.append(" ? ");
48. sql.append(")");
49.
50. stmt = conn.prepareStatement(sql.toString());
51. stmt.setString(1, newUser.getLogin());
52. stmt.setString(2, newUser.getPasswd());
53. stmt.setString(3, newUser.getUserName());
54. stmt.setShort(4, (short)newUser.getAge());
55. stmt.setShort(5, (short)(newUser.isGirl() ? 0 : 1));
56.
57. stmt.execute();
58. }
59. catch (Exception e)
60. {
61. log.error("增加新用户异常", e);
62.
63. throw e;
64. }
65. finally
66. {
67. try
68. {
69. if (conn != null)
70. {
71. conn.close();
72. }
73. }
74. catch (SQLException e)
75. {
76. }
77. }
78. }
79.
80. /**
81. * 删除用户服务
82. * @param id 用户ID
83. * @throws Exception
84. */
85. public static final void delUser(int id)throws Exception
86. {
87. //….
88.
89. StringBuffer sql = new StringBuffer();
90. sql.append("delete from demo where id = ?");
91.
92. stmt = conn.prepareStatement(sql.toString());
93. stmt.setInt(1, id);
94.
95. stmt.execute();
96.
97. //….
98. }
99.
100. /**
101. * 修改用户属*********
102. * @param user
103. * @throws Exception
104. */
105. public static final void modifyUser(User user)throws Exception
106. {
107. //….
108.
109. StringBuffer sql = new StringBuffer();
110. sql.append("update demo set ");
111. sql.append(" login = ?,");
112. sql.append(" passwd = ?,");
113. sql.append(" userName = ?,");
114. sql.append(" age = ?,");
115. sql.append(" sex = ? ");
116. sql.append(" where id = ?");
117.
118. stmt = conn.prepareStatement(sql.toString());
119. stmt.setString(1, user.getLogin());
120. stmt.setString(2, user.getPasswd());
121. stmt.setString(3, user.getUserName());
122. stmt.setShort(4, (short)user.getAge());
123. stmt.setShort(5, (short)(user.isGirl() ? 0 : 1));
124. stmt.setInt(6, user.getId());
125.
126. stmt.executeUpdate();
127.
128. //….
129. }
130.
131. /**
132. * 根据ID查询用户服务
133. * @param id
134. * @return 用户对象
135. * @throws Exception
136. */
137. public static final User getUser(int id)throws Exception
138. {
139. //….
140.
141. StringBuffer sql = new StringBuffer();
142. sql.append("select * from demo where id = ?");
143.
144. stmt = conn.prepareStatement(sql.toString());
145. stmt.setInt(1, id);
146.
147. rs = stmt.executeQuery();
148.
149. if (rs.next())
150. {
151. User user = new User();
152. user.setId(rs.getInt("id"));
153. user.setLogin(rs.getString("login"));
154. user.setPasswd(rs.getString("passwd"));
155. user.setUserName(rs.getString("userName"));
156. user.setAge(rs.getShort("age"));
157. user.setGirl((rs.getShort("sex") == 0) ? true : false);
158.
159. return user;
160. }
161. else
162. {
163. throw new Exception("查询不到用户, id=" + id);
164. }
165.
166. //….
167. }
168.
169. /**
170. * 获取用户列表
171. * @return
172. */
173. public static final ArrayList<User> userList()throws Exception
174. {
175. ArrayList<User> userList = new ArrayList<User>();
176.
177. //….
178.
179. String sql = "select * from demo";
180.
181. stmt = conn.prepareStatement(sql);
182.
183. rs = stmt.executeQuery();
184.
185. while (rs.next())
186. {
187. User user = new User();
188. user.setId(rs.getInt("id"));
189. user.setLogin(rs.getString("login"));
190. user.setPasswd(rs.getString("passwd"));
191. user.setUserName(rs.getString("userName"));
192. user.setAge(rs.getShort("age"));
193. user.setGirl((rs.getShort("sex") == 0) ? true : false);
194.
195. userList.add(user);
196. }
197.
198. //….
199.
200. return userList;
201. }
202. }
在JavaService类中,提供了增、删、改、查共5个方法,其中”查”有两个方法。
4. Java端运行
运行Java服务端,需要配置classpath,编写run.sh脚本:
1.
2. #!/bin/sh
3.
4. # ———————————————————–
5. # LAJP-Java Service 启动脚本
6. #
7. # (2009-09 http://code.google.com/p/lajp/)
8. #
9. # ———————————————————–
10.
11. # java服务中需要的jar文件或classpath路径,如业务程序、第三方jar文件log4j等
12. export other_classpath=/media/sda3/prog/eclipse_java_my/workspace/lajp_mysql_demo/lib/c3p0-0.9.1.2.jar:/media/sda3/prog/eclipse_java_my/workspace/lajp_mysql_demo/lib/mysql-connector-java-5.1.7-bin.jar:/media/sda3/prog/eclipse_java_my/workspace/lajp_mysql_demo/lib/log4j-1.2.8.jar:/media/sda3/prog/eclipse_java_my/workspace/lajp_mysql_demo/bin/
13.
14. # 自启动类和方法,LAJP服务启动时会自动加载并执行
15. export AUTORUN_CLASS=com.googlecode.lajp.mysqldemo.DBUtil
16. export AUTORUN_METHOD=init
17.
18. # 字符集设置 GBK|UTF-8
19. # export CHARSET=GBK
20.
21. # LAJP服务启动指令(前台)
22. java -classpath .:lajp_9.09.jar:$other_classpath lajp.PhpJava
23.
24. # LAJP服务启动指令(后台)
25. # nohup java -classpath lajp_9.09.jar:$other_classpath lajp.PhpJava &
26.
设置other_classpath变量,引入c3p0-0.9.1.2.jar、 mysql-connector-java-5.1.7-bin.jar、 log4j-1.2.8.jar和Java端服务程序。
AUTORUN_CLASS和 AUTORUN_METHOD两个变量, 设置在启动时自动运行 DBUtil类中的init()方法,使Java端服务启动时加载Mysql的JDBC驱动,并配置数据库连接池。
三、PHP端
1. index.html:
1. <html>
2. <head>
3. <meta http-equiv="refresh" content="0; url=list.php">
4. </head>
5. </html>
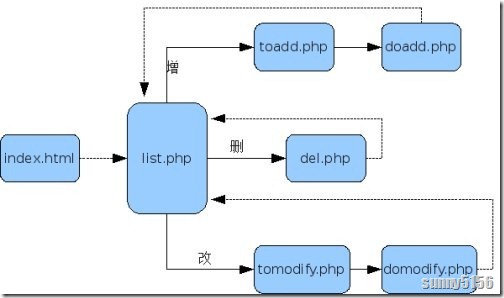
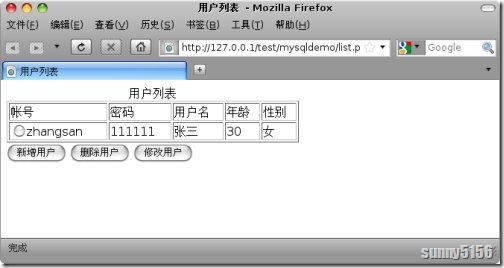
访问index.html会自动转向到程序的核心页面list.php,在list页面中显示用户列表。
2. list.php:
1. <?php header("Content-Type:text/html;charset=utf-8");
2.
3. require_once("CLASS_user.php");
4. require_once("../../lajp/php_java.php");
5.
6. try
7. {
8. //调用Java服务:获得用户列表集合
9. $list = lajp_call("com.googlecode.lajp.mysqldemo.JavaService::userList");
10. }
11. catch (Exception $e)
12. {
13. echo "获得用户列表出错:{$e}<br>";
14. return;
15. }
16. ?>
17.
18. <html>
19. <head>
20. <meta http-equiv="Content-Type" content="text/html; charset=utf-8">
21. <title>用户列表</title>
22. <script language="javascript">
23. function add()
24. {
25. document.form1.action = "toadd.php"
26. document.form1.submit();
27. }
28. function del()
29. {
30. document.form1.action = "del.php"
31. document.form1.submit();
32. }
33. function modify()
34. {
35. document.form1.action = "tomodify.php"
36. document.form1.submit();
37. }
38. </script>
39. </head>
40.
41. <body>
42. <form name="form1" method="post" action="">
43. <table width="60%" border="1">
44. <caption>
45. 用户列表
46. </caption>
47. <tr>
48. <td>帐号</td>
49. <td>密码</td>
50. <td>用户名</td>
51. <td>年龄</td>
52. <td>性别</td>
53. </tr>
54.
55. <?php
56. //遍历用户列表集合
57. foreach ($list as $user)
58. {
59. ?>
60. <tr>
61. <td><input type="radio" name="id" value="<?php echo $user->id; ?>"><?php echo $user->login; ?></td>
62. <td><?php echo $user->passwd; ?></td>
63. <td><?php echo $user->userName; ?></td>
64. <td><?php echo $user->age; ?></td>
65. <td><?php echo ($user->girl == TRUE ? "女" : "男"); ?></td>
66. </tr>
67. <?php
68. }
69. ?>
70. </table>
71. <input type="button" value="新增用户" onClick="add();">
72. <input type="button" value="删除用户" onClick="del()">
73. <input type="button" value="修改用户" onClick="modify()">
74. </form>
75. <p> </p>
76. </body>
77. </html>
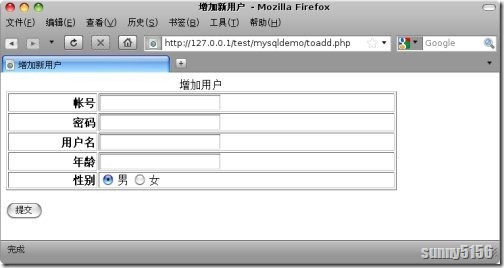
3. 增加用户流程主要两个由PHP文件组成
toadd.php:
1. <?php header("Content-Type:text/html;charset=utf-8"); ?>
2.
3. <html>
4. <head>
5. <meta http-equiv="Content-Type" content="text/html; charset=utf-8">
6. <title>增加新用户</title>
7. </head>
8.
9. <body>
10. <form name="form1" method="post" action="doadd.php">
11. <table width="80%" border="1">
12. <caption>
13. 增加用户
14. </caption>
15. <tr>
16. <th align="right" scope="row">帐号</th>
17. <td><input type="text" name="login"></td>
18. </tr>
19. <tr>
20. <th align="right" scope="row">密码</th>
21. <td><input type="text" name="passwd"></td>
22. </tr>
23. <tr>
24. <th align="right" scope="row">用户名</th>
25. <td><input type="text" name="userName"></td>
26. </tr>
27. <tr>
28. <th align="right" scope="row">年龄</th>
29. <td><input type="text" name="age"></td>
30. </tr>
31. <tr>
32. <th align="right" scope="row">性别</th>
33. <td><input name="girl" type="radio" value="false" checked>
34. 男
35. <input type="radio" name="girl" value="true">
36. 女</td>
37. </tr>
38. </table>
39. <p>
40. <input type="submit" name="Submit" value="提交">
41. </p>
42. </form>
43. </body>
44. </html>
doadd.php:
1. <?php header("Content-Type:text/html;charset=utf-8");
2.
3. require_once("CLASS_user.php");
4. $user = new com_googlecode_lajp_mysqldemo_User;
5.
6. //接收表单提交的数据
7. $user->login = $_POST["login"];
8. $user->passwd = $_POST["passwd"];
9. $user->userName = $_POST["userName"];
10. $user->age = (int)$_POST["age"];
11. $user->girl = $_POST["girl"] == "true" ? TRUE : FALSE;
12.
13. //省略数据校验过程…
14.
15. require_once("../../lajp/php_java.php");
16.
17. try
18. {
19. //调用Java服务:增加用户
20. lajp_call("com.googlecode.lajp.mysqldemo.JavaService::addUser", $user);
21. //重定向
22. header("Location: list.php");
23. }
24. catch (Exception $e)
25. {
26. echo "增加用户出错:{$e}<br>";
27. }
28. ?>
4. 删除
del.php
1. <?php header("Content-Type:text/html;charset=utf-8");
2.
3. //要删除的用户ID
4. $id = (int)$_POST["id"];
5.
6. require_once("../../lajp/php_java.php");
7.
8. try
9. {
10. //调用Java服务:删除用户
11. lajp_call("com.googlecode.lajp.mysqldemo.JavaService::delUser", $id);
12. //重定向
13. header("Location: list.php");
14. }
15. catch (Exception $e)
16. {
17. echo "删除用户出错:{$e}<br>";
18. }
19. ?>
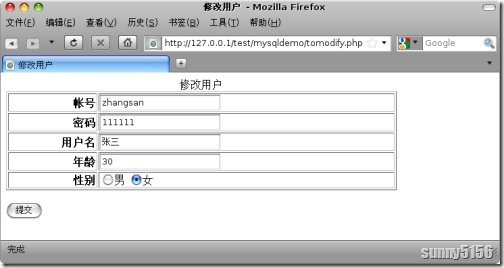
5. 修改用户流程也由两个PHP文件构成:
tomodify.php
1. <?php header("Content-Type:text/html;charset=utf-8"); ?>
2.
3. <?php
4. require_once("CLASS_user.php");
5.
6. //要修改的用户ID
7. $id = (int)$_POST["id"];
8.
9. require_once("../../lajp/php_java.php");
10.
11. try
12. {
13. //调用Java服务:查询用户
14. $user = lajp_call("com.googlecode.lajp.mysqldemo.JavaService::getUser", $id);
15. }
16. catch (Exception $e)
17. {
18. echo "查询用户出错:{$e}<br>";
19. }
20. ?>
21.
22. <html>
23. <head>
24. <meta http-equiv="Content-Type" content="text/html; charset=utf-8">
25. <title>修改用户</title>
26. </head>
27.
28. <body>
29. <form name="form1" method="post" action="domodify.php">
30. <table width="80%" border="1">
31. <input type="hidden" name="id" value="<?php echo $user->id; ?>">
32. <caption>
33. 修改用户
34. </caption>
35. <tr>
36. <th align="right" scope="row">帐号</th>
37. <td><input type="text" name="login" value="<?php echo $user->login; ?>"></td>
38. </tr>
39. <tr>
40. <th align="right" scope="row">密码</th>
41. <td><input type="text" name="passwd" value="<?php echo $user->passwd; ?>"></td>
42. </tr>
43. <tr>
44. <th align="right" scope="row">用户名</th>
45. <td><input type="text" name="userName" value="<?php echo $user->userName; ?>"></td>
46. </tr>
47. <tr>
48. <th align="right" scope="row">年龄</th>
49. <td><input type="text" name="age" value="<?php echo $user->age; ?>"></td>
50. </tr>
51. <tr>
52. <th align="right" scope="row">性别</th>
53. <?php
54. if ($user->girl)
55. {
56. ?>
57. <td>
58. <input name="girl" type="radio" value="false">男
59. <input type="radio" name="girl" value="true" checked>女
60. </td>
61. <?php
62. }
63. else
64. {
65. ?>
66. <td>
67. <input name="girl" type="radio" value="false" checked>男
68. <input type="radio" name="girl" value="true">女
69. </td>
70. <?php
71. }
72. ?>
73. </tr>
74. </table>
75. <p>
76. <input type="submit" name="Submit" value="提交">
77. </p>
78. </form>
79. </body>
80. </html>
domodify.php
1. <?php header("Content-Type:text/html;charset=utf-8");
2.
3. require_once("CLASS_user.php");
4. $user = new com_googlecode_lajp_mysqldemo_User;
5.
6. //接收表单提交的数据
7. $user->id = (int)$_POST["id"];
8. $user->login = $_POST["login"];
9. $user->passwd = $_POST["passwd"];
10. $user->userName = $_POST["userName"];
11. $user->age = (int)$_POST["age"];
12. $user->girl = $_POST["girl"] == "true" ? TRUE : FALSE;
13.
14. //省略数据校验过程…
15.
16. require_once("../../lajp/php_java.php");
17.
18. try
19. {
20. //调用Java服务:修改用户
21. lajp_call("com.googlecode.lajp.mysqldemo.JavaService::modifyUser", $user);
22. //重定向
23. header("Location: list.php");
24. }
25. catch (Exception $e)
26. {
27. echo "修改用户出错:{$e}<br>";
28. }
29. ?>
在上面的php文件中通过require_once函数导入了两个文件,其中”php_java.php”是LAJP框架提供的,”CLASS_user.php”是和Java交互时的传递对象,代码如下:
1. <?php
2. //用户类
3. class com_googlecode_lajp_mysqldemo_User
4. {
5. var $id;
6. var $login;
7. var $passwd;
8. var $userName;
9. var $age;
10. var $girl;
11. }
12. ?>


