Spring1
一.Spring 框架简介
1、Spring 框架宗旨:不重新发明技术,让原有技术使用起来更加方便.
2、Spring 几大核心功能
IoC/DI 控制反转/依赖注入
AOP 面向切面编程
声明式事务
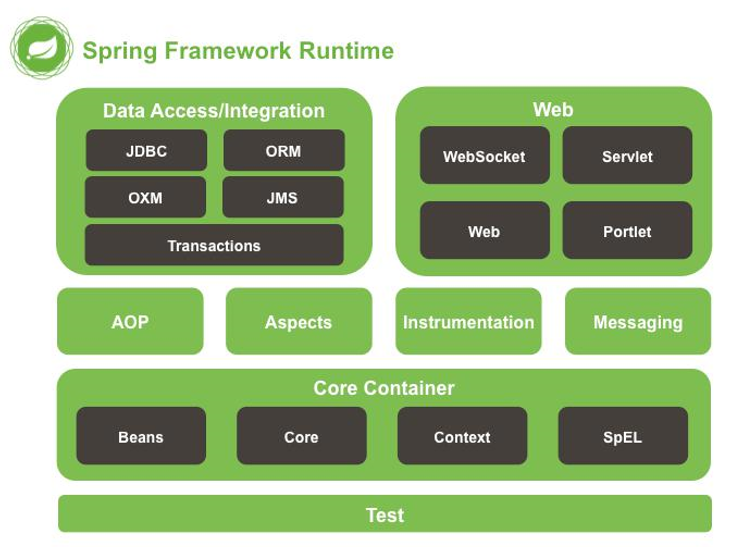
3、Spring 框架 runtime

1)Test:spring 提供测试功能
2)CoreContainer:核心容器.Spring 启动最基本的条件.
Beans:Spring 负责创建类对象并管理对象
Core: 核心类
Context: 上下文参数.获取外部资源或者管理注解等
SpEl:expression.jar
3)AOP: 实现 aop 功能需要依赖
4)Aspects: 切面 AOP 依赖的包
5)DataAccess/Integration:spring 封装数据访问层相关内容
JDBC:Spring 对 JDBC 封装后的代码.
ORM: 封装了持久层框架的代码.例如 Hibernate
Transactions:对应 spring-tx.jar,声明式事务使用.
6)WEB:需要 spring 完成 web 相关功能时需要.
例如:由tomcat加载spring配置文件时需要有spring-web包
4、Spring 框架中重要概念
容器(Container):Spring 当作一个大容器.
BeanFactory 接口,老版本。新版本中 ApplicationContext 接口,是 BeanFactory 子接口.BeanFactory 的功能在 ApplicationContext 中都有。
5、从 Spring3 开始把 Spring 框架的功能拆分成多个 jar。Spring2 及以前就一个 jar。
二.IoC
1、名称:控制反转(Inversion of Control)
2、概念:IoC 完成的事情原先由程序员主动通过 new 实例化对象事情,转交给Spring负责。
控制反转中‘控制’指的是:控制类的对象.
控制反转中‘反转’指的是转交给 Spring 负责.
IoC 最大的作用:解耦:程序员不需要管理对象。解除了对象管理和程序员之间的耦合。
三.Spring 环境搭建
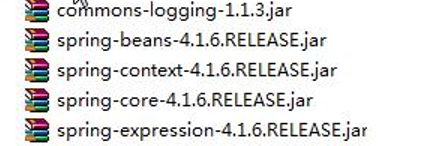
1、导入 jar
四个核心包一个日志包(commons-logging)

2、在 src 下新建 applicationContext.xml
文件名称和路径自定义。
Spring 容器 ApplicationContext,applicationContext.xml 配置的信息最终存储到了 AppliationContext 容器中
spring 配置文件是基于 schema
schema 文件扩展名.xsd。把 schema 理解成 DTD 的升级版。比 DTD 具备更好的扩展性。
每次引入一个 xsd 文件是一个 namespace(xmlns)
配置文件中只需要引入基本 schema
通过<bean/> 创建对象.
默认配置文件被加载时创建对象.
<?xml version="1.0" encoding="UTF-8"?>
<beans xmlns="http://www.springframework.org/schema/beans"
    xmlns:xsi="http://www.w3.org/2001/XMLSchema-instance"
    xsi:schemaLocation="http://www.springframework.org/schema/beans
    http://www.springframework.org/schema/beans/spring-beans.xsd">
    <!-- id 表示获取到对象标识
         class 创建哪个类的对象
    -->
    <bean id="peo" class="com.su.pojo.People"/>
</beans>
3、编写测试方法
getBean(“<bean>标签id值”,返回值类型);如果没有第二个参数,默认是 Object。
getBeanDefinitionNames(),Spring 容器中目前管理的所有对象。
ApplicationContext ac = new ClassPathXmlApplicationContext("applicationContext.xml");
People people = ac.getBean("peo",People.class);
System.out.println(people);
// String[] names = ac.getBeanDefinitionNames();
// for (String string : names) {
// System.out.println(string);
// }
四.Spring 创建对象的三种方式
1、通过构造方法创建
1)无参构造创建:默认情况.
2)有参构造创建:需要明确配置
需要在类中提供有参构造方法
在 applicationContext.xml 中设置调用哪个构造方法创建对象。
如果设定的条件匹配多个构造方法执行最后的构造方法。
index: 参数的索引,从 0 开始
name: 参数名
type:类型(区分开关键字和封装类 int 和 Integer)
<bean id="peo" class="com.su.pojo.People">
    <!-- ref 引用另一个 bean;value 基本数据类型或 String 等 -->
    <constructor-arg index="0" name="id" type="int" value="123"></constructor-arg>
    <constructor-arg index="1" name="name" type="java.lang.String" value="张三"></constructor-arg>
</bean>
2、实例工厂
1)工厂设计模式:帮助创建类对象。一个工厂可以生产多个对象。
2)实例工厂:需要先创建工厂,才能生产对象
3)实现步骤:
必须要有一个实例工厂
public class PeopleFactory {
    public People newInstance(){
      return new People(1,"测试");
    }
}
在 applicationContext.xml 中配置工厂对象和需要创建的对象
<bean id="factory" class="com.su.pojo.PeopleFactory"></bean>
<bean id="peo1" factory-bean="factory" factory-method="newInstance"></bean>
3、静态工厂
1)不需要创建工厂,快速创建对象。
2)实现步骤
编写一个静态工厂(在方法上添加 static)
public class PeopleFactory {
    public static People newInstance(){
        return new People(1,"测试");
    }
}
在 applicationContext.xml 中
<bean id="peo2" class="com.su.pojo.PeopleFactory" factory-method="newInstance"></bean>
五.如何给 Bean 的属性赋值(注入)
1、通过构造方法设置值.
2、设置注入(通过 set 方法)
如果属性是基本数据类型或 String 等简单类型
<bean id="peo" class="com.su.pojo.People">
    <property name="id" value="222"></property>
    <property name="name" value="张三"></property>
</bean>
等效于
<bean id="peo" class="com.su.pojo.People">
    <property name="id">
        <value>456</value>
    </property>
    <property name="name">
        <value>zhangsan</value>
    </property>
</bean>
如果属性是 Set<?>
<property name="sets">
    <set>
        <value>1</value>
        <value>2</value>
        <value>3</value>
    </set>
</property>
如果属性是 List<?>
<property name="list">
    <list>
        <value>1</value>
        <value>2</value>
        <value>3</value>
    </list>
</property>
如果 list 中就只有一个值
<property name="list" value="1">
</property>
如果属性是数组
如果数组中就只有一个值,可以直接通过 value 属性赋值。
<property name="strs" >
    <array>
        <value>1</value>
        <value>2</value>
        <value>3</value>
    </array>
</property>
如果属性是 map
<property name="map">
    <map>
        <entry key="a" value="b" > </entry>
        <entry key="c" value="d" > </entry>
    </map>
</property>
如果属性 Properties 类型
<property name="demo">
    <props>
        <prop key="key">value</prop>
        <prop key="key1">value1</prop>
    </props>
</property>
六. DI
1、DI:中文名称:依赖注入(Dependency Injection)
2、概念:DI 和 IoC 是一样的。当一个类(A)中需要依赖另一个类(B)对象时,把 B 赋值给 A 的过程就叫做依赖注入。
3、 代码体现:
<bean id="peo" class="com.su.pojo.People">
    <property name="desk" ref="desk" ></property>
</bean>
<bean id="desk" class="com.su.pojo.Desk">
    <property name="id" value="1"></property>
    <property name="price" value="12"></property>
</bean>
七.使用 Spring 简化 MyBatis
1、导入mybatis所有jar和spring基本包,spring-jdbc,spring-tx,spring-aop,spring-web,spring 整合mybatis的包等。

2、先配置 web.xml
<?xml version="1.0" encoding="UTF-8"?>
<web-app version="3.0" xmlns="http://java.sun.com/xml/ns/javaee"
    xmlns:xsi="http://www.w3.org/2001/XMLSchema-instance"
    xsi:schemaLocation="http://java.sun.com/xml/ns/javaee
    http://java.sun.com/xml/ns/javaee/web-app_3_0.xsd">
    <!-- 上下文参数 -->
    <context-param>
        <param-name>contextConfigLocation</param-name>
        <!-- spring 配置文件 -->
        <param-value>classpath:applicationContext.xml</para m-value>
    </context-param>
    <!-- 封装了一个监听器,帮助加载 Spring 的配置文件 -->
   <listener>
      <listener-class>org.springframework.web.context.ContextLoaderListener</listener-class>
    </listener>
</web-app>
3、编写 spring 配置文件 applicationContext.xml
<?xml version="1.0" encoding="UTF-8"?>
<beans xmlns="http://www.springframework.org/schema/beans"
    xmlns:xsi="http://www.w3.org/2001/XMLSchema-instance"
    xsi:schemaLocation="http://www.springframework.org/schema/beans
        http://www.springframework.org/schema/beans/spring-beans.xsd">
    <!-- 数据源封装类.数据源:获取数据库连接,spring-jdbc.jar中-->
    <bean id="dataSource" class="org.springframework.jdbc.datasource.DriverManagerDataSource">
        <property name="driverClassName" value="com.mysql.jdbc.Driver"></property>
        <property name="url" value="jdbc:mysql://localhost:3306/ssm"></property>
        <property name="username" value="root"></property>
        <property name="password" value="smallming"></property>
    </bean>
    <!-- 创建SqlSessionFactory对象 -->
    <bean id="factory" class="org.mybatis.spring.SqlSessionFactoryBean">
        <!-- 数据库连接信息来源于dataSource -->
        <property name="dataSource" ref="dataSource"></property>
    </bean>
    <!-- 扫描器相当于mybatis.xml中 mappers下package标签,扫描com.su.mapper包后会给对应接口创建对象-->
    <bean class="org.mybatis.spring.mapper.MapperScannerConfigurer">
        <!-- 要扫描哪个包 -->
        <property name="basePackage" value="com.su.mapper"></property>
        <!-- 和factory产生关系 -->
        <property name="sqlSessionFactory" ref="factory"></property>
    </bean>
    <!-- 由spring管理service实现类 -->
    <bean id="airportService" class="com.su.service.impl.AirportServiceImpl">
        <property name="airportMapper" ref="airportMapper"></property>
    </bean>
</beans>
4、编写代码
1)正常编写 pojo
2)编写 mapper 包下时必须使用接口绑定方案或注解方案(必须有接口)
3)正常编写 Service 接口和 Service 实现类
需要在 Service 实现类中声明 Mapper 接口对象,并生成get/set 方法。
4)spring 无法管理 Servlet,在 service 中取出 Servie 对象
@WebServlet("/airport")
public class AirportServlet extends HttpServlet{
    private AirportService airportService;
    @Override
    public void init() throws ServletException {
        //对 service 实例化
        // ApplicationContext ac = new ClassPathXmlApplicationContext("applicationContext.xml");
        //spring 和 web 整合后所有信息都存放在 webApplicationContext
        ApplicationContext ac = WebApplicationContextUtils.getRequiredWebApplicationContext(getServletContext());
        airportService=ac.getBean("airportService",AirportServiceImpl.class);
    }
    @Override
    protected void service(HttpServletRequest req, HttpServletResponse resp) throws ServletException, IOException {
        req.setAttribute("list", airportService.show());
        req.getRequestDispatcher("index.jsp").forward(req, resp);
    }
}


【推荐】国内首个AI IDE,深度理解中文开发场景,立即下载体验Trae
【推荐】编程新体验,更懂你的AI,立即体验豆包MarsCode编程助手
【推荐】抖音旗下AI助手豆包,你的智能百科全书,全免费不限次数
【推荐】轻量又高性能的 SSH 工具 IShell:AI 加持,快人一步
· 基于Microsoft.Extensions.AI核心库实现RAG应用
· Linux系列:如何用heaptrack跟踪.NET程序的非托管内存泄露
· 开发者必知的日志记录最佳实践
· SQL Server 2025 AI相关能力初探
· Linux系列:如何用 C#调用 C方法造成内存泄露
· Manus爆火,是硬核还是营销?
· 终于写完轮子一部分:tcp代理 了,记录一下
· 别再用vector<bool>了!Google高级工程师:这可能是STL最大的设计失误
· 震惊!C++程序真的从main开始吗?99%的程序员都答错了
· 单元测试从入门到精通