centos加密隧道openxxx的使用

vpn概述

连接与管理内网
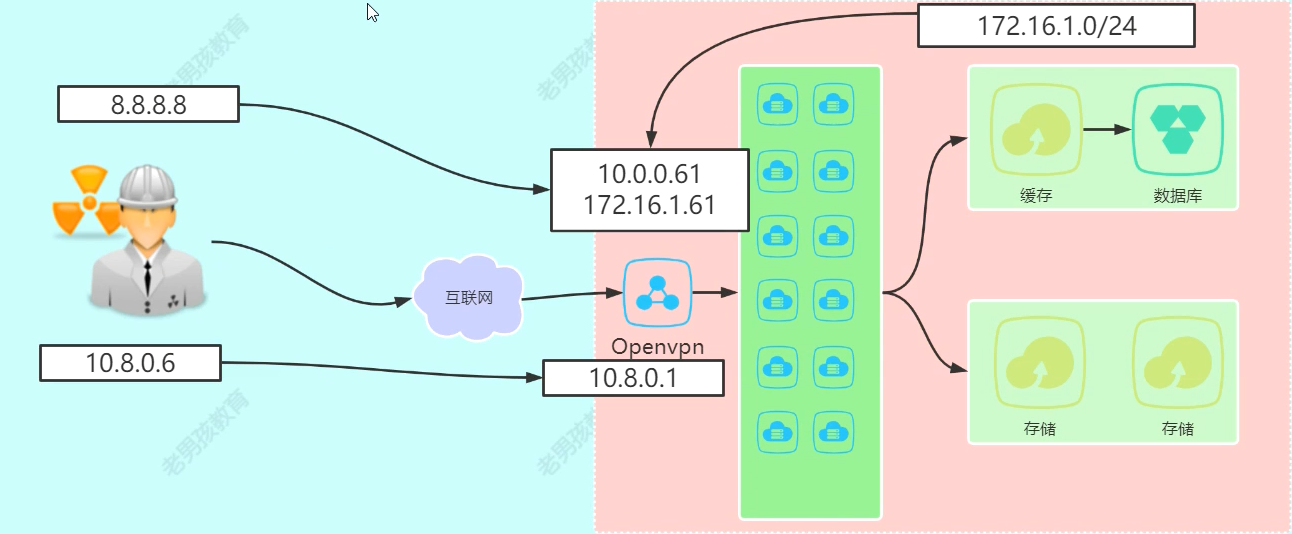
openxxx应用场景

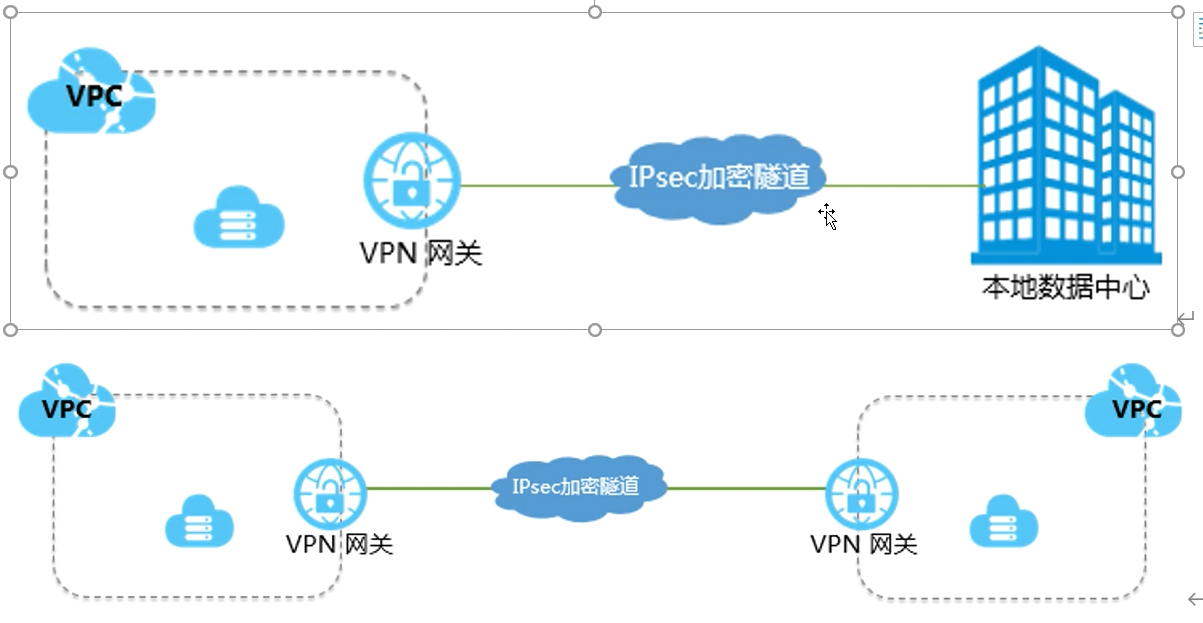
安装:
easy-rsa 生成证书文件
yum install -y easy-rsa
[root@localhost ~]# rpm -ql easy-rsa
/usr/share/doc/easy-rsa-3.0.8
/usr/share/doc/easy-rsa-3.0.8/COPYING.md
/usr/share/doc/easy-rsa-3.0.8/ChangeLog
/usr/share/doc/easy-rsa-3.0.8/README.md
/usr/share/doc/easy-rsa-3.0.8/README.quickstart.md
/usr/share/doc/easy-rsa-3.0.8/vars.example
/usr/share/easy-rsa
/usr/share/easy-rsa/3
/usr/share/easy-rsa/3.0
/usr/share/easy-rsa/3.0.8
/usr/share/easy-rsa/3.0.8/easyrsa
/usr/share/easy-rsa/3.0.8/openssl-easyrsa.cnf
/usr/share/easy-rsa/3.0.8/x509-types
/usr/share/easy-rsa/3.0.8/x509-types/COMMON
/usr/share/easy-rsa/3.0.8/x509-types/ca
/usr/share/easy-rsa/3.0.8/x509-types/client
/usr/share/easy-rsa/3.0.8/x509-types/code-signing
/usr/share/easy-rsa/3.0.8/x509-types/email
/usr/share/easy-rsa/3.0.8/x509-types/kdc
/usr/share/easy-rsa/3.0.8/x509-types/server
/usr/share/easy-rsa/3.0.8/x509-types/serverClient
/usr/share/licenses/easy-rsa-3.0.8
/usr/share/licenses/easy-rsa-3.0.8/gpl-2.0.txt
[root@localhost easy-rsa]mkdir /opt/easy-rsa
[root@localhost easy-rsa]cd /opt/easy-rsa/
[root@localhost easy-rsa]/usr/bin/cp -a /usr/share/easy-rsa/3.0.8/* ./
[root@localhost easy-rsa]/usr/bin/cp -a /usr/share/doc/easy-rsa-3.0.8//vars.example ./vars


[root@localhost easy-rsa]egrep -v '^$|^#' vars   #ca证书信息内容
if [ -z "$EASYRSA_CALLER" ]; then
echo "You appear to be sourcing an Easy-RSA 'vars' file." >&2
echo "This is no longer necessary and is disallowed. See the section called" >&2
echo "'How to use this file' near the top comments for more details." >&2
return 1
fi
set_var EASYRSA_DN "cn_only"
set_var EASYRSA_REQ_COUNTRY "US"
set_var EASYRSA_REQ_PROVINCE "California"
set_var EASYRSA_REQ_CITY "San Francisco"
set_var EASYRSA_REQ_ORG "Copyleft Certificate Co"
set_var EASYRSA_REQ_EMAIL "me@example.net"
set_var EASYRSA_REQ_OU "My Organizational Unit"
[root@localhost easy-rsa]# tree
.
├── easyrsa
├── openssl-easyrsa.cnf
├── vars
└── x509-types
├── ca
├── client
├── code-signing
├── COMMON
├── email
├── kdc
├── server
└── serverClient
1 directory, 11 files
服务端:
1初始化,在当前目录创建PKI目录 用于存储证书
[root@localhost easy-rsa]# ./easyrsa init-pki

Note: using Easy-RSA configuration from: /opt/easy-rsa/vars

init-pki complete; you may now create a CA or requests.
Your newly created PKI dir is: /opt/easy-rsa/pki
2,创建根证书,会提示设置密码,用于ca对之后社鞥承德server和client证书签名时使用,其他可默认
[root@localhost easy-rsa]# ./easyrsa init-pki
Note: using Easy-RSA configuration from: /opt/easy-rsa/vars
init-pki complete; you may now create a CA or requests.
Your newly created PKI dir is: /opt/easy-rsa/pki
[root@localhost easy-rsa]# ./easyrsa build-ca
Note: using Easy-RSA configuration from: /opt/easy-rsa/vars
Using SSL: openssl OpenSSL 1.0.2k-fips 26 Jan 2017
Enter New CA Key Passphrase: 12345qwert
Re-Enter New CA Key Passphrase: 12345qwert
Generating RSA private key, 2048 bit long modulus
......+++
.................+++
e is 65537 (0x10001)
You are about to be asked to enter information that will be incorporated
into your certificate request.
What you are about to enter is what is called a Distinguished Name or a DN.
There are quite a few fields but you can leave some blank
For some fields there will be a default value,
If you enter '.', the field will be left blank.
-----
Common Name (eg: your user, host, or server name) [Easy-RSA CA]:回车
CA creation complete and you may now import and sign cert requests.
Your new CA certificate file for publishing is at:
/opt/easy-rsa/pki/ca.crt
3,创建server端证书和私钥文件,nopass表示不加密西药文件,其他可以默认
./easyrsa gen-req server nopass
[root@localhost easy-rsa]# ./easyrsa gen-req server nopass

Note: using Easy-RSA configuration from: /opt/easy-rsa/vars
Using SSL: openssl OpenSSL 1.0.2k-fips  26 Jan 2017
Generating a 2048 bit RSA private key
............+++
................................................+++
writing new private key to '/opt/easy-rsa/pki/easy-rsa-2165.MfJbuy/tmp.2RjCuv'
-----
You are about to be asked to enter information that will be incorporated
into your certificate request.
What you are about to enter is what is called a Distinguished Name or a DN.
There are quite a few fields but you can leave some blank
For some fields there will be a default value,
If you enter '.', the field will be left blank.
-----
Common Name (eg: your user, host, or server name) [server]:输入server

Keypair and certificate request completed. Your files are:
req: /opt/easy-rsa/pki/reqs/server.req 证书请求文件
key: /opt/easy-rsa/pki/private/server.key 私钥
4,给server端证书签名,首先是对一些信息的确认,可以输入yes 然后创建ca根证书时设置的密码
./easyrsa sign server server
[root@localhost easy-rsa]# ./easyrsa sign server server

Note: using Easy-RSA configuration from: /opt/easy-rsa/vars
Using SSL: openssl OpenSSL 1.0.2k-fips  26 Jan 2017


You are about to sign the following certificate.
Please check over the details shown below for accuracy. Note that this request
has not been cryptographically verified. Please be sure it came from a trusted
source or that you have verified the request checksum with the sender.

Request subject, to be signed as a server certificate for 825 days:

subject=
    commonName                = server


Type the word 'yes' to continue, or any other input to abort.
  Confirm request details: yes
Using configuration from /opt/easy-rsa/pki/easy-rsa-2334.A8Dytm/tmp.7XRcTo
Enter pass phrase for /opt/easy-rsa/pki/private/ca.key:   输入上面设置的密码 12345qwert
Check that the request matches the signature
Signature ok
The Subject's Distinguished Name is as follows
commonName            :ASN.1 12:'server'
Certificate is to be certified until Feb 14 10:16:15 2025 GMT (825 days)

Write out database with 1 new entries
Data Base Updated

Certificate created at: /opt/easy-rsa/pki/issued/server.crt   证书文件
[root@localhost easy-rsa]# tree
.
├── easyrsa
├── openssl-easyrsa.cnf
├── pki
│   ├── ca.crt
│   ├── certs_by_serial
│   │   └── EC7DB973FCAB4BD749B4A501CAD4E40D.pem
│   ├── index.txt
│   ├── index.txt.attr
│   ├── index.txt.attr.old
│   ├── index.txt.old
│   ├── issued
│   │   └── server.crt
│   ├── openssl-easyrsa.cnf
│   ├── private
│   │   ├── ca.key
│   │   └── server.key
│   ├── renewed
│   │   ├── certs_by_serial
│   │   ├── private_by_serial
│   │   └── reqs_by_serial
│   ├── reqs
│   │   └── server.req
│   ├── revoked
│   │   ├── certs_by_serial
│   │   ├── private_by_serial
│   │   └── reqs_by_serial
│   ├── safessl-easyrsa.cnf
│   ├── serial
│   └── serial.old
├── vars
└── x509-types
    ├── ca
    ├── client
    ├── code-signing
    ├── COMMON
    ├── email
    ├── kdc
    ├── server
    └── serverClient
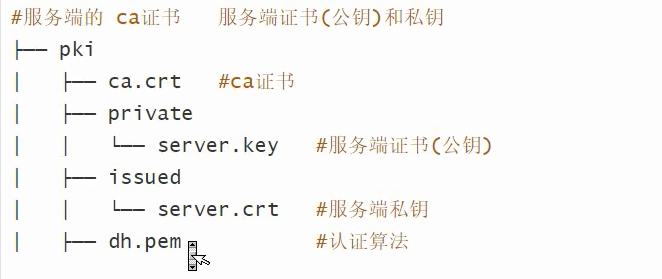
客户端:
5,创建Diffie-Hellman文件,秘钥交换时的Diffie-Hellman算法
./easyrsa gen-dh
root@localhost easy-rsa]# ./easyrsa gen-dh

Note: using Easy-RSA configuration from: /opt/easy-rsa/vars
Using SSL: openssl OpenSSL 1.0.2k-fips  26 Jan 2017
Generating DH parameters, 2048 bit long safe prime, generator 2
This is going to take a long time
..........................................+...................................................................................................................................
...................................................................................................................................................................................
...................................................+.........................................+.............................................................................................
............................+......................
DH parameters of size 2048 created at /opt/easy-rsa/pki/dh.pem
[root@localhost easy-rsa]# cat pki/dh.pem
-----BEGIN DH PARAMETERS-----
MIIBCAKCAQEA4Ipi5Vcgav0qkQTlB+YG67qownbmqV1DustHIKP0he2w9xB0JfpE
nJ1ujeFrTPYv1jZgCvLcONLQ2aI70nt3uRM+fvZFw/Z9OxfJ/IMdM+XXuoYMBUGK
IE1V/o0azRpIQcECYHVYWfCd59Eo0AvrRuXJIfb1xghTrOrmflxKCgc+pMcKXLtd
bPS635lc0k/TBlL+GVOgnpxQxO8XQPo8psW6ZOL0vJCJCOS0e+oNlktUt/IRuB+a
mGu0W4wmp05a5wymBPVGql65GY772CwxxDqKGFvFuu3SGDusxD/4AlSrmubEl042
88RDhphgQiFdp0+q371+NTLBdFp6IukyYwIBAg==
-----END DH PARAMETERS-----
6,创建client端证书和私钥文件,nopass表示不加密私钥文件,其他可默认
./easyrsa gen-req client nopass
[root@localhost easy-rsa]# ./easyrsa  gen-req client nopass

Note: using Easy-RSA configuration from: /opt/easy-rsa/vars
Using SSL: openssl OpenSSL 1.0.2k-fips  26 Jan 2017
Generating a 2048 bit RSA private key
...........................+++
..................................................................................................................................................................................+++
writing new private key to '/opt/easy-rsa/pki/easy-rsa-3035.pvNyW8/tmp.pN7dS5'
-----
You are about to be asked to enter information that will be incorporated
into your certificate request.
What you are about to enter is what is called a Distinguished Name or a DN.
There are quite a few fields but you can leave some blank
For some fields there will be a default value,
If you enter '.', the field will be left blank.
-----
Common Name (eg: your user, host, or server name) [client]:client

Keypair and certificate request completed. Your files are:
req: /opt/easy-rsa/pki/reqs/client.req
key: /opt/easy-rsa/pki/private/client.key
7,给client 端证书签名,首先是对一些信息的确认,可以输入yes,然后创建ca根证书时设置的密码
./easyrsa sign client client
[root@localhost easy-rsa]# ./easyrsa  sign client client

Note: using Easy-RSA configuration from: /opt/easy-rsa/vars
Using SSL: openssl OpenSSL 1.0.2k-fips  26 Jan 2017


You are about to sign the following certificate.
Please check over the details shown below for accuracy. Note that this request
has not been cryptographically verified. Please be sure it came from a trusted
source or that you have verified the request checksum with the sender.

Request subject, to be signed as a client certificate for 825 days:

subject=
    commonName                = client


Type the word 'yes' to continue, or any other input to abort.
  Confirm request details: yes
Using configuration from /opt/easy-rsa/pki/easy-rsa-3128.hNpEzr/tmp.NGulIF
Enter pass phrase for /opt/easy-rsa/pki/private/ca.key:输入12345qwert
Check that the request matches the signature
Signature ok
The Subject's Distinguished Name is as follows
commonName            :ASN.1 12:'client'
Certificate is to be certified until Feb 14 10:42:42 2025 GMT (825 days)

Write out database with 1 new entries
Data Base Updated

Certificate created at: /opt/easy-rsa/pki/issued/client.crt
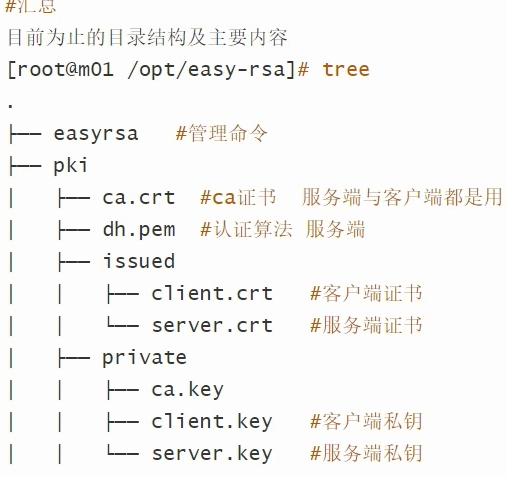
安装openvpn
yum install openvpn -y
yum install openvpn -y
已安装:
  openvpn.x86_64 0:2.4.12-1.el7

作为依赖被安装:
  lz4.x86_64 0:1.8.3-1.el7                                                                     pkcs11-helper.x86_64 0:1.11-3.el7

完毕!
[root@localhost ~]# rpm -ql openvpn
[root@localhost ~]# rpm -ql openvpn
/etc/openvpn
/etc/openvpn/client
/etc/openvpn/server
/run/openvpn-client
/run/openvpn-server
/usr/lib/systemd/system/openvpn-client@.service
/usr/lib/systemd/system/openvpn-server@.service
/usr/lib/systemd/system/openvpn@.service
/usr/lib/tmpfiles.d/openvpn.conf
/usr/lib64/openvpn
/usr/lib64/openvpn/plugins
/usr/lib64/openvpn/plugins/openvpn-plugin-auth-pam.so
/usr/lib64/openvpn/plugins/openvpn-plugin-down-root.so
/usr/sbin/openvpn
/usr/share/doc/openvpn-2.4.12
/usr/share/doc/openvpn-2.4.12/AUTHORS
/usr/share/doc/openvpn-2.4.12/COPYING
/usr/share/doc/openvpn-2.4.12/COPYRIGHT.GPL
/usr/share/doc/openvpn-2.4.12/ChangeLog
/usr/share/doc/openvpn-2.4.12/Changes.rst
/usr/share/doc/openvpn-2.4.12/README
/usr/share/doc/openvpn-2.4.12/README.auth-pam
/usr/share/doc/openvpn-2.4.12/README.down-root
/usr/share/doc/openvpn-2.4.12/README.systemd
/usr/share/doc/openvpn-2.4.12/contrib
/usr/share/doc/openvpn-2.4.12/contrib/OCSP_check
/usr/share/doc/openvpn-2.4.12/contrib/OCSP_check/OCSP_check.sh
/usr/share/doc/openvpn-2.4.12/contrib/README
/usr/share/doc/openvpn-2.4.12/contrib/openvpn-fwmarkroute-1.00
/usr/share/doc/openvpn-2.4.12/contrib/openvpn-fwmarkroute-1.00/README
/usr/share/doc/openvpn-2.4.12/contrib/openvpn-fwmarkroute-1.00/fwmarkroute.down
/usr/share/doc/openvpn-2.4.12/contrib/openvpn-fwmarkroute-1.00/fwmarkroute.up
/usr/share/doc/openvpn-2.4.12/contrib/pull-resolv-conf
/usr/share/doc/openvpn-2.4.12/contrib/pull-resolv-conf/client.down
/usr/share/doc/openvpn-2.4.12/contrib/pull-resolv-conf/client.up
/usr/share/doc/openvpn-2.4.12/management-notes.txt
/usr/share/doc/openvpn-2.4.12/sample
/usr/share/doc/openvpn-2.4.12/sample/sample-config-files
/usr/share/doc/openvpn-2.4.12/sample/sample-config-files/README
/usr/share/doc/openvpn-2.4.12/sample/sample-config-files/client.conf
/usr/share/doc/openvpn-2.4.12/sample/sample-config-files/firewall.sh
/usr/share/doc/openvpn-2.4.12/sample/sample-config-files/home.up
/usr/share/doc/openvpn-2.4.12/sample/sample-config-files/loopback-client
/usr/share/doc/openvpn-2.4.12/sample/sample-config-files/loopback-server
/usr/share/doc/openvpn-2.4.12/sample/sample-config-files/office.up
/usr/share/doc/openvpn-2.4.12/sample/sample-config-files/openvpn-shutdown.sh
/usr/share/doc/openvpn-2.4.12/sample/sample-config-files/openvpn-startup.sh
/usr/share/doc/openvpn-2.4.12/sample/sample-config-files/roadwarrior-client.conf
/usr/share/doc/openvpn-2.4.12/sample/sample-config-files/roadwarrior-server.conf
/usr/share/doc/openvpn-2.4.12/sample/sample-config-files/server.conf
/usr/share/doc/openvpn-2.4.12/sample/sample-config-files/static-home.conf
/usr/share/doc/openvpn-2.4.12/sample/sample-config-files/static-office.conf
/usr/share/doc/openvpn-2.4.12/sample/sample-config-files/tls-home.conf
/usr/share/doc/openvpn-2.4.12/sample/sample-config-files/tls-office.conf
/usr/share/doc/openvpn-2.4.12/sample/sample-config-files/xinetd-client-config
/usr/share/doc/openvpn-2.4.12/sample/sample-config-files/xinetd-server-config
/usr/share/doc/openvpn-2.4.12/sample/sample-scripts
/usr/share/doc/openvpn-2.4.12/sample/sample-scripts/auth-pam.pl
/usr/share/doc/openvpn-2.4.12/sample/sample-scripts/bridge-start
/usr/share/doc/openvpn-2.4.12/sample/sample-scripts/bridge-stop
/usr/share/doc/openvpn-2.4.12/sample/sample-scripts/ucn.pl
/usr/share/doc/openvpn-2.4.12/sample/sample-scripts/verify-cn
/usr/share/doc/openvpn-2.4.12/sample/sample-windows
/usr/share/doc/openvpn-2.4.12/sample/sample-windows/sample.ovpn
/usr/share/man/man8/openvpn.8.gz
/var/lib/openvpn
服务端配置文件
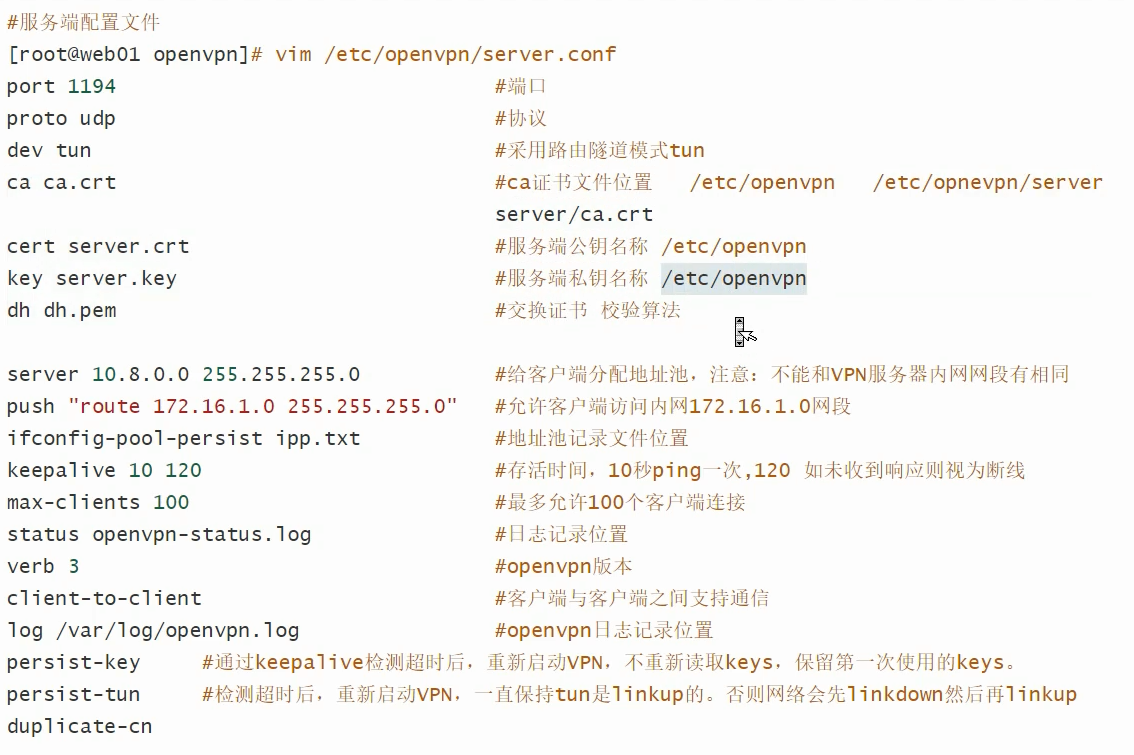
#local 192.168.1.5 #云主机内网ip
port 11094
proto tcp
dev tun

ca ca.crt
cert server.crt
key server.key
dh dh.pem

auth SHA512
#tls-crypt tc.key
topology subnet


server 10.8.0.0 255.255.255.0
push "redirect-gateway def1 bypass-dhcp"


ifconfig-pool-persist ipp.txt
#push "dhcp-option DNS 192.168.1.2"
keepalive 10 120
max-clients 100
status openvpn-status.log
log /var/log/openvpn.log
verb 3
client-to-client

#cipher AES-256-CBC
user nobody
group nobody
persist-key
persist-tun
duplicate-cn
cp /opt/easy-rsa/pki/ca.crt /etc/openvpn/
cp /opt/easy-rsa/pki/issued/server.crt /etc/openvpn/
cp /opt/easy-rsa/pki/private/server.key /etc/openvpn/
cp /opt/easy-rsa/pki/dh.pem /etc/openvpn/
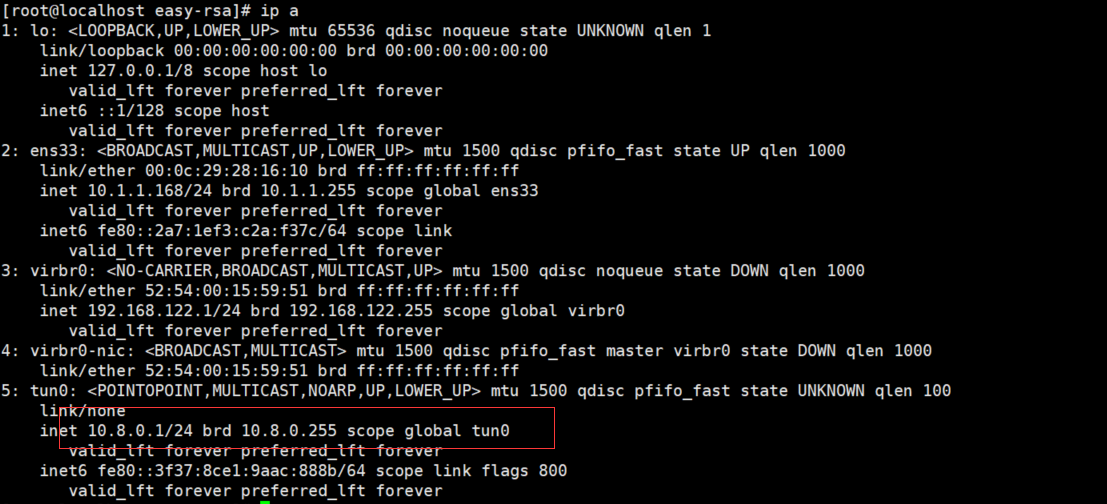
[root@localhost easy-rsa]# systemctl start openvpn@server

[root@localhost easy-rsa]# systemctl enable openvpn@server

[root@localhost easy-rsa]# tail -f /var/log/openvpn.log
Sun Nov 13 12:13:44 2022 Listening for incoming TCP connection on [AF_INET][undef]:11094
Sun Nov 13 12:13:44 2022 TCPv4_SERVER link local (bound): [AF_INET][undef]:11094
Sun Nov 13 12:13:44 2022 TCPv4_SERVER link remote: [AF_UNSPEC]
Sun Nov 13 12:13:44 2022 GID set to nobody
Sun Nov 13 12:13:44 2022 UID set to nobody
Sun Nov 13 12:13:44 2022 MULTI: multi_init called, r=256 v=256
Sun Nov 13 12:13:44 2022 IFCONFIG POOL: base=10.8.0.2 size=252, ipv6=0
Sun Nov 13 12:13:44 2022 IFCONFIG POOL LIST
Sun Nov 13 12:13:44 2022 MULTI: TCP INIT maxclients=100 maxevents=104
Sun Nov 13 12:13:44 2022 Initialization Sequence Completed


windows客户端:

 cd /opt/easy-rsa/
 sz pki/ca.crt
 sz pki/issued/client.crt
 sz pki/private/client.key
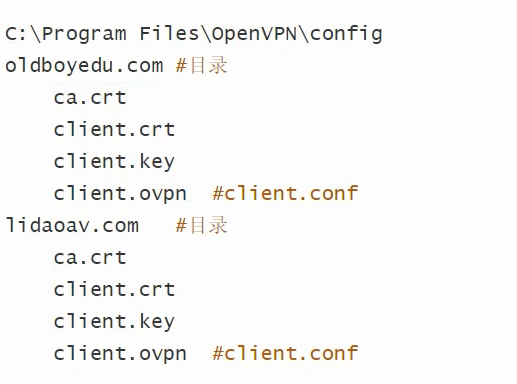
 把三个文件放入windows电脑的D:\soft\OpenVPN\config\local文件夹
 手动创建文件client.ovpn
client.ovpn
client
dev tun
proto tcp
remote 10.1.1.168 1194
route-metric 50
resolv-retry infinite
nobind
persist-key
persist-tun
remote-cert-tls server
verb 3
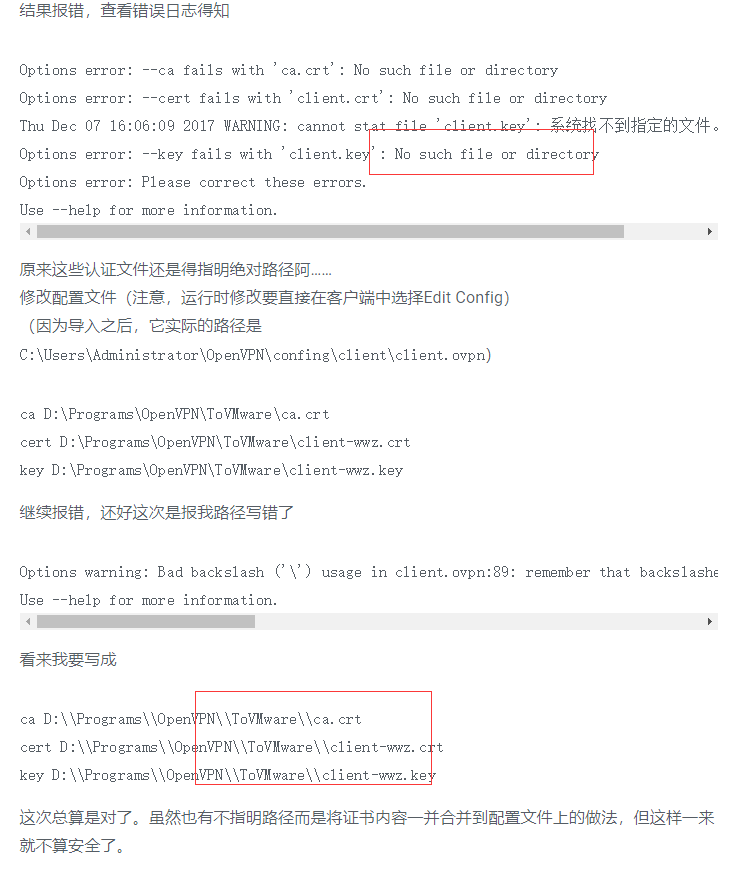
ca ca.crt
cert client.crt
key client.key

windows导入配置 启动
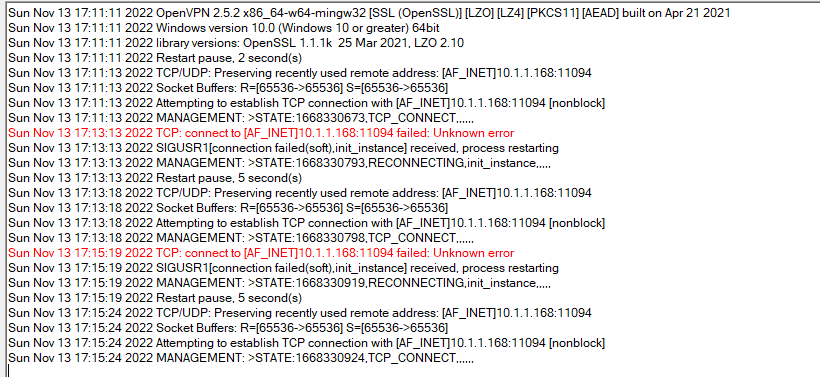
telnet链接不上

查看防火墙
[root@localhost ~]# iptables -F
[root@localhost ~]# iptables -nL
telnet成功 端口可以链接了

重新链接客户端
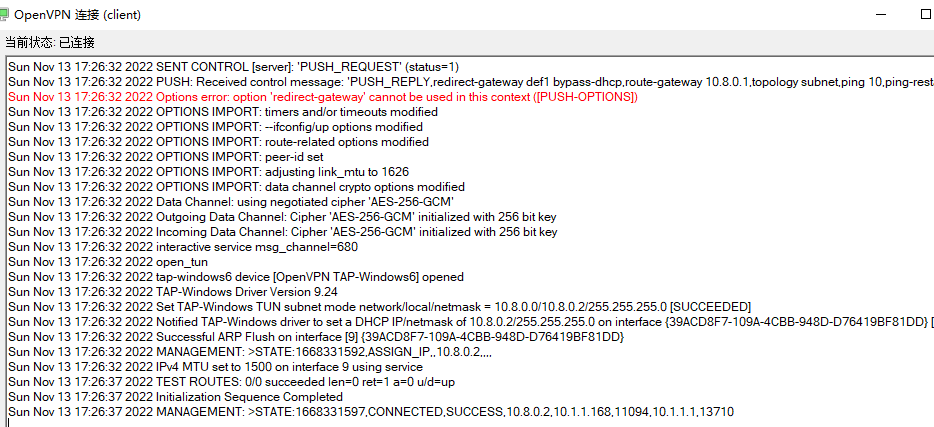

本地windows电脑依然无法ping同虚拟机的第二张网卡

查看window路由表
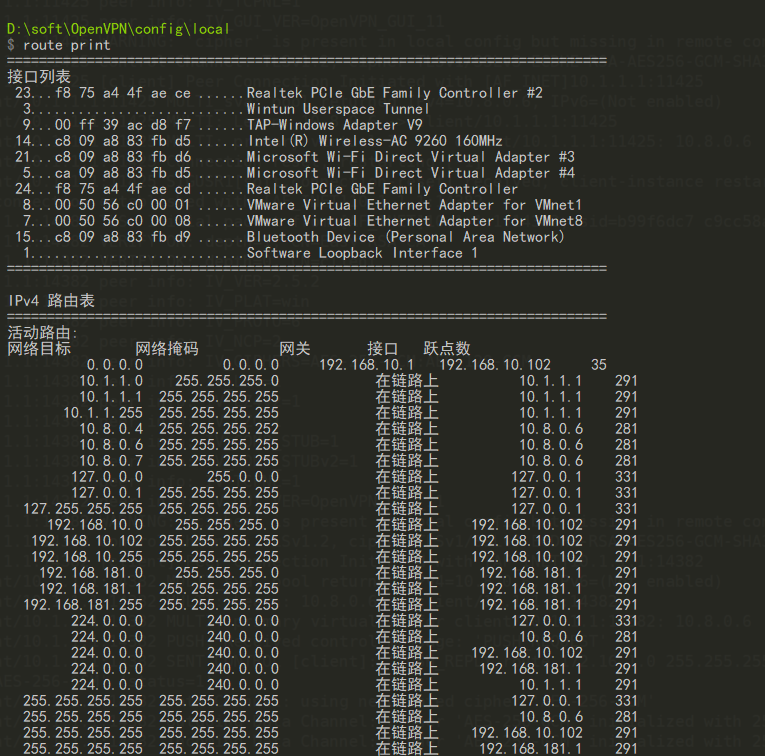
查看服务器路由表

tcpdump -nnn -i tun0 icmp


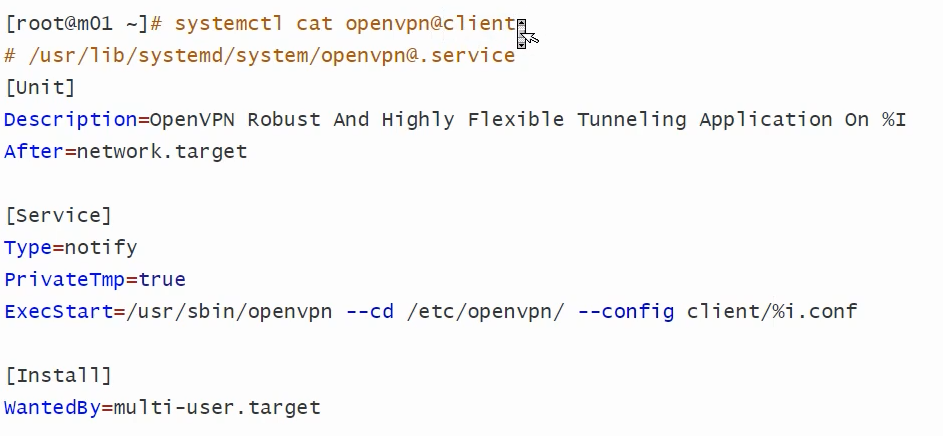
查看启动配置文件
[root@localhost ~]# systemctl cat openvpn@server.service
# /usr/lib/systemd/system/openvpn@.service
[Unit]
Description=OpenVPN Robust And Highly Flexible Tunneling Application On %I
After=network.target

[Service]
Type=notify
PrivateTmp=true
ExecStart=/usr/sbin/openvpn --cd /etc/openvpn/ --config %i.conf

[Install]
WantedBy=multi-user.target
opunvpn linux客户端
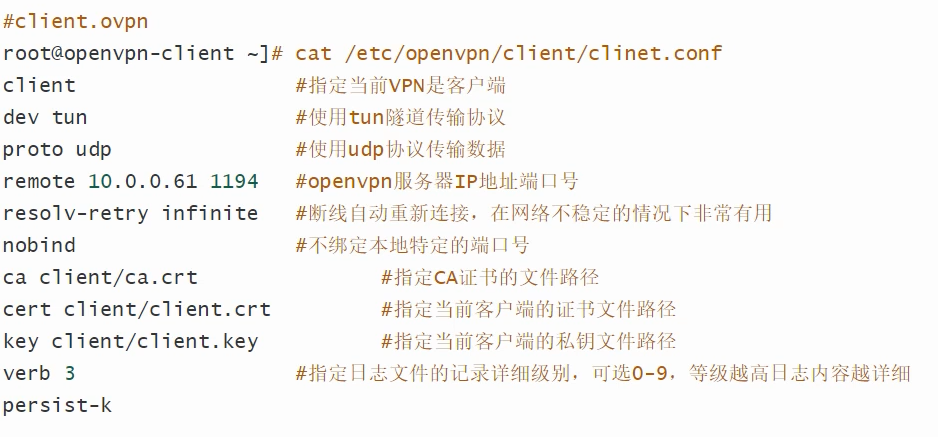
手动启动:

openvpn统一身份认证体系解决方案
在/etc/openvpn/server.conf中添加如下配置
script-security 3
auth-user-pass-verify "/etc/openvpn/checkpsw.sh" via-env
#client-cert-not-required
username-as-common-name
说明:
script-security 3 使用3级别开启脚本使用功能
auth-user-pass-verify /etc/openvpn/checkpsw.sh via-env使用脚本验证本地文件
client-cert-not-required 不验证客户端证书,如果启用证书和密码双重认证注释此行username-as-common-name 使用客户提供的UserName作为CommonName
在/etc/openvpn下新建脚本文件checkpsw.sh
#!/bin/sh
###########################################################
# checkpsw.sh (C) 2004 Mathias Sundman <mathias@openvpn.se>
#
# This script will authenticate OpenVPN users against
# a plain text file. The passfile should simply contain
# one row per user with the username first followed by
# one or more space(s) or tab(s) and then the password.
PASSFILE="/etc/openvpn/openvpnfile"
LOG_FILE="/var/log/openvpn-password.log"
TIME_STAMP=`date "+%Y-%m-%d %T"`
###########################################################
if [ ! -r "${PASSFILE}" ]; then
echo "${TIME_STAMP}: Could not open password file \"${PASSFILE}\" for reading." >> ${LOG_FILE}
exit 1
fi
CORRECT_PASSWORD=`awk '!/^;/&&!/^#/&&$1=="'${username}'"{print $2;exit}' ${PASSFILE}`
if [ "${CORRECT_PASSWORD}" = "" ]; then
echo "${TIME_STAMP}: User does not exist: username=\"${username}\", password=\"${password}\"." >> ${LOG_FILE}
exit 1
fi
if [ "${password}" = "${CORRECT_PASSWORD}" ]; then
echo "${TIME_STAMP}: Successful authentication: username=\"${username}\"." >> ${LOG_FILE}
exit 0
fi
echo "${TIME_STAMP}: Incorrect password: username=\"${username}\", password=\"${password}\"." >> ${LOG_FILE}
exit 1
赋予可执行权限
chmod u+x checkpsw.sh
chmod 655 checkpsw.sh
新建密码文件/etc/openvpn/openvpnfile,前面是用户,后面是密码,每行一条,中间用空格或者tab键隔开
[root@localhost openvpn]# cat openvpnfile
sunlong 123
client002 123456
[root@localhost openvpn]#chmod 644 openvpnfile
重启openvpn
[root@localhost openvpn]# pkill openvpn
[root@localhost openvpn]# ps -ef|grep openvpn
root      2526  1574  0 14:55 pts/0    00:00:00 grep --color=auto openvpn
[root@localhost openvpn]# systemctl start openvpn@server.service
[root@localhost openvpn]# ps -ef|grep openvpn
nobody    2644     1  0 14:55 ?        00:00:00 /usr/sbin/openvpn --cd /etc/openvpn/ --config server.conf
root      2677  1574  0 14:55 pts/0    00:00:00 grep --color=auto openvpn
windows客户端配置
client
proto tcp
dev tun

auth-user-pass
remote 10.1.1.168 1194


resolv-retry infinite
nobind
persist-key
persist-tun
remote-cert-tls server
cipher AES-256-GCM

verb 3
ca D:\\soft\\OpenVPN\\config\\local\\ca.crt
cert D:\\soft\\OpenVPN\\config\\local\\client.crt
key D:\\soft\\OpenVPN\\config\\local\\client.key

key-direction 1
Linux客户端配置文件如下:
配置文件新增

auth-user-pass    auth-user-pass/etc/openvpn/openvpnfile
新建密码文件/etc/openvpn/openvpnfile,第一行为用户名,第二行为密码

client02
123456
添加到开机自启动

echo “/usr/local/sbin/openvpn--config /etc/openvpn/client.conf >/dev/null &”>>/etc/rc.local
此功能需要编译时加入–enable-password-save参数,即

./configure --enable-password-save --with-lzo-lib=/usr/local/lib --with-lzo-headers=/usr/local/include
否则会报如下错误:

'Auth' password cannot be read from a file
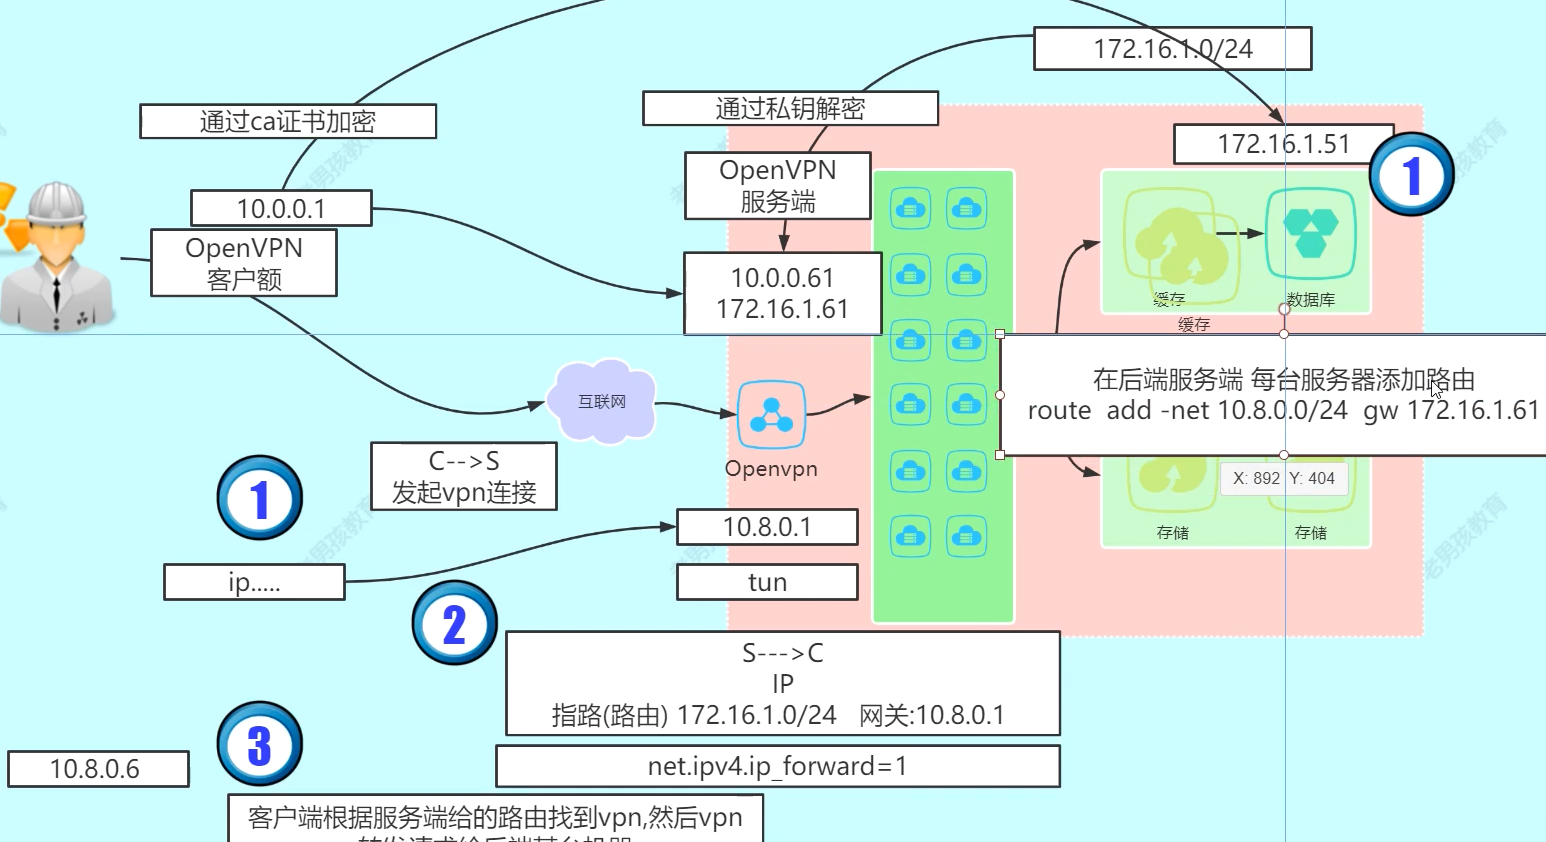
通过防火墙实现自动回包
本文来自博客园,作者:孙龙-程序员,转载请注明原文链接:https://www.cnblogs.com/sunlong88/p/16842388.html


【推荐】国内首个AI IDE,深度理解中文开发场景,立即下载体验Trae
【推荐】编程新体验,更懂你的AI,立即体验豆包MarsCode编程助手
【推荐】抖音旗下AI助手豆包,你的智能百科全书,全免费不限次数
【推荐】轻量又高性能的 SSH 工具 IShell:AI 加持,快人一步
· 没有Manus邀请码?试试免邀请码的MGX或者开源的OpenManus吧
· 无需6万激活码!GitHub神秘组织3小时极速复刻Manus,手把手教你使用OpenManus搭建本
· C#/.NET/.NET Core优秀项目和框架2025年2月简报
· DeepSeek在M芯片Mac上本地化部署
· 葡萄城 AI 搜索升级:DeepSeek 加持,客户体验更智能
2020-10-30 golang etcd clientv3.New()不报超时错误的问题解决