

安装环境
服务端:192.168.1.113
客户端:192.168.1.114
需求:114主机上 /opt/image/ 自动同步113主机上 /home/image/
服务端 192.168.1.113
1、安装 rsync
yum install rsync –y
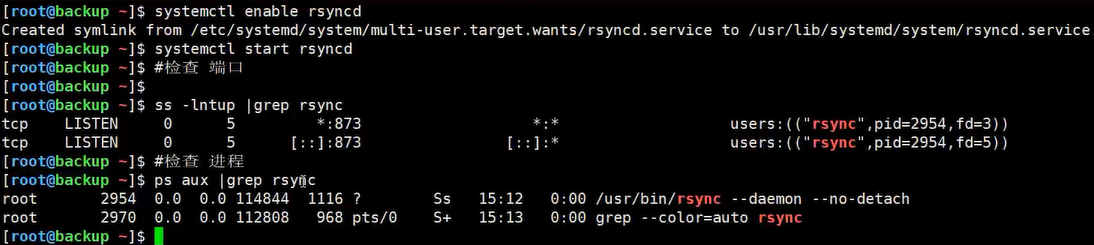
systemctl start rsyncd # 启动
systemctl enable rsyncd # 增加开机启动
systemctl restart rsyncd
2、参考配置文件
vi /etc/rsyncd.conf

uid = root
gid = root
use chroot = no
read only = no
max connections = 200
transfer logging = yes
log file =/var/log/rsyncd.log
timeout = 900

[image]
path = /home/image/
ignore erros
auth users = rsync
secrets file = /etc/rsyncd.secrets
hosts allow = 192.168.1.0/255.255.255.0
hosts deny = *
list = false
实战配置文件
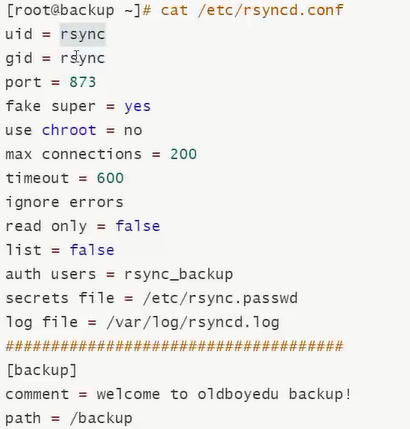
uid = rsync
gid = rsync
port = 873
fake super = yes
use chroot = no
max connections = 200
timeout = 900
ignore errors
read only = false
list = false
auth users = rsync
secrets file = /etc/rsyncd.secrets
log file = /var/log/rsyncd.log
[backup]
comment = welcome to lodboyedu backup!
path = /backup
创建rsync用户和用户组(安装rsync默认创建了)
#查看rsync用户是否存在
[root@localhost /]# id rsync
uid=1006(rsync) gid=1006(rsync) 组=1006(rsync)

# 不存在rsync就创建组与系统用户
[root@localhost /]#groupadd rsync -g 666
[root@localhost /]#useradd rsync -u 666 -g 666 -M -s /sbin/nologin -r
创建服务端用户和密码文件 备份文件目录
[root@localhost /]#echo "rsync:123456" > /etc/rsyncd.secrets
[root@localhost /]#chmod 600 /etc/rsyncd.secrets
[root@localhost backup]# ll /etc/rsyncd.secrets
-rw------- 1 root root 13 10月 16 16:11 /etc/rsyncd.secrets
[root@localhost backup]# ll /etc/rsyncd.conf
-rw-r--r-- 1 root root 297 10月 16 17:14 /etc/rsyncd.conf
[root@localhost /]#mkdir -p /backup
[root@localhost /]#chown -R rsync.rsync /backup
防火墙
# 防火墙
firewall-cmd --permanent --add-port=873/tcp
firewall-cmd --reload
# 启动服务
systemctl start rsyncd
systemctl enable --now rsyncd

-A INPUT -p tcp -m state --state NEW -m tcp --dport 873 -j ACCEPT
检查软件是否安装
rpm -qa |grep rsync
配置文件
1,用户rsync
2,密码文件 权限600/640
3,共享目录/backup
3,启动服务
systemctl start rsyncd
systemctl enable rsyncd
配置说明:
# 设置服务器信息提示文件名称,在该文件中编写提示信息
motd file = /etc/rsyncd.motd

# 开启Rsync数据传输日志功能
transfer logging = yes

# 设置日志文件名称,可以通过log format参数设置日志格式
log file =/var/log/rsyncd.log

# 设置Rsync进程号保存文件名称
pid file =/var/run/rsyncd.pid

# 设置锁文件名称
lock file =/var/run/rsync.lock

# 设置服务器监听的端口号,默认为873
port = 873

# 设置服务器所监听网卡接口的IP地址,这里服务器IP地址为192.168.0.254
address = 192.168.0.254

# 设置进行数据传输时所使用的账户名称或ID号,默认使用nobody
uid = nobody

# 设置进行数据传输时所使用的组名称或GID号,默认使用nobody
gid = nobody

# 设置user chroot为yes后,rsync会首先进行chroot设置,将根映射到path参数路径下,对客户
# 端而言,系统的根就是path参数所指定的路径。但这样做需要root权限,并且在同步符号
# 连接资料时仅会同步名称,而内容将不会同步。
use chroot = no

# 是否允许客户端上传数据,这里设置为只读。
read only = yes

# 设置并发连接数,0代表无限制。超出并发数后,则将会收到稍后重试的提示消息
max connections = 10

# 模块,Rsync通过模块定义同步的目录,模块以[name]的形式定义,这与Samba定义共享目录是一样的效果。
[common]

# comment定义注释说明字串
comment = Web content

# 同步目录的真实路径通过path指定
path = /common

# 忽略一些IO错误
ignore errors

# exclude可以指定例外的目录,即将common目录下的某个目录设置为不同步数据
exclude = test/

# 设置允许连接服务器的账户,账户可以是系统中不存在的用户
auth users = tom,jerry

# 设置密码验证文件名称,注意该文件的权限要求为只读,建议权限为600,仅在设置auth users 参数后有效
secrets file = /etc/rsyncd.secrets

# 设置允许哪些主机可以同步数据,可以是单个IP,也可以是网段,多个IP与网段之间使用空格分隔
hosts allow=192.168.0.0/255.255.255.0

# 设置拒绝所有(除hosts allow定义的主机外)
hosts deny=*

# 客户端请求显示模块列表时,本模块名称是否显示,默认为true
list= false
客户端 192.168.1.114
1、安装 rsync
yum install rsync –y

systemctl start rsyncd    # 启动
systemctl enable rsyncd   # 增加开机启动
2、客户端 创建同步目录
[root@localhost /]#mkdir -p /backup
[root@localhost /]#chown -R rsync.rsync /backup
3、创建 客户端 密码
echo "123456" > /root/passwd    # 同步时免密码
chmod 600 /root/passwd          # 修改权限
4、拉取同步 本例采用
# 192.168.1.114 拉取192.168.1.113 的数据
rsync -avz --password-file=/root/passwd rsync@192.168.1.113::image /opt/image/
[root@localhost backup]# rsync -avz --password-file=/root/passwd rsync@10.1.1.169::backup /backup
receiving incremental file list
./
10.txt
11.txt
12.txt
13.txt
14.txt
15.txt
5.txt
6.txt
7.txt
8.txt
9.txt

sent 240 bytes  received 702 bytes  1,884.00 bytes/sec
total size is 0  speedup is 0.00
推送同步
#192.168.1.114 推送数据至 192.168.1.113
rsync -avz --password-file=/root/passwd /opt/image/ rsync@192.168.1.113::image
[root@localhost backup]# rsync -avz --password-file=/root/passwd /backup rsync@10.1.1.168::backup
sending incremental file list
backup/
backup/5.txt
backup/6.txt
backup/7.txt
backup/8.txt
backup/9.txt

sent 413 bytes  received 123 bytes  1,072.00 bytes/sec
total size is 0  speedup is 0.00
错误相关
@ERROR: auth failed on module image
rsync error: error starting client-server protocol (code 5) at main.c(1503) [receiver=3.0.6]
1、客户端没有 /root/passwd 这个文件或密码不对,或服务器端 用户名和密码不对
2、/etc/rsyncd.secrets, /root/passwd 文件权限要 改成 600
————————————————
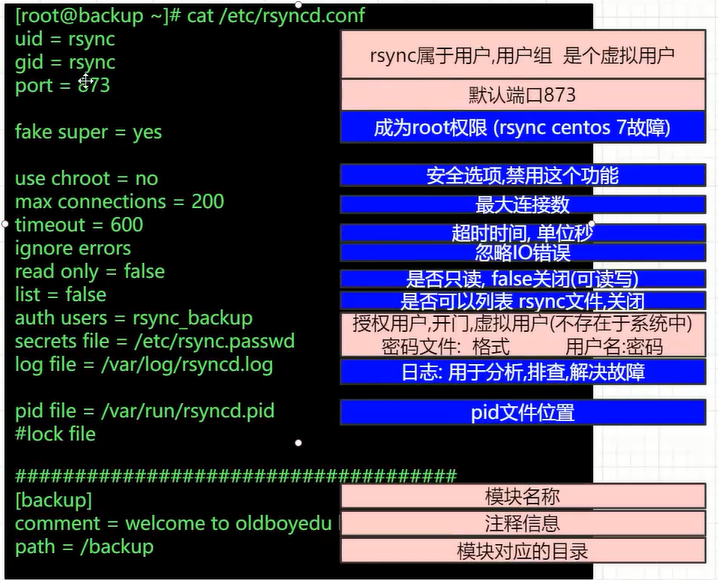
Centos 6.8 安装 rsync
安装(xinetd 与rsync)
chkconfig rsync on 与 service xinetd restart
配置文件 rsyncd.conf
mkdir /etc/rsyncd
touch /etc/rsyncd/{rsyncd.conf,rsyncd.secrets}
vim /etc/xinetd.d/rsync
# 指定配置文件
vim /etc/xinetd.d/rsync

{
        disable = no
        flags           = IPv6
        socket_type     = stream
        wait            = no
        user            = root
        server          = /usr/bin/rsync
        server_args     = --daemon --config=/etc/rsyncd/rsyncd.conf
        log_on_failure  += USERID
}
其他说明:
[root@backup ~]useradd -s /sbin/nologin -M rsync
[root@backup ~] cat -A /etc/rsync.passwd
rsync_backup:123456$
[root@backup ~] chmod 600 /etc/rsync.passwd
[root@backup ~] mkdir -p /backup
[root@backup ~] chown -R rsync.rsync  /backup/
rsync选项补充
-D #保持设备文件的信息
-L #保留软连接指向的目标文件
-e #使用的信道协议,指定代替rsh的shell程序
--delete #保持一直同步,两边一模一样,过于危险,不推荐加上
--bwlimit #限速
--partial #断点续传
--exclude= #同步的时候,排除某些文件
--exclude-from= 文件列表(文件内容里面都是要派出的)
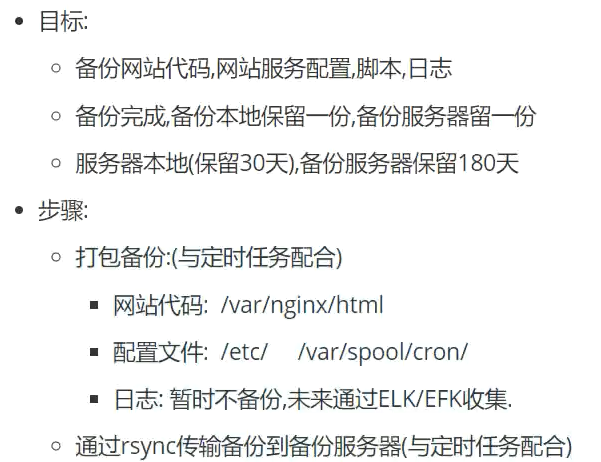
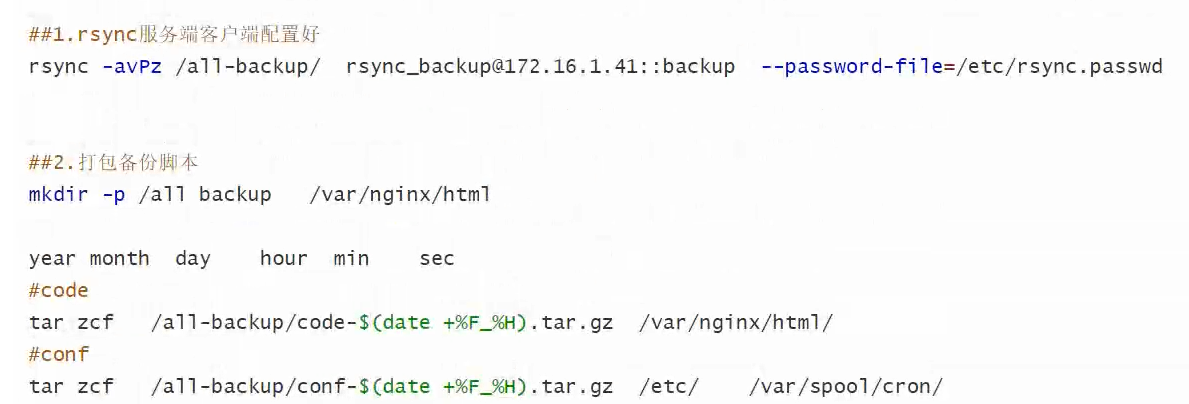
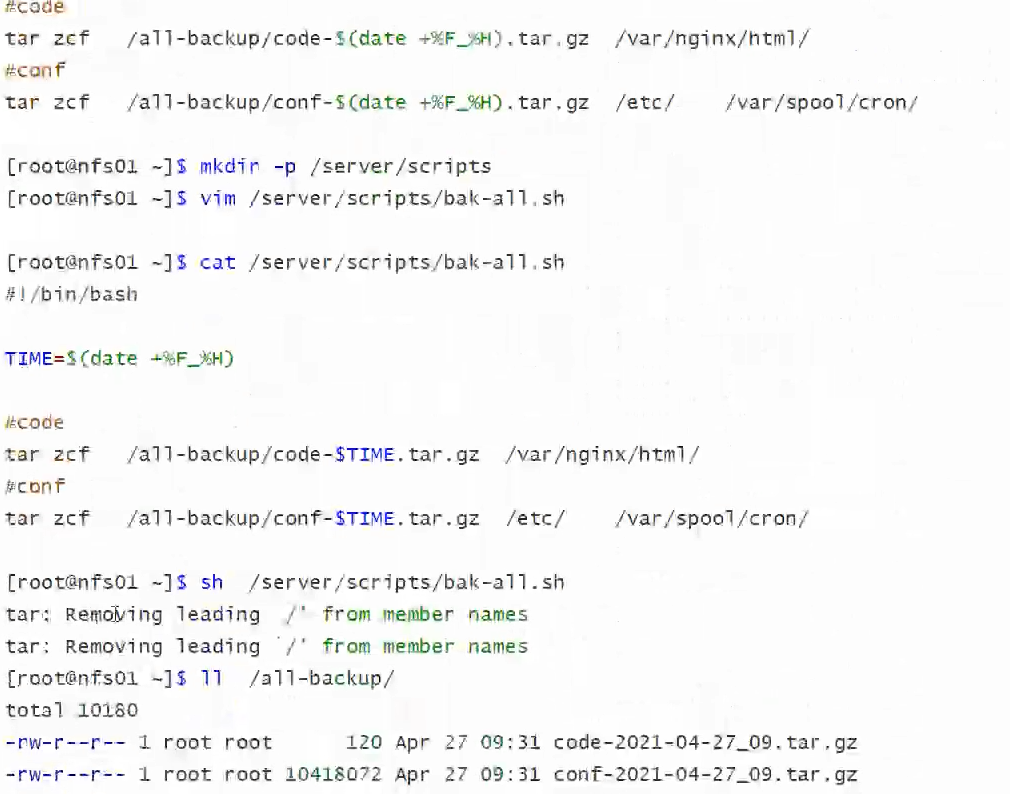
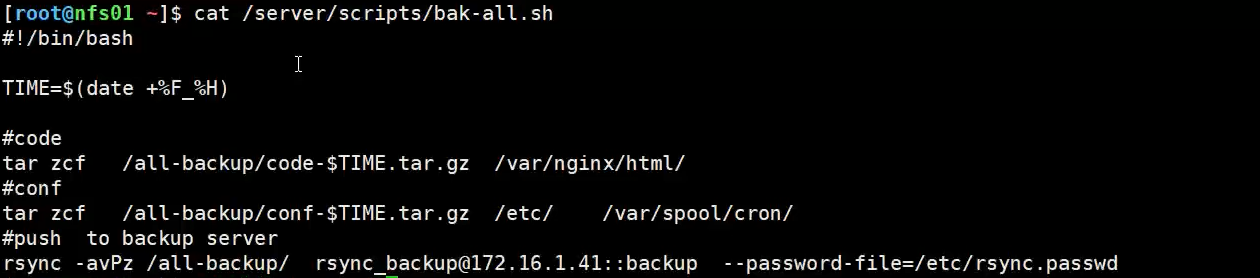
备份案例:


常见错误解决方案:
排除故障
***************************
1.@ERROR: auth failed on module xxxxx
    rsync: connection unexpectedly closed (90 bytes read so far)
    rsync error: error in rsync protocol data stream (code 12) at io.c(150)
    这是由于密码设错了, 没法登入成功, 请检查一下 rsyncd.scrt 中的密码, 二端是否一致?

安全

2.password file must not be other-accessible
    continuing without password file
    Password:
    这表示 rsyncd.scrt 的档案权限属性不对, 应设为 600。

服务器

3.@ERROR: chroot failed
    rsync: connection unexpectedly closed (75 bytes read so far)
    rsync error: error in rsync protocol data stream (code 12) at io.c(150)
    这一般是您的 rsyncd.conf 中的 path 路径所设的那个目录并不存在所致.请先用 mkdir开设好要备份目录

网络

4.@ERROR: access denied to www from unknown (192.168.1.123)
    rsync: connection unexpectedly closed (0 bytes received so far) [receiver]
    rsync error: error in rsync protocol data stream (code 12) at io.c(359)
    最后缘由终于找到了。由于有两个网段都须要同步该文件夹内容,但没有在hosts allow 后面添加另外一个IP段
    hosts allow = 192.168.1.0/24
    改成
    hosts allow = 192.168.1.0/24 192.168.2.0/24
    从新启动rsync服务,问题解决

ssh

5.rsync: failed to connect to 172.21.50.8: No route to host (113)
    rsync error: error in socket IO (code 10) at clientserver.c(104) [receiver=2.6.9]
    对方没开机、防火墙阻挡、经过的网络上有防火墙阻挡,都有可能。关闭防火墙,其实就是把tcp udp 的873端口打开
    启动服务:rsync --daemon --config=/etc/rsyncd.conf

socket

6.@ERROR: auth failed on module backup
    rsync error: error starting client-server protocol (code 5) at main.c(1506) [Receiver=3.0.7]
    client端没有设置/etc/rsync.pas这个文件,而在使用rsync命令的时候,加了这个参数--password-file=/etc/rsync.scrt

tcp

7.rsync: recv_generator: mkdir "/teacherclubBackup/rsync……" failed: No space left on device (28)
    *** Skipping any contents from this failed directory ***
    磁盘空间满了

ide

8.rsync: opendir "/kexue" (in dtsChannel) failed: Permission denied (13)
    同步目录的权限设置不对,改成755

测试

9.rsync: read error: Connection reset by peer (104)
    rsync error: error in rsync protocol data stream (code 12) at io.c(759) [receiver=3.0.5]
    未启动xinetd守护进程
    [root@CC02 /]# service xinetd start

ui

10.rsync: unable to open configuration file "/etc/rsyncd.conf": No such file or directory
    xnetid查找的配置文件位置默认是/etc下,在/etc下找不到rsyncd.conf文件

this

11.rsync: failed to connect to 203.100.192.66: Connection timed out (110)
    rsync error: error in socket IO (code 10) at clientserver.c(124) [receiver=3.0.5]
    链接服务器超时,检查服务器的端口netstat –tunlp,远程telnet测试


12.[root@client cron.daily.rsync]# sh root.sh
    ERROR: password file must not be other-accessible
    rsync error: syntax or usage error (code 1) at authenticate.c(175) [Receiver=3.0.9]
    建立密码文件,root用户用的是 rsyncroot.password,权限是600


13.如何经过ssh进行rsync,并且无须输入密码?
  能够经过如下几个步骤
  1. 经过ssh-keygen在server A上创建SSH keys,不要指定密码,你会在~/.ssh下看到identity和identity.pub文件
  2. 在server B上的home目录创建子目录.ssh
  3. 将A的identity.pub拷贝到server B上
  4. 将identity.pub加到~[user b]/.ssh/authorized_keys
  5. 因而server A上的A用户,可经过下面命令以用户B ssh到server B上了。e.g. ssh -l userB serverB。这样就使server A上的用户A就能够ssh以用户B的身份无需密码登录到server B上了。


14.如何经过在不危害安全的状况下经过防火墙使用rsync?
  解答以下:
   这一般有两种状况,一种是服务器在防火墙内,一种是服务器在防火墙外。不管哪一种状况,一般仍是使用ssh,这时最好新建一个备份用户,而且配置sshd 仅容许这个用户经过RSA认证方式进入。若是服务器在防火墙内,则最好限定客户端的IP地址,拒绝其它全部链接。
若是客户机在防火墙内,则能够简单容许防 火墙打开TCP端口22的ssh外发链接就ok了。


15.我能将更改过或者删除的文件也备份上来吗?
  固然能够。你可使用如:rsync -other -options -backupdir = ./backup-2000-2-13  ...这样的命令来实现。这样若是源文件:/path/to/some/file.c改变了,那么旧的文件就会被移到./backup- 2000-2-13/path/to/some/file.c,这里这个目录须要本身
手工创建起来


16.我须要在防火墙上开放哪些端口以适应rsync?
  视状况而定。rsync能够直接经过873端口的tcp链接传文件,也能够经过22端口的ssh来进行文件传递,但你也能够经过下列命令改变它的端口:
  rsync --port 8730 otherhost::
  或者
  rsync -e 'ssh -p 2002' otherhost:


17.我如何经过rsync只复制目录结构,忽略掉文件呢?
  rsync -av --include '*/' --exclude '*' source-dir dest-dir


18.为何我总会出现"Read-only file system"的错误呢?
  看看是否忘了设"read only = no"了


19. uid 4294967295 (-1) is impossible to set on

        在server端添加一行参数:

        fake super = yes

        重启rsync服务便可。再同步就不会出现错误信息了。
本文来自博客园,作者:孙龙-程序员,转载请注明原文链接:https://www.cnblogs.com/sunlong88/p/16722845.html

 浙公网安备 33010602011771号