MVVMLight -MVVM模型
为什么要使用 MVVM ?
使用MVVM主要是为了解耦,真正实现数据和视图的完全分离。
Model: 应用程序中数据逻辑的一部分,通常用模型对象对应数据库中的实体. Model->Entity
View: 视图部分,通常指前端页面或项用户展示的部分
在使用MVVMLight前,我是通过实现INotifyPropertyChanged接口的自定义基类 PropertyChangedBase,并在该类中实现接口PropertyChangedHandler 委托。增加对应的ReplayCommand 方法来实现,而Mvvmlight 替我们完成了这
些功能。
下面通过示例展示MVVM的简单使用和解决的问题:
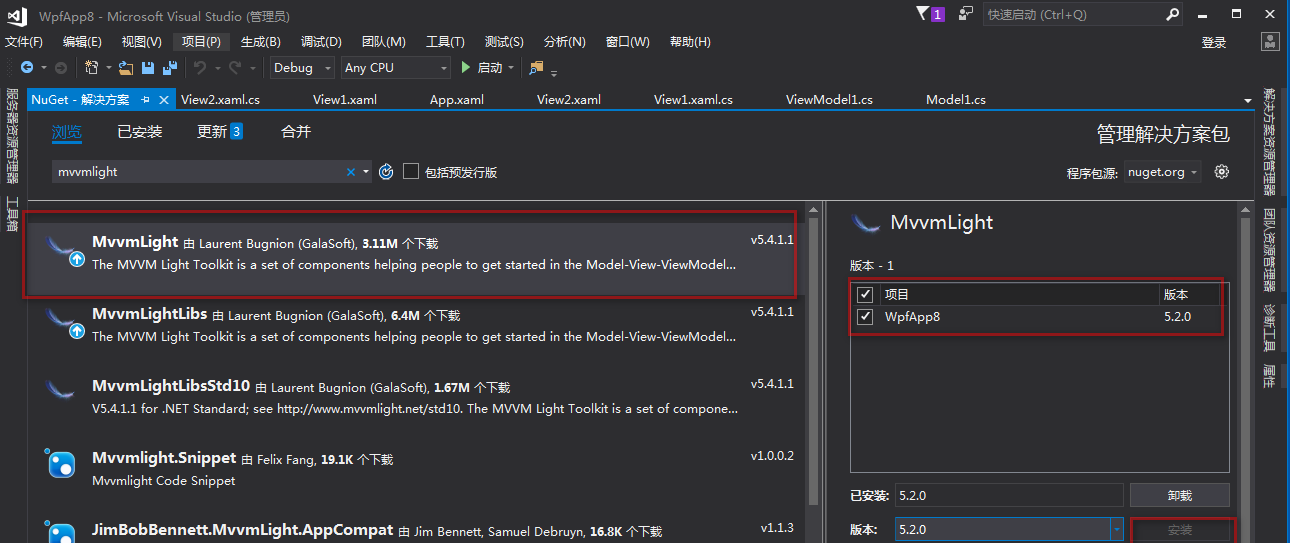
1.MVVMLight 的安装
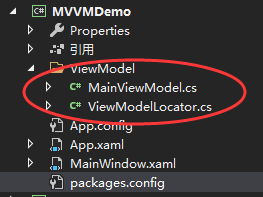
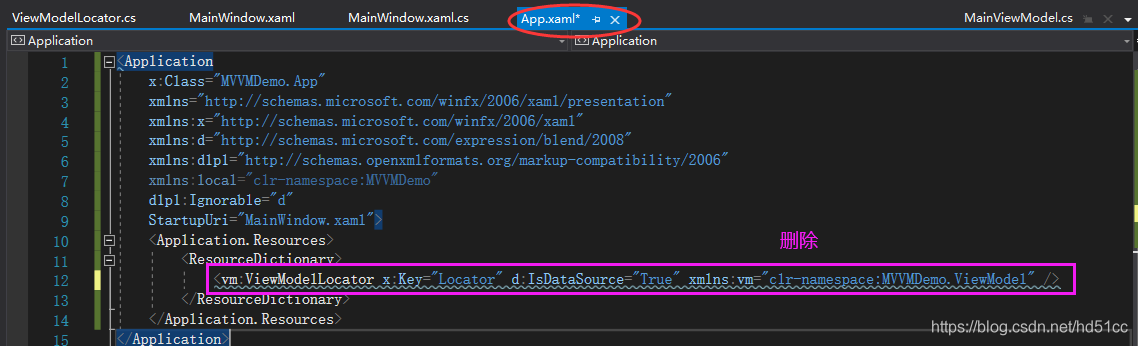
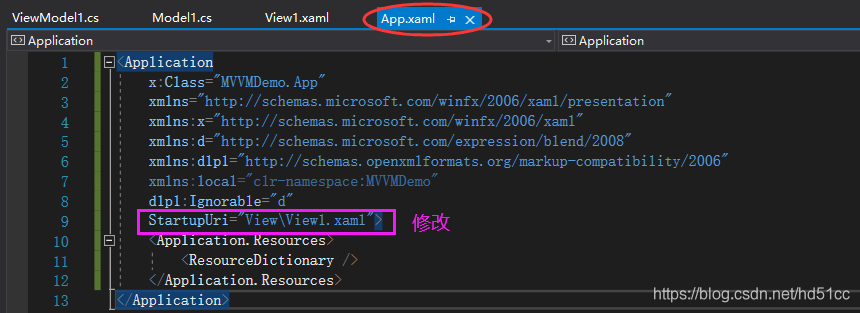
2.MVVM 安装以后,会在项目目录下生成“ViewModel” 文件夹,并在“App.xaml” 增加配置项信息
<Application
x:Class="MVVMDemo.App"
xmlns="http://schemas.microsoft.com/winfx/2006/xaml/presentation"
xmlns:x="http://schemas.microsoft.com/winfx/2006/xaml"
xmlns:d="http://schemas.microsoft.com/expression/blend/2008"
xmlns:d1p1="http://schemas.openxmlformats.org/markup-compatibility/2006"
xmlns:local="clr-namespace:MVVMDemo"
d1p1:Ignorable="d"
StartupUri="MainWindow.xaml">
<Application.Resources>
<ResourceDictionary>
<vm:ViewModelLocator x:Key="Locator" d:IsDataSource="True" xmlns:vm="clr-namespace:MVVMDemo.ViewModel" />
</ResourceDictionary>
</Application.Resources>
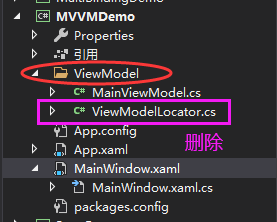
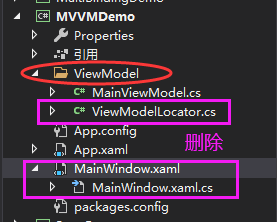
如果在项目中不需要上述模型,可以删除“MainViewModel”、“ViewModelLocator” 和 app.xaml 中 vm:xxx 部分,并重新编译!
需要删除:
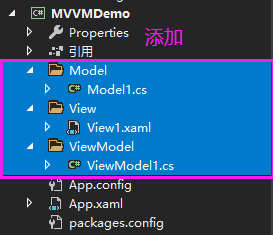
然后新建 Model(后台模型) 、View(前台UI) 、ViewModel (前台与后台关联处理) 三个文件夹
并创建自己所需的模型:Model View ModelView 等类
using GalaSoft.MvvmLight;
namespace WpfApp8.Model
{
public class Model1:ViewModelBase //继承该基类,它帮助我们实现了INotifyPropertyChanged接口,实现变化通知
{
private int number1;
private int number2;
private int sum;
public int Number1 {
get { return number1; }
set { number1 = value;
RaisePropertyChanged("Number1");}
}
public int Number2 {
get { return number2; }
set {
number2 = value;
RaisePropertyChanged();//这里不需要传递参数了,因为其实现了[CallMemberName]
}
}
public int Sum
{
get { return sum; }
set {
sum = value;
RaisePropertyChanged(); }
}
public void SumExe()
{
Sum = Number1 + Number2;
}
}
}
ViewModel:
using GalaSoft.MvvmLight;
using GalaSoft.MvvmLight.Command;
using WpfApp8.Model;
namespace WpfApp8.ViewModel
{
public class ViewModel1:ViewModelBase
{
private Model1 model1;
public Model1 ModelProp {
get {return model1; }
set
{
model1 = value;
RaisePropertyChanged();
}
}
public RelayCommand addCommand { get; set; }
public ViewModel1()
{
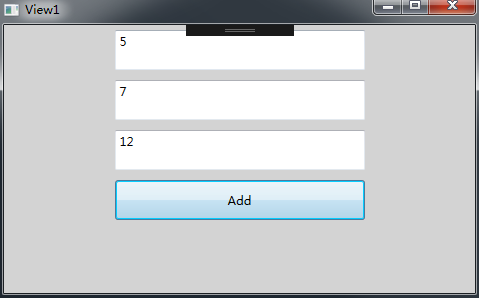
ModelProp = new Model1 { Number1 = 5, Number2 = 7 };
addCommand = new RelayCommand(ModelProp.SumExe);
}
}
}
View:
<Window x:Class="WpfApp8.View.View1"
xmlns="http://schemas.microsoft.com/winfx/2006/xaml/presentation"
xmlns:x="http://schemas.microsoft.com/winfx/2006/xaml"
xmlns:d="http://schemas.microsoft.com/expression/blend/2008"
xmlns:mc="http://schemas.openxmlformats.org/markup-compatibility/2006"
xmlns:local="clr-namespace:WpfApp8.View"
mc:Ignorable="d"
Title="View1" Height="450" Width="800" Background="LightGray">
<StackPanel>
<TextBox Width="250" Height="40" Margin="5" Text="{Binding ModelProp.Number1}" />
<TextBox Width="250" Height="40" Margin="5" Text="{Binding ModelProp.Number2}" />
<TextBox Width="250" Height="40" Margin="5" Text="{Binding ModelProp.Sum}" />
<Button
Width="250"
Height="40"
Margin="5"
Command="{Binding addCommand}"
Content="Add" />
</StackPanel>
</Window>
CS:
using WpfApp8.ViewModel;
namespace WpfApp8.View
{
/// <summary>
/// View1.xaml 的交互逻辑
/// </summary>
public partial class View1 : Window
{
public View1()
{
InitializeComponent();
this.DataContext = new ViewModel1();
}
}
}
效果1:
如果此时需要修改UI,则只需要更换UI元素即可:
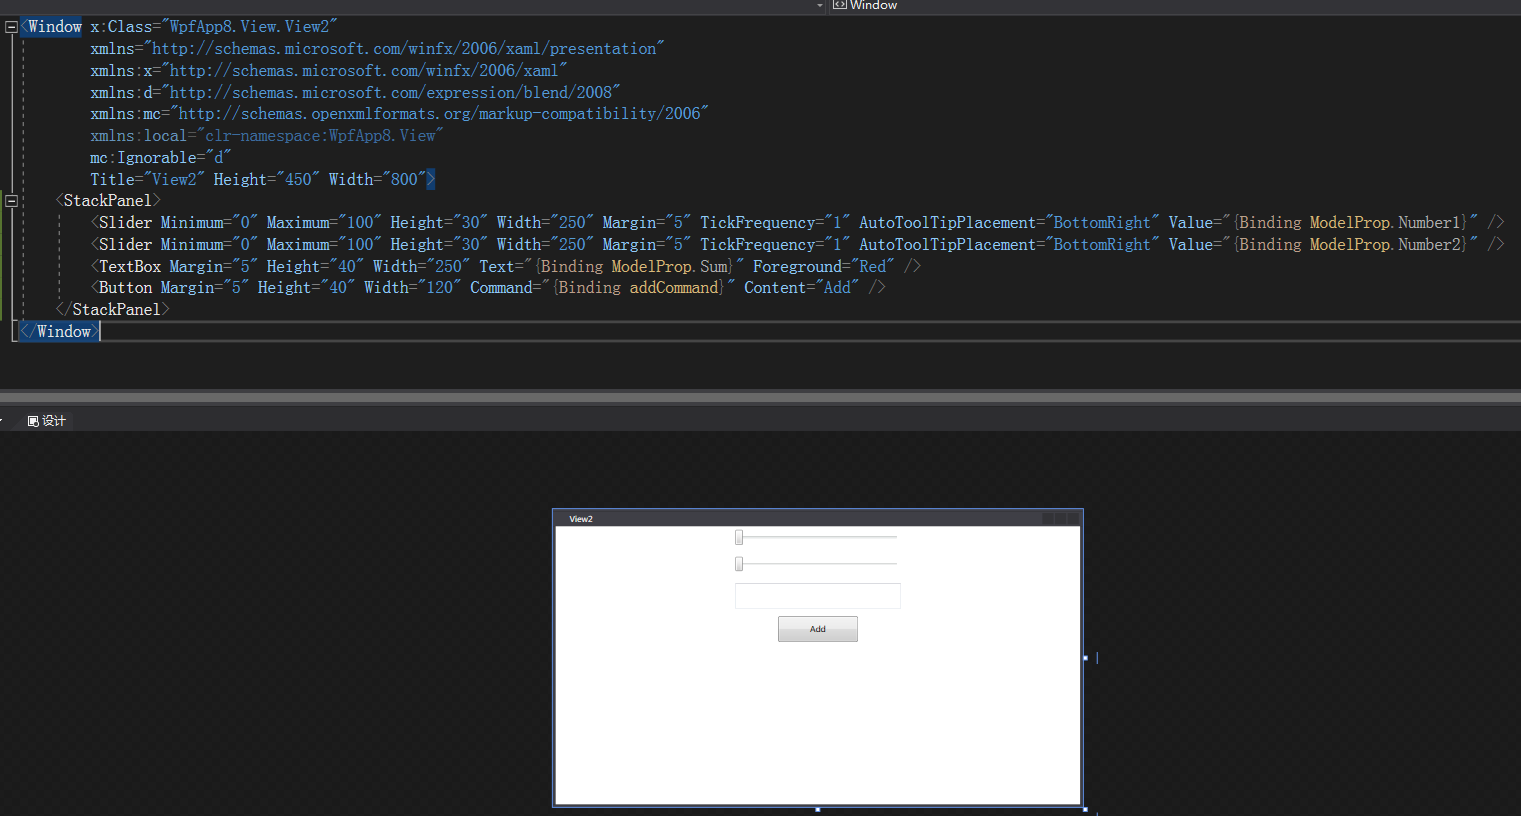
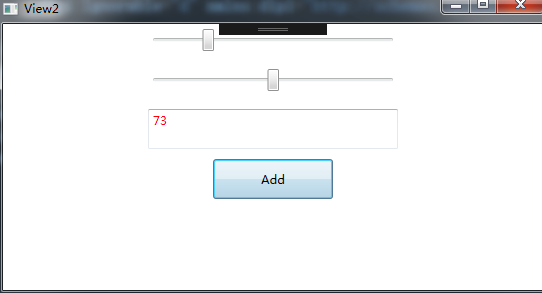
效果2:

 浙公网安备 33010602011771号