JUC
一、JUC是什么
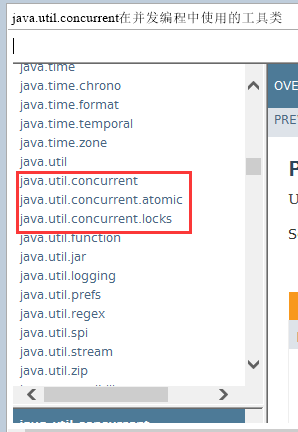
1、java.util.concurrent在并发编程中使用的工具类
2、进程/线程回顾
2.1 进程/线程是什么?


进程:进程是一个具有一定独立功能的程序关于某个数据集合的一次运行活动。它是操作系统动态执行的基本单元,在传统的操作系统中,进程既是基本的分配单元,也是基本的执行单元。

线程:通常在一个进程中可以包含若干个线程,当然一个进程中至少有一个线程,不然没有存在的意义。线程可以利用进程所拥有的资源,在引入线程的操作系统中,通常都是把进程作为分配资源的基本单位,而把线程作为独立运行和独立调度的基本单位,由于线程比进程更小,基本上不拥有系统资源,故对它的调度所付出的开销就会小得多,能更高效的提高系统多个程序间并发执行的程度。
2.2 进程/线程例子
 使用QQ,查看进程一定有一个QQ.exe的进程,我可以用qq和A文字聊天,和B视频聊天,给C传文件,给D发一段语言,QQ支持录入信息的搜索。

大四的时候写论文,用word写论文,同时用QQ音乐放音乐,同时用QQ聊天,多个进程。

word如没有保存,停电关机,再通电后打开word可以恢复之前未保存的文档,word也会检查你的拼写,两个线程:容灾备份,语法检查
2.3 线程状态
Thread.State


public enum State {
    /**
     * Thread state for a thread which has not yet started.
     */
    NEW,(新建)

    /**
     * Thread state for a runnable thread.  A thread in the runnable
     * state is executing in the Java virtual machine but it may
     * be waiting for other resources from the operating system
     * such as processor.
     */
    RUNNABLE,(准备就绪)

    /**
     * Thread state for a thread blocked waiting for a monitor lock.
     * A thread in the blocked state is waiting for a monitor lock
     * to enter a synchronized block/method or
     * reenter a synchronized block/method after calling
     * {@link Object#wait() Object.wait}.
     */
    BLOCKED,(阻塞)

    /**
     * Thread state for a waiting thread.
     * A thread is in the waiting state due to calling one of the
     * following methods:
     * <ul>
     *   <li>{@link Object#wait() Object.wait} with no timeout</li>
     *   <li>{@link #join() Thread.join} with no timeout</li>
     *   <li>{@link LockSupport#park() LockSupport.park}</li>
     * </ul>
     *
     * <p>A thread in the waiting state is waiting for another thread to
     * perform a particular action.
     *
     * For example, a thread that has called <tt>Object.wait()</tt>
     * on an object is waiting for another thread to call
     * <tt>Object.notify()</tt> or <tt>Object.notifyAll()</tt> on
     * that object. A thread that has called <tt>Thread.join()</tt>
     * is waiting for a specified thread to terminate.
     */
    WAITING,(不见不散)

    /**
     * Thread state for a waiting thread with a specified waiting time.
     * A thread is in the timed waiting state due to calling one of
     * the following methods with a specified positive waiting time:
     * <ul>
     *   <li>{@link #sleep Thread.sleep}</li>
     *   <li>{@link Object#wait(long) Object.wait} with timeout</li>
     *   <li>{@link #join(long) Thread.join} with timeout</li>
     *   <li>{@link LockSupport#parkNanos LockSupport.parkNanos}</li>
     *   <li>{@link LockSupport#parkUntil LockSupport.parkUntil}</li>
     * </ul>
     */
    TIMED_WAITING,(过时不候)

    /**
     * Thread state for a terminated thread.
     * The thread has completed execution.
     */
    TERMINATED;(终结)
}
2.4 wait/sleep区别
wait/sleep
功能都是当前线程暂停,有什么区别?

wait放开手去睡,放开手里的锁
sleep握紧手去睡,醒了手里还有锁
2.5 什么是并发、并行?
并发:多个操作在同一时间间隔内发生

并行:多个操作在同一时刻发生
二、Lock接口
1、复习Synchronized
1.1 多线程编程模板上
1、线程 操作 资源类
2、高内聚低耦合
1.2 实现步骤
1、创建资源类
2、资源类里创建同步方法、同步代码块
1.3 例子卖票程序
2、Lock
2.1 Lock是什么?
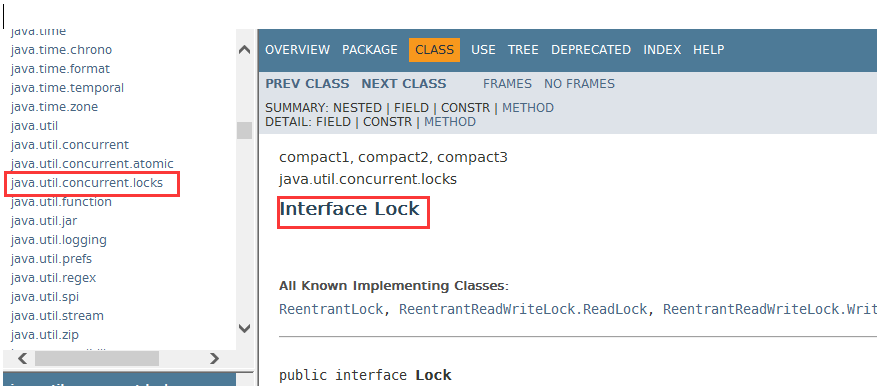
2.2 Lock接口的实现 ReentrantLock可重入锁
2.3 如何使用?
class X {
   private final ReentrantLock lock = new ReentrantLock();
   // ...

   public void m() {
     lock.lock();  // block until condition holds
     try {
       // ... method body
     } finally {
       lock.unlock()
     }
   }
 }
2.4 创建线程方式
public class SaleTicket extends Thread

java是单继承,资源宝贵,要用接口方式
Thread t1 = new Thread();
t1.start();
new Thread(Runnable r,String name)
->
new Thread(()->{},'A').start()
2.5 实现runnable方法
class MyThread implements Runnable//新建类实现runnable接口

new Thread(new MyThread,...)

这种方法会新增类,有更新更好的方法
new Thread(new Runnable() {
    @Override
    public void run() {

    }
   }, "your thread name").start();

 这种方法不需要创建新的类,可以new接口
new Thread(() -> {

 }, "your thread name").start();

  这种方法代码更简洁精炼
2.6 代码示例
package com.atguigu.thread;

import java.util.concurrent.locks.Lock;
import java.util.concurrent.locks.ReentrantLock;

class Ticket //实例例eld +method
{
 private int number=30;
/* //1同步 public synchronized void sale()
 {//2同步  synchronized(this) {}
  if(number > 0) {
    System.out.println(Thread.currentThread().getName()+"卖出"+(number--)+"\t 还剩number);
   }
 }*/

// Lock implementations provide more extensive locking operations
// than can be obtained using synchronized methods and statements.
 private Lock lock = new ReentrantLock();//List list = new ArrayList()

 public void sale()
 {
   lock.lock();

   try {
    if(number > 0) {
     System.out.println(Thread.currentThread().getName()+"卖出"+(number--)+"\t 还剩number);
    }
   } catch (Exception e) {
    e.printStackTrace();
   } finally {
    lock.unlock();
   }

 }

}


/**
 *
 * @Description:卖票程序个售票出  0张票
 @author xiale
 * 笔记:J里面如何 1 多线程编-上
    1.1 线程  (资里源类 *   1.2 高内聚 /
public class SaleTicket
{
 public static void main(String[] args)//main所有程序
   Ticket ticket = new Ticket();
   //Thread(Runnable target, String name) Allocates a new Thread object.


 new Thread(() -> {for (int i = 1; i < 40; i++)ticket.sale();}, "AA").start();
 new Thread(() -> {for (int i = 1; i < 40; i++)ticket.sale();}, "BB").start();
 new Thread(() -> {for (int i = 1; i < 40; i++)ticket.sale();}, "CC").start();


/*  new Thread(new Runnable() {
    @Override
    public void run()
    {
     for (int i = 1; i <=40; i++)
     {

       ticket.sale();
     }
    }
   }, "AA").start();

   new Thread(new Runnable() {
    @Override
    public void run()
    {
     for (int i = 1; i <=40; i++)
     {
       ticket.sale();
     }
    }
   }, "BB").start();
   new Thread(new Runnable() {
    @Override
    public void run()
    {
     for (int i = 1; i <=40; i++)
     {
       ticket.sale();
     }
    }
   }, "CC").start();
   */
 }
}


//1 class MyThread implements Runnable

//2 匿名内部类

//3 laExpress
三、Java8之lambda表达式复习
1、lambda表达式
1.1 什么是lambda?
Lambda 是一个匿名函数,我们可以把 Lambda
表达式理解为是一段可以传递的代码(将代码
像数据一样进行传递)。可以写出更简洁、更
灵活的代码。作为一种更紧凑的代码风格,使
Java的语言表达能力得到了提升。


Lambda 表达式在Java 语言中引入了一个新的语法元
素和操作符。这个操作符为 “->” , 该操作符被称
为 Lambda 操作符或剪头操作符。它将 Lambda 分为
两个部分:
左侧:指定了 Lambda 表达式需要的所有参数
右侧:指定了 Lambda 体,即 Lambda 表达式要执行
的功能
1.2 lambda表达式要求
lambda表达式,如果一个接口只有一个方法,我可以把方法名省略
Foo foo = () -> {System.out.println("****hello lambda");};
1.3 写法
拷贝小括号(),写死右箭头->,落地大括号{...}
1.4 函数式接口
lambda表达式,必须是函数式接口,必须只有一个方法
如果接口只有一个方法java默认它为函数式接口。
为了正确使用Lambda表达式,需要给接口加个注解:@FunctionalInterface
如有两个方法,立刻报错
2、接口里是否能有实现方法?
2.1 default方法实现?
接口里在java8后容许有接口的实现,default方法默认实现
default int div(int x,int y) {
  return x/y;
 }
接口里default方法可以有几个?
多个
2.2 静态方法实现
静态方法实现:接口新增
public static int sub(int x,int y){
  return x-y;
}
可以有几个?
多个
注意静态的叫类方法,能用foo去调吗?要改成Foo
3、代码实现
package com.atguigu.thread;
@FunctionalInterface
interface Foo{

// public void sayHello() ;
// public void say886() ;

 public int add(int x,int y);

 default int div(int x,int y) {
   return x/y;
 }

 public static int sub(int x,int y) {
   return x-y;
 }
}


/**
 *
 * @Description: Lambda Express-----> 函数式编程
 * 1 拷贝小括号(形参列表),写死右箭头 ->,落地大括号 {方法实现}
 * 2 有且只有一个public方法@FunctionalInterface注解增强定义
 * 3 default方法默认实现
 * 4 静态方法实现
 */
public class LambdaDemo
{
 public static void main(String[] args)
 {
//  Foo foo = new Foo() {
//   @Override
//   public void sayHello() {
//     System.out.println("Hello!!");
//   }
//
//   @Override
//   public void say886() {
//     // TODO Auto-generated method stub
//
//   }
//  };
//  foo.sayHello();
//  System.out.println("============");
//  foo = ()->{System.out.println("Hello!! lambda !!");};
//  foo.sayHello();

 Foo foo = (x,y)->{
   System.out.println("Hello!! lambda !!");
   return x+y;
   };

   int result = foo.add(3,5);
   System.out.println("******result="+result);
   System.out.println("******result div="+foo.div(10, 2));
   System.out.println("******result sub="+Foo.sub(10, 2));

 }
}
四、线程间通信
1、面试题:两个线程打印
两个线程,一个线程打印1-52,另一个打印字母A-Z打印顺序为12A34B...5152Z,
要求用线程间通信
2、线程间通信:
1、生产者+消费者
2、通知等待唤醒机制
3、多线程编程模板中
1、判断
2、干活
3、通知
4、sychronized实现
4.1 代码
package com.atguigu.thread;

import java.util.concurrent.locks.Condition;
import java.util.concurrent.locks.Lock;
import java.util.concurrent.locks.ReentrantLock;


class ShareDataOne//资源类
{
  private int number = 0;//初始值为零的一个变量

  public synchronized void increment() throws InterruptedException
  {
     //1判断
     if(number !=0 ) {
       this.wait();
     }
     //2干活
     ++number;
     System.out.println(Thread.currentThread().getName()+"\t"+number);
     //3通知
     this.notifyAll();
  }

  public synchronized void decrement() throws InterruptedException
  {
     // 1判断
     if (number == 0) {
       this.wait();
     }
     // 2干活
     --number;
     System.out.println(Thread.currentThread().getName() + "\t" + number);
     // 3通知
     this.notifyAll();
  }
}

/**
 *
 * @Description:
 *现在两个线程,
 * 可以操作初始值为零的一个变量,
 * 实现一个线程对该变量加1,一个线程对该变量减1,
 * 交替,来10轮。
 * @author xialei
 *
 *  * 笔记:Java里面如何进行工程级别的多线程编写
 * 1 多线程变成模板(套路)-----上
 *     1.1  线程    操作    资源类
 *     1.2  高内聚  低耦合
 * 2 多线程变成模板(套路)-----下
 *     2.1  判断
 *     2.2  干活
 *     2.3  通知

 */
public class NotifyWaitDemoOne
{
  public static void main(String[] args)
  {
     ShareDataOne sd = new ShareDataOne();
     new Thread(() -> {
       for (int i = 1; i < 10; i++) {
          try {
            sd.increment();
          } catch (InterruptedException e) {
            // TODO Auto-generated catch block
            e.printStackTrace();
          }
       }
     }, "A").start();
     new Thread(() -> {
       for (int i = 1; i < 10; i++) {
          try {
            sd.decrement();
          } catch (InterruptedException e) {
            // TODO Auto-generated catch block
            e.printStackTrace();
          }
       }
     }, "B").start();
  }
}
/*
 * *
 * 2 多线程变成模板(套路)-----下
 *     2.1  判断
 *     2.2  干活
 *     2.3  通知
 * 3 防止虚假唤醒用while
 *
 *
 * */
4.2 换成四个线程
换成4个线程会导致错误,虚假唤醒

原因:在java多线程判断时,不能用if,程序出事出在了判断上面,
突然有一添加的线程进到if了,突然中断了交出控制权,
没有进行验证,而是直接走下去了,加了两次,甚至多次
4.3 解决办法
package com.atguigu.thread;

import java.util.concurrent.locks.Condition;
import java.util.concurrent.locks.Lock;
import java.util.concurrent.locks.ReentrantLock;

import org.omg.IOP.Codec;


class ShareData//资源类
{
  private int number = 0;//初始值为零的一个变量

  public synchronized void increment() throws InterruptedException
  {
     //判断
     while(number!=0) {
       this.wait();
     }
     //干活
     ++number;
     System.out.println(Thread.currentThread().getName()+" \t "+number);
     //通知
     this.notifyAll();;
  }

  public synchronized void decrement() throws InterruptedException
  {
     //判断
     while(number!=1) {
       this.wait();
     }
     //干活
     --number;
     System.out.println(Thread.currentThread().getName()+" \t "+number);
     //通知
     this.notifyAll();
  }
}

/**
 *
 * @Description:
 *现在两个线程,
 * 可以操作初始值为零的一个变量,
 * 实现一个线程对该变量加1,一个线程对该变量减1,
 * 交替,来10轮。
 * @author xialei
 *
 *  * 笔记:Java里面如何进行工程级别的多线程编写
 * 1 多线程变成模板(套路)-----上
 *     1.1  线程    操作    资源类
 *     1.2  高内聚  低耦合
 * 2 多线程变成模板(套路)-----下
 *     2.1  判断
 *     2.2  干活
 *     2.3  通知

 */
public class NotifyWaitDemo
{
  public static void main(String[] args)
  {
     ShareData sd = new ShareData();
     new Thread(() -> {

       for (int i = 1; i <= 10; i++) {
          try {
            sd.increment();
          } catch (InterruptedException e) {
            e.printStackTrace();
          }
       }
     }, "A").start();

     new Thread(() -> {

       for (int i = 1; i <= 10; i++) {
          try {
            sd.decrement();
          } catch (InterruptedException e) {
            e.printStackTrace();
          }
       }
     }, "B").start();
     new Thread(() -> {

       for (int i = 1; i <= 10; i++) {
          try {
            sd.increment();
          } catch (InterruptedException e) {
            e.printStackTrace();
          }
       }
     }, "C").start();
     new Thread(() -> {

       for (int i = 1; i <= 10; i++) {
          try {
            sd.decrement();
          } catch (InterruptedException e) {
            e.printStackTrace();
          }
       }
     }, "D").start();

  }
}


/*
 * *
 * 2 多线程变成模板(套路)-----下
 *     2.1  判断
 *     2.2  干活
 *     2.3  通知
 * 3 防止虚假唤醒用while
 *
 *
 * */
5、多线程编程模板下
1、注意多线程之间的虚假唤醒
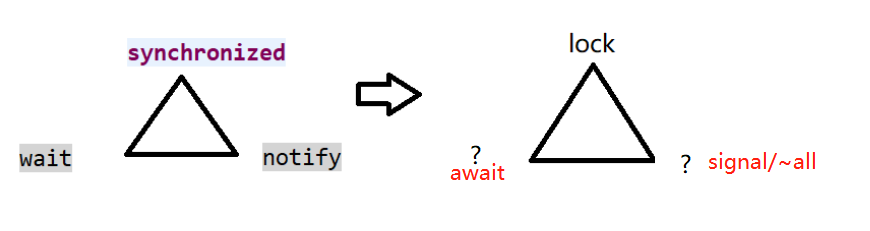
6、java8新版实现
对比:
代码实现:
package com.atguigu.thread;

import java.util.concurrent.locks.Condition;
import java.util.concurrent.locks.Lock;
import java.util.concurrent.locks.ReentrantLock;

import org.omg.IOP.Codec;


class ShareData//资源类
{
  private int number = 0;//初始值为零的一个变量

  private Lock lock = new ReentrantLock();
  private Condition condition  = lock.newCondition();

  public  void increment() throws InterruptedException
  {

      lock.lock();
         try {
          //判断
          while(number!=0) {
            condition.await();
          }
          //干活
          ++number;
          System.out.println(Thread.currentThread().getName()+" \t "+number);
          //通知
          condition.signalAll();
     } catch (Exception e) {
       e.printStackTrace();
     } finally {
       lock.unlock();
     }

  }


  public  void decrement() throws InterruptedException
  {

      lock.lock();
         try {
          //判断
          while(number!=1) {
            condition.await();
          }
          //干活
          --number;
          System.out.println(Thread.currentThread().getName()+" \t "+number);
          //通知
          condition.signalAll();
     } catch (Exception e) {
       e.printStackTrace();
     } finally {
       lock.unlock();
     }

  }

  /*public synchronized void increment() throws InterruptedException
  {
     //判断
     while(number!=0) {
       this.wait();
     }
     //干活
     ++number;
     System.out.println(Thread.currentThread().getName()+" \t "+number);
     //通知
     this.notifyAll();;
  }

  public synchronized void decrement() throws InterruptedException
  {
     //判断
     while(number!=1) {
       this.wait();
     }
     //干活
     --number;
     System.out.println(Thread.currentThread().getName()+" \t "+number);
     //通知
     this.notifyAll();
  }*/
}

/**
 *
 * @Description:
 *现在两个线程,
 * 可以操作初始值为零的一个变量,
 * 实现一个线程对该变量加1,一个线程对该变量减1,
 * 交替,来10轮。
 *
 *  * 笔记:Java里面如何进行工程级别的多线程编写
 * 1 多线程变成模板(套路)-----上
 *     1.1  线程    操作    资源类
 *     1.2  高内聚  低耦合
 * 2 多线程变成模板(套路)-----下
 *     2.1  判断
 *     2.2  干活
 *     2.3  通知

 */
public class NotifyWaitDemo
{
  public static void main(String[] args)
  {
     ShareData sd = new ShareData();
     new Thread(() -> {

       for (int i = 1; i <= 10; i++) {
          try {
            sd.increment();
          } catch (InterruptedException e) {
            e.printStackTrace();
          }
       }
     }, "A").start();

     new Thread(() -> {

       for (int i = 1; i <= 10; i++) {
          try {
            sd.decrement();
          } catch (InterruptedException e) {
            e.printStackTrace();
          }
       }
     }, "B").start();
     new Thread(() -> {

       for (int i = 1; i <= 10; i++) {
          try {
            sd.increment();
          } catch (InterruptedException e) {
            e.printStackTrace();
          }
       }
     }, "C").start();
     new Thread(() -> {

       for (int i = 1; i <= 10; i++) {
          try {
            sd.decrement();
          } catch (InterruptedException e) {
            e.printStackTrace();
          }
       }
     }, "D").start();

  }
}


/*
 * *
 * 2 多线程变成模板(套路)-----下
 *     2.1  判断
 *     2.2  干活
 *     2.3  通知
 * 3 防止虚假唤醒用while
 *
 *
 * */
五、线程间定制化调用通信
1、思路
1、有顺序通知,需要有标识位

2、有一个锁Lock,3把钥匙Condition

3、判断标志位

4、输出线程名+第几次+第几轮

5、修改标志位,通知下一个
2、代码实现
package com.atguigu.thread;

import java.util.concurrent.locks.Condition;
import java.util.concurrent.locks.Lock;
import java.util.concurrent.locks.ReentrantLock;


class ShareResource
{
  private int number = 1;//1:A 2:B 3:C
  private Lock lock = new ReentrantLock();
  private Condition c1 = lock.newCondition();
  private Condition c2 = lock.newCondition();
  private Condition c3 = lock.newCondition();

  public void print5(int totalLoopNumber)
  {
     lock.lock();
     try
     {
       //1 判断
       while(number != 1)
       {
          //A 就要停止
          c1.await();
       }
       //2 干活
       for (int i = 1; i <=5; i++)
       {
          System.out.println(Thread.currentThread().getName()+"\t"+i+"\t totalLoopNumber: "+totalLoopNumber);
       }
       //3 通知
       number = 2;
       c2.signal();
     } catch (Exception e) {
       e.printStackTrace();
     } finally {
       lock.unlock();
     }
  }
  public void print10(int totalLoopNumber)
  {
     lock.lock();
     try
     {
       //1 判断
       while(number != 2)
       {
          //A 就要停止
          c2.await();
       }
       //2 干活
       for (int i = 1; i <=10; i++)
       {
          System.out.println(Thread.currentThread().getName()+"\t"+i+"\t totalLoopNumber: "+totalLoopNumber);
       }
       //3 通知
       number = 3;
       c3.signal();
     } catch (Exception e) {
       e.printStackTrace();
     } finally {
       lock.unlock();
     }
  }

  public void print15(int totalLoopNumber)
  {
     lock.lock();
     try
     {
       //1 判断
       while(number != 3)
       {
          //A 就要停止
          c3.await();
       }
       //2 干活
       for (int i = 1; i <=15; i++)
       {
          System.out.println(Thread.currentThread().getName()+"\t"+i+"\t totalLoopNumber: "+totalLoopNumber);
       }
       //3 通知
       number = 1;
       c1.signal();
     } catch (Exception e) {
       e.printStackTrace();
     } finally {
       lock.unlock();
     }
  }
}


/**
 *
 * @Description:
 * 多线程之间按顺序调用,实现A->B->C
 * 三个线程启动,要求如下:
 *
 * AA打印5次,BB打印10次,CC打印15次
 * 接着
 * AA打印5次,BB打印10次,CC打印15次
 * ......来10轮
 *
 */
public class ThreadOrderAccess
{
  public static void main(String[] args)
  {
     ShareResource sr = new ShareResource();

     new Thread(() -> {
       for (int i = 1; i <=10; i++)
       {
          sr.print5(i);
       }
     }, "AA").start();
     new Thread(() -> {
       for (int i = 1; i <=10; i++)
       {
          sr.print10(i);
       }
     }, "BB").start();
     new Thread(() -> {
       for (int i = 1; i <=10; i++)
       {
          sr.print15(i);
       }
     }, "CC").start();


  }
}
六、NotSafeDemo
1、需求:请举例说明集合类是不安全的(见本章最后代码)
2、证明集合不安全
2.1 线程不安全错误
java.util.ConcurrentModificationException

ArrayList在迭代的时候如果同时对其进行修改就会
抛出java.util.ConcurrentModificationException异常
并发修改异常
2.2 原理
List<String> list = new ArrayList<>();
for (int i = 0; i <30 ; i++) {
            new Thread(()->{
                list.add(UUID.randomUUID().toString().substring(0,8));
                System.out.println(list);
            },String.valueOf(i)).start();
        }

看ArrayList的源码
public boolean add(E e) {
    ensureCapacityInternal(size + 1);  // Increments modCount!!
    elementData[size++] = e;
    return true;
}
没有synchronized线程不安全
3、解决方案
3.1 Vector
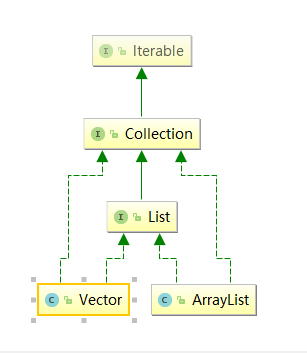
List<String> list = new Vector<>();

看Vector的源码
public synchronized boolean add(E e) {
    modCount++;
    ensureCapacityHelper(elementCount + 1);
    elementData[elementCount++] = e;
    return true;
}
有synchronized线程安全
3.2 Collections
List<String> list = Collections.synchronizedList(new ArrayList<>());
Collections提供了方法synchronizedList保证list是同步线程安全的

那HashMap,HashSet是线程安全的吗?也不是
所以有同样的线程安全方法

3.3 写时复制
List<String> list = new CopyOnWriteArrayList<>();
4、写时复制
4.1 不加锁性能提升出错误,加锁数据一致性能下降
4.2 CopyOnWriteArrayList定义
A thread-safe variant of ArrayList in which all mutative operations (add, set, and so on) are implemented by making a fresh copy of the underlying
array.
CopyOnWriteArrayList是arraylist的一种线程安全变体,
其中所有可变操作(add、set等)都是通过生成底层数组的新副本来实现的。
4.3 写时复制原理
线程进行写操作时,复制底层数组并扩容1,对新数组进行写操作,同时其他线程可以进行读操作,此时读取的是原数组,当线程写操作完成后,再讲新数组赋值给原数组。
/**
 * Appends the specified element to the end of this list.
 *
 * @param e element to be appended to this list
 * @return {@code true} (as specified by {@link Collection#add})
 */
public boolean add(E e) {
    final ReentrantLock lock = this.lock;
    lock.lock();
    try {
        Object[] elements = getArray();
        int len = elements.length;
        Object[] newElements = Arrays.copyOf(elements, len + 1);
        newElements[len] = e;
        setArray(newElements);
        return true;
    } finally {
        lock.unlock();
    }
}

CopyOnWrite容器即写时复制的容器。往一个容器添加元素的时候,不直接往当前容器Object[]添加,
而是先将当前容器Object[]进行Copy,复制出一个新的容器Object[] newElements,然后向新的容器Object[] newElements里添加元素。
添加元素后,再将原容器的引用指向新的容器setArray(newElements)。
这样做的好处是可以对CopyOnWrite容器进行并发的读,而不需要加锁,因为当前容器不会添加任何元素。
所以CopyOnWrite容器也是一种读写分离的思想,读和写不同的容器。
5、扩展类比
5.1 HashSet
Set<String> set = new HashSet<>();//线程不安全
Set<String> set = new CopyOnWriteArraySet<>();//线程安全

HashSet底层数据结构是什么?
HashMap

但HashSet的add是放一个值,而HashMap是放K、V键值对


public HashSet() {
    map = new HashMap<>();
}

private static final Object PRESENT = new Object();

public boolean add(E e) {
    return map.put(e, PRESENT)==null;
}
5.2 HashMap
Map<String,String> map = new HashMap<>();//线程不安全
Map<String,String> map = new ConcurrentHashMap<>();//线程安全
6、代码示例
package com.atguigu.gmall.jucdemo;

import java.util.*;
import java.util.concurrent.ConcurrentHashMap;
import java.util.concurrent.CopyOnWriteArrayList;
import java.util.concurrent.CopyOnWriteArraySet;

/**
 * 请举例说明集合类是不安全的
 */
public class NotSafeDemo {
    public static void main(String[] args) {

        Map<String,String> map = new ConcurrentHashMap<>();
        for (int i = 0; i <30 ; i++) {
            new Thread(()->{
                map.put(Thread.currentThread().getName(),UUID.randomUUID().toString().substring(0,8));
                System.out.println(map);
            },String.valueOf(i)).start();
        }


    }

    private static void setNoSafe() {
        Set<String> set = new CopyOnWriteArraySet<>();
        for (int i = 0; i <30 ; i++) {
            new Thread(()->{
                set.add(UUID.randomUUID().toString().substring(0,8));
                System.out.println(set);
            },String.valueOf(i)).start();
        }
    }

    private static void listNoSafe() {
        //        List<String> list = Arrays.asList("a","b","c");
        //        list.forEach(System.out::println);
        //写时复制
        List<String> list = new CopyOnWriteArrayList<>();
        // new CopyOnWriteArrayList<>();
        //Collections.synchronizedList(new ArrayList<>());
        //new Vector<>();//new ArrayList<>();

        for (int i = 0; i <30 ; i++) {
                    new Thread(()->{
                        list.add(UUID.randomUUID().toString().substring(0,8));
                        System.out.println(list);
                    },String.valueOf(i)).start();
                }
    }


}


    /**
     * 写时复制
     CopyOnWrite容器即写时复制的容器。往一个容器添加元素的时候,不直接往当前容器Object[]添加,
     而是先将当前容器Object[]进行Copy,复制出一个新的容器Object[] newElements,然后向新的容器Object[] newElements里添加元素。
     添加元素后,再将原容器的引用指向新的容器setArray(newElements)。
     这样做的好处是可以对CopyOnWrite容器进行并发的读,而不需要加锁,因为当前容器不会添加任何元素。
     所以CopyOnWrite容器也是一种读写分离的思想,读和写不同的容器。

     *
     *
     *
     *

    public boolean add(E e) {
        final ReentrantLock lock = this.lock;
        lock.lock();
        try {
            Object[] elements = getArray();
            int len = elements.length;
            Object[] newElements = Arrays.copyOf(elements, len + 1);
            newElements[len] = e;
            setArray(newElements);
            return true;
        } finally {
            lock.unlock();
        }
    }
     */
七、多线程锁
1、代码
package com.atguigu.thread;

import java.util.concurrent.TimeUnit;


class Phone
{

 public  synchronized void sendSMS() throws Exception
 {

   System.out.println("------sendSMS");
 }
 public synchronized void sendEmail() throws Exception
 {
   System.out.println("------sendEmail");
 }

 public void getHello()
 {
   System.out.println("------getHello");
 }

}

/**
 *
 * @Description: 8锁
 *
 1 标准访问,先打印短信还是邮件
 2 停4秒在短信方法内,先打印短信还是邮件
 3 新增普通的hello方法,是先打短信还是hello
 4 现在有两部手机,先打印短信还是邮件
 5 两个静态同步方法,1部手机,先打印短信还是邮件
 6 两个静态同步方法,2部手机,先打印短信还是邮件
 7 1个静态同步方法,1个普通同步方法,1部手机,先打印短信还是邮件
 8 1个静态同步方法,1个普通同步方法,2部手机,先打印短信还是邮件
 * ---------------------------------
 *
 */
public class Lock_8
{
 public static void main(String[] args) throws Exception
 {

   Phone phone = new Phone();
   Phone phone2 = new Phone();

   new Thread(() -> {
    try {
     phone.sendSMS();
    } catch (Exception e) {
     e.printStackTrace();
    }
   }, "AA").start();

   Thread.sleep(100);

   new Thread(() -> {
    try {
     phone.sendEmail();
     //phone.getHello();
     //phone2.sendEmail();
    } catch (Exception e) {
     e.printStackTrace();
    }
   }, "BB").start();
 }
}
2、8锁问题
1 标准访问,先打印短信还是邮件
2 停4秒在短信方法内,先打印短信还是邮件
3 普通的hello方法,是先打短信还是hello
4 现在有两部手机,先打印短信还是邮件
5 两个静态同步方法,1部手机,先打印短信还是邮件
6 两个静态同步方法,2部手机,先打印短信还是邮件
7 1个静态同步方法,1个普通同步方法,1部手机,先打印短信还是邮件
8 1个静态同步方法,1个普通同步方法,2部手机,先打印短信还是邮件


运行答案:
1、短信
2、短信
3、Hello
4、邮件
5、短信
6、短信
7、邮件
8、邮件
3、8锁问题分析
A 一个对象里面如果有多个synchronized方法,某一个时刻内,只要一个线程去调用其中的一个synchronized方法了,
其它的线程都只能等待,换句话说,某一个时刻内,只能有唯一一个线程去访问这些synchronized方法
锁的是当前对象this,被锁定后,其它的线程都不能进入到当前对象的其它的synchronized方法

加个普通方法后发现和同步锁无关
换成两个对象后,不是同一把锁了,情况立刻变化。


synchronized实现同步的基础:Java中的每一个对象都可以作为锁。
具体表现为以下3种形式。
对于普通同步方法,锁是当前实例对象。
对于静态同步方法,锁是当前类的Class对象。
对于同步方法块,锁是Synchonized括号里配置的对象

当一个线程试图访问同步代码块时,它首先必须得到锁,退出或抛出异常时必须释放锁。

也就是说如果一个实例对象的非静态同步方法获取锁后,该实例对象的其他非静态同步方法必须等待获取锁的方法释放锁后才能获取锁,
可是别的实例对象的非静态同步方法因为跟该实例对象的非静态同步方法用的是不同的锁,
所以毋须等待该实例对象已获取锁的非静态同步方法释放锁就可以获取他们自己的锁。

所有的静态同步方法用的也是同一把锁——类对象本身,
这两把锁是两个不同的对象,所以静态同步方法与非静态同步方法之间是不会有竞态条件的。
但是一旦一个静态同步方法获取锁后,其他的静态同步方法都必须等待该方法释放锁后才能获取锁,
而不管是同一个实例对象的静态同步方法之间,
还是不同的实例对象的静态同步方法之间,只要它们同一个类的实例对象!
总结:简单来说就是一个对象一把锁,分清楚该对象的锁是否已经被获取。
八、Callable接口
1、callable是什么?
1.1 面试题:获得多线程的方法几种?
(1)继承thread类(2)runnable接口
如果只回答这两个你连被问到juc的机会都没有
1.2 callable是一个函数式接口
2、与runnable对比
 面试题:callable接口与runnable接口的区别?

 答:(1)是否有返回值
       (2)是否抛异常
       (3)落地方法不一样,一个是run,一个是call
3、怎么用?
3.1 直接替换runnable是否可行?
不可行,因为:Thread类的构造方法根本没有Callable
3.2 FutureTask(中间人)
FutureTask<Integer> futureTask = new FutureTask<Integer>(new MyThread());
new Thread(futureTask , "AA").start();

运行成功后如何获得返回值?
ft.get();
4、FutureTask
4.1 原理
在主线程中需要执行比较耗时的操作时,但又不想阻塞主线程时,可以把这些作业交给Future对象在后台完成,
当主线程将来需要时,就可以通过Future对象获得后台作业的计算结果或者执行状态。

一般FutureTask多用于耗时的计算,主线程可以在完成自己的任务后,再去获取结果。

仅在计算完成时才能检索结果;如果计算尚未完成,则阻塞 get 方法。一旦计算完成,就不能再重新开始或取消计算。get方法而获取结果只有在计算完成时获取,否则会一直阻塞直到任务转入完成状态,
然后会返回结果或者抛出异常。

只计算一次
get方法放到最后
4.2 代码
import java.util.concurrent.Callable;
import java.util.concurrent.FutureTask;
import java.util.concurrent.TimeUnit;

class MyThread implements Runnable{

    @Override
    public void run() {

    }
}
class MyThread2 implements Callable<Integer>{

    @Override
    public Integer call() throws Exception {
        System.out.println(Thread.currentThread().getName()+"come in callable");
        return 200;
    }
}


public class CallableDemo {


    public static void main(String[] args) throws Exception {

        //FutureTask<Integer> futureTask = new FutureTask(new MyThread2());
        FutureTask<Integer> futureTask = new FutureTask(()->{
            System.out.println(Thread.currentThread().getName()+"  come in callable");
            TimeUnit.SECONDS.sleep(4);
            return 1024;
        });
        FutureTask<Integer> futureTask2 = new FutureTask(()->{
            System.out.println(Thread.currentThread().getName()+"  come in callable");
            TimeUnit.SECONDS.sleep(4);
            return 2048;
        });

        new Thread(futureTask,"zhang3").start();
        new Thread(futureTask2,"li4").start();

        //System.out.println(futureTask.get());
        //System.out.println(futureTask2.get());
        //1、一般放在程序后面,直接获取结果
        //2、只会计算结果一次

        while(!futureTask.isDone()){
            System.out.println("***wait");
        }
        System.out.println(futureTask.get());
        System.out.println(Thread.currentThread().getName()+" come over");
    }
}

/**
 *
 *
在主线程中需要执行比较耗时的操作时,但又不想阻塞主线程时,可以把这些作业交给Future对象在后台完成,
当主线程将来需要时,就可以通过Future对象获得后台作业的计算结果或者执行状态。

一般FutureTask多用于耗时的计算,主线程可以在完成自己的任务后,再去获取结果。

仅在计算完成时才能检索结果;如果计算尚未完成,则阻塞 get 方法。一旦计算完成,
就不能再重新开始或取消计算。get方法而获取结果只有在计算完成时获取,否则会一直阻塞直到任务转入完成状态,
然后会返回结果或者抛出异常。

只计算一次
get方法放到最后
 */
九、JUC强大的辅助类讲解
1、CountDownLatch减少计数
1.1 原理
 * CountDownLatch主要有两个方法,当一个或多个线程调用await方法时,这些线程会阻塞。
 * 其它线程调用countDown方法会将计数器减1(调用countDown方法的线程不会阻塞),
 * 当计数器的值变为0时,因await方法阻塞的线程会被唤醒,继续执行。
1.2 代码
package com.atguigu.thread;

import java.util.concurrent.CountDownLatch;


/**
 *
 * @Description:
 *  *让一些线程阻塞直到另一些线程完成一系列操作后才被唤醒。
 *
 * CountDownLatch主要有两个方法,当一个或多个线程调用await方法时,这些线程会阻塞。
 * 其它线程调用countDown方法会将计数器减1(调用countDown方法的线程不会阻塞),
 * 当计数器的值变为0时,因await方法阻塞的线程会被唤醒,继续执行。
 *
 * 解释:6个同学陆续离开教室后值班同学才可以关门。
 *
 * main主线程必须要等前面6个线程完成全部工作后,自己才能开干
 */
public class CountDownLatchDemo
{
   public static void main(String[] args) throws InterruptedException
   {
         CountDownLatch countDownLatch = new CountDownLatch(6);

       for (int i = 1; i <=6; i++) //6个上自习的同学,各自离开教室的时间不一致
       {
          new Thread(() -> {
              System.out.println(Thread.currentThread().getName()+"\t 号同学离开教室");
              countDownLatch.countDown();
          }, String.valueOf(i)).start();
       }
       countDownLatch.await();
       System.out.println(Thread.currentThread().getName()+"\t****** 班长关门走人,main线程是班长");

   }


}
2、CyclicBarrier循环栅栏
2.1 原理
 * CyclicBarrier
 * 的字面意思是可循环(Cyclic)使用的屏障(Barrier)。它要做的事情是,
 * 让一组线程到达一个屏障(也可以叫同步点)时被阻塞,
 * 直到最后一个线程到达屏障时,屏障才会开门,所有
 * 被屏障拦截的线程才会继续干活。
 * 线程进入屏障通过CyclicBarrier的await()方法。
2.2 代码
package com.atguigu.thread;

import java.util.concurrent.BrokenBarrierException;
import java.util.concurrent.CyclicBarrier;

/**
 *
 *
 * CyclicBarrier
 * 的字面意思是可循环(Cyclic)使用的屏障(Barrier)。它要做的事情是,
 * 让一组线程到达一个屏障(也可以叫同步点)时被阻塞,
 * 直到最后一个线程到达屏障时,屏障才会开门,所有
 * 被屏障拦截的线程才会继续干活。
 * 线程进入屏障通过CyclicBarrier的await()方法。
 *
 * 集齐7颗龙珠就可以召唤神龙
 */
public class CyclicBarrierDemo
{
  private static final int NUMBER = 7;

  public static void main(String[] args)
  {
     //CyclicBarrier(int parties, Runnable barrierAction)

     CyclicBarrier cyclicBarrier = new CyclicBarrier(NUMBER, ()->{System.out.println("*****集齐7颗龙珠就可以召唤神龙");}) ;

     for (int i = 1; i <= 7; i++) {
       new Thread(() -> {
          try {
            System.out.println(Thread.currentThread().getName()+"\t 星龙珠被收集 ");
            cyclicBarrier.await();
          } catch (InterruptedException | BrokenBarrierException e) {
            // TODO Auto-generated catch block
            e.printStackTrace();
          }

       }, String.valueOf(i)).start();
     }


  }
}
3、Semaphore信号灯
3.1 原理
 在信号量上我们定义两种操作:
 * acquire(获取) 当一个线程调用acquire操作时,它要么通过成功获取信号量(信号量减1),
 *       要么一直等下去,直到有线程释放信号量,或超时。
 * release(释放)实际上会将信号量的值加1,然后唤醒等待的线程。
 *
 * 信号量主要用于两个目的,一个是用于多个共享资源的互斥使用,另一个用于并发线程数的控制。
3.2 代码
package com.atguigu.thread;

import java.util.Random;
import java.util.concurrent.Semaphore;
import java.util.concurrent.TimeUnit;

/**
 *
 * @Description: TODO(这里用一句话描述这个类的作用)
 *
 * 在信号量上我们定义两种操作:
 * acquire(获取) 当一个线程调用acquire操作时,它要么通过成功获取信号量(信号量减1),
 *             要么一直等下去,直到有线程释放信号量,或超时。
 * release(释放)实际上会将信号量的值加1,然后唤醒等待的线程。
 *
 * 信号量主要用于两个目的,一个是用于多个共享资源的互斥使用,另一个用于并发线程数的控制。
 */
public class SemaphoreDemo
{
  public static void main(String[] args)
  {
     Semaphore semaphore = new Semaphore(3);//模拟3个停车位

     for (int i = 1; i <=6; i++) //模拟6部汽车
     {
       new Thread(() -> {
          try
          {
            semaphore.acquire();
            System.out.println(Thread.currentThread().getName()+"\t 抢到了车位");
            TimeUnit.SECONDS.sleep(new Random().nextInt(5));
            System.out.println(Thread.currentThread().getName()+"\t------- 离开");
          } catch (InterruptedException e) {
            e.printStackTrace();
          }finally {
            semaphore.release();
          }
       }, String.valueOf(i)).start();
     }

  }
}
十、ReentrantReadWriteLock读写锁
1、问题引例
import java.util.HashMap;
import java.util.Map;
import java.util.concurrent.TimeUnit;

class MyCache{
    private volatile Map<String,Object> map = new HashMap<>();
    public void put(String key,Object value){
        System.out.println(Thread.currentThread().getName()+"\t 正在写"+key);
        //暂停一会儿线程
        try {TimeUnit.MILLISECONDS.sleep(300);} catch (InterruptedException e) {e.printStackTrace(); }
        map.put(key,value);
        System.out.println(Thread.currentThread().getName()+"\t 写完了"+key);
    }

    public Object get(String key){
        Object result = null;
        System.out.println(Thread.currentThread().getName()+"\t 正在读"+key);
        try {TimeUnit.MILLISECONDS.sleep(300);} catch (InterruptedException e) {e.printStackTrace(); }
        result = map.get(key);
        System.out.println(Thread.currentThread().getName()+"\t 读完了"+result);
        return result;
    }
}
public class ReadWriteLockDemo {


    public static void main(String[] args) {
        MyCache myCache = new MyCache();

        for (int i = 1; i <= 5; i++) {
            final int num = i;
            new Thread(()->{
                myCache.put(num+"",num+"");
            },String.valueOf(i)).start();
        }
        for (int i = 1; i <= 5; i++) {
            final int num = i;
            new Thread(()->{
                myCache.get(num+"");
            },String.valueOf(i)).start();
        }

    }

}
2、使用示例
import java.util.HashMap;
import java.util.Map;
import java.util.concurrent.TimeUnit;
import java.util.concurrent.locks.ReadWriteLock;
import java.util.concurrent.locks.ReentrantReadWriteLock;

class MyCache {
    private volatile Map<String, Object> map = new HashMap<>();
    private ReadWriteLock rwLock = new ReentrantReadWriteLock();

    public void put(String key, Object value) {
        rwLock.writeLock().lock();
        try {
            System.out.println(Thread.currentThread().getName() + "\t 正在写" + key);
            //暂停一会儿线程
            try {
                TimeUnit.MILLISECONDS.sleep(300);
            } catch (InterruptedException e) {
                e.printStackTrace();
            }
            map.put(key, value);
            System.out.println(Thread.currentThread().getName() + "\t 写完了" + key);
            System.out.println();
        } catch (Exception e) {
            e.printStackTrace();
        } finally {
            rwLock.writeLock().unlock();
        }

    }

    public Object get(String key) {
        rwLock.readLock().lock();
        Object result = null;
        try {
            System.out.println(Thread.currentThread().getName() + "\t 正在读" + key);
            try {
                TimeUnit.MILLISECONDS.sleep(300);
            } catch (InterruptedException e) {
                e.printStackTrace();
            }
            result = map.get(key);
            System.out.println(Thread.currentThread().getName() + "\t 读完了" + result);
        } catch (Exception e) {
            e.printStackTrace();
        } finally {
            rwLock.readLock().unlock();
        }
        return result;
    }
}

public class ReadWriteLockDemo {


    public static void main(String[] args) {
        MyCache myCache = new MyCache();

        for (int i = 1; i <= 5; i++) {
            final int num = i;
            new Thread(() -> {
                myCache.put(num + "", num + "");
            }, String.valueOf(i)).start();
        }
        for (int i = 1; i <= 5; i++) {
            final int num = i;
            new Thread(() -> {
                myCache.get(num + "");
            }, String.valueOf(i)).start();
        }

    }

}
十一、BlockingQueueDemo阻塞队列
1、阻塞队列
当队列是空的,从队列中获取元素的操作将会被阻塞
当队列是满的,从队列中添加元素的操作将会被阻塞

试图从空的队列中获取元素的线程将会被阻塞,直到其他线程往空的队列插入新的元素

试图向已满的队列中添加新元素的线程将会被阻塞,直到其他线程从队列中移除一个或多个元素或者完全清空,使队列变得空闲起来并后续新增
2、阻塞队列用途
在多线程领域:所谓阻塞,在某些情况下会挂起线程(即阻塞),一旦条件满足,被挂起的线程又会自动被唤起

为什么需要BlockingQueue
好处是我们不需要关心什么时候需要阻塞线程,什么时候需要唤醒线程,因为这一切BlockingQueue都给你一手包办了

在concurrent包发布以前,在多线程环境下,我们每个程序员都必须去自己控制这些细节,尤其还要兼顾效率和线程安全,而这会给我们的程序带来不小的复杂度。
3、队列架构
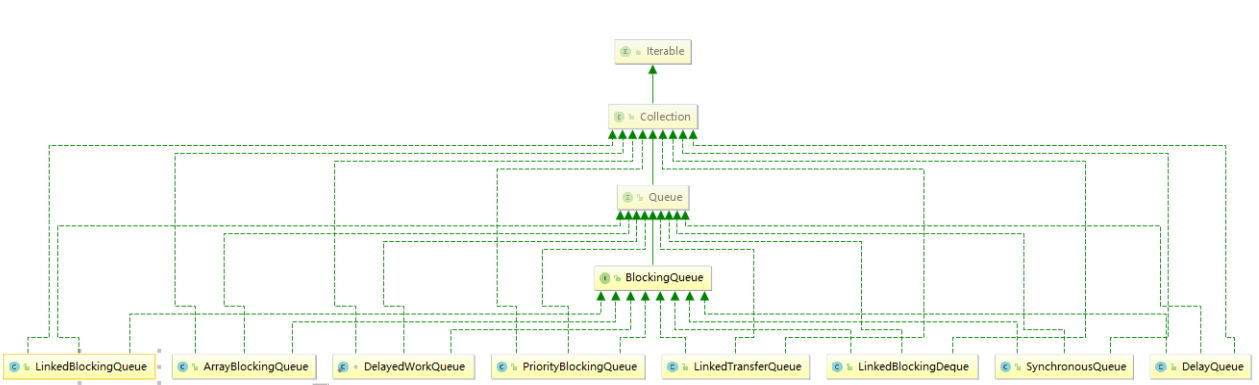
4、七种阻塞队列
ArrayBlockingQueue:由数组结构组成的有界阻塞队列。
LinkedBlockingQueue:由链表结构组成的有界(但大小默认值为integer.MAX_VALUE)阻塞队列。
PriorityBlockingQueue:支持优先级排序的无界阻塞队列。
DelayQueue:使用优先级队列实现的延迟无界阻塞队列。
SynchronousQueue:不存储元素的阻塞队列,也即单个元素的队列。
LinkedTransferQueue:由链表组成的无界阻塞队列。
LinkedBlockingDeque:由链表组成的双向阻塞队列。
5、BlockingQueue核心方法

抛出异常:当阻塞队列满时,再往队列里add插入元素会抛IllegalStateException:Queue full
当阻塞队列空时,再往队列里remove移除元素会抛NoSuchElementException
特殊值:插入方法,成功ture失败false
移除方法,成功返回出队列的元素,队列里没有就返回null
一直阻塞:当阻塞队列满时,生产者线程继续往队列里put元素,队列会一直阻塞生产者线程直到put数据or响应中断退出
当阻塞队列空时,消费者线程试图从队列里take元素,队列会一直阻塞消费者线程直到队列可用
超时退出:当阻塞队列满时,队列会阻塞生产者线程一定时间,超过限时后生产者线程会退出
6、代码
import java.util.ArrayList;
import java.util.List;
import java.util.concurrent.ArrayBlockingQueue;
import java.util.concurrent.BlockingQueue;
import java.util.concurrent.TimeUnit;

/**
 * 阻塞队列
 */
public class BlockingQueueDemo {

    public static void main(String[] args) throws InterruptedException {

//        List list = new ArrayList();

        BlockingQueue<String> blockingQueue = new ArrayBlockingQueue<>(3);
        //第一组
//        System.out.println(blockingQueue.add("a"));
//        System.out.println(blockingQueue.add("b"));
//        System.out.println(blockingQueue.add("c"));
//        System.out.println(blockingQueue.element());

        //System.out.println(blockingQueue.add("x"));
//        System.out.println(blockingQueue.remove());
//        System.out.println(blockingQueue.remove());
//        System.out.println(blockingQueue.remove());
//        System.out.println(blockingQueue.remove());
//    第二组
//        System.out.println(blockingQueue.offer("a"));
//        System.out.println(blockingQueue.offer("b"));
//        System.out.println(blockingQueue.offer("c"));
//        System.out.println(blockingQueue.offer("x"));
//        System.out.println(blockingQueue.poll());
//        System.out.println(blockingQueue.poll());
//        System.out.println(blockingQueue.poll());
//        System.out.println(blockingQueue.poll());
//    第三组
//         blockingQueue.put("a");
//         blockingQueue.put("b");
//         blockingQueue.put("c");
//         //blockingQueue.put("x");
//        System.out.println(blockingQueue.take());
//        System.out.println(blockingQueue.take());
//        System.out.println(blockingQueue.take());
//        System.out.println(blockingQueue.take());

//    第四组
        System.out.println(blockingQueue.offer("a"));
        System.out.println(blockingQueue.offer("b"));
        System.out.println(blockingQueue.offer("c"));
        System.out.println(blockingQueue.offer("a",3L, TimeUnit.SECONDS));

    }
}
十二、ThreadPool线程池
1、为什么用线程池?
线程池的优势:
线程池做的工作只要是控制运行的线程数量,处理过程中将任务放入队列,然后在线程创建后启动这些任务,如果线程数量超过了最大数量,超出数量的线程排队等候,等其他线程执行完毕,再从队列中取出任务来执行。

它的主要特点为:线程复用;控制最大并发数;管理线程。

第一:降低资源消耗。通过重复利用已创建的线程降低线程创建和销毁造成的销耗。
第二:提高响应速度。当任务到达时,任务可以不需要等待线程创建就能立即执行。
第三:提高线程的可管理性。线程是稀缺资源,如果无限制的创建,不仅会销耗系统资源,还会降低系统的稳定性,使用线程池可以进行统一的分配,调优和监控。
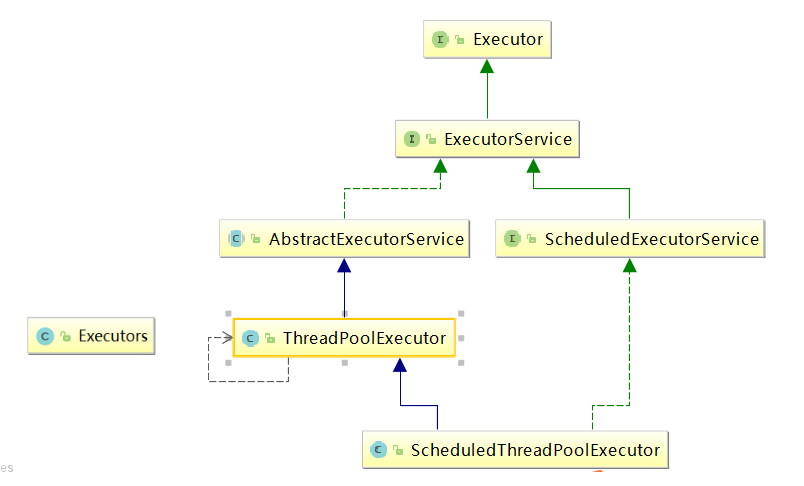
2、线程池架构
Java中的线程池是通过Executor框架实现的,该框架中用到了Executor,Executors,ExecutorService,ThreadPoolExecutor这几个类
3、JDK自带创建线程池方式
public static ExecutorService newFixedThreadPool(int nThreads) {
    return new ThreadPoolExecutor(nThreads, nThreads,
                                  0L, TimeUnit.MILLISECONDS,
                                  new LinkedBlockingQueue<Runnable>());
}

newFixedThreadPool创建的线程池corePoolSize和maximumPoolSize值是相等的,它使用的是LinkedBlockingQueue
public static ExecutorService newSingleThreadExecutor() {
    return new FinalizableDelegatedExecutorService
        (new ThreadPoolExecutor(1, 1,
                                0L, TimeUnit.MILLISECONDS,
                                new LinkedBlockingQueue<Runnable>()));
}

newSingleThreadExecutor 创建的线程池corePoolSize和maximumPoolSize值都是1,它使用的是LinkedBlockingQueue
public static ExecutorService newCachedThreadPool() {
    return new ThreadPoolExecutor(0, Integer.MAX_VALUE,
                                  60L, TimeUnit.SECONDS,
                                  new SynchronousQueue<Runnable>());
}
newCachedThreadPool创建的线程池将corePoolSize设置为0,将maximumPoolSize设置为Integer.MAX_VALUE,它使用的是SynchronousQueue,也就是说来了任务就创建线程运行,当线程空闲超过60秒,就销毁线程。
执行很多短期异步任务,线程池根据需要创建新线程,但在先前构建的线程可用时将重用它们。可扩容,遇强则强
import java.util.Arrays;
import java.util.List;
import java.util.concurrent.Executor;
import java.util.concurrent.ExecutorService;
import java.util.concurrent.Executors;

/**
 * 线程池
 * Arrays
 * Collections
 * Executors
 */
public class MyThreadPoolDemo {

    public static void main(String[] args) {
        //List list = new ArrayList();
        //List list = Arrays.asList("a","b");
        //固定数的线程池,一池五线程

//       ExecutorService threadPool =  Executors.newFixedThreadPool(5); //一个银行网点,5个受理业务的窗口
//       ExecutorService threadPool =  Executors.newSingleThreadExecutor(); //一个银行网点,1个受理业务的窗口
       ExecutorService threadPool =  Executors.newCachedThreadPool(); //一个银行网点,可扩展受理业务的窗口

        //10个顾客请求
        try {
            for (int i = 1; i <=10; i++) {
                threadPool.execute(()->{
                    System.out.println(Thread.currentThread().getName()+"\t 办理业务");
                });
            }
        } catch (Exception e) {
            e.printStackTrace();
        } finally {
            threadPool.shutdown();
        }

    }
}
4、ThreadPoolExecutor底层原理

5、线程池的七大参数
public ThreadPoolExecutor(int corePoolSize,
                          int maximumPoolSize,
                          long keepAliveTime,
                          TimeUnit unit,
                          BlockingQueue<Runnable> workQueue,
                          ThreadFactory threadFactory,
                          RejectedExecutionHandler handler) {
    if (corePoolSize < 0 ||
        maximumPoolSize <= 0 ||
        maximumPoolSize < corePoolSize ||
        keepAliveTime < 0)
        throw new IllegalArgumentException();
    if (workQueue == null || threadFactory == null || handler == null)
        throw new NullPointerException();
    this.corePoolSize = corePoolSize;
    this.maximumPoolSize = maximumPoolSize;
    this.workQueue = workQueue;
    this.keepAliveTime = unit.toNanos(keepAliveTime);
    this.threadFactory = threadFactory;
    this.handler = handler;
}
6、线程池底层工作原理
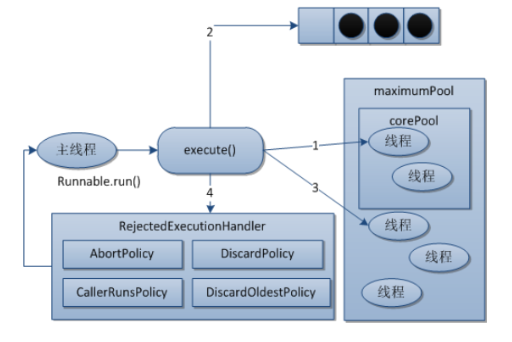
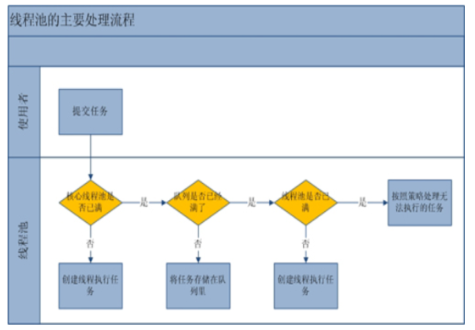
1、在创建了线程池后,开始等待请求。
2、当调用execute()方法添加一个请求任务时,线程池会做出如下判断:
  2.1如果正在运行的线程数量小于corePoolSize,那么马上创建线程运行这个任务;
  2.2如果正在运行的线程数量大于或等于corePoolSize,那么将这个任务放入队列;
  2.3如果这个时候队列满了且正在运行的线程数量还小于maximumPoolSize,那么还是要创建非核心线程立刻运行这个任务;
  2.4如果队列满了且正在运行的线程数量大于或等于maximumPoolSize,那么线程池会启动饱和拒绝策略来执行。
3、当一个线程完成任务时,它会从队列中取下一个任务来执行。
4、当一个线程无事可做超过一定的时间(keepAliveTime)时,线程会判断:
    如果当前运行的线程数大于corePoolSize,那么这个线程就被停掉。
    所以线程池的所有任务完成后,它最终会收缩到corePoolSize的大小。
7、线程池拒绝策略
7.1 什么是拒绝策略?
等待队列已经排满了,再也塞不下新任务了
同时,
线程池中的max线程也达到了,无法继续为新任务服务。

这个是时候我们就需要拒绝策略机制合理的处理这个问题。
7.2 JDK内置拒绝策略
AbortPolicy(默认):直接抛出RejectedExecutionException异常阻止系统正常运行

CallerRunsPolicy:“调用者运行”一种调节机制,该策略既不会抛弃任务,也不
会抛出异常,而是将某些任务回退到调用者,从而降低新任务的流量。

DiscardOldestPolicy:抛弃队列中等待最久的任务,然后把当前任务加人队列中
尝试再次提交当前任务。

DiscardPolicy:该策略默默地丢弃无法处理的任务,不予任何处理也不抛出异常。
如果允许任务丢失,这是最好的一种策略。
以上内置拒绝策略均实现了RejectedExecutionHandle接口
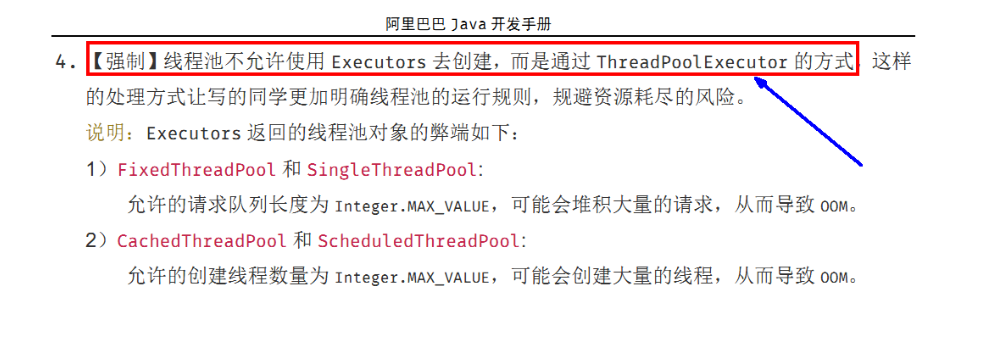
8、在工作中单一的/固定数的/可变的三种创建线程池的方法哪个用的多?超级大坑
答案是一个都不用,我们工作中只能使用自定义的
Executors中JDK已经给你提供了,为什么不用?
9、在工作中如何使用线程池,是否自定义过线程池
import java.util.Arrays;
import java.util.List;
import java.util.concurrent.*;

/**
 * 线程池
 * Arrays
 * Collections
 * Executors
 */
public class MyThreadPoolDemo {

    public static void main(String[] args) {
        ExecutorService threadPool = new ThreadPoolExecutor(
                2,
                5,
                2L,
                TimeUnit.SECONDS,
                new ArrayBlockingQueue<Runnable>(3),
                Executors.defaultThreadFactory(),
                //new ThreadPoolExecutor.AbortPolicy()
                //new ThreadPoolExecutor.CallerRunsPolicy()
                //new ThreadPoolExecutor.DiscardOldestPolicy()
                new ThreadPoolExecutor.DiscardOldestPolicy()
        );
        //10个顾客请求
        try {
            for (int i = 1; i <= 10; i++) {
                threadPool.execute(() -> {
                    System.out.println(Thread.currentThread().getName() + "\t 办理业务");
                });
            }
        } catch (Exception e) {
            e.printStackTrace();
        } finally {
            threadPool.shutdown();
        }

    }

    private static void threadPool() {
        //List list = new ArrayList();
        //List list = Arrays.asList("a","b");
        //固定数的线程池,一池五线程

//       ExecutorService threadPool =  Executors.newFixedThreadPool(5); //一个银行网点,5个受理业务的窗口
//       ExecutorService threadPool =  Executors.newSingleThreadExecutor(); //一个银行网点,1个受理业务的窗口
        ExecutorService threadPool = Executors.newCachedThreadPool(); //一个银行网点,可扩展受理业务的窗口

        //10个顾客请求
        try {
            for (int i = 1; i <= 10; i++) {
                threadPool.execute(() -> {
                    System.out.println(Thread.currentThread().getName() + "\t 办理业务");
                });
            }
        } catch (Exception e) {
            e.printStackTrace();
        } finally {
            threadPool.shutdown();
        }
    }
}
十三、Java8之流式计算复习
1、函数式接口
1.1 java.util.function
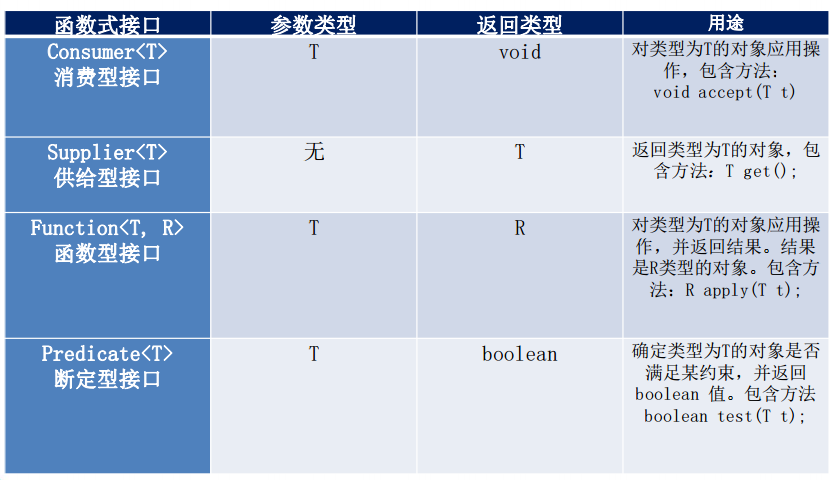
1.2 java内置核心四大函数式接口
1.3 示例代码
//R apply(T t);函数型接口,一个参数,一个返回值
Function<String,Integer> function = t ->{return t.length();};
System.out.println(function.apply("abcd"));

//boolean test(T t);断定型接口,一个参数,返回boolean
Predicate<String> predicate = t->{return t.startsWith("a");};
System.out.println(predicate.test("a"));

// void accept(T t);消费型接口,一个参数,没有返回值
Consumer<String> consumer = t->{
    System.out.println(t);
};
consumer.accept("javaXXXX");

//T get(); 供给型接口,无参数,有返回值
Supplier<String> supplier =()->{return UUID.randomUUID().toString();};
System.out.println(supplier.get());
2、Stream流
2.1 stream是什么?
是数据渠道,用于操作数据源(集合、数组等)所生成的元素序列。
“集合讲的是数据,流讲的是计算!”
2.2 stream流特点
Stream 自己不会存储元素
Stream 不会改变源对象。相反,他们会返回一个持有结果的新Stream。
Stream 操作是延迟执行的。这意味着他们会等到需要结果的时候才执行。
2.3 stream流的执行阶段
创建一个Stream:一个数据源(数组、集合)
中间操作:一个中间操作,处理数据源数据
终止操作:一个终止操作,执行中间操作链,产生结果
源头=>中间流水线=>结果
package com.atguigu.juc.study;

import lombok.AllArgsConstructor;
import lombok.Data;
import lombok.NoArgsConstructor;

import java.util.Arrays;
import java.util.List;
import java.util.UUID;
import java.util.function.*;

@Data
@NoArgsConstructor
@AllArgsConstructor
class User
{
    private Integer id;
    private String  userName;
    private int     age;
}

/**
 * @create 2019-02-26 22:24
 *
 * 题目:请按照给出数据,找出同时满足
 *      偶数ID且年龄大于24且用户名转为大写且用户名字母倒排序
 *      最后只输出一个用户名字
 */
public class StreamDemo
{
    public static void main(String[] args)
    {
        User u1 = new User(11,"a",23);
        User u2 = new User(12,"b",24);
        User u3 = new User(13,"c",22);
        User u4 = new User(14,"d",28);
        User u5 = new User(16,"e",26);

        List<User> list = Arrays.asList(u1,u2,u3,u4,u5);

        list.stream().filter(p -> {
            return p.getId() % 2 == 0;
        }).filter(p -> {
            return p.getAge() > 24;
        }).map(f -> {
            return f.getUserName().toUpperCase();
        }).sorted((o1, o2) -> {
            return o2.compareTo(o1);
        }).limit(1).forEach(System.out::println);


        //    R apply(T t);
        Function<String,Integer> function = t -> {return t.length();};
        System.out.println(function.apply("abc"));

        // boolean test(T t);
        Predicate<String> predicate = t -> {return t.startsWith("a");};
        System.out.println(predicate.test("a"));

        //void accept(T t);
        Consumer<String> consumer = t -> {System.out.println(t);};
        consumer.accept("java1018");


        //    T get();
        Supplier<String> supplier =  () -> {return UUID.randomUUID().toString();};
        System.out.println(supplier.get());;

    }
}
十四、分支合并框架
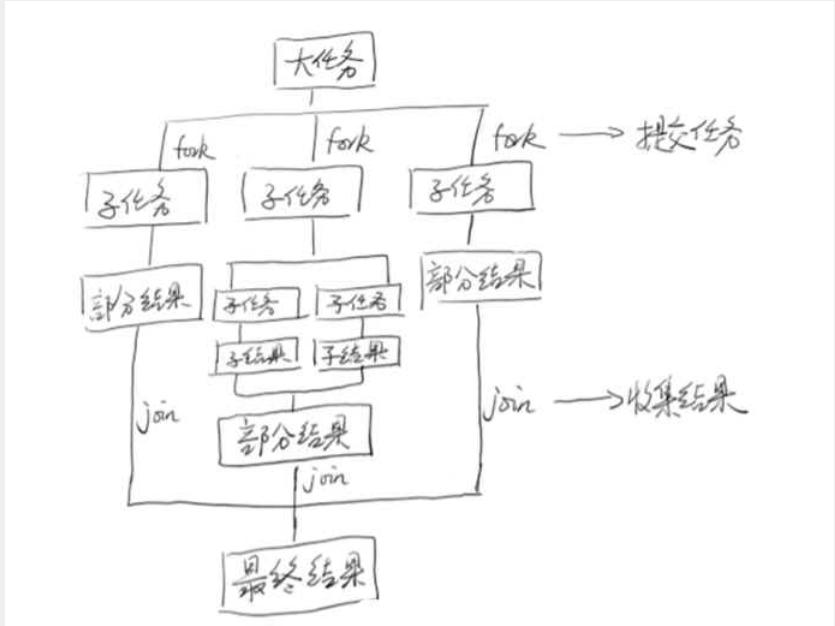
1、原理
Fork:把一个复杂任务进行分拆,大事化小
Join:把分拆任务的结果进行合并

2、相关类
2.1 ForkJoinPool
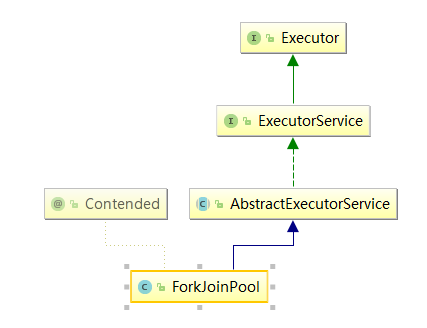
分支合并池 类比=> 线程池
2.2 ForkJoinTask
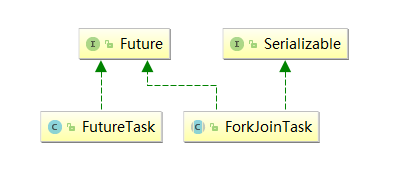
ForkJoinTask 类比=> FutureTask
2.3 RecursiveTask
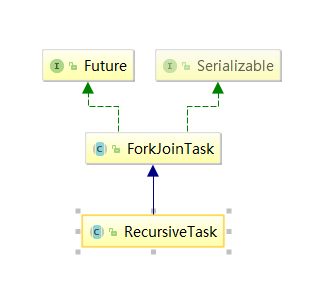
递归任务:继承后可以实现递归(自己调自己)调用的任务
3、实例代码
import java.util.concurrent.ExecutionException;
import java.util.concurrent.ForkJoinPool;
import java.util.concurrent.ForkJoinTask;
import java.util.concurrent.RecursiveTask;

class MyTask extends RecursiveTask<Integer>{
    private static final Integer ADJUST_VALUE = 10;
    private int begin;
    private int end;
    private int result;

    public MyTask(int begin, int end) {
        this.begin = begin;
        this.end = end;
    }

    @Override
    protected Integer compute() {
        if((end - begin)<=ADJUST_VALUE){
           for(int i =begin;i <= end;i++){
                result = result + i;
           }
        }else{
            int middle = (begin + end)/2;
            MyTask task01 = new MyTask(begin,middle);
            MyTask task02 = new MyTask(middle+1,end);
            task01.fork();
            task02.fork();
            result =  task01.join() + task02.join();
        }


        return result;
    }
}


/**
 * 分支合并例子
 * ForkJoinPool
 * ForkJoinTask
 * RecursiveTask
 */
public class ForkJoinDemo {

    public static void main(String[] args) throws ExecutionException, InterruptedException {

        MyTask myTask = new MyTask(0,100);
        ForkJoinPool forkJoinPool = new ForkJoinPool();
        ForkJoinTask<Integer> forkJoinTask = forkJoinPool.submit(myTask);

        System.out.println(forkJoinTask.get());

        forkJoinPool.shutdown();
    }
}
十五、异步回调
1、原理
同步、异步、异步回调

2、实例
import java.util.concurrent.CompletableFuture;

public class CompletableFutureDemo {

    public static void main(String[] args) throws Exception {
        //同步,异步,异步回调

        //同步
//        CompletableFuture<Void> completableFuture1 = CompletableFuture.runAsync(()->{
//            System.out.println(Thread.currentThread().getName()+"\t completableFuture1");
//        });
//        completableFuture1.get();

        //异步回调
        CompletableFuture<Integer> completableFuture2 = CompletableFuture.supplyAsync(()->{
            System.out.println(Thread.currentThread().getName()+"\t completableFuture2");
            int i = 10/0;
            return 1024;
        });

        completableFuture2.whenComplete((t,u)->{
            System.out.println("-------t="+t);
            System.out.println("-------u="+u);
        }).exceptionally(f->{
            System.out.println("-----exception:"+f.getMessage());
            return 444;
        }).get();

    }
}


【推荐】国内首个AI IDE,深度理解中文开发场景,立即下载体验Trae
【推荐】编程新体验,更懂你的AI,立即体验豆包MarsCode编程助手
【推荐】抖音旗下AI助手豆包,你的智能百科全书,全免费不限次数
【推荐】轻量又高性能的 SSH 工具 IShell:AI 加持,快人一步
· 从 HTTP 原因短语缺失研究 HTTP/2 和 HTTP/3 的设计差异
· AI与.NET技术实操系列:向量存储与相似性搜索在 .NET 中的实现
· 基于Microsoft.Extensions.AI核心库实现RAG应用
· Linux系列:如何用heaptrack跟踪.NET程序的非托管内存泄露
· 开发者必知的日志记录最佳实践
· TypeScript + Deepseek 打造卜卦网站:技术与玄学的结合
· Manus的开源复刻OpenManus初探
· AI 智能体引爆开源社区「GitHub 热点速览」
· 从HTTP原因短语缺失研究HTTP/2和HTTP/3的设计差异
· 三行代码完成国际化适配,妙~啊~