MySQL 初识
一、MySQL介绍:
-服务端软件-socket服务端-本地文件操作-解析指令
-客户端软件-socket客户端-发送指令-解析指令
数据库管理软件的分类:
分两大类:
- 关系型:如sqllite,db2,oracle,access,sql server,MySQL,注意:sql语句通用 # 关系型数据库需要有表结构
- 非关系型:mongodb,redis,memcache # 非关系型数据库是key-value存储的,没有表结构
二、MySQL的配置使用:
1/安装过程省略,自行百度
终端需要使用管理员身份运行
2/启动mysql之前先设置下环境变量,这样就不需要每次启动mysql的时候都要切换到文件目录下
将mysql的目录加入到环境变量(过程:此电脑>右键>属性>高级系统设置>高级>环境变量>系统变量下>双击Path>新建>
将mysql的bin路径(比如我的mysql文件bin目录在D:\mysql\bin\)复制,确认确认确认...)
3/配置(mysql目录新建文件my.ini,编辑保存)
[mysql]
# 设置mysql客户端默认字符集
default-character-set=utf8
[mysqld]
#设置3306端口
port = 3306
# 设置mysql的安装目录
basedir=D:\Program Files\mysql5.7.26
# 设置mysql数据库的数据的存放目录
datadir=D:\Program Files\mysql5.7.26\data
# 其它配置
max_connections=200
character-set-server=utf8
default-storage-engine=INNODB
sql_mode=NO_ENGINE_SUBSTITUTION,STRICT_TRANS_TABLES
4/安装、启动MySQL服务端
# 安装MySQL服务
以管理员身份打开cmd窗口后,将目录切换到你解压文件的bin目录,输入mysqld install回车运行

# 启动mysql服务
以管理员身份在cmd中输入:net start mysql
新开一个cmd终端,启动客户端
C:\WINDOWS\system32>mysql -uroot -p    # 输入用户名root,密码-p
Enter password: ******                 # 输入密码,第一次安装后密码为空,直接回车就行
(可以打全:mysql -h 127.0.0.1 -P 3306 -uroot -p,默认本地ip和端口可以省略)
Welcome to the MySQL monitor.  Commands end with ; or \g.
Your MySQL connection id is 6
Server version: 5.7.26 MySQL Community Server (GPL)

Copyright (c) 2000, 2019, Oracle and/or its affiliates. All rights reserved.

Oracle is a registered trademark of Oracle Corporation and/or its
affiliates. Other names may be trademarks of their respective
owners.

Type 'help;' or '\h' for help. Type '\c' to clear the current input statement.

mysql>                                 # 到这里代表mysql客户端已经启动。
在这里强调一点,cmd启动MySQL的时候最好以管理员身份运行,因为这样才能获取到完全权限。
4/这里有必要将mysqld服务端加入到系统服务中
前提必须先关闭mysqld和客户端
- 先查看mysqld进程,cmd端(管理员身份执行)输入:tasklist |findstr mysqld
- 第一步获取到mysqld的PID号(假设为13978),接下来输入命令杀死进程:taskkill /F /PID 13978
- 继续输入:mysqld install
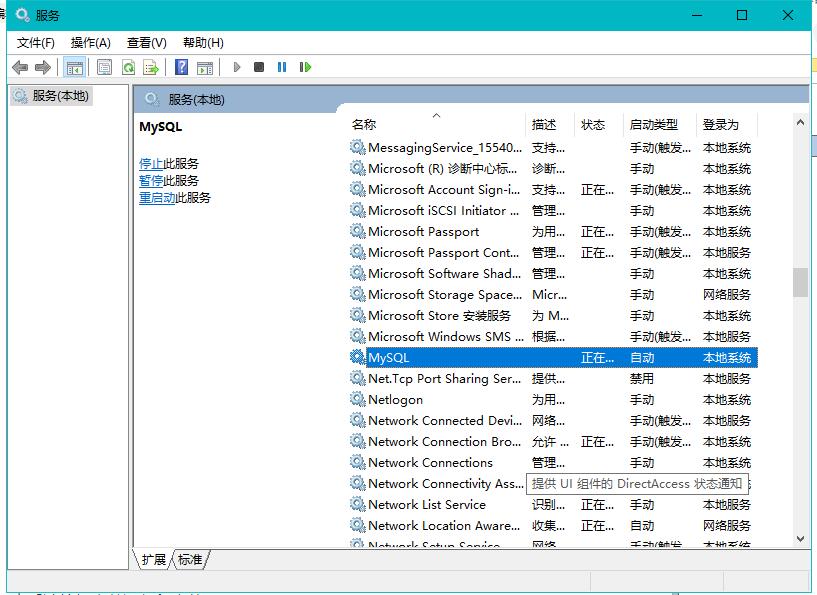
- 运行:services.msc 查看计算机本地服务,查看列表中是否已经加入有MySQL

5/修改root用户登录初始密码(破解管理员密码)
注意:修改密码不是在mysql里面修改,需要退出客户端,在外面修改
修改密码:
######登录后修改:
5.7版本修改密码和老版本不一样:需要:
输入:
update mysql.user set authentication_string=password('新密码') where user = 'root';
flush privileges;

######不登录修改:
输入:
C:\WINDOWS\system32>mysqladmin -uroot -p原密码 password 新密码
mysqladmin: [Warning] Using a password on the command line interface can be insecure.
Warning: Since password will be sent to server in plain text, use ssl connection to ensure password safety.
破解密码:
windows下:
Microsoft Windows [版本 10.0.17134.706]
(c) 2018 Microsoft Corporation。保留所有权利。

C:\WINDOWS\system32>mysqld --skip-grant-tables   # 绕过密码监测文件,这里第一次回车可能会卡主,关闭cmd再试一次就没问题了

C:\WINDOWS\system32>mysql    # 直接进入mysql(而且是root用户)
Welcome to the MySQL monitor.  Commands end with ; or \g.
Your MySQL connection id is 2
Server version: 5.7.26 MySQL Community Server (GPL)

Copyright (c) 2000, 2019, Oracle and/or its affiliates. All rights reserved.

Oracle is a registered trademark of Oracle Corporation and/or its
affiliates. Other names may be trademarks of their respective
owners.

Type 'help;' or '\h' for help. Type '\c' to clear the current input statement.
###### ↓↓↓↓↓↓修改密码↓↓↓↓↓↓######(此时无需原密码)
mysql> update mysql.user set authentication_string=password('新密码') where user = 'root';
Query OK, 1 row affected (0.00 sec)
Rows matched: 1  Changed: 1  Warnings: 0

mysql> flush privileges;   # 刷新下
Query OK, 0 rows affected (0.00 sec)

# 这样就破解成功完成密码修改。
5/在windows下,设置配置文件(my.ini)
[mysqld]    #服务端配置
port = 3306      # 默认端口号
basedir=D:\mysql   # 文件目录
datadir=D:\mysql\data   # 数据库目录
max_connections=200     # 客户端最大连接数
character-set-server=utf8     # 统一字符编码
collation-server=utf8_general_ci   # 排序规则
default-storage-engine=INNODB   # 默认存储引擎为innodb
sql_mode=NO_ENGINE_SUBSTITUTION,STRICT_TRANS_TABLES
[mysql]
default-character-set=utf8    # 同一字符编码utf-8
[client]
default-character-set=utf8    # 统一字符编码utf-8
三、MySQL的sql语句:(也就是敲啥命令可以达到操作数据库的增删改查)
tip: sql书写错误,只要没加分号,可以加\c使前面的sql语句失效
- 针对文件夹的(库)
# 增
create database db1 charset utf8;
# 改
alter database db1 charset gbk;
# 查
show databases;
show create database db1;
# 删
drop database db1;
-
文件首先需要在文件夹下面,所以在操作文件之前,应该先确定操作的是哪个文件夹下面的文件
use db1; # 切换文件夹 select database(); # 查看当前所在的库 # 增 create table t1(id int,name char); # 创建出来的可能是多个文件,解耦管理 # 改 alter table t1 modify name char(16);
alter table t1 modify name char(16) after age; # 将name字段放在age字段后面 alter table t1 add sex char(10); # 添加sex表头 alter table t1 drop column sex: # 删除表中sex这列 # 查 show tables; show create table t1; # 查看表的详细信息 describe t1; == desc t1; # 查看表结构 # 删 drop table t1; - 针对(记录)
# 增
insert into db1.t1 values (1,'egon'),(2,'kevin'),(3,'jason');  # into可加可不加,db1可以不指定,默认就是在当前库下
# 改
update db1.t1 set name='DSB' where id > 1;
update db1.t1 set name='DSB' where id = 2 or id = 3;
# 查
select id,name from db1.t1;  # db1可不指定,默认当前库下
select * from t1;
# 删
delete from db1.t1 where id >3;
delete from db1.t1 where name='egon'  # 这里注意如果少了一个引号,后面无论敲什么都没有用了需要将引号补全
四、存储引擎
针对不同类型的文件,需要对应有不同的存储方式帮助我们去操作
# 查看所有的存储引擎
show engines;

# 查看不同存储引擎存储表结构文件特点
create table t1(id int)engine=innodb;
create table t2(id int)engine=myisam;
create table t3(id int)engine=blackhole;
create table t4(id int)engine=memory;

insert into t1 values(1);
insert into t2 values(1);
insert into t3 values(1);
insert into t4 values(1);
请相信自己
当我们迷茫,懒惰,退缩的时候 我们会格外的相信命运 相信一切都是命中注定
而当我们努力拼搏,积极向上时 我们会格外的相信自己
所以命运是什么呢? 它是如果你习惯它 那它就会一直左右你
如果你想挣脱它 那它就成为你的阻碍 可如果你打破了它 那它就是你人生的垫脚石!
如果觉得这篇文章对你有小小的帮助的话,记得在右下角点个“推荐”哦,博主在此感谢!


