spring详解
1、什么是 Spring ?
Spring是一个开源框架,Spring是于2003 年兴起的一个轻量级的Java 开发框架,由Rod Johnson 在其著作Expert One-On-One J2EE Development and Design中阐述的部分理念和原型衍生而来。它是为了解决企业应用开发的复杂性而创建的。框架的主要优势之一就是其分层架构,分层架构允许使用者选择使用哪一个组件,同时为 J2EE 应用程序开发提供集成的框架。Spring使用基本的JavaBean来完成以前只可能由EJB完成的事情。然而,Spring的用途不仅限于服务器端的开发。从简单性、可测试性和松耦合的角度而言,任何Java应用都可以从Spring中受益。Spring的核心是控制反转(IoC)和面向切面(AOP)。
简单来说,Spring是一个分层的JavaSE/EE full-stack(一站式) 轻量级开源框架。
2、Spring 起源
Rod Johnson在2002年编著的《Expert one on one J2EE design and development》一书中,对Java EE 系统框架臃肿、低效、脱离现实的种种现状提出了质疑,并积极寻求探索革新Spring Logo之道。以此书为指导思想,他编写了interface21框架,这是一个力图冲破J2EE传统开发的困境,从实际需求出发,着眼于轻便、灵巧,易于开发、测试和部署的轻量级开发框架。Spring框架即以interface21框架为基础,经过重新设计,并不断丰富其内涵,于2004年3月24日,发布了1.0正式版。同年他又推出了一部堪称经典的力作《Expert one-on-one J2EE Development without EJB》,该书在Java世界掀起了轩然大波,不断改变着Java开发者程序设计和开发的思考方式。在该书中,作者根据自己多年丰富的实践经验,对EJB的各种笨重臃肿的结构进行了逐一的分析和否定,并分别以简洁实用的方式替换之。至此一战功成,Rod Johnson成为一个改变Java世界的大师级人物。
3、Spring 特点
①、方便解耦,简化开发
通过Spring提供的IoC容器,我们可以将对象之间的依赖关系交由Spring进行控制,避免硬编码所造成的过度程序耦合。有了Spring,用户不必再为单实例模式类、属性文件解析等这些很底层的需求编写代码,可以更专注于上层的应用。
②、AOP编程的支持
通过Spring提供的AOP功能,方便进行面向切面的编程,许多不容易用传统OOP实现的功能可以通过AOP轻松应付。
③、声明式事务的支持
在Spring中,我们可以从单调烦闷的事务管理代码中解脱出来,通过声明式方式灵活地进行事务的管理,提高开发效率和质量。
④、方便程序的测试
可以用非容器依赖的编程方式进行几乎所有的测试工作,在Spring里,测试不再是昂贵的操作,而是随手可做的事情。例如:Spring对Junit4支持,可以通过注解方便的测试Spring程序。
⑤、方便集成各种优秀框架
Spring不排斥各种优秀的开源框架,相反,Spring可以降低各种框架的使用难度,Spring提供了对各种优秀框架(如Struts,Hibernate、Hessian、Quartz)等的直接支持。
⑥、降低Java EE API的使用难度
Spring对很多难用的Java EE API(如JDBC,JavaMail,远程调用等)提供了一个薄薄的封装层,通过Spring的简易封装,这些Java EE API的使用难度大为降低。
⑦、Java 源码是经典学习范例
Spring的源码设计精妙、结构清晰、匠心独运,处处体现着大师对Java设计模式灵活运用以及对Java技术的高深造诣。Spring框架源码无疑是Java技术的最佳实践范例。如果想在短时间内迅速提高自己的Java技术水平和应用开发水平,学习和研究Spring源码将会使你收到意想不到的效果。
4、Spring 框架结构

1、核心容器:核心容器提供 Spring 框架的基本功能(Spring Core)。核心容器的主要组件是 BeanFactory,它是工厂模式的实现。BeanFactory 使用控制反转(IOC) 模式将应用程序的配置和依赖性规范与实际的应用程序代码分开。
2、Spring 上下文:Spring 上下文是一个配置文件,向 Spring框架提供上下文信息。Spring 上下文包括企业服务,例如JNDI、EJB、电子邮件、国际化、校验和调度功能。
3、Spring AOP:通过配置管理特性,Spring AOP 模块直接将面向切面的编程功能集成到了 Spring 框架中。所以,可以很容易地使 Spring 框架管理的任何对象支持AOP。Spring AOP 模块为基于 Spring 的应用程序中的对象提供了事务管理服务。通过使用 Spring AOP,不用依赖 EJB 组件,就可以将声明性事务管理集成到应用程序中。
4、Spring DAO:JDBCDAO抽象层提供了有意义的异常层次结构,可用该结构来管理异常处理和不同数据库供应商抛出的错误消息。异常层次结构简化了错误处理,并且极大地降低了需要编写的异常代码数量(例如打开和关闭连接)。Spring DAO 的面向 JDBC 的异常遵从通用的 DAO 异常层次结构。
5、Spring ORM:Spring 框架插入了若干个ORM框架,从而提供了 ORM 的对象关系工具,其中包括JDO、Hibernate和iBatisSQL Map。所有这些都遵从 Spring 的通用事务和 DAO 异常层次结构。
6、Spring Web 模块:Web 上下文模块建立在应用程序上下文模块之上,为基于 Web 的应用程序提供了上下文。所以,Spring框架支持与 Jakarta Struts 的集成。Web 模块还简化了处理多部分请求以及将请求参数绑定到域对象的工作。
7、Spring MVC 框架:MVC框架是一个全功能的构建 Web应用程序的 MVC 实现。通过策略接口,MVC框架变成为高度可配置的,MVC 容纳了大量视图技术,其中包括 JSP、Velocity、Tiles、iText 和 POI。模型由javabean构成,存放于Map;视图是一个接口,负责显示模型;控制器表示逻辑代码,是Controller的实现。Spring框架的功能可以用在任何J2EE服务器中,大多数功能也适用于不受管理的环境。Spring 的核心要点是:支持不绑定到特定 J2EE服务的可重用业务和数据访问对象。毫无疑问,这样的对象可以在不同J2EE 环境(Web 或EJB)、独立应用程序、测试环境之间重用。
5、Spring 框架特征
轻量——从大小与开销两方面而言Spring都是轻量的。完整的Spring框架可以在一个大小只有1MB多的JAR文件里发布。并且Spring所需的处理开销也是微不足道的。此外,Spring是非侵入式的:典型地,Spring应用中的对象不依赖于Spring的特定类。
控制反转——Spring通过一种称作控制反转(IoC)的技术促进了低耦合。当应用了IoC,一个对象依赖的其它对象会通过被动的方式传递进来,而不是这个对象自己创建或者查找依赖对象。你可以认为IoC与JNDI相反——不是对象从容器中查找依赖,而是容器在对象初始化时不等对象请求就主动将依赖传递给它。
面向切面——Spring提供了面向切面编程的丰富支持,允许通过分离应用的业务逻辑与系统级服务(例如审计(auditing)和事务(transaction)管理)进行内聚性的开发。应用对象只实现它们应该做的——完成业务逻辑——仅此而已。它们并不负责(甚至是意识)其它的系统级关注点,例如日志或事务支持。
容器——Spring包含并管理应用对象的配置和生命周期,在这个意义上它是一种容器,你可以配置你的每个bean如何被创建——基于一个可配置原型(prototype),你的bean可以创建一个单独的实例或者每次需要时都生成一个新的实例——以及它们是如何相互关联的。然而,Spring不应该被混同于传统的重量级的EJB容器,它们经常是庞大与笨重的,难以使用。
框架——Spring可以将简单的组件配置、组合成为复杂的应用。在Spring中,应用对象被声明式地组合,典型地是在一个XML文件里。Spring也提供了很多基础功能(事务管理、持久化框架集成等等),将应用逻辑的开发留给了你。
MVC——Spring的作用是整合,但不仅仅限于整合,Spring 框架可以被看做是一个企业解决方案级别的框架。客户端发送请求,服务器控制器(由DispatcherServlet实现的)完成请求的转发,控制器调用一个用于映射的类HandlerMapping,该类用于将请求映射到对应的处理器来处理请求。HandlerMapping 将请求映射到对应的处理器Controller(相当于Action)在Spring 当中如果写一些处理器组件,一般实现Controller 接口,在Controller 中就可以调用一些Service 或DAO 来进行数据操作 ModelAndView 用于存放从DAO 中取出的数据,还可以存放响应视图的一些数据。 如果想将处理结果返回给用户,那么在Spring 框架中还提供一个视图组件ViewResolver,该组件根据Controller 返回的标示,找到对应的视图,将响应response 返回给用户。(典型例子是 SpringMVC 的实现,可以参考 SpringMVC详解)
6、Spring 优点
Spring能有效地组织你的中间层对象,无论你是否选择使用了EJB。如果你仅仅使用了Struts或其他的包含了J2EE特有APIs的framework,你会发现Spring关注了遗留下的问题。Spring能消除在许多工程上对Singleton的过多使用。根据我的经验,这是一个主要的问题,它减少了系统的可测试性和面向对象特性。
Spring能消除使用各种各样格式的属性定制文件的需要,在整个应用和工程中,可通过一种一致的方法来进行配置。曾经感到迷惑,一个特定类要查找迷幻般的属性关键字或系统属性,为此不得不读Javadoc乃至源编码吗?有了Spring,你可很简单地看到类的JavaBean属性。
Spring能通过接口而不是类促进好的编程习惯,减少编程代价到几乎为零。
Spring被设计为让使用它创建的应用尽可能少的依赖于他的APIs。在Spring应用中的大多数业务对象没有依赖于Spring。所以使用Spring构建的应用程序易于单元测试。
Spring能使EJB的使用成为一个实现选择,而不是应用架构的必然选择。你能选择用POJOs或local EJBs来实现业务接口,却不会影响调用代码。
Spring帮助你解决许多问题而无需使用EJB。Spring能提供一种EJB的替换物,它们适于许多web应用。例如,Spring能使用AOP提供声明性事务而不通过使用EJB容器,如果你仅仅需要与单个的数据库打交道,甚至不需要JTA实现。
Spring为数据存取提供了一致的框架,不论是使用JDBC或O/R mapping产品(如Hibernate)。
总结:
1.低侵入式设计,代码污染极低
2.独立于各种应用服务器,基于Spring框架的应用,可以真正实现Write Once,Run Anywhere的承诺
3.Spring的DI机制降低了业务对象替换的复杂性,提高了组件之间的解耦
4.Spring的AOP支持允许将一些通用任务如安全、事务、日志等进行集中式管理,从而提供了更好的复用
5.Spring的ORM和DAO提供了与第三方持久层框架的良好整合,并简化了底层的数据库访问
6.Spring并不强制应用完全依赖于Spring,开发者可自由选用Spring框架的部分或全部
我相信提到 Spring,很多人会脱口而出IOC(控制反转)、DI(依赖注入)、AOP等等概念,这些概念也是面试官经常问到的知识点。那么这篇博客我们就来详细的讲解 IOC控制反转。
1、什么是 IOC?
IOC-Inversion of Control,即控制反转。它不是什么技术,而是一种设计思想。
传统的创建对象的方法是直接通过 new 关键字,而 spring 则是通过 IOC 容器来创建对象,也就是说我们将创建对象的控制权交给了 IOC 容器。我们可以用一句话来概括 IOC:
IOC 让程序员不在关注怎么去创建对象,而是关注与对象创建之后的操作,把对象的创建、初始化、销毁等工作交给spring容器来做。
2、分享Bromon的blog上对IoC与DI浅显易懂的讲解
IoC(Inversion of Control,控制反转)。这是spring的核心,贯穿始终。所谓IoC,对于spring框架来说,就是由spring来负责控制对象的生命周期和对象间的关系。这是什么意思呢,举个简单的例子,我们是如何找女朋友的?常见的情况是,我们到处去看哪里有长得漂亮身材又好的mm,然后打听她们的兴趣爱好、qq号、电话号、ip号、iq号………,想办法认识她们,投其所好送其所要,然后嘿嘿……这个过程是复杂深奥的,我们必须自己设计和面对每个环节。传统的程序开发也是如此,在一个对象中,如果要使用另外的对象,就必须得到它(自己new一个,或者从JNDI中查询一个),使用完之后还要将对象销毁(比如Connection等),对象始终会和其他的接口或类藕合起来。
那么IoC是如何做的呢?有点像通过婚介找女朋友,在我和女朋友之间引入了一个第三者:婚姻介绍所。婚介管理了很多男男女女的资料,我可以向婚介提出一个列表,告诉它我想找个什么样的女朋友,比如长得像李嘉欣,身材像林熙雷,唱歌像周杰伦,速度像卡洛斯,技术像齐达内之类的,然后婚介就会按照我们的要求,提供一个mm,我们只需要去和她谈恋爱、结婚就行了。简单明了,如果婚介给我们的人选不符合要求,我们就会抛出异常。整个过程不再由我自己控制,而是有婚介这样一个类似容器的机构来控制。Spring所倡导的开发方式就是如此,所有的类都会在spring容器中登记,告诉spring你是个什么东西,你需要什么东西,然后spring会在系统运行到适当的时候,把你要的东西主动给你,同时也把你交给其他需要你的东西。所有的类的创建、销毁都由 spring来控制,也就是说控制对象生存周期的不再是引用它的对象,而是spring。对于某个具体的对象而言,以前是它控制其他对象,现在是所有对象都被spring控制,所以这叫控制反转。
3、Spring 容器创建对象的三种方式
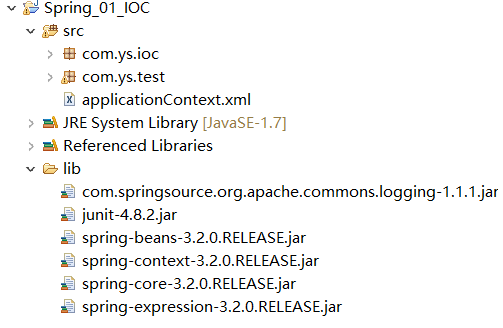
第一步:创建工程,然后导入相应的 jar 包,如下图:(详情参见上面的源码下载)
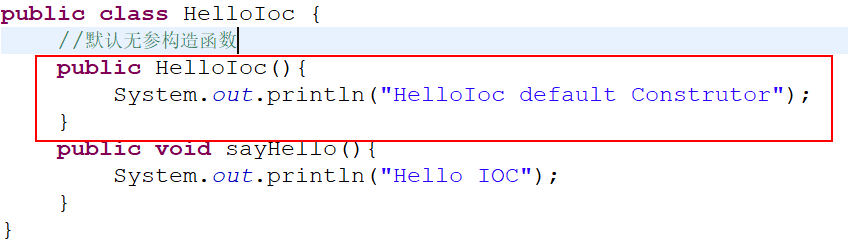
第二步:创建测试对象 HelloIoc
|
1
2
3
4
5
6
7
8
|
package com.ys.ioc;//这是测试对象,我们通过 IOC 来创建对象public class HelloIoc { public void sayHello(){ System.out.println("Hello IOC"); }} |
传统的创建对象的方法:new 关键字
|
1
2
3
4
5
6
|
//传统的创建对象方法----new @Test public void testTradition(){ HelloIoc hello = new HelloIoc(); hello.sayHello(); } |
这里通过 Spring 容器怎么来创建呢?
第一种方法:利用默认的构造方法
在 src 目录下新建 applicationContext.xml 文件,这是 spring 配置文件,添加如下代码:
|
1
2
3
4
5
6
7
8
9
10
11
12
13
14
15
|
<?xml version="1.0" encoding="UTF-8"?><beans xmlns="http://www.springframework.org/schema/beans" xmlns:xsi="http://www.w3.org/2001/XMLSchema-instance" xsi:schemaLocation="http://www.springframework.org/schema/beans http://www.springframework.org/schema/beans/spring-beans.xsd"> <!-- 创建对象的第一种方式:利用无参构造器 id:唯一标识符 class:类的全类名 --> <bean id="helloIoc" class="com.ys.ioc.HelloIoc" ></bean> <!-- 别名属性 name:和bean的 id 属性对应 --> <alias name="helloIoc" alias="helloIoc2"/> </beans> |
测试代码:
|
1
2
3
4
5
6
7
8
9
10
11
12
13
14
15
16
17
|
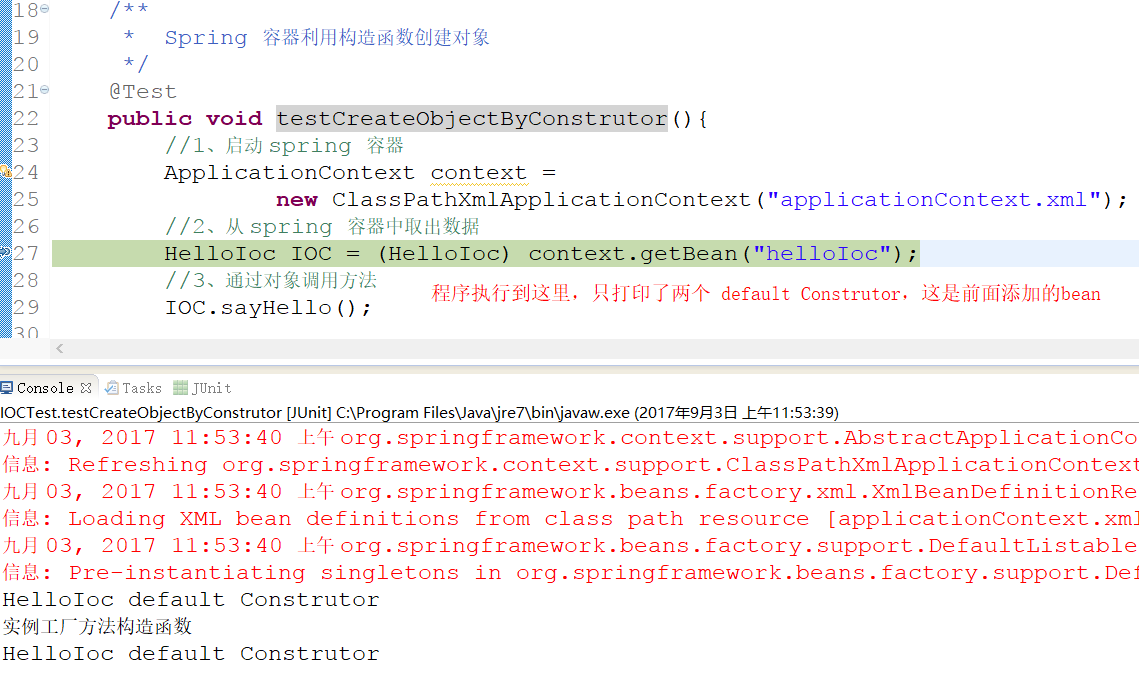
/** * Spring 容器利用构造函数创建对象 */ @Test public void testCreateObjectByConstrutor(){ //1、启动 spring 容器 ApplicationContext context = new ClassPathXmlApplicationContext("applicationContext.xml"); //2、从 spring 容器中取出数据 HelloIoc IOC = (HelloIoc) context.getBean("helloIoc"); //3、通过对象调用方法 IOC.sayHello(); //利用配置文件 alias 别名属性创建对象 HelloIoc IOC2 = (HelloIoc) context.getBean("helloIoc2"); IOC2.sayHello(); } |
我们可以在测试类 HelloIoc.java 中手动添加无参的构造方法,然后执行上面的测试代码,会发现构造方法会在 sayHello()方法执行之前调用。
第二种方法:利用静态工厂方法
首先创建静态工厂类 HelloStaticFactory.java
|
1
2
3
4
5
6
7
8
9
10
11
12
|
package com.ys.ioc;public class HelloStaticFactory { public HelloStaticFactory(){ System.out.println("HelloStaticFactory constructor"); } //静态工厂方法 public static HelloIoc getInstances(){ return new HelloIoc(); }} |
接着在 applicationContext.xml 中进行如下配置:
|
1
2
3
4
5
6
|
<!-- 创建对象的第二种方式:利用静态工厂方法 factory-method:静态工厂类的获取对象的静态方法 class:静态工厂类的全类名 --> <bean id="helloStaticFactory" factory-method="getInstances" class="com.ys.ioc.HelloStaticFactory"></bean> |
编写测试类:
|
1
2
3
4
5
6
7
8
9
10
11
|
/** * Spring 容器利用静态工厂方法创建对象 */ @Test public void createObjectStaticFactory(){ ApplicationContext context = new ClassPathXmlApplicationContext("applicationContext.xml"); HelloIoc staticFactory = (HelloIoc) context.getBean("helloStaticFactory"); staticFactory.sayHello(); } |
注意:spring容器只负责调用静态工厂方法,而这个静态工厂方法内部实现由程序员完成
第三种方法:利用实例工厂方法
首先创建实例工厂类 HelloInstanceFactory .java
|
1
2
3
4
5
6
7
8
9
10
11
12
13
|
package com.ys.ioc;public class HelloInstanceFactory { public HelloInstanceFactory(){ System.out.println("实例工厂方法构造函数"); } //利用实例工厂方法创建对象 public HelloIoc getInstance(){ HelloIoc instanceIoc = new HelloIoc(); return instanceIoc; }} |
接着在 applicationContext.xml 中进行如下配置:
|
1
2
3
4
5
6
7
8
|
<!-- 创建对象的第三种方式:利用实例工厂方法 factory-bean:指定当前Spring中包含工厂方法的beanID factory-method:工厂方法名称 --> <bean id="instanceFactory" class="com.ys.ioc.HelloInstanceFactory"></bean> <bean id="instance" factory-bean="instanceFactory" factory-method="getInstance"></bean> |
最后编写测试类:
|
1
2
3
4
5
6
7
8
9
10
11
|
/** * Spring 容器利用实例工厂方法创建对象 */ @Test public void createObjectInstanceFactory(){ ApplicationContext context = new ClassPathXmlApplicationContext("applicationContext.xml"); HelloIoc staticFactory = (HelloIoc) context.getBean("instance"); staticFactory.sayHello(); } |
4、Spring 容器创建对象的时机
第一种:默认情况下,启动 spring 容器便创建对象(遇到bean便创建对象)
测试:
第一步:我们在 HelloIoc.java 中添加默认构造方法:
第二步:在 applicationContext.xml 文件中添加 bean(由于上面我们通过三种方式来创建对象了,里面已经有三个bean了)
第三步:启动 Spring 容器,查看无参构造函数的打印次数

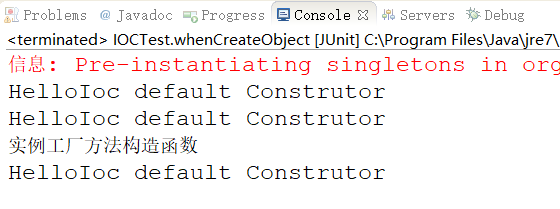
控制台打印结果如下:
第二种:在spring的配置文件bean中有一个属性 lazy-init="default/true/false"
①、如果lazy-init为"default/false"在启动spring容器时创建对象(默认情况)
②、如果lazy-init为"true",在context.getBean时才要创建对象
我们测试 lazy-init=“true”的情况

我们测试通过断点调试:
然后继续往下面执行:

在第一种情况下可以在启动spring容器的时候,检查spring容器配置文件的正确性,如果再结合tomcat,如果spring容器不能正常启动,整个tomcat就不能正常启动。但是这样的缺点是把一些bean过早的放在了内存中,如果有数据,则对内存来是一个消耗。
反过来,在第二种情况下,可以减少内存的消耗,但是不容易发现错误
5、spring的bean中的scope:"singleton/prototype/request/session/global session"
一、默认scope的值是singleton,即产生的对象是单例的
applicationContext.xml 文件中配置:
|
1
|
<bean id="helloIoc" scope="singleton" class="com.ys.ioc.HelloIoc" ></bean> |
验证:
|
1
2
3
4
5
6
7
8
|
//spring 容器默认产生对象是单例的 scope="singleton" @Test public void test_scope_single_CreateObject(){ ApplicationContext context = new ClassPathXmlApplicationContext("applicationContext.xml"); HelloIoc hello1 = (HelloIoc) context.getBean("helloIoc"); HelloIoc hello2 = (HelloIoc) context.getBean("helloIoc"); System.out.println(hello1.equals(hello2)); //true } |
二、scope=“prototype”
多例模式,并且spring容器启动的时候并不会创建对象,而是在得到 bean 的时候才会创建对象
applicationContext.xml 文件中配置:
|
1
|
<bean id="helloIoc" scope="prototype" class="com.ys.ioc.HelloIoc" ></bean> |
验证:
|
1
2
3
4
5
6
7
8
|
//spring 容器默认产生对象是单例的 scope="prototype" @Test public void test_scope_prototype_CreateObject(){ ApplicationContext context = new ClassPathXmlApplicationContext("applicationContext.xml"); HelloIoc hello1 = (HelloIoc) context.getBean("helloIoc"); HelloIoc hello2 = (HelloIoc) context.getBean("helloIoc"); System.out.println(hello1.equals(hello2)); //false } |
总结:在单例模式下,启动 spring 容器,便会创建对象;在多例模式下,启动容器并不会创建对象,获得 bean 的时候才会创建对象
5、Spring 容器生命周期
创建 SpringLifeCycle.java
|
1
2
3
4
5
6
7
8
9
10
11
12
13
14
15
16
17
18
19
20
21
22
23
|
package com.ys.ioc;/** * Spring 容器的生命周期 * @author hadoop * */public class SpringLifeCycle { public SpringLifeCycle(){ System.out.println("SpringLifeCycle"); } //定义初始化方法 public void init(){ System.out.println("init..."); } //定义销毁方法 public void destroy(){ System.out.println("destroy..."); } public void sayHello(){ System.out.println("say Hello..."); }} |
applicationContext.xml
|
1
2
|
<!-- 生命周期 --> <bean id="springLifeCycle" init-method="init" destroy-method="destroy" class="com.ys.ioc.SpringLifeCycle"></bean> |
测试:
|
1
2
3
4
5
6
7
8
9
10
11
12
|
//spring 容器的初始化和销毁 @Test public void testSpringLifeCycle(){ ApplicationContext context = new ClassPathXmlApplicationContext("applicationContext.xml"); SpringLifeCycle hello = (SpringLifeCycle) context.getBean("springLifeCycle"); hello.sayHello(); //销毁spring容器 ClassPathXmlApplicationContext classContext = (ClassPathXmlApplicationContext) context; classContext.close(); } |
控制台打印如下:
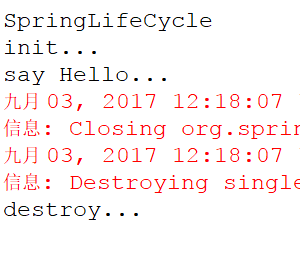
分析:spring 容器的声明周期
1、spring容器创建对象
2、执行init方法
3、调用自己的方法
4、当spring容器关闭的时候执行destroy方法
注意:当scope为"prototype"时,调用 close() 方法时是不会调用 destroy 方法的
上一篇博客我们主要讲解了IOC控制反转,也就是说IOC 让程序员不在关注怎么去创建对象,而是关注与对象创建之后的操作,把对象的创建、初始化、销毁等工作交给spring容器来做。那么创建对象的时候,有可能依赖于其他的对象,即类的属性如何赋值?这也是我们这篇博客讲解 Spring 另一个核心要点:DI依赖注入。
1、什么是DI依赖注入?
spring动态的向某个对象提供它所需要的其他对象。这一点是通过DI(Dependency Injection,依赖注入)来实现的。比如对象A需要操作数据库,以前我们总是要在A中自己编写代码来获得一个Connection对象,有了 spring我们就只需要告诉spring,A中需要一个Connection,至于这个Connection怎么构造,何时构造,A不需要知道。在系统运行时,spring会在适当的时候制造一个Connection,然后像打针一样,注射到A当中,这样就完成了对各个对象之间关系的控制。A需要依赖 Connection才能正常运行,而这个Connection是由spring注入到A中的,依赖注入的名字就这么来的。那么DI是如何实现的呢? Java 1.3之后一个重要特征是反射(reflection),它允许程序在运行的时候动态的生成对象、执行对象的方法、改变对象的属性,spring就是通过反射来实现注入的。
简单来说什么是依赖注入,就是给属性赋值(包括基本数据类型和引用数据类型)
2、利用 set 方法给属性赋值
第一步:创建工程,并导入相应的 jar 包
第二步:创建实体类 Person
|
1
2
3
4
5
6
7
8
9
10
11
12
13
14
15
16
17
18
19
20
21
22
23
24
25
26
27
28
29
30
31
32
33
34
35
36
37
38
39
40
41
42
43
44
45
46
47
48
49
50
51
52
53
54
55
56
57
58
59
60
|
package com.ys.di;import java.util.List;import java.util.Map;import java.util.Properties;import java.util.Set;public class Person { private Long pid; private String pname; private Student students; private List lists; private Set sets; private Map maps; private Properties properties; public Long getPid() { return pid; } public void setPid(Long pid) { this.pid = pid; } public String getPname() { return pname; } public void setPname(String pname) { this.pname = pname; } public Student getStudents() { return students; } public void setStudents(Student students) { this.students = students; } public List getLists() { return lists; } public void setLists(List lists) { this.lists = lists; } public Set getSets() { return sets; } public void setSets(Set sets) { this.sets = sets; } public Map getMaps() { return maps; } public void setMaps(Map maps) { this.maps = maps; } public Properties getProperties() { return properties; } public void setProperties(Properties properties) { this.properties = properties; } } |
我们看到这个实体类包括引用类型 Student 类,基本数据类以及集合数据类型。
第三步:在 applicationContext.xml 中进行赋值
|
1
2
3
4
5
6
7
8
9
10
11
12
13
14
15
16
17
18
19
20
21
22
23
24
25
26
27
28
29
30
31
32
33
34
35
36
37
38
39
40
41
42
43
44
45
46
47
48
|
<!-- property是用来描述一个类的属性 基本类型的封装类、String等需要值的类型用value赋值 引用类型用ref赋值--><bean id="person" class="com.ys.di.Person"> <property name="pid" value="1"></property> <property name="pname" value="vae"></property> <property name="students"> <ref bean="student"/> </property> <property name="lists"> <list> <value>1</value> <ref bean="student"/> <value>vae</value> </list> </property> <property name="sets"> <set> <value>1</value> <ref bean="student"/> <value>vae</value> </set> </property> <property name="maps"> <map> <entry key="m1" value="1"></entry> <entry key="m2" > <ref bean="student"/> </entry> </map> </property> <property name="properties"> <props> <prop key="p1">p1</prop> <prop key="p2">p2</prop> </props> </property> </bean><bean id="student" class="com.ys.di.Student"></bean> |
第四步:测试
|
1
2
3
4
5
6
7
8
9
10
11
|
//利用 set 方法给对象赋值 @Test public void testSet(){ //1、启动 spring 容器 //2、从 spring 容器中取出数据 //3、通过对象调用方法 ApplicationContext context = new ClassPathXmlApplicationContext("applicationContext.xml"); Person person = (Person) context.getBean("person"); System.out.println(person.getPname());//vae } |
3、利用 构造函数 给属性赋值
第一步:在实体类 Per'son.java 中添加两个构造方法:有参和无参
|
1
2
3
4
5
6
7
|
//默认构造函数 public Person(){} //带参构造函数 public Person(Long pid,Student students){ this.pid = pid; this.students = students; } |
第二步:在 applicationContext.xml 中进行赋值
|
1
2
3
4
5
6
7
8
9
10
11
12
13
|
<!-- 根据构造函数赋值 --> <!-- index 代表参数的位置 从0开始计算 type 指的是参数的类型,在有多个构造函数时,可以用type来区分,要是能确定是那个构造函数,可以不用写type value 给基本类型赋值 ref 给引用类型赋值 --> <bean id="person_con" class="com.ys.di.Person"> <constructor-arg index="0" type="java.lang.Long" value="1"> </constructor-arg> <constructor-arg index="1" type="com.ys.di.Student" ref="student_con"></constructor-arg> </bean> <bean id="student_con" class="com.ys.di.Student"></bean> |
第三步:测试
|
1
2
3
4
5
6
7
|
//利用 构造函数 给对象赋值 @Test public void testConstrutor(){ ApplicationContext context = new ClassPathXmlApplicationContext("applicationContext.xml"); Person person = (Person) context.getBean("person_con"); System.out.println(person.getPid());//1 } |
总结:
1、如果spring的配置文件中的bean中没有<constructor-arg>该元素,则调用默认的构造函数
2、如果spring的配置文件中的bean中有<constructor-arg>该元素,则该元素确定唯一的构造函数
Annotation(注解)是JDK1.5及以后版本引入的。它可以用于创建文档,跟踪代码中的依赖性,甚至执行基本编译时检查。注解是以‘@注解名’在代码中存在的。
前面讲解 IOC 和 DI 都是通过 xml 文件来进行配置的,我们发现 xml 配置还是比较麻烦的,那么如何简化配置呢?答案就是使用注解!
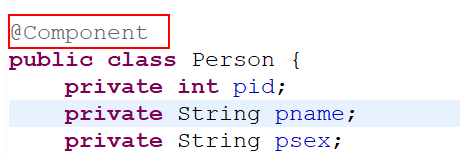
1、注解 @Component
我们这里有个类 Person
|
1
2
3
4
5
6
7
8
9
10
11
12
13
14
15
16
17
18
19
20
21
22
23
24
25
|
package com.ys.annotation;public class Person { private int pid; private String pname; private String psex; public int getPid() { return pid; } public void setPid(int pid) { this.pid = pid; } public String getPname() { return pname; } public void setPname(String pname) { this.pname = pname; } public String getPsex() { return psex; } public void setPsex(String psex) { this.psex = psex; }} |
如果我们不使用注解,通过前面讲解的,要想让 Spring 容器帮我们产生 Person 对象,我们要进行如下配置:
applicationContext.xml 配置:
|
1
|
<bean id="person" class="com.ys.annotation.Person"></bean> |
如果使用注解呢?
第一步:在 applicationContext.xml 中引入命名空间
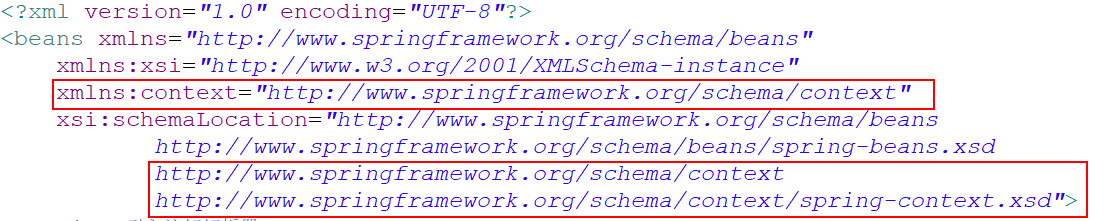
这里我们简单讲解一下这里引入的命名空间,简单来说就是用来约束xml文件格式的。第一个 xmlns:context ,这表示标签格式应该是 <context:标签名>
第二步:在 applicationContext.xml 文件中引入注解扫描器
|
1
2
|
<!-- 组件扫描,扫描含有注解的类 --> <context:component-scan base-package="com.ys.annotation"></context:component-scan> |
base-package:表示含有注解类的包名
如果扫描多个包,则上面的代码书写多行,改变 base-package 里面的内容即可!
第三步:在 Person 类中添加注解@Component
第四步:测试
|
1
2
3
4
5
6
7
8
9
10
|
@Test public void testAnnotation(){ //1、启动 spring 容器 //2、从 spring 容器中取出数据 //3、通过对象调用方法 ApplicationContext context = new ClassPathXmlApplicationContext("applicationContext.xml"); Person person = (Person) context.getBean("person"); System.out.println(person.getPname()); } |
如果看完上面的注解配置,你一脸懵逼,那没关系,我们下面来详细讲解。
@Component
如果一个类上加了@Component注解,就会进行如下的法则
如果其value属性的值为""
@Component
public class Person {}
等价于
<bean id="person" class="..Person">
如果其value属性的值不为""
@Component("p")
public class Person {}
等价于
<bean id="p" class="..Person">
那么这就很好理解测试程序中,我们直接 context.getBean("person") 这样写。
2、@Repository @Service @Controller
此外:下面三个注解是 @Component 注解的衍生注解,功能一样
|
1
2
3
|
@Repository :dao层@Service:service层@Controller:web层 |
3、注解 @Resource
@Resource 注解,它可以对类成员变量、方法及构造函数进行标注,完成自动装配的工作。 通过 @Resource 的使用来消除 set ,get方法。
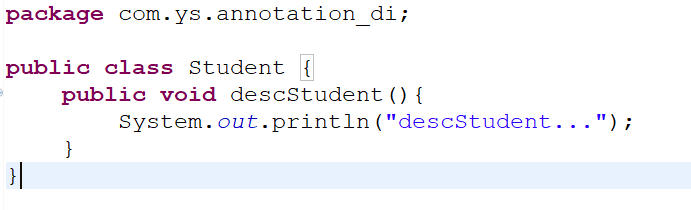
首先创建一个 学生类 Student.java
然后在 Person 类中添加一个属性 Student
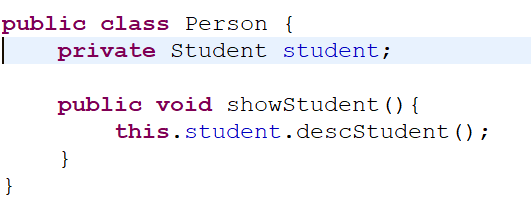
那么我们如何获取 Person 对象,并调用 showStudent()方法呢?这个问题简化就是如何给属性 Student 实例化,也就是依赖注入
不使用注解:
|
1
2
3
4
|
<property name="students"> <ref bean="student"/></property><bean id="student" class="com.ys.annotation_di.Student"></bean> |
使用注解:
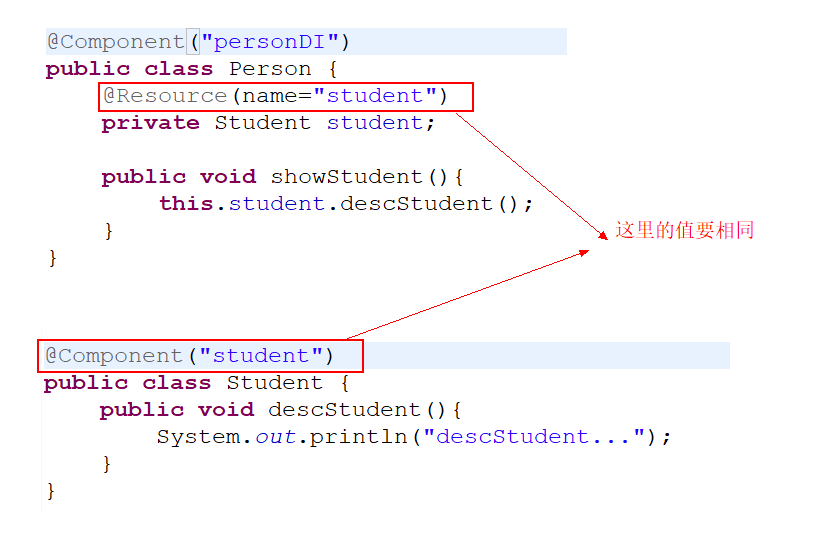
@Resource注解以后,判断该注解name的属性是否为""(name没有写)
①、如果没有写name属性,则会让属性的名称的值和spring配置文件bean中ID的值做匹配(如果没有进行配置,也和注解@Component进行匹配),如果匹配成功则赋值,如果匹配不成功,则会按照spring配置文件class类型进行匹配,如果匹配不成功,则报错
②、如果有name属性,则会按照name属性的值和spring的bean中ID进行匹配,匹配成功,则赋值,不成功则报错
4、注解 @Autowired
功能和注解 @Resource 一样,可以对类成员变量、方法及构造函数进行标注,完成自动装配的工作。只不过注解@Resource 是按照名称来进行装配,而@Autowired 则是按照类型来进行装配。
第一步:创建接口 PersonDao
|
1
2
3
4
5
6
7
|
package com.ys.autowired;public interface PersonDao { public void savePerson();} |
第二步:创建一个接口实现类 PersonDaoImplOne
|
1
2
3
4
5
6
7
8
9
10
11
12
13
14
|
package com.ys.autowired;import org.springframework.stereotype.Component;@Component("personDaoImplOne")public class PersonDaoImplOne implements PersonDao{ @Override public void savePerson() { System.out.println("save Person One"); }} |
第三步:创建PersonService
|
1
2
3
4
5
6
7
8
9
10
11
12
13
14
15
|
package com.ys.autowired;import org.springframework.beans.factory.annotation.Autowired;import org.springframework.stereotype.Service;@Service("personService")public class PersonService{ @Autowired private PersonDao personDao; public void savePerson() { this.personDao.savePerson(); }} |
注意:这里我们在 private PesronDao personDao 上面添加了注解 @Autowired,它首先会根据类型去匹配,PersonDao 是一个接口,它的实现类是 PesronDaoImpOne,那么这里的意思就是:
PersonDao personDao = new PersonDaoImpOne();
那么问题来了,如果 PersonDao 的实现类有多个呢?我们创建第一个实现类 PersonDaoImpTwo
|
1
2
3
4
5
6
7
8
9
10
11
12
13
14
|
package com.ys.autowired;import org.springframework.stereotype.Component;@Component("personDaoImplTwo")public class PersonDaoImplTwo implements PersonDao{ @Override public void savePerson() { System.out.println("save Person Two"); }} |
如果还是向上面那样写,那么测试就会报错。怎么解决呢?
第一种方法:更改名称

第二种方法:@Autowired 和 @Qualifier("名称") 配合使用
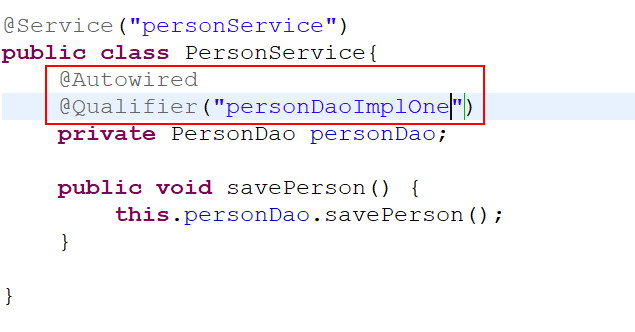
在使用@Autowired时,首先在容器中查询对应类型的bean
如果查询结果刚好为一个,就将该bean装配给@Autowired指定的数据
如果查询的结果不止一个,那么@Autowired会根据名称来查找。
如果查询的结果为空,那么会抛出异常。解决方法时,使用required=false
这章我们接着讲 Spring 的核心概念---AOP,这也是 Spring 框架中最为核心的一个概念。
1、AOP 什么?
AOP(Aspect Oriented Programming),通常称为面向切面编程。它利用一种称为"横切"的技术,剖解开封装的对象内部,并将那些影响了多个类的公共行为封装到一个可重用模块,并将其命名为"Aspect",即切面。所谓"切面",简单说就是那些与业务无关,却为业务模块所共同调用的逻辑或责任封装起来,便于减少系统的重复代码,降低模块之间的耦合度,并有利于未来的可操作性和可维护性。
什么是切面,什么是公共模块,那么我们概念少说,直接通过一个实例来看看 AOP 到底是什么。
2、需求
现在有一张表 User,然后我们要在程序中实现对 User 表的增加和删除操作。
要求:增加和删除操作都必须要开启事务,操作完成之后要提交事务。
User.java
|
1
2
3
4
5
6
7
8
9
10
11
12
13
14
15
16
17
18
19
|
package com.ys.aop.one;public class User { private int uid; private String uname; public int getUid() { return uid; } public void setUid(int uid) { this.uid = uid; } public String getUname() { return uname; } public void setUname(String uname) { this.uname = uname; }} |
3、解决办法1:使用静态代理
第一步:创建 UserService 接口
|
1
2
3
4
5
6
7
8
|
package com.ys.aop.one;public interface UserService { //添加 user public void addUser(User user); //删除 user public void deleteUser(int uid);} |
第二步:创建 UserService的实现类
|
1
2
3
4
5
6
7
8
9
10
11
12
|
package com.ys.aop.one;public class UserServiceImpl implements UserService{ @Override public void addUser(User user) { System.out.println("增加 User"); } @Override public void deleteUser(int uid) { System.out.println("删除 User"); }} |
第三步:创建事务类 MyTransaction
|
1
2
3
4
5
6
7
8
9
10
11
12
|
package com.ys.aop.one;public class MyTransaction { //开启事务 public void before(){ System.out.println("开启事务"); } //提交事务 public void after(){ System.out.println("提交事务"); }} |
第四步:创建代理类 ProxyUser.java
|
1
2
3
4
5
6
7
8
9
10
11
12
13
14
15
16
17
18
19
20
21
22
23
24
25
|
package com.ys.aop.one;public class ProxyUser implements UserService{ //真实类 private UserService userService; //事务类 private MyTransaction transaction; //使用构造函数实例化 public ProxyUser(UserService userService,MyTransaction transaction){ this.userService = userService; this.transaction = transaction; } @Override public void addUser(User user) { transaction.before(); userService.addUser(user); transaction.after(); } @Override public void deleteUser(int uid) { transaction.before(); userService.deleteUser(uid); transaction.after(); }} |
测试:
|
1
2
3
4
5
6
7
8
9
|
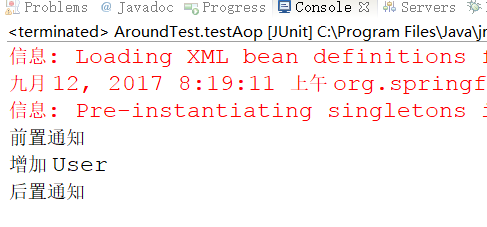
@Test public void testOne(){ MyTransaction transaction = new MyTransaction(); UserService userService = new UserServiceImpl(); //产生静态代理对象 ProxyUser proxy = new ProxyUser(userService, transaction); proxy.addUser(null); proxy.deleteUser(0); } |
结果:
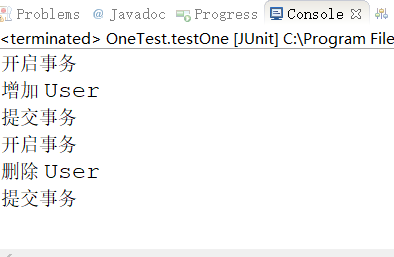
这是一个很基础的静态代理,业务类UserServiceImpl 只需要关注业务逻辑本身,保证了业务的重用性,这也是代理类的优点,没什么好说的。我们主要说说这样写的缺点:
①、代理对象的一个接口只服务于一种类型的对象,如果要代理的方法很多,势必要为每一种方法都进行代理,静态代理在程序规模稍大时就无法胜任了。
②、如果接口增加一个方法,比如 UserService 增加修改 updateUser()方法,则除了所有实现类需要实现这个方法外,所有代理类也需要实现此方法。增加了代码维护的复杂度。
4、解决办法2:使用JDK动态代理
动态代理就不要自己手动生成代理类了,我们去掉 ProxyUser.java 类,增加一个 ObjectInterceptor.java 类
|
1
2
3
4
5
6
7
8
9
10
11
12
13
14
15
16
17
18
19
20
21
22
23
24
25
26
27
28
29
30
31
32
33
|
package com.ys.aop.two;import java.lang.reflect.InvocationHandler;import java.lang.reflect.Method;import java.lang.reflect.Proxy;import com.ys.aop.one.MyTransaction;public class ObjectInterceptor implements InvocationHandler{ //目标类 private Object target; //切面类(这里指事务类) private MyTransaction transaction; //通过构造器赋值 public ObjectInterceptor(Object target,MyTransaction transaction){ this.target = target; this.transaction = transaction; } @Override public Object invoke(Object proxy, Method method, Object[] args) throws Throwable { //开启事务 this.transaction.before(); //调用目标类方法 method.invoke(this.target, args); //提交事务 this.transaction.after(); return null; } } |
测试:
|
1
2
3
4
5
6
7
8
9
10
11
12
13
14
15
16
17
|
@Test public void testOne(){ //目标类 Object target = new UserServiceImpl(); //事务类 MyTransaction transaction = new MyTransaction(); ObjectInterceptor proxyObject = new ObjectInterceptor(target, transaction); /** * 三个参数的含义: * 1、目标类的类加载器 * 2、目标类所有实现的接口 * 3、拦截器 */ UserService userService = (UserService) Proxy.newProxyInstance(target.getClass().getClassLoader(), target.getClass().getInterfaces(), proxyObject); userService.addUser(null); } |
结果:

那么使用动态代理来完成这个需求就很好了,后期在 UserService 中增加业务方法,都不用更改代码就能自动给我们生成代理对象。而且将 UserService 换成别的类也是可以的。
也就是做到了代理对象能够代理多个目标类,多个目标方法。
注意:我们这里使用的是 JDK 动态代理,要求是必须要实现接口。与之对应的另外一种动态代理实现模式 Cglib,则不需要,我们这里就不讲解 cglib 的实现方式了。
不管是哪种方式实现动态代理。本章的主角:AOP 实现原理也是动态代理
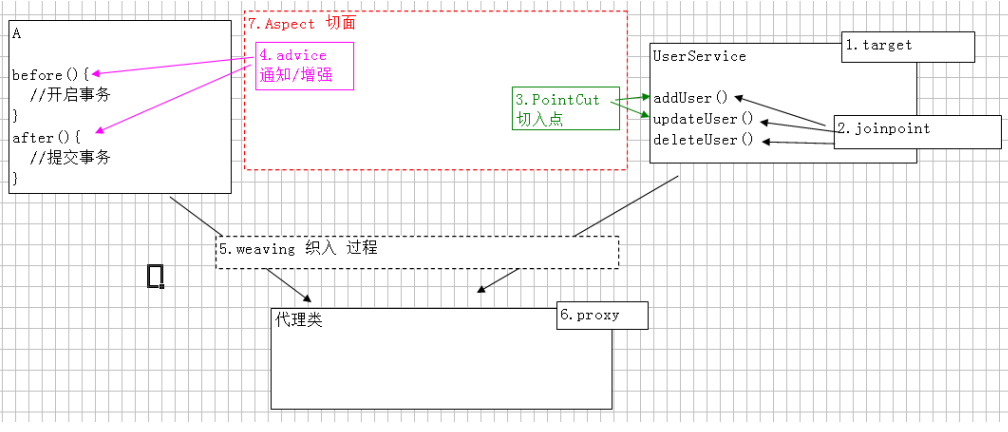
5、AOP 关键术语
1.target:目标类,需要被代理的类。例如:UserService
2.Joinpoint(连接点):所谓连接点是指那些可能被拦截到的方法。例如:所有的方法
3.PointCut 切入点:已经被增强的连接点。例如:addUser()
4.advice 通知/增强,增强代码。例如:after、before
5. Weaving(织入):是指把增强advice应用到目标对象target来创建新的代理对象proxy的过程.
6.proxy 代理类:通知+切入点
7. Aspect(切面): 是切入点pointcut和通知advice的结合
具体可以根据下面这张图来理解:
6、AOP 的通知类型
Spring按照通知Advice在目标类方法的连接点位置,可以分为5类
- 前置通知 org.springframework.aop.MethodBeforeAdvice
- 在目标方法执行前实施增强,比如上面例子的 before()方法
- 后置通知 org.springframework.aop.AfterReturningAdvice
- 在目标方法执行后实施增强,比如上面例子的 after()方法
- 环绕通知 org.aopalliance.intercept.MethodInterceptor
- 在目标方法执行前后实施增强
- 异常抛出通知 org.springframework.aop.ThrowsAdvice
- 在方法抛出异常后实施增强
- 引介通知 org.springframework.aop.IntroductionInterceptor
在目标类中添加一些新的方法和属性
7、使用 Spring AOP 解决上面的需求
我们只需要在Spring 的配置文件 applicationContext.xml 进行如下配置:
|
1
2
3
4
5
6
7
8
9
10
11
12
13
14
15
16
17
18
19
20
21
22
23
24
25
26
27
28
29
30
31
32
33
34
35
36
|
<beans xmlns="http://www.springframework.org/schema/beans" xmlns:xsi="http://www.w3.org/2001/XMLSchema-instance" xmlns:aop="http://www.springframework.org/schema/aop" xsi:schemaLocation="http://www.springframework.org/schema/beans http://www.springframework.org/schema/beans/spring-beans.xsd http://www.springframework.org/schema/aop http://www.springframework.org/schema/aop/spring-aop.xsd"> <!--1、 创建目标类 --> <bean id="userService" class="com.ys.aop.UserServiceImpl"></bean> <!--2、创建切面类(通知) --> <bean id="transaction" class="com.ys.aop.one.MyTransaction"></bean> <!--3、aop编程 3.1 导入命名空间 3.2 使用 <aop:config>进行配置 proxy-target-class="true" 声明时使用cglib代理 如果不声明,Spring 会自动选择cglib代理还是JDK动态代理 <aop:pointcut> 切入点 ,从目标对象获得具体方法 <aop:advisor> 特殊的切面,只有一个通知 和 一个切入点 advice-ref 通知引用 pointcut-ref 切入点引用 3.3 切入点表达式 execution(* com.ys.aop.*.*(..)) 选择方法 返回值任意 包 类名任意 方法名任意 参数任意 --> <aop:config> <!-- 切入点表达式 --> <aop:pointcut expression="execution(* com.ys.aop.*.*(..))" id="myPointCut"/> <aop:aspect ref="transaction"> <!-- 配置前置通知,注意 method 的值要和 对应切面的类方法名称相同 --> <aop:before method="before" pointcut-ref="myPointCut"></aop:before> <aop:after-returning method="after" pointcut-ref="myPointCut"/> </aop:aspect> </aop:config></beans> |
测试:
|
1
2
3
4
5
6
|
@Test public void testAop(){ ApplicationContext context = new ClassPathXmlApplicationContext("applicationContext.xml"); UserService useService = (UserService) context.getBean("userService"); useService.addUser(null); } |
结果:
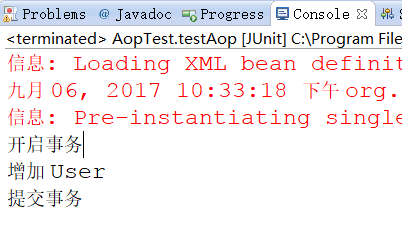
上面的配置我们在注释中写的很清楚了。这里我们重点讲解一下:
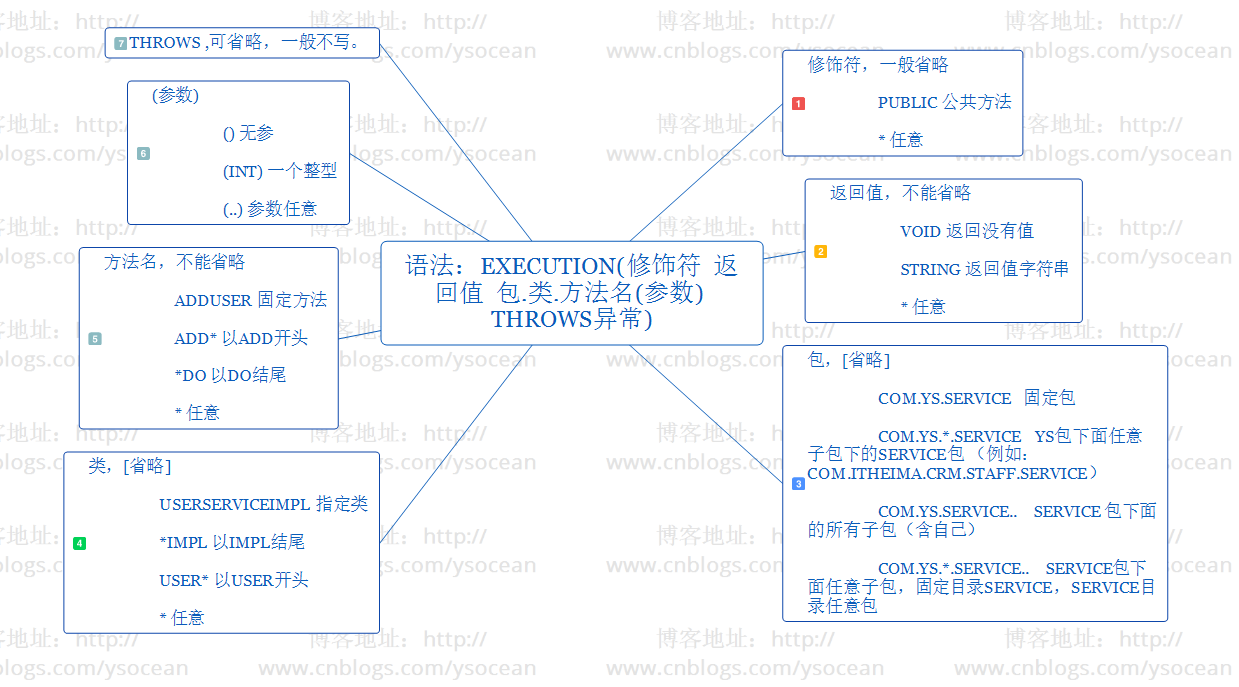
①、 切入点表达式,一个完整的方法表示如下:
|
1
2
|
execution(modifiers-pattern? ref-type-pattern declaring-type-pattern? name-pattern(param-pattern) throws-pattern?) 类修饰符 返回值 方法所在的包 方法名 方法抛出的异常 |
那么根据上面的对比,我们就很好理解:
|
1
2
|
execution(* com.ys.aop.*.*(..))选择方法 返回值任意 包 类名任意 方法名任意 参数任意 |
②、springAOP 的具体加载步骤:
1、当 spring 容器启动的时候,加载了 spring 的配置文件
2、为配置文件中的所有 bean 创建对象
3、spring 容器会解析 aop:config 的配置
1、解析切入点表达式,用切入点表达式和纳入 spring 容器中的 bean 做匹配
如果匹配成功,则会为该 bean 创建代理对象,代理对象的方法=目标方法+通知
如果匹配不成功,不会创建代理对象
4、在客户端利用 context.getBean() 获取对象时,如果该对象有代理对象,则返回代理对象;如果没有,则返回目标对象
说明:如果目标类没有实现接口,则 spring 容器会采用 cglib 的方式产生代理对象,如果实现了接口,则会采用 jdk 的方式
上一篇博客我们引出了 AOP 的概念,以及 AOP 的具体实现方式。但是为什么要这样实现?以及提出的切入点表达式到底该怎么理解?
1、什么是 AspectJ?
AspectJ是一个面向切面的框架,它扩展了Java语言。AspectJ定义了AOP语法,也可以说 AspectJ 是一个基于 Java 语言的 AOP 框架。通常我们在使用 Spring AOP 的时候,都会导入 AspectJ 的相关 jar 包。

在 spring2.0以后,spring新增了对AspectJ 切点表达式的支持;Aspect1.5新增注解功能,通过 JDK5的注解技术,能直接在类中定义切面;新版本的 spring 框架,也都建议使用 AspectJ 来实现 AOP。所以说在 spring AOP 的核心包 Spring-aop-3.2.jar 里面也有对 AspectJ 的支持。
2、切入点表达式
上一篇博客中,我们在spring配置文件中配置如下:
|
1
2
|
<!-- 切入点表达式 --><aop:pointcut expression="execution(* com.ys.aop.*.*(..))" id="myPointCut"/> |
那么它表达的意思是 返回值任意,包名为 com.ys.aop 下的任意类名中的任意方法名,参数任意。那么这到底是什么意思呢?
首先 execution 是 AspectJ 框架定义的一个切入点函数,其语法形式如下:
|
1
2
|
execution(modifiers-pattern? ref-type-pattern declaring-type-pattern? name-pattern(param-pattern) throws-pattern?) 类修饰符 返回值 方法所在的包 方法名 方法抛出的异常 |
简单点来说就是:
|
1
|
语法:execution(修饰符 返回值 包.类.方法名(参数) throws异常) |
具体解释我们用下面一张思维导图来看:
注意:如果切入点表达式有多个不同目录呢? 可以通过 || 来表示或的关系。
|
1
2
|
<aop:pointcut expression="execution(* com.ys.*Service1.*(..)) || execution(* com.ys.*Service2.*(..))" id="myPointCut"/> |
表示匹配 com.ys包下的,以 Service1结尾或者以Service2结尾的类的任意方法。
AOP 切入点表达式支持多种形式的定义规则:
|
1
2
3
4
5
6
7
8
9
10
11
12
|
1、execution:匹配方法的执行(常用) execution(public *.*(..))2.within:匹配包或子包中的方法(了解) within(com.ys.aop..*)3.this:匹配实现接口的代理对象中的方法(了解) this(com.ys.aop.user.UserDAO)4.target:匹配实现接口的目标对象中的方法(了解) target(com.ys.aop.user.UserDAO)5.args:匹配参数格式符合标准的方法(了解) args(int,int)6.bean(id) 对指定的bean所有的方法(了解) bean('userServiceId') |
2、Aspect 通知类型
Aspect 通知类型,定义了类型名称以及方法格式。类型如下:
|
1
2
3
4
5
6
7
8
9
10
11
12
|
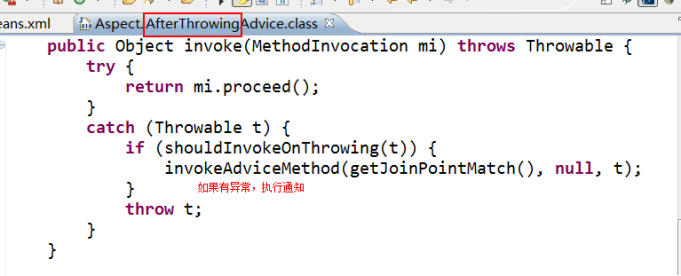
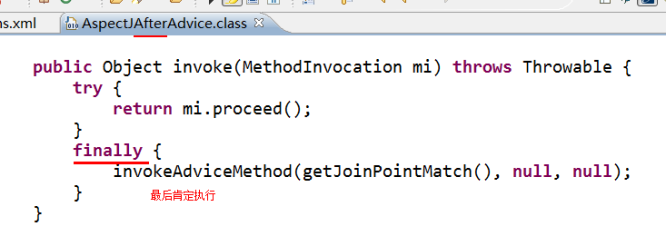
before:前置通知(应用:各种校验) 在方法执行前执行,如果通知抛出异常,阻止方法运行afterReturning:后置通知(应用:常规数据处理) 方法正常返回后执行,如果方法中抛出异常,通知无法执行 必须在方法执行后才执行,所以可以获得方法的返回值。around:环绕通知(应用:十分强大,可以做任何事情) 方法执行前后分别执行,可以阻止方法的执行 必须手动执行目标方法afterThrowing:抛出异常通知(应用:包装异常信息) 方法抛出异常后执行,如果方法没有抛出异常,无法执行after:最终通知(应用:清理现场) 方法执行完毕后执行,无论方法中是否出现异常 |
这里最重要的是around,环绕通知,它可以代替上面的任意通知。
在程序中表示的意思如下:
|
1
2
3
4
5
6
7
8
9
|
try{ //前置:before //手动执行目标方法 //后置:afterRetruning} catch(){ //抛出异常 afterThrowing} finally{ //最终 after} |
对应的 jar 包如下:
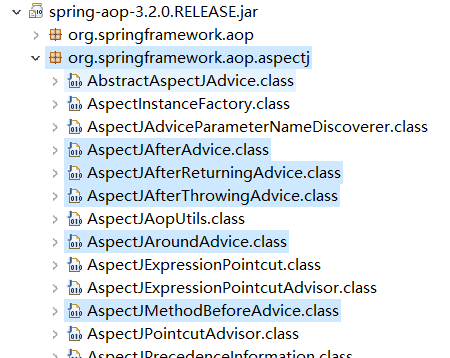
我们可以查看源码:
3、AOP具体实例
①、创建接口
|
1
2
3
4
5
6
7
8
|
package com.ys.aop;public interface UserService { //添加 user public void addUser(); //删除 user public void deleteUser();} |
②、创建实现类
|
1
2
3
4
5
6
7
8
9
10
11
12
|
package com.ys.aop;public class UserServiceImpl implements UserService{ @Override public void addUser() { System.out.println("增加 User"); } @Override public void deleteUser() { System.out.println("删除 User"); }} |
③、创建切面类(包含各种通知)
|
1
2
3
4
5
6
7
8
9
10
11
12
13
14
15
16
17
18
19
20
21
22
23
|
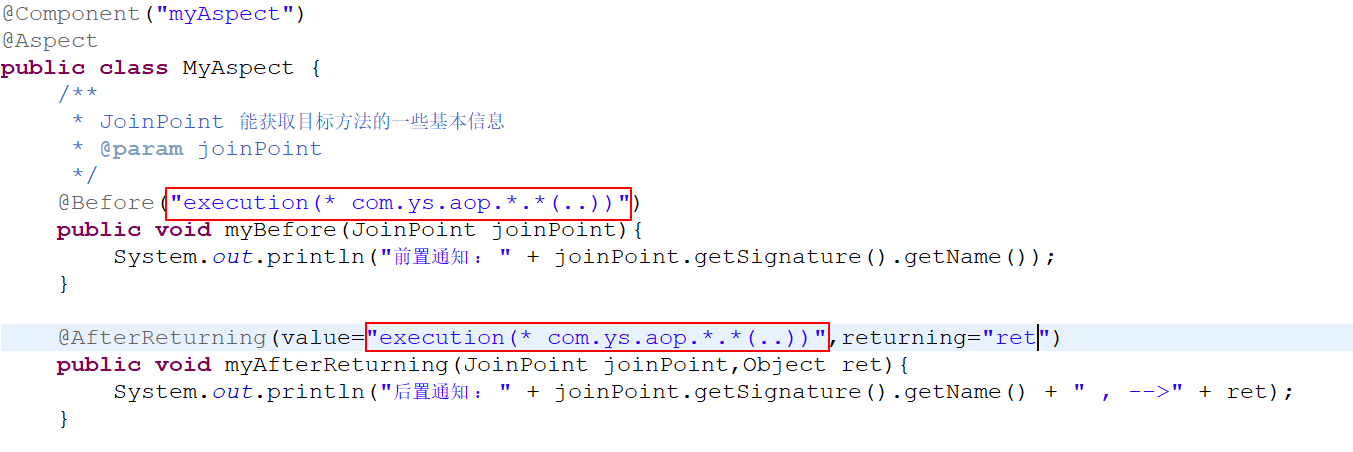
package com.ys.aop;import org.aspectj.lang.JoinPoint;public class MyAspect { /** * JoinPoint 能获取目标方法的一些基本信息 * @param joinPoint */ public void myBefore(JoinPoint joinPoint){ System.out.println("前置通知 : " + joinPoint.getSignature().getName()); } public void myAfterReturning(JoinPoint joinPoint,Object ret){ System.out.println("后置通知 : " + joinPoint.getSignature().getName() + " , -->" + ret); } public void myAfter(){ System.out.println("最终通知"); }} |
④、创建spring配置文件applicationContext.xml
我们首先测试前置通知、后置通知、最终通知
|
1
2
3
4
5
6
7
8
9
10
11
12
13
14
15
16
17
18
19
20
21
22
23
24
25
26
27
28
29
30
31
32
33
34
35
36
37
38
39
40
41
42
43
44
45
46
47
48
49
50
51
52
53
54
55
56
|
<beans xmlns="http://www.springframework.org/schema/beans" xmlns:xsi="http://www.w3.org/2001/XMLSchema-instance" xmlns:aop="http://www.springframework.org/schema/aop" xsi:schemaLocation="http://www.springframework.org/schema/beans http://www.springframework.org/schema/beans/spring-beans.xsd http://www.springframework.org/schema/aop http://www.springframework.org/schema/aop/spring-aop.xsd"> <!--1、 创建目标类 --> <bean id="userService" class="com.ys.aop.UserServiceImpl"></bean> <!--2、创建切面类(通知) --> <bean id="myAspect" class="com.ys.aop.MyAspect"></bean> <!--3、aop编程 3.1 导入命名空间 3.2 使用 <aop:config>进行配置 proxy-target-class="true" 声明时使用cglib代理 如果不声明,Spring 会自动选择cglib代理还是JDK动态代理 <aop:pointcut> 切入点 ,从目标对象获得具体方法 <aop:advisor> 特殊的切面,只有一个通知 和 一个切入点 advice-ref 通知引用 pointcut-ref 切入点引用 3.3 切入点表达式 execution(* com.ys.aop.*.*(..)) 选择方法 返回值任意 包 类名任意 方法名任意 参数任意 --> <aop:config> <aop:aspect ref="myAspect"> <!-- 切入点表达式 --> <aop:pointcut expression="execution(* com.ys.aop.*.*(..))" id="myPointCut"/> <!-- 3.1 前置通知 <aop:before method="" pointcut="" pointcut-ref=""/> method : 通知,及方法名 pointcut :切入点表达式,此表达式只能当前通知使用。 pointcut-ref : 切入点引用,可以与其他通知共享切入点。 通知方法格式:public void myBefore(JoinPoint joinPoint){ 参数1:org.aspectj.lang.JoinPoint 用于描述连接点(目标方法),获得目标方法名等 --> <aop:before method="myBefore" pointcut-ref="myPointCut"/> <!-- 3.2后置通知 ,目标方法后执行,获得返回值 <aop:after-returning method="" pointcut-ref="" returning=""/> returning 通知方法第二个参数的名称 通知方法格式:public void myAfterReturning(JoinPoint joinPoint,Object ret){ 参数1:连接点描述 参数2:类型Object,参数名 returning="ret" 配置的 --> <aop:after-returning method="myAfterReturning" pointcut-ref="myPointCut" returning="ret" /> <!-- 3.3 最终通知 --> <aop:after method="myAfter" pointcut-ref="myPointCut"/> </aop:aspect> </aop:config></beans> |
⑤、测试
|
1
2
3
4
5
6
|
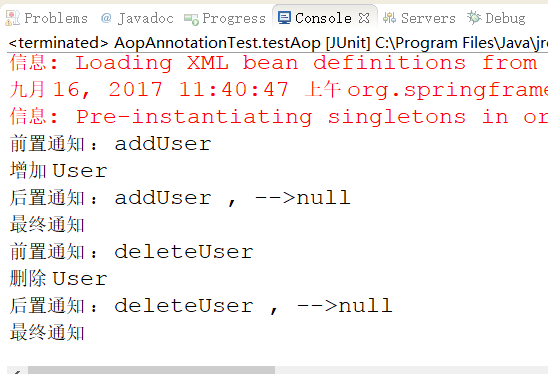
@Test public void testAop(){ ApplicationContext context = new ClassPathXmlApplicationContext("applicationContext.xml"); UserService useService = (UserService) context.getBean("userService"); useService.addUser(); } |
控制台打印:
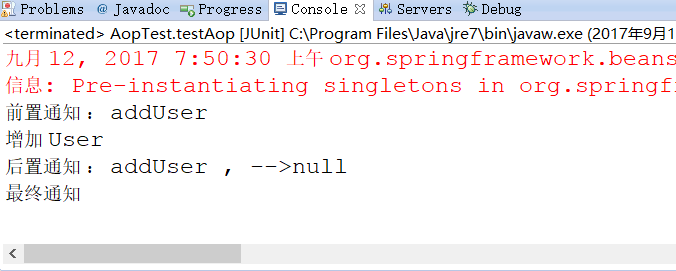
注意,后置通知的返回值为 null,是因为我们的目标方法 addUser() 没有返回值。如果有返回值,这里就是addUser() 的返回值。
4、测试异常通知
目标接口保持不变,目标类我们手动引入异常:
|
1
2
3
4
|
public void addUser() { int i = 1/0;//显然这里会抛出除数不能为 0 System.out.println("增加 User"); } |
接着配置切面:MyAspect.java
|
1
2
3
|
public void myAfterThrowing(JoinPoint joinPoint,Throwable e){ System.out.println("抛出异常通知 : " + e.getMessage()); } |
接着在 applicationContext.xml 中配置如下:
|
1
2
3
4
5
6
7
8
9
|
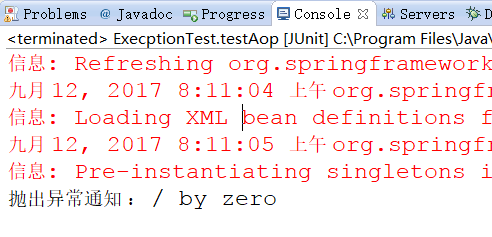
<!-- 3.4 抛出异常 <aop:after-throwing method="" pointcut-ref="" throwing=""/> throwing :通知方法的第二个参数名称 通知方法格式:public void myAfterThrowing(JoinPoint joinPoint,Throwable e){ 参数1:连接点描述对象 参数2:获得异常信息,类型Throwable ,参数名由throwing="e" 配置 --> <aop:after-throwing method="myAfterThrowing" pointcut-ref="myPointCut" throwing="e"/> |
测试:
|
1
2
3
4
5
6
7
|
@Test public void testAop(){ String str = "com/ys/execption/applicationContext.xml"; ApplicationContext context = new ClassPathXmlApplicationContext(str); UserService useService = (UserService) context.getBean("userService"); useService.addUser(); } |
控制台打印:
5、测试环绕通知
目标接口和目标类保持不变,切面MyAspect 修改如下:
|
1
2
3
4
5
6
7
8
9
10
11
12
|
public class MyAspect { public Object myAround(ProceedingJoinPoint joinPoint) throws Throwable{ System.out.println("前置通知"); //手动执行目标方法 Object obj = joinPoint.proceed(); System.out.println("后置通知"); return obj; }} |
applicationContext.xml 配置如下:
|
1
2
3
4
5
6
7
8
9
10
|
<!-- 环绕通知 <aop:around method="" pointcut-ref=""/> 通知方法格式:public Object myAround(ProceedingJoinPoint joinPoint) throws Throwable{ 返回值类型:Object 方法名:任意 参数:org.aspectj.lang.ProceedingJoinPoint 抛出异常 执行目标方法:Object obj = joinPoint.proceed(); --> <aop:around method="myAround" pointcut-ref="myPointCut"/> |
测试:
|
1
2
3
4
5
6
7
|
@Test public void testAop(){ String str = "com/ys/around/applicationContext.xml"; ApplicationContext context = new ClassPathXmlApplicationContext(str); UserService useService = (UserService) context.getBean("userService"); useService.addUser(); } |
打印结果:
那么至此,通过 xml 配置的方式我们讲解了Spring AOP 的配置。
上一篇博客我们讲解了 AspectJ 框架如何实现 AOP,然后具体的实现方式我们是通过 xml 来进行配置的。xml 方式思路清晰,便于理解,但是书写过于麻烦。这篇博客我们将用 注解 的方式来进行 AOP 配置。
为了便于大家理解,讲解方式是这样的,我们先给出 xml 的配置,然后介绍如何通过 注解 来进行替代。
|
1
2
3
4
5
6
7
8
9
10
11
12
13
14
15
16
17
18
19
20
21
22
23
24
25
26
27
|
package com.ys.aop;import org.aspectj.lang.JoinPoint;public class MyAspect { /** * JoinPoint 能获取目标方法的一些基本信息 * @param joinPoint */ public void myBefore(JoinPoint joinPoint){ System.out.println("前置通知 : " + joinPoint.getSignature().getName()); } public void myAfterReturning(JoinPoint joinPoint,Object ret){ System.out.println("后置通知 : " + joinPoint.getSignature().getName() + " , -->" + ret); } public void myAfterThrowing(JoinPoint joinPoint,Throwable e){ System.out.println("抛出异常通知 : " + e.getMessage()); } public void myAfter(){ System.out.println("最终通知"); }} |
④、AOP配置文件 applicationContext.xml
|
1
2
3
4
5
6
7
8
9
10
11
12
13
14
15
16
17
18
19
20
21
22
23
24
25
26
27
28
29
30
31
32
33
34
35
36
37
38
39
40
41
42
43
44
45
46
47
48
49
50
51
52
53
54
55
56
57
58
59
60
|
<?xml version="1.0" encoding="UTF-8"?><beans xmlns="http://www.springframework.org/schema/beans" xmlns:xsi="http://www.w3.org/2001/XMLSchema-instance" xmlns:context="http://www.springframework.org/schema/context" xmlns:aop="http://www.springframework.org/schema/aop" xsi:schemaLocation="http://www.springframework.org/schema/beans http://www.springframework.org/schema/beans/spring-beans.xsd http://www.springframework.org/schema/aop http://www.springframework.org/schema/aop/spring-aop.xsd http://www.springframework.org/schema/context http://www.springframework.org/schema/context/spring-context.xsd"> <!--1、创建目标类 --> <bean id="userService" class="com.ys.aop.UserServiceImpl"></bean> <!--2、创建切面类(通知) --> <bean id="myAspect" class="com.ys.aop.MyAspect"></bean> <!--3、aop编程 3.1 导入命名空间 3.2 使用 <aop:config>进行配置 proxy-target-class="true" 声明时使用cglib代理 如果不声明,Spring 会自动选择cglib代理还是JDK动态代理 <aop:pointcut> 切入点 ,从目标对象获得具体方法 <aop:advisor> 特殊的切面,只有一个通知 和 一个切入点 advice-ref 通知引用 pointcut-ref 切入点引用 3.3 切入点表达式 execution(* com.ys.aop.*.*(..)) 选择方法 返回值任意 包 类名任意 方法名任意 参数任意 --> <aop:config> <aop:aspect ref="myAspect"> <!-- 切入点表达式 --> <aop:pointcut expression="execution(* com.ys.aop.*.*(..))" id="myPointCut"/> <!-- 3.1 前置通知 <aop:before method="" pointcut="" pointcut-ref=""/> method : 通知,及方法名 pointcut :切入点表达式,此表达式只能当前通知使用。 pointcut-ref : 切入点引用,可以与其他通知共享切入点。 通知方法格式:public void myBefore(JoinPoint joinPoint){ 参数1:org.aspectj.lang.JoinPoint 用于描述连接点(目标方法),获得目标方法名等 --> <aop:before method="myBefore" pointcut-ref="myPointCut"/> <!-- 3.2后置通知 ,目标方法后执行,获得返回值 <aop:after-returning method="" pointcut-ref="" returning=""/> returning 通知方法第二个参数的名称 通知方法格式:public void myAfterReturning(JoinPoint joinPoint,Object ret){ 参数1:连接点描述 参数2:类型Object,参数名 returning="ret" 配置的 --> <aop:after-returning method="myAfterReturning" pointcut-ref="myPointCut" returning="ret" /> <!-- 3.3 最终通知 --> <aop:after method="myAfter" pointcut-ref="myPointCut"/> </aop:aspect> </aop:config></beans> |
⑤、测试
|
1
2
3
4
5
6
7
|
@Testpublic void testAop(){ ApplicationContext context = new ClassPathXmlApplicationContext("applicationContext.xml"); UserService useService = (UserService) context.getBean("userService"); useService.addUser(); useService.deleteUser();} |
⑥、控制台打印结果
上面的例子很简单,就是在 UserService 的 addUser()方法和 deleteUser()方法增加前置通知和后置通知,这在实际操作中很好理解。比如这是和数据库打交道的话,那么我们在 addUser() 或者 deleteUser() 时,必须要在前面开始事务,操作完毕后提交事务。下面我们就用注解的方式来配置。
2、注解实现 AOP
①、导入相应的 jar 包,以及在 applicationContext.xml 文件中导入相应的命名空间。这个在上面的源码下载链接中都有

|
1
2
3
4
5
6
7
8
9
10
11
12
13
|
<?xml version="1.0" encoding="UTF-8"?><beans xmlns="http://www.springframework.org/schema/beans" xmlns:xsi="http://www.w3.org/2001/XMLSchema-instance" xmlns:context="http://www.springframework.org/schema/context" xmlns:aop="http://www.springframework.org/schema/aop" xsi:schemaLocation="http://www.springframework.org/schema/beans http://www.springframework.org/schema/beans/spring-beans.xsd http://www.springframework.org/schema/aop http://www.springframework.org/schema/aop/spring-aop.xsd http://www.springframework.org/schema/context http://www.springframework.org/schema/context/spring-context.xsd"> </beans> |
②、注解配置 bean
xml配置:
|
1
2
3
4
|
<!--1、创建目标类 --><bean id="userService" class="com.ys.aop.UserServiceImpl"></bean> <!--2、创建切面类(通知) --><bean id="myAspect" class="com.ys.aop.MyAspect"></bean> |
注解配置:
目标类:

切面类:

③、配置扫描注解识别
这个我们在前面也讲过,上面配置的注解,Spring 如何才能识别这些类上添加了注解呢?我们必须告诉他。
在 applicationContext.xml 文件中添加如下配置:
|
1
2
3
4
5
|
<!-- 配置扫描注解类 base-package:表示含有注解类的包名。 如果扫描多个包,则下面的代码书写多行,改变 base-package 里面的内容即可! --> <context:component-scan base-package="com.ys.aop"></context:component-scan> |
④、注解配置 AOP
一、我们用xml配置过如下:

这是告诉 Spring 哪个是切面类。下面我们用注解配置
我们在切面类上添加 @Aspect 注解,如下:

二、如何让 Spring 认识我们所配置的 AOP 注解呢?光有前面的类注解扫描是不够的,这里我们要额外配置 AOP 注解识别。
我们在 applicationContext.xml 文件中增加如下配置:
|
1
2
|
<!--2、确定 aop 注解生效 --><aop:aspectj-autoproxy></aop:aspectj-autoproxy> |
三、注解配置前置通知
我们先看 xml 配置前置通知如下:
|
1
2
3
4
5
6
7
8
9
10
11
|
<!-- 切入点表达式 --> <aop:pointcut expression="execution(* com.ys.aop.*.*(..))" id="myPointCut"/> <!-- 3.1 前置通知 <aop:before method="" pointcut="" pointcut-ref=""/> method : 通知,及方法名 pointcut :切入点表达式,此表达式只能当前通知使用。 pointcut-ref : 切入点引用,可以与其他通知共享切入点。 通知方法格式:public void myBefore(JoinPoint joinPoint){ 参数1:org.aspectj.lang.JoinPoint 用于描述连接点(目标方法),获得目标方法名等 --> <aop:before method="myBefore" pointcut-ref="myPointCut"/> |
那么注解的方式如下:

四、注解配置后置通知
xml 配置后置通知:
|
1
2
3
4
5
6
7
8
|
<!-- 3.2后置通知 ,目标方法后执行,获得返回值 <aop:after-returning method="" pointcut-ref="" returning=""/> returning 通知方法第二个参数的名称 通知方法格式:public void myAfterReturning(JoinPoint joinPoint,Object ret){ 参数1:连接点描述 参数2:类型Object,参数名 returning="ret" 配置的 --> <aop:after-returning method="myAfterReturning" pointcut-ref="myPointCut" returning="ret" /> |
注意看,后置通知有个 returning="ret" 配置,这是用来获得目标方法的返回值的。
注解配置如下:

五、测试
|
1
2
3
4
5
6
7
|
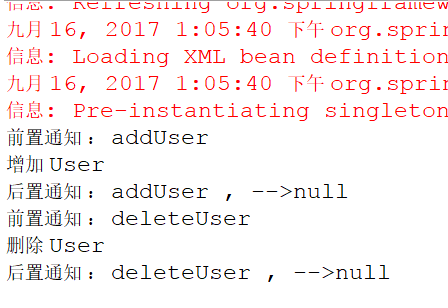
@Test public void testAopAnnotation(){ ApplicationContext context = new ClassPathXmlApplicationContext("applicationContext_Annotation.xml"); UserService useService = (UserService) context.getBean("userService"); useService.addUser(); useService.deleteUser(); } |
六、控制台打印结果
3、注解改进
我们可以看前置通知和后置通知的注解配置:
注意看红色框住的部分,很显然这里是重复的,而且如果我们有多个通知方法,那就得在每个方法名都写上该注解,而且如果包名够复杂,也很容易写错。那么怎么办呢?
解决办法就是声明公共切入点:
①、在 切面类 MyAspect.java 中新增一个切入点方法 myPointCut(),然后在这个方法上添加 @Pointcut 注解

②、那么前置通知和后置通知,我们可以进行如下改写配置:

4、总结
上面我们只进行了前置通知和后置通知的讲解,还有比如最终通知、环绕通知、抛出异常通知等,配置方式都差不多,这里就不进行一一讲解了。然后我们看一下这些通知的注解:
@Aspect 声明切面,修饰切面类,从而获得 通知。
通知
@Before 前置
@AfterReturning 后置
@Around 环绕
@AfterThrowing 抛出异常
@After 最终
切入点
@PointCut ,修饰方法 private void xxx(){} 之后通过“方法名”获得切入点引用
1、事务介绍
事务(Transaction),一般是指要做的或所做的事情。在计算机术语中是指访问并可能更新数据库中各种数据项的一个程序执行单元(unit)。
这里我们以取钱的例子来讲解:比如你去ATM机取1000块钱,大体有两个步骤:第一步输入密码金额,银行卡扣掉1000元钱;第二步从ATM出1000元钱。这两个步骤必须是要么都执行要么都不执行。如果银行卡扣除了1000块但是ATM出钱失败的话,你将会损失1000元;如果银行卡扣钱失败但是ATM却出了1000块,那么银行将损失1000元。
如何保证这两个步骤不会出现一个出现异常了,而另一个执行成功呢?事务就是用来解决这样的问题。事务是一系列的动作,它们综合在一起才是一个完整的工作单元,这些动作必须全部完成,如果有一个失败的话,那么事务就会回滚到最开始的状态,仿佛什么都没发生过一样。 在企业级应用程序开发中,事务管理是必不可少的技术,用来确保数据的完整性和一致性。
2、事务的四个特性(ACID)
①、原子性(Atomicity):事务是一个原子操作,由一系列动作组成。事务的原子性确保动作要么全部完成,要么完全不起作用。
②、一致性(Consistency):一旦事务完成(不管成功还是失败),系统必须确保它所建模的业务处于一致的状态,而不会是部分完成部分失败。在现实中的数据不应该被破坏。
③、隔离性(Isolation):可能有许多事务会同时处理相同的数据,因此每个事务都应该与其他事务隔离开来,防止数据损坏。
④、持久性(Durability):一旦事务完成,无论发生什么系统错误,它的结果都不应该受到影响,这样就能从任何系统崩溃中恢复过来。通常情况下,事务的结果被写到持久化存储器中。
3、Spring 事务管理的核心接口
首先我们创建一个Java工程,然后导入 Spring 核心事务包
我们打开Spring的核心事务包,查看如下类:org.springframework.transaction

上面所示的三个类文件便是Spring的事务管理接口。如下图所示:下面我们分别对这三个接口进行简单的介绍
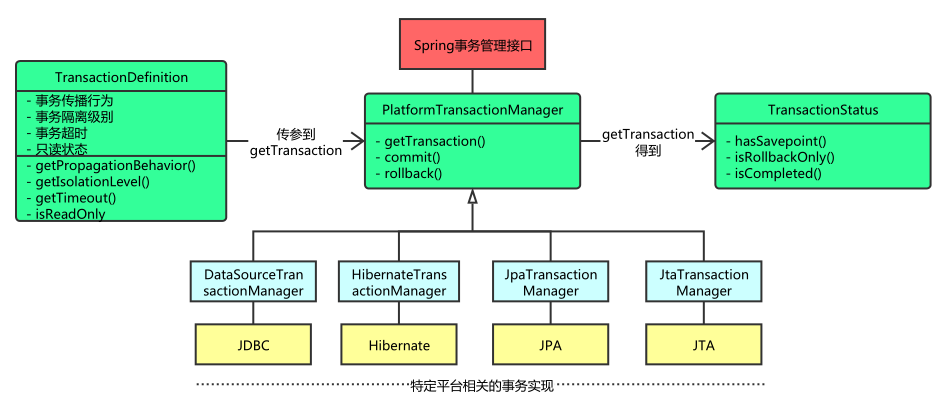
4、 PlatformTransactionManager 事务管理器
Spring事务管理器的接口是org.springframework.transaction.PlatformTransactionManager,如上图所示,Spring并不直接管理事务,通过这个接口,Spring为各个平台如JDBC、Hibernate等都提供了对应的事务管理器,也就是将事务管理的职责委托给Hibernate或者JTA等持久化机制所提供的相关平台框架的事务来实现。
我们进入到 PlatformTransactionManager 接口,查看源码:

①、TransactionStatus getTransaction(TransactionDefinition definition) ,事务管理器 通过TransactionDefinition,获得“事务状态”,从而管理事务。
②、void commit(TransactionStatus status) 根据状态提交
③、void rollback(TransactionStatus status) 根据状态回滚
也就是说Spring事务管理的为不同的事务API提供一致的编程模型,具体的事务管理机制由对应各个平台去实现。
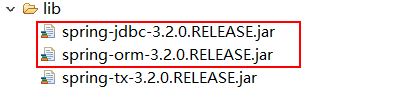
比如下面我们导入实现事务管理的两种平台:JDBC和Hibernate
然后我们再次查看PlatformTransactionManager接口,会发现它多了几个实现类,如下:

5、TransactionStatus 事务状态
在上面 PlatformTransactionManager 接口中,有如下方法:

这个方法返回的是 TransactionStatus对象,然后程序根据返回的对象来获取事务状态,然后进行相应的操作。
而 TransactionStatus 这个接口的内容如下:
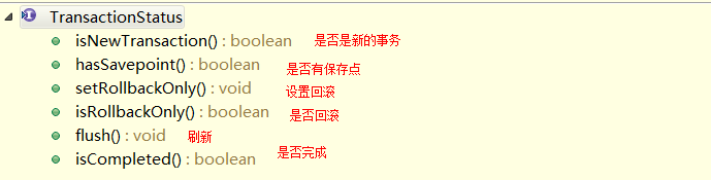
这个接口描述的是一些处理事务提供简单的控制事务执行和查询事务状态的方法,在回滚或提交的时候需要应用对应的事务状态。
6、TransactionDefinition 基本事务属性的定义
上面讲到的事务管理器接口PlatformTransactionManager通过getTransaction(TransactionDefinition definition)方法来得到事务,这个方法里面的参数是TransactionDefinition类,这个类就定义了一些基本的事务属性。
那么什么是事务属性呢?事务属性可以理解成事务的一些基本配置,描述了事务策略如何应用到方法上。事务属性包含了5个方面,如图所示:
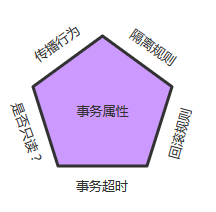
TransactionDefinition 接口方法如下:
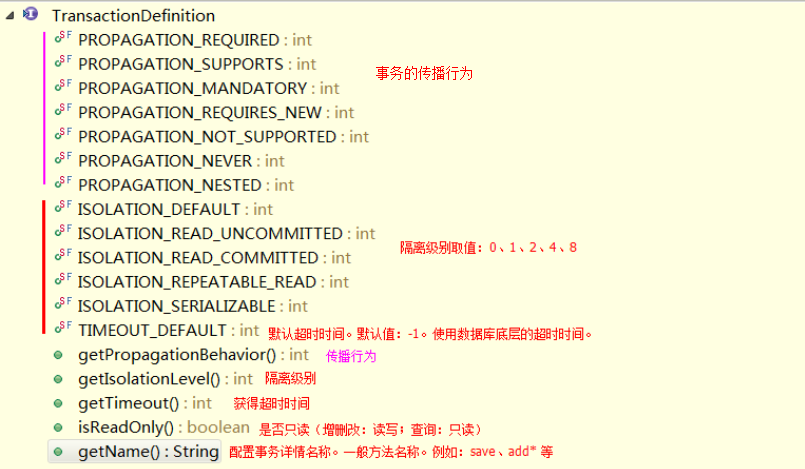
一、传播行为:当事务方法被另一个事务方法调用时,必须指定事务应该如何传播。
Spring 定义了如下七中传播行为,这里以A业务和B业务之间如何传播事务为例说明:
①、PROPAGATION_REQUIRED :required , 必须。默认值,A如果有事务,B将使用该事务;如果A没有事务,B将创建一个新的事务。
②、PROPAGATION_SUPPORTS:supports ,支持。A如果有事务,B将使用该事务;如果A没有事务,B将以非事务执行。
③、PROPAGATION_MANDATORY:mandatory ,强制。A如果有事务,B将使用该事务;如果A没有事务,B将抛异常。
④、PROPAGATION_REQUIRES_NEW :requires_new,必须新的。如果A有事务,将A的事务挂起,B创建一个新的事务;如果A没有事务,B创建一个新的事务。
⑤、PROPAGATION_NOT_SUPPORTED :not_supported ,不支持。如果A有事务,将A的事务挂起,B将以非事务执行;如果A没有事务,B将以非事务执行。
⑥、PROPAGATION_NEVER :never,从不。如果A有事务,B将抛异常;如果A没有事务,B将以非事务执行。
⑦、PROPAGATION_NESTED :nested ,嵌套。A和B底层采用保存点机制,形成嵌套事务。
二、隔离级别:定义了一个事务可能受其他并发事务影响的程度。
并发事务引起的问题:
在典型的应用程序中,多个事务并发运行,经常会操作相同的数据来完成各自的任务。并发虽然是必须的,但可能会导致以下的问题。
①、脏读(Dirty reads)——脏读发生在一个事务读取了另一个事务改写但尚未提交的数据时。如果改写在稍后被回滚了,那么第一个事务获取的数据就是无效的。
②、不可重复读(Nonrepeatable read)——不可重复读发生在一个事务执行相同的查询两次或两次以上,但是每次都得到不同的数据时。这通常是因为另一个并发事务在两次查询期间进行了更新。
③、幻读(Phantom read)——幻读与不可重复读类似。它发生在一个事务(T1)读取了几行数据,接着另一个并发事务(T2)插入了一些数据时。在随后的查询中,第一个事务(T1)就会发现多了一些原本不存在的记录。
注意:不可重复读重点是修改,而幻读重点是新增或删除。
在 Spring 事务管理中,为我们定义了如下的隔离级别:
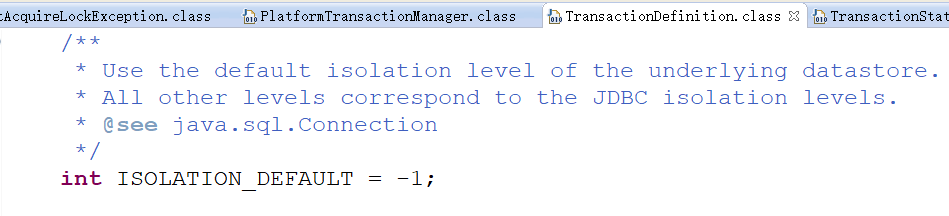
①、ISOLATION_DEFAULT:使用后端数据库默认的隔离级别
②、ISOLATION_READ_UNCOMMITTED:最低的隔离级别,允许读取尚未提交的数据变更,可能会导致脏读、幻读或不可重复读
③、ISOLATION_READ_COMMITTED:允许读取并发事务已经提交的数据,可以阻止脏读,但是幻读或不可重复读仍有可能发生
④、ISOLATION_REPEATABLE_READ:对同一字段的多次读取结果都是一致的,除非数据是被本身事务自己所修改,可以阻止脏读和不可重复读,但幻读仍有可能发生
⑤、ISOLATION_SERIALIZABLE:最高的隔离级别,完全服从ACID的隔离级别,确保阻止脏读、不可重复读以及幻读,也是最慢的事务隔离级别,因为它通常是通过完全锁定事务相关的数据库表来实现的
上面定义的隔离级别,在 Spring 的 TransactionDefinition.class 中也分别用常量 -1,0,1,2,4,8表示。比如 ISOLATION_DEFAULT 的定义:
三、只读
这是事务的第三个特性,是否为只读事务。如果事务只对后端的数据库进行该操作,数据库可以利用事务的只读特性来进行一些特定的优化。通过将事务设置为只读,你就可以给数据库一个机会,让它应用它认为合适的优化措施。
四、事务超时
为了使应用程序很好地运行,事务不能运行太长的时间。因为事务可能涉及对后端数据库的锁定,所以长时间的事务会不必要的占用数据库资源。事务超时就是事务的一个定时器,在特定时间内事务如果没有执行完毕,那么就会自动回滚,而不是一直等待其结束。
五、回滚规则
事务五边形的最后一个方面是一组规则,这些规则定义了哪些异常会导致事务回滚而哪些不会。默认情况下,事务只有遇到运行期异常时才会回滚,而在遇到检查型异常时不会回滚(这一行为与EJB的回滚行为是一致的) 。但是你可以声明事务在遇到特定的检查型异常时像遇到运行期异常那样回滚。同样,你还可以声明事务遇到特定的异常不回滚,即使这些异常是运行期异常。
7、Spring 编程式事务和声明式事务的区别
编程式事务处理:所谓编程式事务指的是通过编码方式实现事务,允许用户在代码中精确定义事务的边界。即类似于JDBC编程实现事务管理。管理使用TransactionTemplate或者直接使用底层的PlatformTransactionManager。对于编程式事务管理,spring推荐使用TransactionTemplate。
声明式事务处理:管理建立在AOP之上的。其本质是对方法前后进行拦截,然后在目标方法开始之前创建或者加入一个事务,在执行完目标方法之后根据执行情况提交或者回滚事务。声明式事务最大的优点就是不需要通过编程的方式管理事务,这样就不需要在业务逻辑代码中掺杂事务管理的代码,只需在配置文件中做相关的事务规则声明(或通过基于@Transactional注解的方式),便可以将事务规则应用到业务逻辑中。
简单地说,编程式事务侵入到了业务代码里面,但是提供了更加详细的事务管理;而声明式事务由于基于AOP,所以既能起到事务管理的作用,又可以不影响业务代码的具体实现。
8、不用事务实现转账
我们还是以转账为实例。不用事务看如何实现转账。在数据库中有如下表 account ,内容如下:
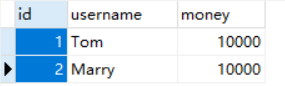
有两个用户 Tom 和 Marry 。他们初始账户余额都为 10000。这时候我们进行如下业务:Tom 向 Marry 转账 1000 块。那么这在程序中可以分解为两个步骤:
①、Tom 的账户余额 10000 减少 1000 块,剩余 9000 块。
②、Marry 的账户余额 10000 增加 1000 块,变为 11000块。
上面两个步骤要么都执行成功,要么都不执行。我们通过 TransactionTemplate 编程式事务来控制:
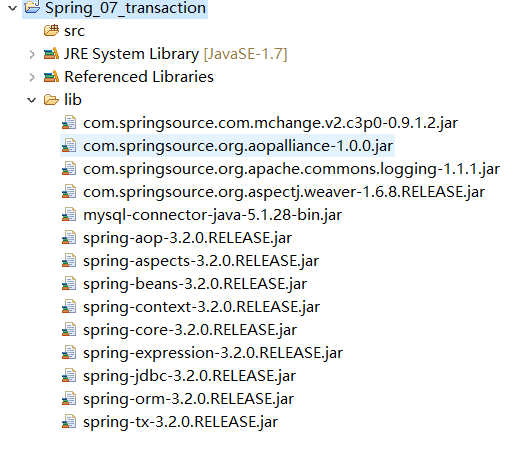
第一步:创建Java工程并导入相应的 jar 包(这里不用事务其实不需要这么多jar包,为了后面的讲解需要,我们一次性导入所有的jar包)
第二步:编写 Dao 层
AccountDao 接口:
|
1
2
3
4
5
6
7
8
9
10
11
12
13
14
15
16
17
18
|
package com.ys.dao;public interface AccountDao { /** * 汇款 * @param outer 汇款人 * @param money 汇款金额 */ public void out(String outer,int money); /** * 收款 * @param inner 收款人 * @param money 收款金额 */ public void in(String inner,int money);} |
AccountDaoImpl 接口实现类
|
1
2
3
4
5
6
7
8
9
10
11
12
13
14
15
16
17
18
19
20
21
22
23
24
25
|
package com.ys.dao.impl;import org.springframework.jdbc.core.support.JdbcDaoSupport;import com.ys.dao.AccountDao;public class AccountDaoImpl extends JdbcDaoSupport implements AccountDao { /** * 根据用户名减少账户金额 */ @Override public void out(String outer, int money) { this.getJdbcTemplate().update("update account set money = money - ? where username = ?",money,outer); } /** * 根据用户名增加账户金额 */ @Override public void in(String inner, int money) { this.getJdbcTemplate().update("update account set money = money + ? where username = ?",money,inner); }} |
第三步:实现 Service 层
AccountService 接口
|
1
2
3
4
5
6
7
8
9
10
11
12
13
|
package com.ys.service;public interface AccountService { /** * 转账 * @param outer 汇款人 * @param inner 收款人 * @param money 交易金额 */ public void transfer(String outer,String inner,int money);} |
AccountServiceImpl 接口实现类
|
1
2
3
4
5
6
7
8
9
10
11
12
13
14
15
16
17
18
19
|
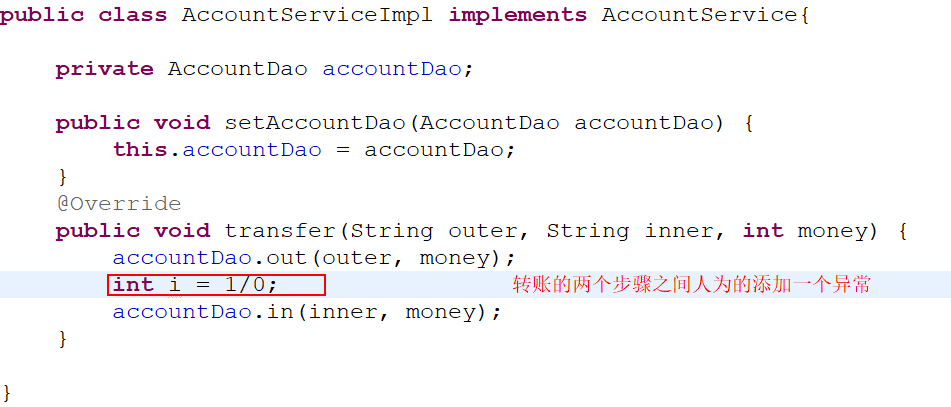
package com.ys.service.impl;import com.ys.dao.AccountDao;import com.ys.service.AccountService;public class AccountServiceImpl implements AccountService{ private AccountDao accountDao; public void setAccountDao(AccountDao accountDao) { this.accountDao = accountDao; } @Override public void transfer(String outer, String inner, int money) { accountDao.out(outer, money); accountDao.in(inner, money); }} |
第四步:Spring 全局配置文件 applicationContext.xml
|
1
2
3
4
5
6
7
8
9
10
11
12
13
14
15
16
17
18
19
20
21
22
23
24
25
26
|
<?xml version="1.0" encoding="UTF-8"?><beans xmlns="http://www.springframework.org/schema/beans" xmlns:xsi="http://www.w3.org/2001/XMLSchema-instance" xmlns:context="http://www.springframework.org/schema/context" xmlns:aop="http://www.springframework.org/schema/aop" xsi:schemaLocation="http://www.springframework.org/schema/beans http://www.springframework.org/schema/beans/spring-beans.xsd http://www.springframework.org/schema/aop http://www.springframework.org/schema/aop/spring-aop.xsd http://www.springframework.org/schema/context http://www.springframework.org/schema/context/spring-context.xsd"> <bean id="dataSource" class="com.mchange.v2.c3p0.ComboPooledDataSource"> <property name="driverClass" value="com.mysql.jdbc.Driver"></property> <property name="jdbcUrl" value="jdbc:mysql://localhost:3306/test"></property> <property name="user" value="root"></property> <property name="password" value="root"></property> </bean> <bean id="accountDao" class="com.ys.dao.impl.AccountDaoImpl"> <property name="dataSource" ref="dataSource"></property> </bean> <bean id="accountService" class="com.ys.service.impl.AccountServiceImpl"> <property name="accountDao" ref="accountDao"></property> </bean></beans> |
第五步:测试
|
1
2
3
4
5
6
7
8
9
10
11
|
public class TransactionTest { @Test public void testNoTransaction(){ ApplicationContext context = new ClassPathXmlApplicationContext("applicationContext.xml"); AccountService account = (AccountService) context.getBean("accountService"); //Tom 向 Marry 转账1000 account.transfer("Tom", "Marry", 1000); }} |
第六步:查看数据库表 account

上面的结果和我们想的一样,Tom 账户 money 减少了1000块。而 Marry 账户金额增加了1000块。
这时候问题来了,比如在 Tom 账户 money 减少了1000块正常。而 Marry 账户金额增加时发生了异常,实际应用中比如断电(这里我们人为构造除数不能为0的异常),如下:
那么这时候我们执行测试程序,很显然会报错,那么数据库是什么情况呢?

数据库account :
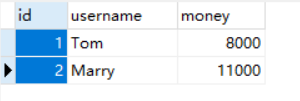
我们发现,程序执行报错了,但是数据库 Tom 账户金额依然减少了 1000 块,但是 Marry 账户的金额却没有增加。这在实际应用中肯定是不允许的,那么如何解决呢?
9、编程式事务处理实现转账(TransactionTemplate )
上面转账的两步操作中间发生了异常,但是第一步依然在数据库中进行了增加操作。实际应用中不会允许这样的情况发生,所以我们这里用事务来进行管理。
Dao 层不变,我们在 Service 层注入 TransactionTemplate 模板,因为是用模板来管理事务,所以模板需要注入事务管理器 DataSourceTransactionManager 。而事务管理器说到底还是用底层的JDBC在管理,所以我们需要在事务管理器中注入 DataSource。这几个步骤分别如下:
AccountServiceImpl 接口:
|
1
2
3
4
5
6
7
8
9
10
11
12
13
14
15
16
17
18
19
20
21
22
23
24
25
26
27
28
29
30
31
32
33
|
package com.ys.service.impl;import org.springframework.transaction.TransactionStatus;import org.springframework.transaction.support.TransactionCallbackWithoutResult;import org.springframework.transaction.support.TransactionTemplate;import com.ys.dao.AccountDao;import com.ys.service.AccountService;public class AccountServiceImpl implements AccountService{ private AccountDao accountDao; private TransactionTemplate transactionTemplate; public void setTransactionTemplate(TransactionTemplate transactionTemplate) { this.transactionTemplate = transactionTemplate; } public void setAccountDao(AccountDao accountDao) { this.accountDao = accountDao; } @Override public void transfer(final String outer,final String inner,final int money) { transactionTemplate.execute(new TransactionCallbackWithoutResult() { @Override protected void doInTransactionWithoutResult(TransactionStatus arg0) { accountDao.out(outer, money); //int i = 1/0; accountDao.in(inner, money); } }); }} |
Spring 全局配置文件 applicationContext.xml:
|
1
2
3
4
5
6
7
8
9
10
11
12
13
14
15
16
17
18
19
20
21
22
23
24
25
26
27
28
29
30
31
32
33
34
35
36
37
|
<?xml version="1.0" encoding="UTF-8"?><beans xmlns="http://www.springframework.org/schema/beans" xmlns:xsi="http://www.w3.org/2001/XMLSchema-instance" xmlns:context="http://www.springframework.org/schema/context" xmlns:aop="http://www.springframework.org/schema/aop" xsi:schemaLocation="http://www.springframework.org/schema/beans http://www.springframework.org/schema/beans/spring-beans.xsd http://www.springframework.org/schema/aop http://www.springframework.org/schema/aop/spring-aop.xsd http://www.springframework.org/schema/context http://www.springframework.org/schema/context/spring-context.xsd"> <bean id="dataSource" class="com.mchange.v2.c3p0.ComboPooledDataSource"> <property name="driverClass" value="com.mysql.jdbc.Driver"></property> <property name="jdbcUrl" value="jdbc:mysql://localhost:3306/test"></property> <property name="user" value="root"></property> <property name="password" value="root"></property> </bean> <bean id="accountDao" class="com.ys.dao.impl.AccountDaoImpl"> <property name="dataSource" ref="dataSource"></property> </bean> <bean id="accountService" class="com.ys.service.impl.AccountServiceImpl"> <property name="accountDao" ref="accountDao"></property> <property name="transactionTemplate" ref="transactionTemplate"></property> </bean> <!-- 创建模板 --> <bean id="transactionTemplate" class="org.springframework.transaction.support.TransactionTemplate"> <property name="transactionManager" ref="txManager"></property> </bean> <!-- 配置事务管理器 ,管理器需要事务,事务从Connection获得,连接从连接池DataSource获得 --> <bean id="txManager" class="org.springframework.jdbc.datasource.DataSourceTransactionManager"> <property name="dataSource" ref="dataSource"></property> </bean></beans> |
测试文件保持不变,可以分两次测试,第一次两次操作没有发生异常,然后数据库正常改变了。第二次操作中间发生了异常,发现数据库内容没变。
如果大家有兴趣也可以试试底层的PlatformTransactionManager来进行事务管理,我这里给出主要代码:
|
1
2
3
4
5
6
7
8
9
10
11
12
13
14
15
16
17
18
|
//定义一个某个框架平台的TransactionManager,如JDBC、Hibernate DataSourceTransactionManager dataSourceTransactionManager = new DataSourceTransactionManager(); dataSourceTransactionManager.setDataSource(this.getJdbcTemplate().getDataSource()); // 设置数据源 DefaultTransactionDefinition transDef = new DefaultTransactionDefinition(); // 定义事务属性 transDef.setPropagationBehavior(DefaultTransactionDefinition.PROPAGATION_REQUIRED); // 设置传播行为属性 TransactionStatus status = dataSourceTransactionManager.getTransaction(transDef); // 获得事务状态 try { // 数据库操作 accountDao.out(outer, money); int i = 1/0; accountDao.in(inner, money); dataSourceTransactionManager.commit(status);// 提交 } catch (Exception e) { dataSourceTransactionManager.rollback(status);// 回滚 } |
10、声明式事务处理实现转账(基于AOP的 xml 配置)
Dao 层和 Service 层与我们最先开始的不用事务实现转账保持不变。主要是 applicationContext.xml 文件变化了。
我们在 applicationContext.xml 文件中配置 aop 自动生成代理,进行事务管理:
①、配置管理器
②、配置事务详情
③、配置 aop
|
1
2
3
4
5
6
7
8
9
10
11
12
13
14
15
16
17
18
19
20
21
22
23
24
25
26
27
28
29
30
31
32
33
34
35
36
37
38
39
40
41
42
43
44
45
46
47
48
49
50
51
52
|
<?xml version="1.0" encoding="UTF-8"?><beans xmlns="http://www.springframework.org/schema/beans" xmlns:xsi="http://www.w3.org/2001/XMLSchema-instance" xmlns:context="http://www.springframework.org/schema/context" xmlns:aop="http://www.springframework.org/schema/aop" xmlns:tx="http://www.springframework.org/schema/tx" xsi:schemaLocation="http://www.springframework.org/schema/beans http://www.springframework.org/schema/beans/spring-beans.xsd http://www.springframework.org/schema/aop http://www.springframework.org/schema/aop/spring-aop.xsd http://www.springframework.org/schema/context http://www.springframework.org/schema/context/spring-context.xsd http://www.springframework.org/schema/tx http://www.springframework.org/schema/tx/spring-tx.xsd"> <bean id="dataSource" class="com.mchange.v2.c3p0.ComboPooledDataSource"> <property name="driverClass" value="com.mysql.jdbc.Driver"></property> <property name="jdbcUrl" value="jdbc:mysql://localhost:3306/test"></property> <property name="user" value="root"></property> <property name="password" value="root"></property> </bean> <bean id="accountDao" class="com.ys.dao.impl.AccountDaoImpl"> <property name="dataSource" ref="dataSource"></property> </bean> <bean id="accountService" class="com.ys.service.impl.AccountServiceImpl"> <property name="accountDao" ref="accountDao"></property> </bean> <!-- 1 事务管理器 --> <bean id="txManager" class="org.springframework.jdbc.datasource.DataSourceTransactionManager"> <property name="dataSource" ref="dataSource"></property> </bean> <!-- 2 事务详情(事务通知) , 在aop筛选基础上,比如对ABC三个确定使用什么样的事务。例如:AC读写、B只读 等 <tx:attributes> 用于配置事务详情(属性属性) <tx:method name=""/> 详情具体配置 propagation 传播行为 , REQUIRED:必须;REQUIRES_NEW:必须是新的 isolation 隔离级别 --> <tx:advice id="txAdvice" transaction-manager="txManager"> <tx:attributes> <tx:method name="transfer" propagation="REQUIRED" isolation="DEFAULT"/> </tx:attributes> </tx:advice> <!-- 3 AOP编程,利用切入点表达式从目标类方法中 确定增强的连接器,从而获得切入点 --> <aop:config> <aop:advisor advice-ref="txAdvice" pointcut="execution(* com.ys.service..*.*(..))"/> </aop:config></beans> |
测试类这里我们就不描述了,也是分有异常和无异常进行测试,发现与预期结果是吻合的。
11、声明式事务处理实现转账(基于AOP的 注解 配置)
分为如下两步:
①、在applicationContext.xml 配置事务管理器,将并事务管理器交予spring
②、在目标类或目标方法添加注解即可 @Transactional
首先在 applicationContext.xml 文件中配置如下:
|
1
2
3
4
5
6
7
8
9
10
|
<!-- 1 事务管理器 --> <bean id="txManager" class="org.springframework.jdbc.datasource.DataSourceTransactionManager"> <property name="dataSource" ref="dataSource"></property> </bean> <!-- 2 将管理器交予spring * transaction-manager 配置事务管理器 * proxy-target-class true : 底层强制使用cglib 代理 --> <tx:annotation-driven transaction-manager="txManager" proxy-target-class="true"/> |
其次在目标类或者方法添加注解@Transactional。如果在类上添加,则说明类中的所有方法都添加事务,如果在方法上添加,则只有该方法具有事务。
|
1
2
3
4
5
6
7
8
9
10
11
12
13
14
15
16
17
18
19
20
21
22
23
24
25
26
27
28
29
30
|
package com.ys.service.impl;import javax.annotation.Resource;import org.springframework.beans.factory.annotation.Autowired;import org.springframework.stereotype.Service;import org.springframework.transaction.annotation.Isolation;import org.springframework.transaction.annotation.Propagation;import org.springframework.transaction.annotation.Transactional;import com.ys.dao.AccountDao;import com.ys.service.AccountService;@Transactional(propagation=Propagation.REQUIRED , isolation = Isolation.DEFAULT)@Service("accountService")public class AccountServiceImpl implements AccountService{ @Resource(name="accountDao") private AccountDao accountDao; public void setAccountDao(AccountDao accountDao) { this.accountDao = accountDao; } @Override public void transfer(String outer, String inner, int money) { accountDao.out(outer, money); //int i = 1/0; accountDao.in(inner, money); }} |
__EOF__

本文链接:https://www.cnblogs.com/sugeek/articles/16863570.html
关于博主:编程菜鸟一只,希望每个今天胜过昨天,一步步走向技术的高峰!
版权声明:本博客所有文章除特别声明外,均采用 BY-NC-SA 许可协议。转载请注明出处!
声援博主:如果您觉得文章对您有帮助,可以点击文章右下角【推荐】一下。您的鼓励是博主的最大动力!


【推荐】国内首个AI IDE,深度理解中文开发场景,立即下载体验Trae
【推荐】编程新体验,更懂你的AI,立即体验豆包MarsCode编程助手
【推荐】抖音旗下AI助手豆包,你的智能百科全书,全免费不限次数
【推荐】轻量又高性能的 SSH 工具 IShell:AI 加持,快人一步
· 从 HTTP 原因短语缺失研究 HTTP/2 和 HTTP/3 的设计差异
· AI与.NET技术实操系列:向量存储与相似性搜索在 .NET 中的实现
· 基于Microsoft.Extensions.AI核心库实现RAG应用
· Linux系列:如何用heaptrack跟踪.NET程序的非托管内存泄露
· 开发者必知的日志记录最佳实践
· winform 绘制太阳,地球,月球 运作规律
· 超详细:普通电脑也行Windows部署deepseek R1训练数据并当服务器共享给他人
· 上周热点回顾(3.3-3.9)
· AI 智能体引爆开源社区「GitHub 热点速览」
· 写一个简单的SQL生成工具