13.Spring 6.0及SpringBoot 3.0新特性解析
https://github.com/spring-projects/spring-framework/wiki/What%27s-New-in-Spring-Framework-6.x
最核心的就是Spring AOT。
GraalVM体验
下载压缩包
打开https://github.com/graalvm/graalvm-ce-builds/releases,按JDK版本下载GraalVM对应的压缩包,请下载Java 17对应的版本,不然后面运行SpringBoot3可能会有问题。
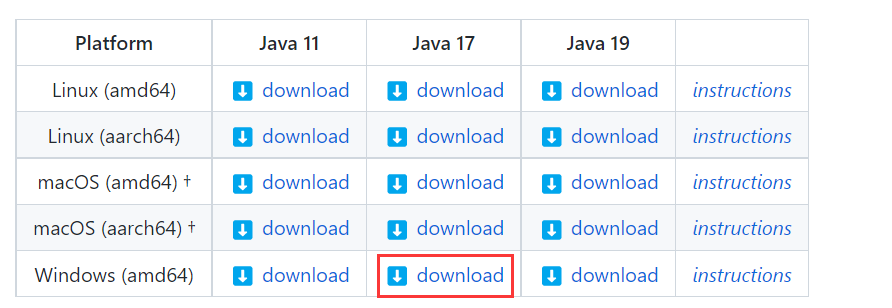
windows的直接给大家:📎graalvm-ce-java17-windows-amd64-22.3.0.zip
下载完后,就解压,

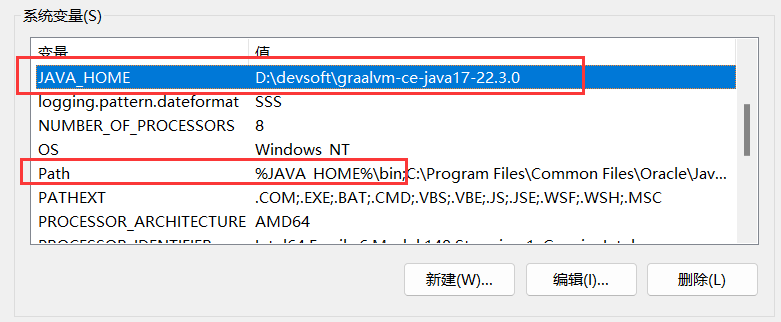
配置环境变量
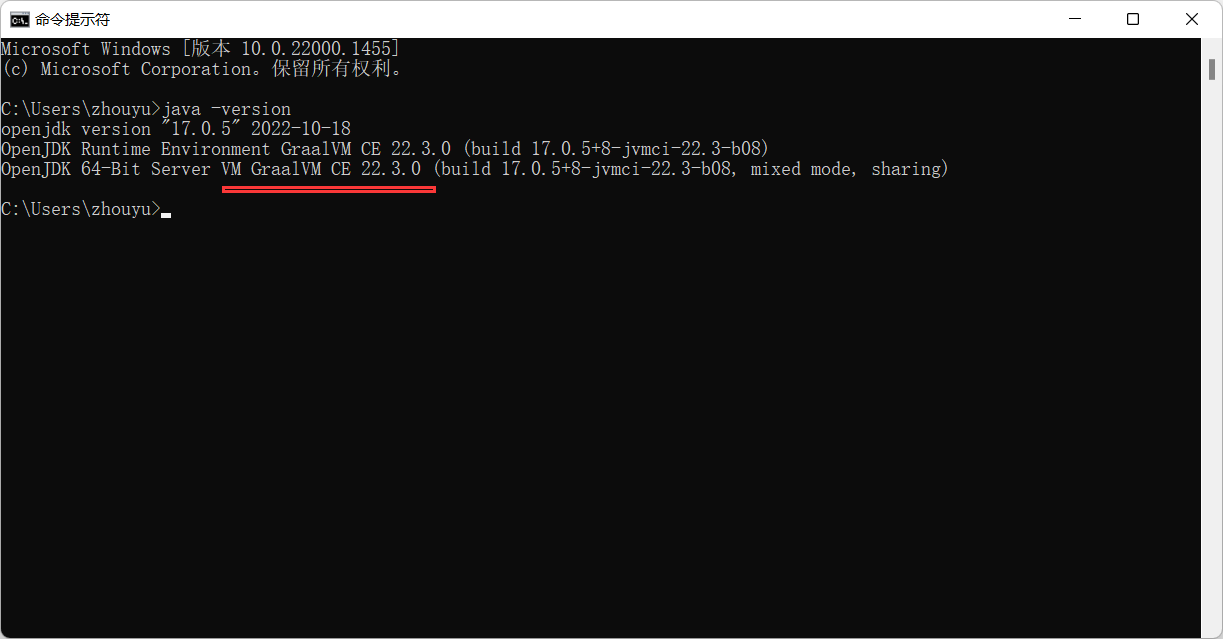
新开一个cmd测试:
安装Visual Studio Build Tools
因为需要C语言环境,所以需要安装Visual Studio Build Tools。
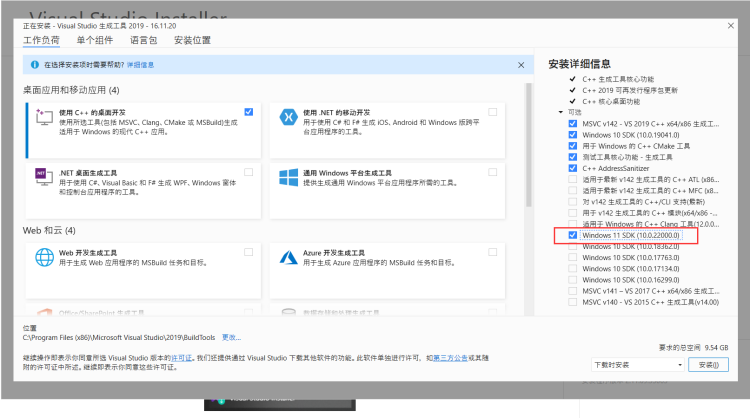
打开visualstudio.microsoft.com,下载Visual Studio Installer。
选择C++桌面开发,和Windows 11 SDK,然后进行下载和安装,安装后重启操作系统。
要使用GraalVM,不能使用普通的windows自带的命令行窗口,得使用VS提供的 x64 Native Tools Command Prompt for VS 2019,如果没有可以执行C:\Program Files (x86)\Microsoft Visual Studio\2019\BuildTools\VC\Auxiliary\Build\vcvars64.bat脚本来安装。
安装完之后其实就可以在 x64 Native Tools Command Prompt for VS 2019中去使用native-image命令去进行编译了。
但是,如果后续在编译过程中编译失败了,出现以下错误:
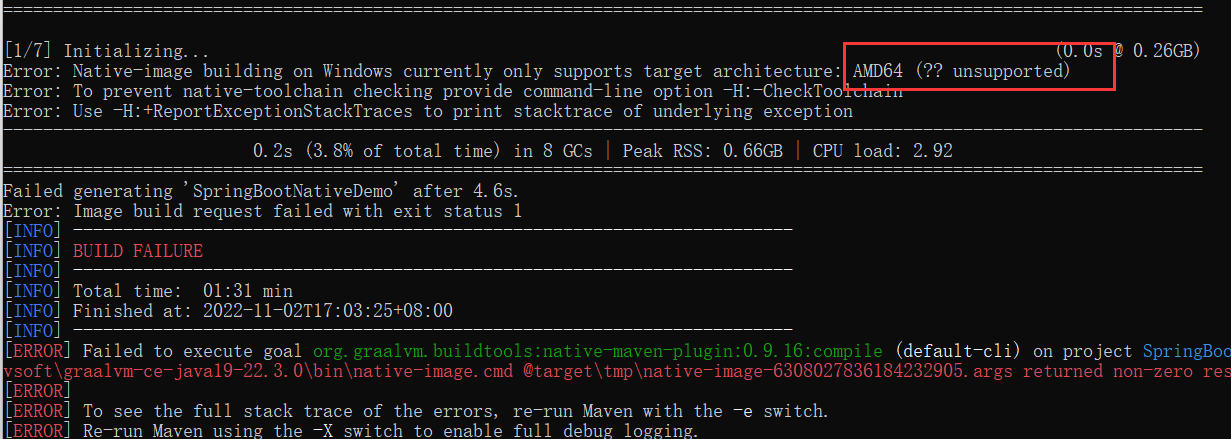
那么可以执行cl.exe,如果是中文,那就得修改为英文。

通过Visual Studio Installer来修改,比如:
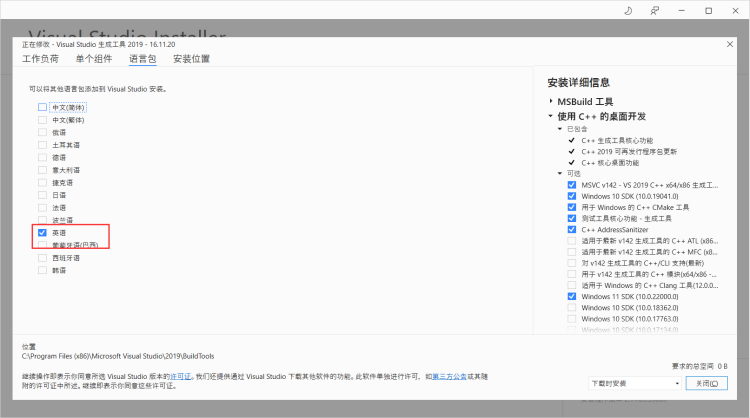
可能一开始只选择了中文,手动选择英文,去掉中文,然后安装即可。
再次检查

这样就可以正常的编译了。
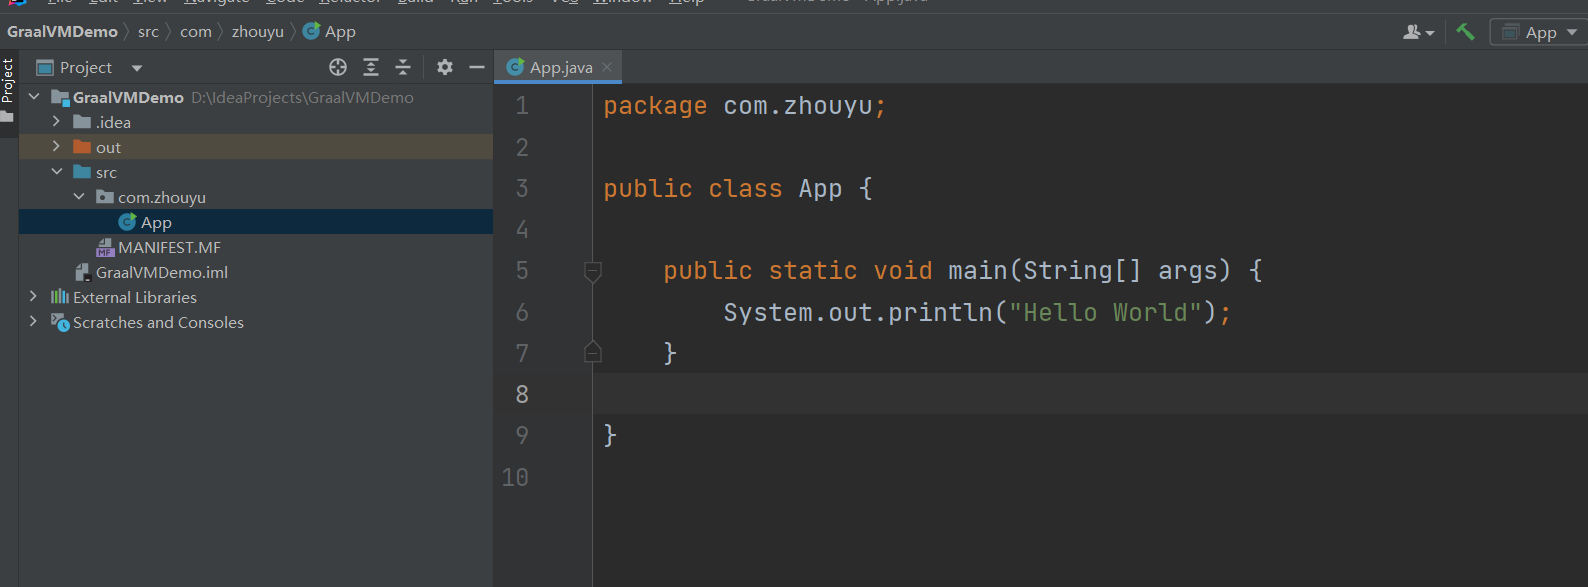
Hello World实战
新建一个简单的Java工程:
我们可以直接把graalvm当作普通的jdk的使用
我们也可以利用native-image命令来将字节码编译为二进制可执行文件。
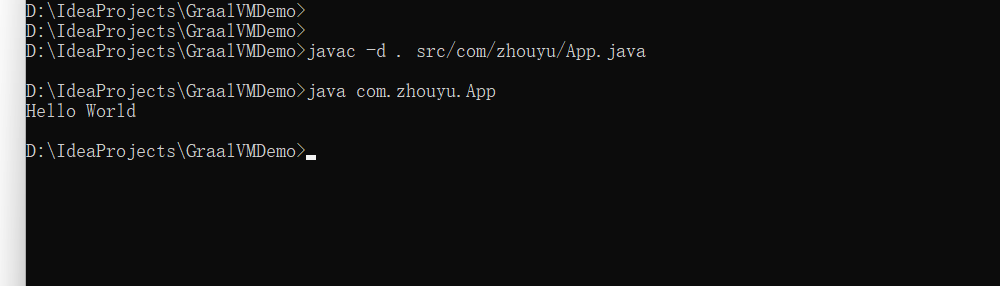
打开x64 Native Tools Command Prompt for VS 2019,进入工程目录下,并利用javac将java文件编译为class文件:javac -d . src/com/zhouyu/App.java
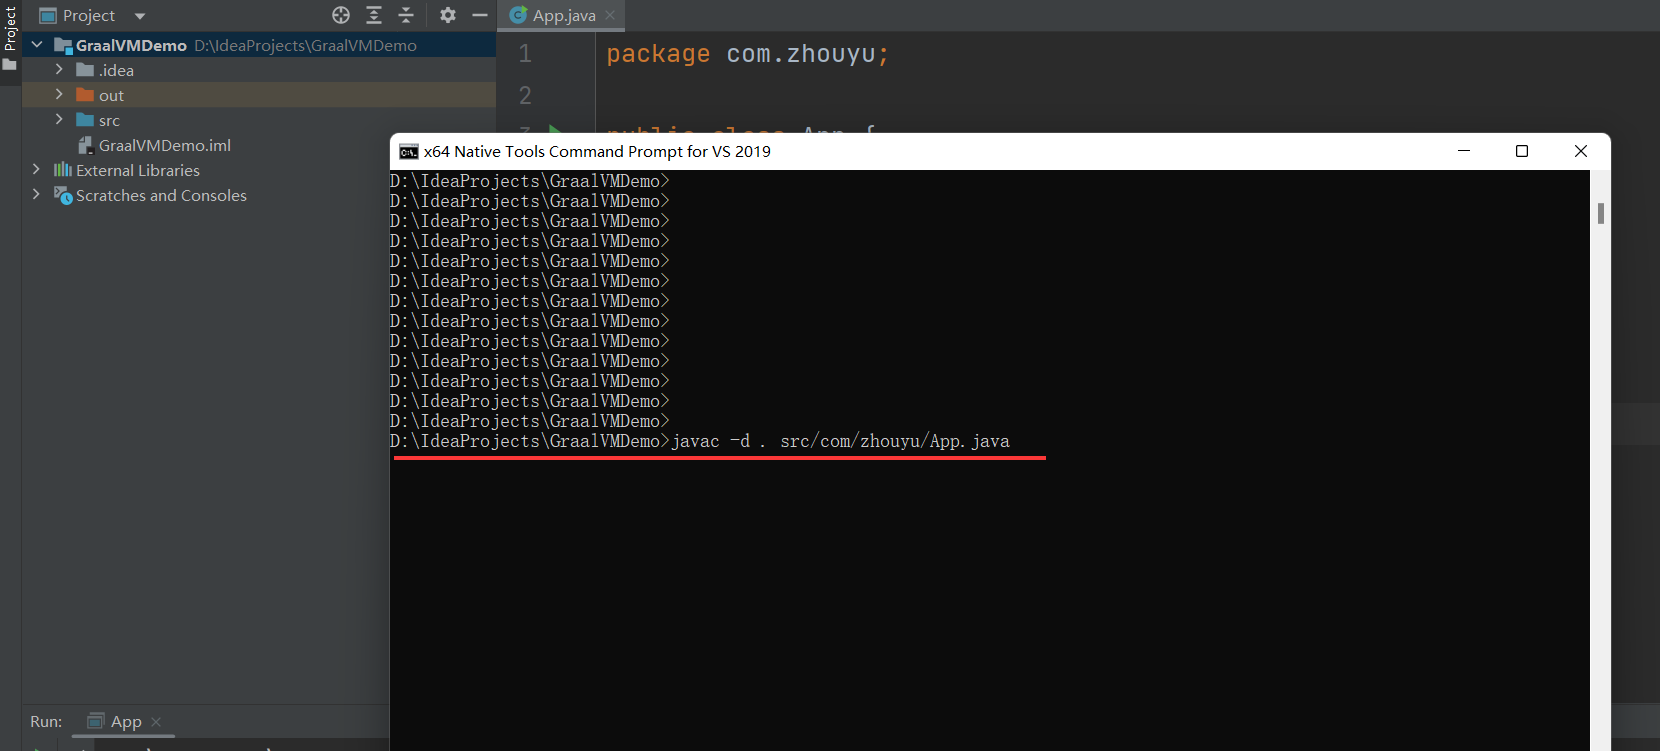
此时的class文件因为有main方法,所以用java命令可以运行
我们也可以利用native-image来编译:
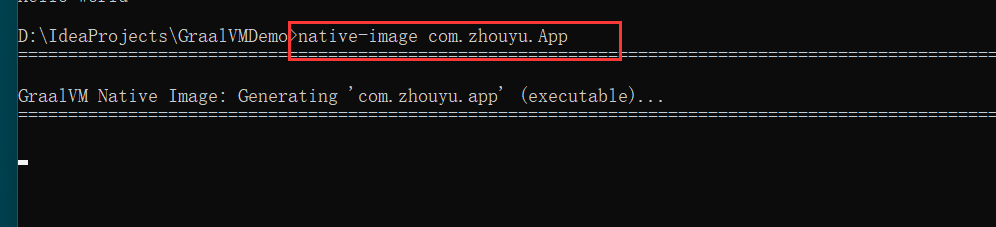
编译需要一些些。。。。。。。时间。

编译完了之后就会在当前目录生成一个exe文件:
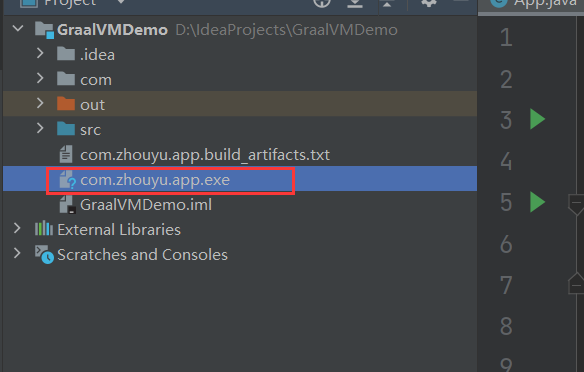
我们可以直接运行这个exe文件:

并且运行这个exe文件是不需要操作系统上安装了JDK环境的。
我们可以使用-o参数来指定exe文件的名字:
native-image com.zhouyu.App -o app
GraalVM的限制
GraalVM在编译成二进制可执行文件时,需要确定该应用到底用到了哪些类、哪些方法、哪些属性,从而把这些代码编译为机器指令(也就是exe文件)。但是我们一个应用中某些类可能是动态生成的,也就是应用运行后才生成的,为了解决这个问题,GraalVM提供了配置的方式,比如我们可以在编译时告诉GraalVM哪些方法会被反射调用,比如我们可以通过reflect-config.json来进行配置。
SpringBoot 3.0实战
然后新建一个Maven工程,添加SpringBoot依赖
<parent>
	<groupId>org.springframework.boot</groupId>
	<artifactId>spring-boot-starter-parent</artifactId>
	<version>3.0.0</version>
</parent>

<dependencies>
	<dependency>
		<groupId>org.springframework.boot</groupId>
		<artifactId>spring-boot-starter-web</artifactId>
	</dependency>
</dependencies>
以及SpringBoot的插件
<build>
	<plugins>
		<plugin>
			<groupId>org.graalvm.buildtools</groupId>
			<artifactId>native-maven-plugin</artifactId>
		</plugin>
		<plugin>
			<groupId>org.springframework.boot</groupId>
			<artifactId>spring-boot-maven-plugin</artifactId>
		</plugin>
	</plugins>
</build>
以及一些代码
@RestController
public class ZhouyuController {

    @Autowired
    private UserService userService;

    @GetMapping("/demo")
    public String test() {
        return userService.test();
    }

}
package com.zhouyu;

import org.springframework.stereotype.Component;

@Component
public class UserService {

    public String test(){
        return "hello zhouyu";
    }
}
package com.zhouyu;

import org.springframework.boot.SpringApplication;
import org.springframework.boot.autoconfigure.SpringBootApplication;

@SpringBootApplication
public class MyApplication {
    public static void main(String[] args) {
        SpringApplication.run(MyApplication.class, args);
    }
}
这本身就是一个普通的SpringBoot工程,所以可以使用我们之前的方式使用,同时也支持利用native-image命令把整个SpringBoot工程编译成为一个exe文件。
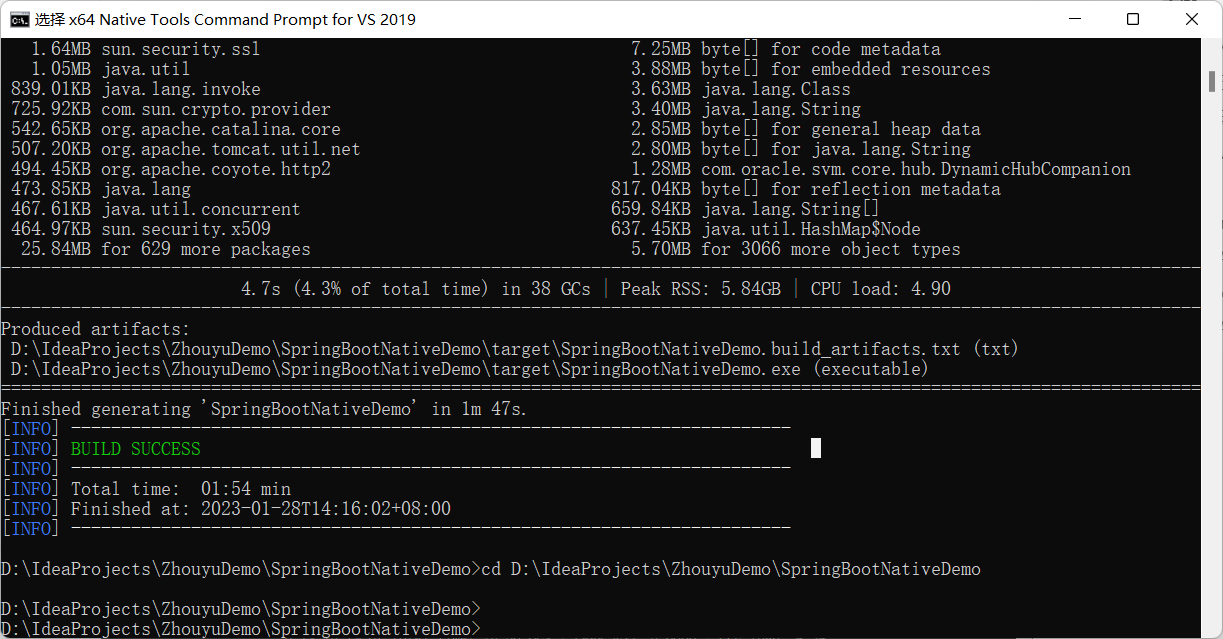
同样在 x64 Native Tools Command Prompt for VS 2019中,进入到工程目录下,执行mvn -Pnative native:compile进行编译就可以了,就能在target下生成对应的exe文件,后续只要运行exe文件就能启动应用了。
在执行命令之前,请确保环境变量中设置的时graalvm的路径。
编译完成截图:
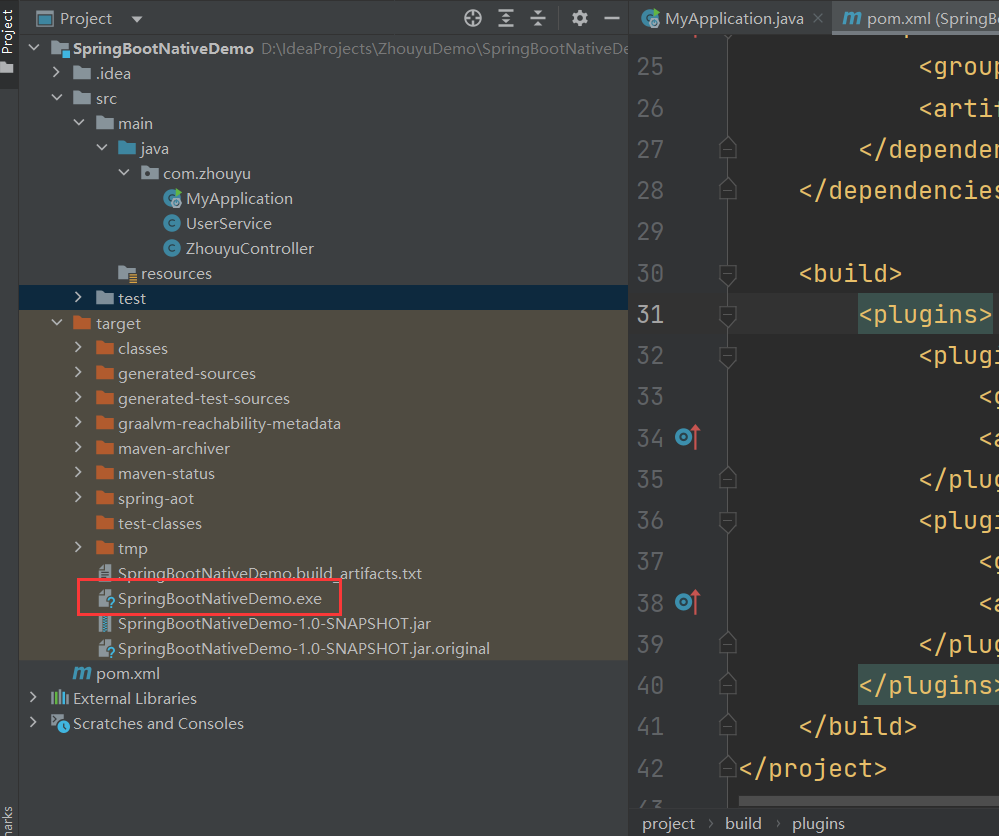
这样,我们就能够直接运行这个exe来启动我们的SpringBoot项目了。
Docker SpringBoot3.0 实战
我们可以直接把SpringBoot应用对应的本地可执行文件构建为一个Docker镜像,这样就能跨操作系统运行了。
Buildpacks,类似Dockerfile的镜像构建技术
注意要安装docker,并启动docker
注意这种方式并不要求你机器上安装了GraalVM,会由SpringBoot插件利用/paketo-buildpacks/native-image来生成本地可执行文件,然后打入到容器中
Docker镜像名字中不能有大写字母,我们可以配置镜像的名字:
<properties>
  <maven.compiler.source>17</maven.compiler.source>
  <maven.compiler.target>17</maven.compiler.target>
  <project.build.sourceEncoding>UTF-8</project.build.sourceEncoding>
  <spring-boot.build-image.imageName>springboot3demo</spring-boot.build-image.imageName>
</properties>
然后执行:
mvn -Pnative spring-boot:build-image
来生成Docker镜像,成功截图:
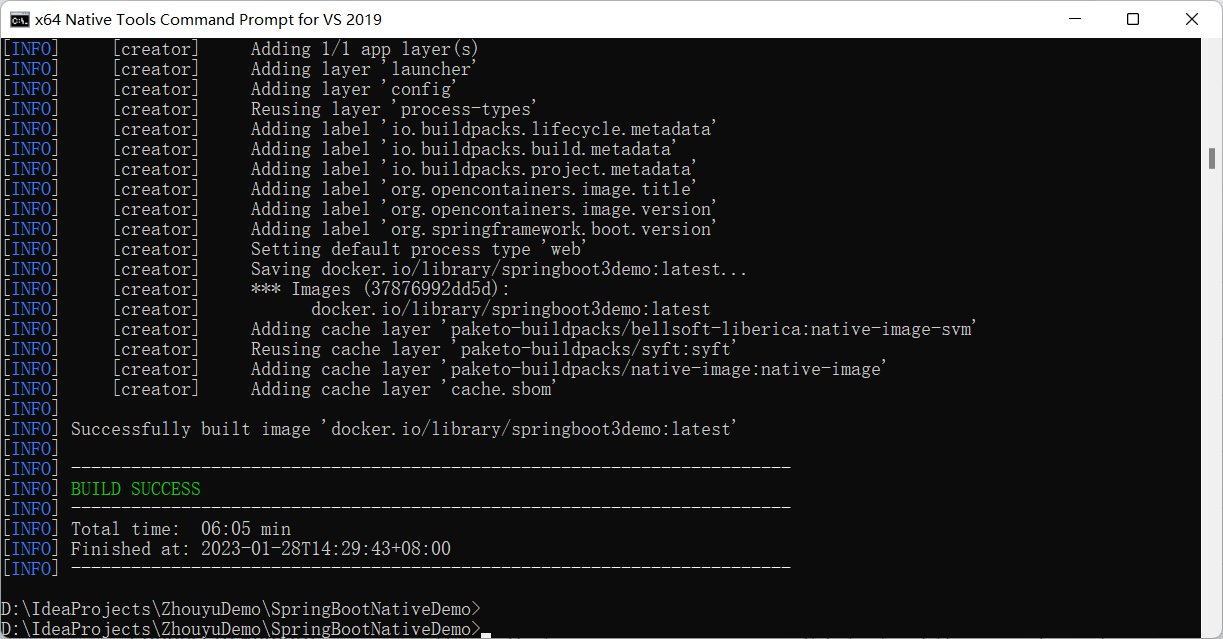
执行完之后,就能看到docker镜像了:

然后就可以运行容器了:
docker run --rm -p 8080:8080 springboot3demo
如果要传参数,可以通过-e
docker run --rm -p 8080:8080 -e methodName=test springboot3demo
不过代码中,得通过以下代码获取:
String methodName = System.getenv("methodName")
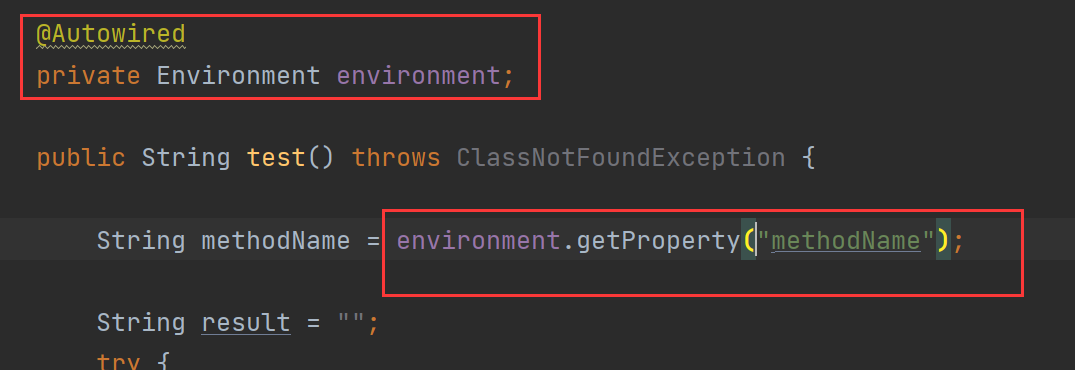
建议工作中直接使用Environment来获取参数:
RuntimeHints
假如应用中有如下代码:
public class ZhouyuService {

    public String test(){
        return "zhouyu";
    }
}
@Component
public class UserService {

    public String test(){

        String result = "";
        try {
            Method test = ZhouyuService.class.getMethod("test", null);
            result = (String) test.invoke(ZhouyuService.class.newInstance(), null);
        } catch (NoSuchMethodException e) {
            throw new RuntimeException(e);
        } catch (InvocationTargetException e) {
            throw new RuntimeException(e);
        } catch (IllegalAccessException e) {
            throw new RuntimeException(e);
        } catch (InstantiationException e) {
            throw new RuntimeException(e);
        }

        return result;
    }

}
在UserService中,通过反射的方式使用到了ZhouyuService的无参构造方法(ZhouyuService.class.newInstance()),如果我们不做任何处理,那么打成二进制可执行文件后是运行不了的,可执行文件中是没有ZhouyuService的无参构造方法的,会报如下错误:
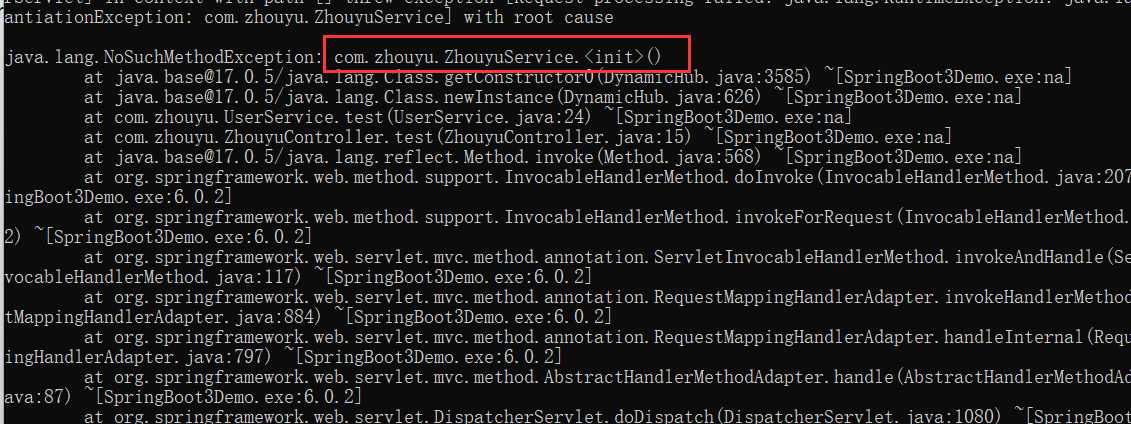
我们可以通过Spring提供的Runtime Hints机制来间接的配置reflect-config.json。
方式一:RuntimeHintsRegistrar
提供一个RuntimeHintsRegistrar接口的实现类,并导入到Spring容器中就可以了:
@Component
@ImportRuntimeHints(UserService.ZhouyuServiceRuntimeHints.class)
public class UserService {

    public String test(){

        String result = "";
        try {
            Method test = ZhouyuService.class.getMethod("test", null);
            result = (String) test.invoke(ZhouyuService.class.newInstance(), null);
        } catch (NoSuchMethodException e) {
            throw new RuntimeException(e);
        } catch (InvocationTargetException e) {
            throw new RuntimeException(e);
        } catch (IllegalAccessException e) {
            throw new RuntimeException(e);
        } catch (InstantiationException e) {
            throw new RuntimeException(e);
        }


        return result;
    }

    static class ZhouyuServiceRuntimeHints implements RuntimeHintsRegistrar {

        @Override
        public void registerHints(RuntimeHints hints, ClassLoader classLoader) {
            try {
                hints.reflection().registerConstructor(ZhouyuService.class.getConstructor(), ExecutableMode.INVOKE);
            } catch (NoSuchMethodException e) {
                throw new RuntimeException(e);
            }
        }
    }
}
方式二:@RegisterReflectionForBinding
@RegisterReflectionForBinding(ZhouyuService.class)
public String test(){

    String result = "";
    try {
        Method test = ZhouyuService.class.getMethod("test", null);
        result = (String) test.invoke(ZhouyuService.class.newInstance(), null);
    } catch (NoSuchMethodException e) {
        throw new RuntimeException(e);
    } catch (InvocationTargetException e) {
        throw new RuntimeException(e);
    } catch (IllegalAccessException e) {
        throw new RuntimeException(e);
    } catch (InstantiationException e) {
        throw new RuntimeException(e);
    }


    return result;
}
注意
如果代码中的methodName是通过参数获取的,那么GraalVM在编译时就不能知道到底会使用到哪个方法,那么test方法也要利用RuntimeHints来进行配置。
@Component
@ImportRuntimeHints(UserService.ZhouyuServiceRuntimeHints.class)
public class UserService {

    public String test(){

        String methodName = System.getProperty("methodName");

        String result = "";
        try {
            Method test = ZhouyuService.class.getMethod(methodName, null);
            result = (String) test.invoke(ZhouyuService.class.newInstance(), null);
        } catch (NoSuchMethodException e) {
            throw new RuntimeException(e);
        } catch (InvocationTargetException e) {
            throw new RuntimeException(e);
        } catch (IllegalAccessException e) {
            throw new RuntimeException(e);
        } catch (InstantiationException e) {
            throw new RuntimeException(e);
        }


        return result;
    }

    static class ZhouyuServiceRuntimeHints implements RuntimeHintsRegistrar {

        @Override
        public void registerHints(RuntimeHints hints, ClassLoader classLoader) {
            try {
                hints.reflection().registerConstructor(ZhouyuService.class.getConstructor(), ExecutableMode.INVOKE);
                hints.reflection().registerMethod(ZhouyuService.class.getMethod("test"), ExecutableMode.INVOKE);
            } catch (NoSuchMethodException e) {
                throw new RuntimeException(e);
            }
        }
    }
}
或者使用了JDK动态代理:
public String test() throws ClassNotFoundException {

    String className = System.getProperty("className");
	Class<?> aClass = Class.forName(className);

	Object o = Proxy.newProxyInstance(UserService.class.getClassLoader(), new Class[]{aClass}, new InvocationHandler() {
    	@Override
    	public Object invoke(Object proxy, Method method, Object[] args) throws Throwable {
        	return method.getName();
    	}
	});

	return o.toString();
}
那么也可以利用RuntimeHints来进行配置要代理的接口:
public void registerHints(RuntimeHints hints, ClassLoader classLoader) {
    hints.proxies().registerJdkProxy(UserInterface.class);
}
方式三:@Reflective
对于反射用到的地方,我们可以直接加一个@Reflective,前提是ZhouyuService得是一个Bean:
@Component
public class ZhouyuService {

    @Reflective
    public ZhouyuService() {
    }

    @Reflective
    public String test(){
        return "zhouyu";
    }
}
以上Spring6提供的RuntimeHints机制,我们可以使用该机制更方便的告诉GraalVM我们额外用到了哪些类、接口、方法等信息,最终Spring会生成对应的reflect-config.json、proxy-config.json中的内容,GraalVM就知道了。
Spring AOT的源码实现
流程图:https://www.processon.com/view/link/63edeea8440e433d3d6a88b2
SpringBoot 3.0插件实现原理
上面的SpringBoot3.0实战过程中,我们在利用image-native编译的时候,target目录下会生成一个spring-aot文件夹:
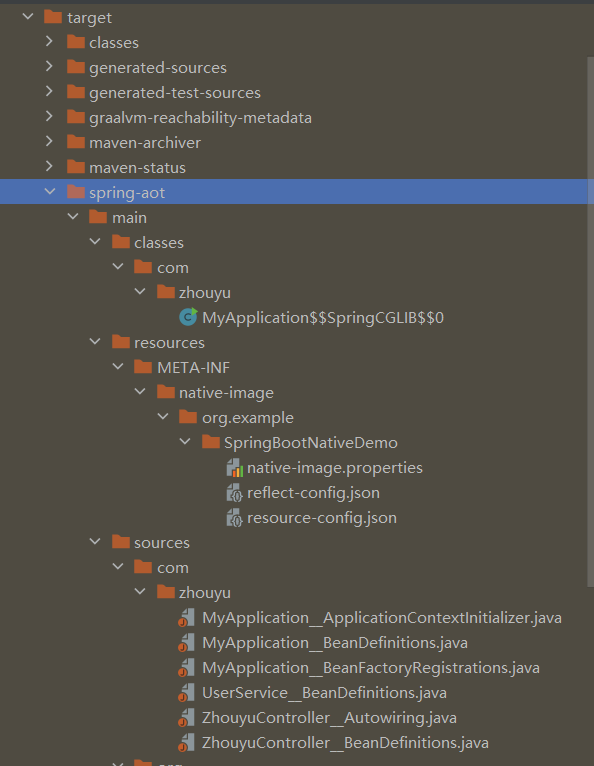
这个spring-aot文件夹是编译的时候spring boot3.0的插件生成的,resources/META-INF/native-image文件夹中的存放的就是graalvm的配置文件。
当我们执行mvn -Pnative native:compile时,实际上执行的是插件native-maven-plugin的逻辑。
我们可以执行mvn help:describe -Dplugin=org.graalvm.buildtools:native-maven-plugin -Ddetail
来查看这个插件的详细信息。
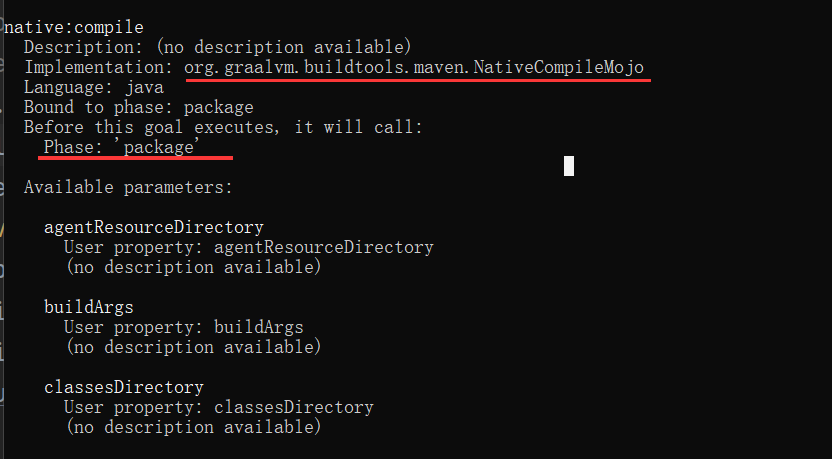
发现native:compile命令对应的实现类为NativeCompileMojo,并且会先执行package这个命令,从而会执行process-aot命令,因为spring-boot-maven-plugin插件中有如下配置:
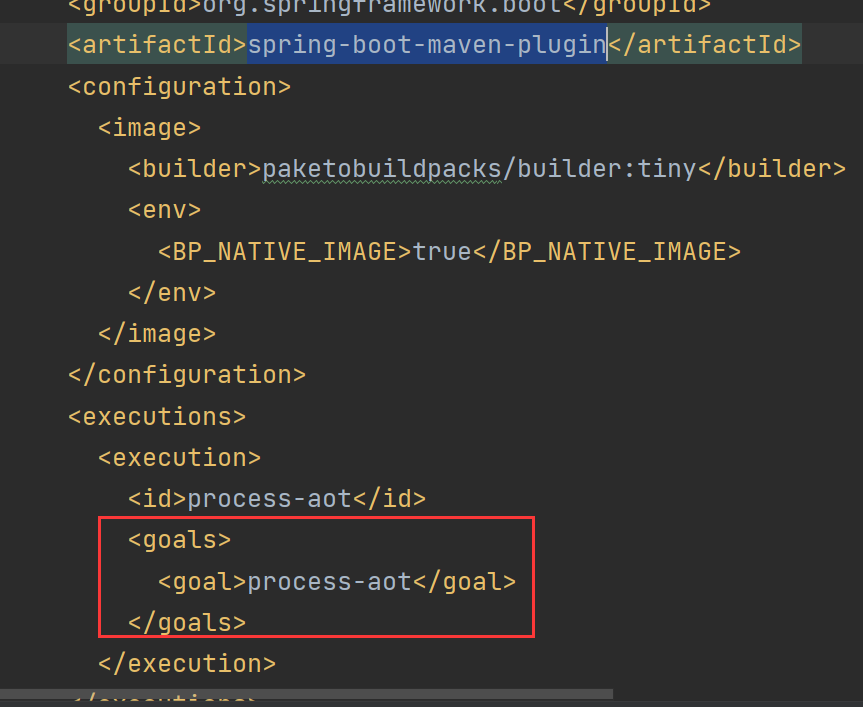
我们可以执行mvn help:describe -Dplugin=org.springframework.boot:spring-boot-maven-plugin -Ddetail
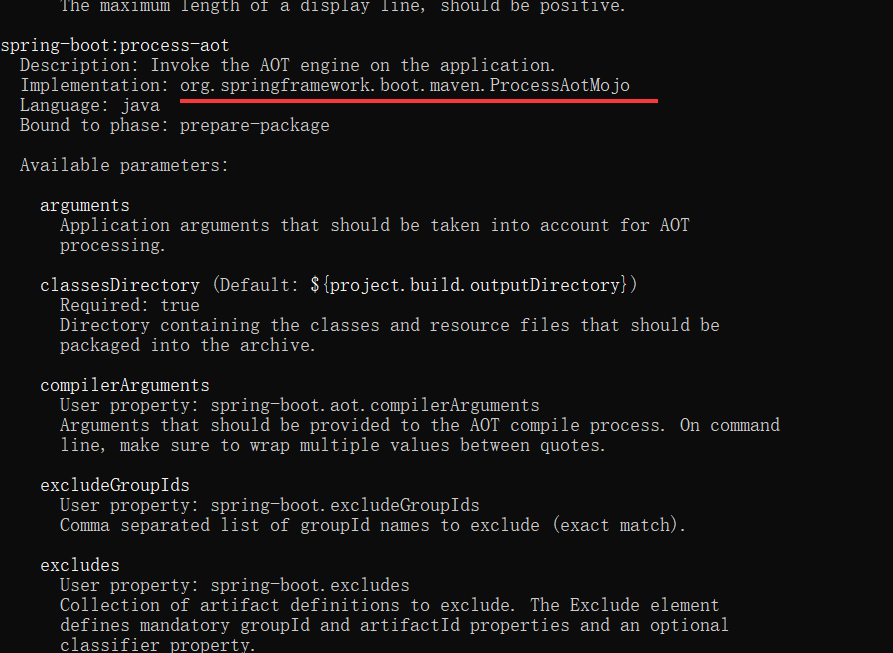
发现对应的phase为:prepare-package,所以会在打包之前执行ProcessAotMojo。
所以,我们在运行mvn -Pnative native:compile时,会先编译我们自己的java代码,然后执行executeAot()方法(会生成一些Java文件并编译成class文件,以及GraalVM的配置文件),然后才执行利用GraalVM打包出二进制可执行文件。
对应的源码实现:
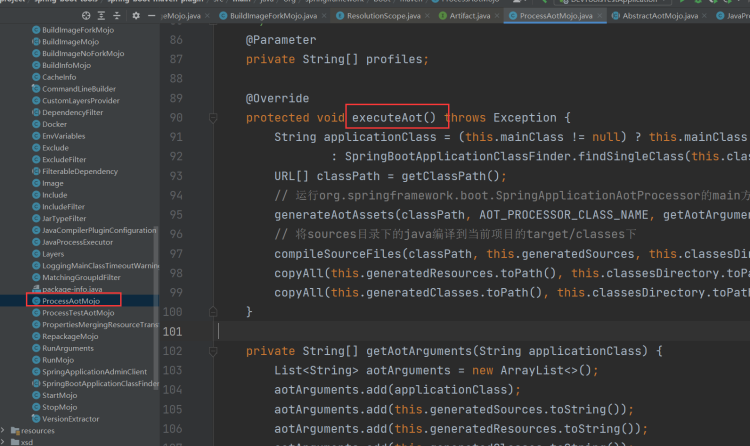
maven插件在编译的时候,就会调用到executeAot()这个方法,这个方法会:
- 先执行org.springframework.boot.SpringApplicationAotProcessor的main方法
- 从而执行SpringApplicationAotProcessor的process()
- 从而执行ContextAotProcessor的doProcess(),从而会生成一些Java类并放在spring-aot/main/sources目录下,详情看后文
- 然后把生成在spring-aot/main/sources目录下的Java类进行编译,并把对应class文件放在项目的编译目录下target/classes
- 然后把spring-aot/main/resources目录下的graalvm配置文件复制到target/classes
- 然后把spring-aot/main/classes目录下生成的class文件复制到target/classes
Spring AOT核心原理
以下只是一些关键源码

prepareApplicationContext会直接启动我们的SpringBoot,并在触发contextLoaded事件后,返回所创建的Spring对象,注意此时还没有扫描Bean。
protected ClassName performAotProcessing(GenericApplicationContext applicationContext) {
	FileSystemGeneratedFiles generatedFiles = createFileSystemGeneratedFiles();

	DefaultGenerationContext generationContext = new DefaultGenerationContext(createClassNameGenerator(), generatedFiles);

	ApplicationContextAotGenerator generator = new ApplicationContextAotGenerator();

	// 会进行扫描,并且根据扫描得到的BeanDefinition生成对应的Xx_BeanDefinitions.java文件
	// 并返回com.zhouyu.MyApplication__ApplicationContextInitializer
	ClassName generatedInitializerClassName = generator.processAheadOfTime(applicationContext, generationContext);

	// 因为后续要通过反射调用com.zhouyu.MyApplication__ApplicationContextInitializer的构造方法
    // 所以将相关信息添加到reflect-config.json对应的RuntimeHints中去
	registerEntryPointHint(generationContext, generatedInitializerClassName);

	// 生成source目录下的Java文件
	generationContext.writeGeneratedContent();

	// 将RuntimeHints中的内容写入resource目录下的Graalvm的各个配置文件中
	writeHints(generationContext.getRuntimeHints());
	writeNativeImageProperties(getDefaultNativeImageArguments(getApplicationClass().getName()));

	return generatedInitializerClassName;
}
public ClassName processAheadOfTime(GenericApplicationContext applicationContext,
									GenerationContext generationContext) {
	return withCglibClassHandler(new CglibClassHandler(generationContext), () -> {

		// 会进行扫描,并找到beanType是代理类的请求,把代理类信息设置到RuntimeHints中
		applicationContext.refreshForAotProcessing(generationContext.getRuntimeHints());

		// 拿出Bean工厂,扫描得到的BeanDefinition对象在里面
		DefaultListableBeanFactory beanFactory = applicationContext.getDefaultListableBeanFactory();

		ApplicationContextInitializationCodeGenerator codeGenerator =
			new ApplicationContextInitializationCodeGenerator(generationContext);

		// 核心
		new BeanFactoryInitializationAotContributions(beanFactory).applyTo(generationContext, codeGenerator);

		return codeGenerator.getGeneratedClass().getName();
	});
}
BeanFactoryInitializationAotContributions(DefaultListableBeanFactory beanFactory) {
	// 把aot.factories文件的加载器以及BeanFactory,封装成为一个Loader对象,然后传入
	this(beanFactory, AotServices.factoriesAndBeans(beanFactory));
}
BeanFactoryInitializationAotContributions(DefaultListableBeanFactory beanFactory,
										  AotServices.Loader loader) {

	// getProcessors()中会从aot.factories以及beanfactory中拿出BeanFactoryInitializationAotProcessor类型的Bean对象
	// 同时还会添加一个RuntimeHintsBeanFactoryInitializationAotProcessor
	this.contributions = getContributions(beanFactory, getProcessors(loader));
}
private List<BeanFactoryInitializationAotContribution> getContributions(
	DefaultListableBeanFactory beanFactory,
	List<BeanFactoryInitializationAotProcessor> processors) {

	List<BeanFactoryInitializationAotContribution> contributions = new ArrayList<>();

	// 逐个调用BeanFactoryInitializationAotProcessor的processAheadOfTime()开始处理
	for (BeanFactoryInitializationAotProcessor processor : processors) {
		BeanFactoryInitializationAotContribution contribution = processor.processAheadOfTime(beanFactory);
		if (contribution != null) {
			contributions.add(contribution);
		}
	}
	return Collections.unmodifiableList(contributions);
}
总结一下,在SpringBoot项目编译时,最终会通过BeanFactoryInitializationAotProcessor来生成Java文件,或者设置RuntimeHints,后续会把写入Java文件到磁盘,将RuntimeHints中的内容写入GraalVM的配置文件,再后面会编译Java文件,再后面就会基于生成出来的GraalVM配置文件打包出二进制可执行文件了。
所以我们要看Java文件怎么生成的,RuntimeHints如何收集的就看具体的BeanFactoryInitializationAotProcessor就行了。
比如:
- 有一个BeanRegistrationsAotProcessor,它就会负责生成Xx_BeanDefinition.java以及Xx__ApplicationContextInitializer.java、Xx__BeanFactoryRegistrations.java中的内容
- 还有一个RuntimeHintsBeanFactoryInitializationAotProcessor,它负责从aot.factories文件以及BeanFactory中获取RuntimeHintsRegistrar类型的对象,以及会找到@ImportRuntimeHints所导入的RuntimeHintsRegistrar对象,最终就是从这些RuntimeHintsRegistrar中设置RuntimeHints。
Spring Boot3.0启动流程
在run()方法中,SpringBoot会创建一个Spring容器,但是SpringBoot3.0中创建容器逻辑为:
private ConfigurableApplicationContext createContext() {
	if (!AotDetector.useGeneratedArtifacts()) {
		return new AnnotationConfigServletWebServerApplicationContext();
	}
	return new ServletWebServerApplicationContext();
}
如果没有使用AOT,那么就会创建AnnotationConfigServletWebServerApplicationContext,它里面会添加ConfigurationClassPostProcessor,从而会解析配置类,从而会扫描。
而如果使用了AOT,则会创建ServletWebServerApplicationContext,它就是一个空容器,它里面没有ConfigurationClassPostProcessor,所以后续不会触发扫描了。
创建完容器后,就会找到MyApplication__ApplicationContextInitializer,开始向容器中注册BeanDefinition。
后续就是创建Bean对象了。
本系列文章来自图灵学院周瑜老师分享,本博客整理学习并搬运
本博客文章均已测试验证,欢迎评论、交流、点赞。
部分文章来源于网络,如有侵权请联系删除。
转载请注明原文链接:https://www.cnblogs.com/sueyyyy/articles/17410473.html

 浙公网安备 33010602011771号