

SpringBoot集成邮件实现每日根据模板给女朋友发送表白邮件
【1】首先,开通发送QQ邮箱的POP3/IMAP/SMTP/Exchange/CardDAV/CalDAV服务,生成授权码
(如果你女朋友的邮箱是qq邮箱,最好你的发件邮箱也是QQ。我之前用新浪邮箱作为发件邮箱,给其他邮箱发邮件都没有问题,但给QQ发件后,QQ邮箱收不到。。。)
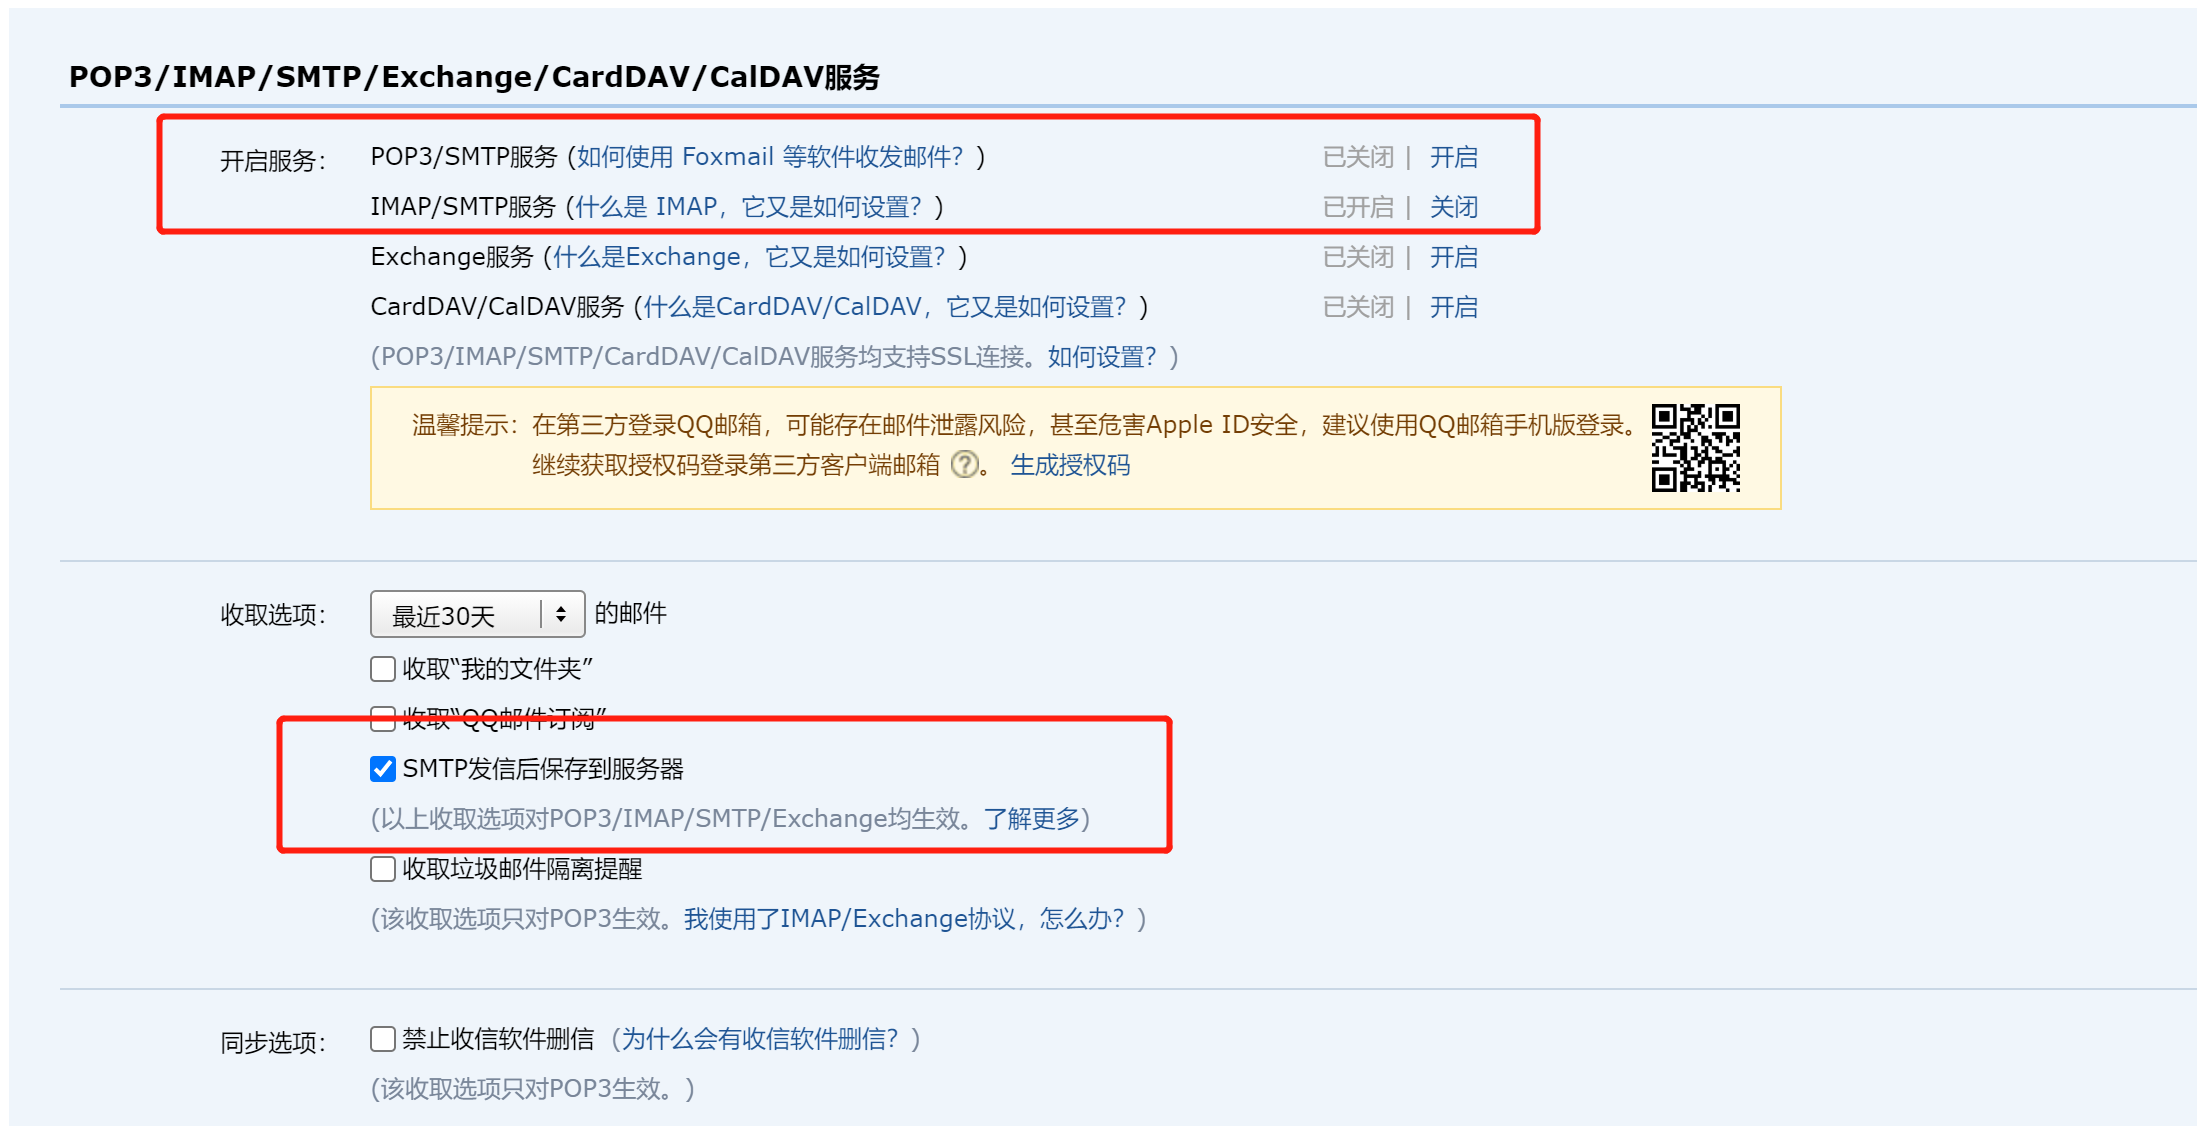
将生成的授权码保存。

【2】pom.xml的依赖包
    <dependency>
            <groupId>org.springframework.boot</groupId>
            <artifactId>spring-boot-starter-mail</artifactId>
        </dependency>
        <dependency>
            <groupId>org.springframework.boot</groupId>
            <artifactId>spring-boot-starter-freemarker</artifactId>
        </dependency>
        <dependency>
            <groupId>org.springframework.boot</groupId>
            <artifactId>spring-boot-starter-thymeleaf</artifactId>
        </dependency>
        <dependency>
            <groupId>org.springframework</groupId>
            <artifactId>spring-context-support</artifactId>
        </dependency>
        <!-- httpclient 依赖 -->
        <dependency>
            <groupId>org.apache.httpcomponents</groupId>
            <artifactId>httpclient</artifactId>
            </dependency>
    </dependencies>
【3】配置application.yml文件
server:
  port: 8081
spring:
  mail:
    username: XXXX@qq.com #你的邮箱
    password: XXXX #授权码
    host: smtp.qq.com
    properties:
      mail:
        smtp:
          auth: true
    port: 587

she:
  mail: XXXX@qq.com #女朋友邮箱
【4】邮件发送工具类【从彩虹屁获取句子】
@Component
public class SendMessage {
    @Autowired
    private JavaMailSenderImpl mailSender;
    @Value("${spring.mail.username}")
    private String from;
    @Value("${spring.mail.password}")
    private String password;
    @Value("${spring.mail.host}")
    private String host;
    @Value("${spring.mail.port}")
    private int port;
    @Value("${she.mail}")
    private String[] sheMail;

    @Resource
    TemplateEngine templateEngine;
    /**
     * 发送模板邮件
     * @param to
     * @param subject
     * @param template
     * @throws MessagingException
     */
    public void sendTemplateMail(String subject,String message) throws MessagingException{
        Context context = new Context();
//      设置传入模板的页面的参数 参数名为:id 参数随便写一个就行
        context.setVariable("content", message);
        Date date = new Date();
        String pattern = "yyyy年MM月dd日 13:14:20";
        SimpleDateFormat simpleDateFormat = new SimpleDateFormat(pattern);

        context.setVariable("date", simpleDateFormat.format(date));
//      emailTemplate是你要发送的模板我这里用的是Thymeleaf
        String process = templateEngine.process("emailDemo", context);


        MimeMessage mineMessage = mailSender.createMimeMessage();
        //要带附件第二个参数设为true
        MimeMessageHelper helper = new MimeMessageHelper(mineMessage, true);
        helper.setFrom(from);
        helper.setTo(sheMail);
        helper.setSubject(subject);
        helper.setText(process, true);

        mailSender.setProtocol("smtp");
        mailSender.setPassword(password);
        mailSender.setPort(port);
        mailSender.setHost(host);
        mailSender.send(mineMessage);

    }/**远程获取要发送的信息*/
    public static String getOneS(){
        try {
            //创建客户端对象
            HttpClient client = HttpClients.createDefault();
            /*创建地址 https://du.shadiao.app/api.php*/
            HttpGet get = new HttpGet("https://chp.shadiao.app/api.php");
            //发起请求,接收响应对象
            HttpResponse response = client.execute(get);
            //获取响应体,响应数据是一种基于HTTP协议标准字符串的对象
            //响应体和响应头,都是封装HTTP协议数据。直接使用可能出现乱码或解析错误
            HttpEntity entity = response.getEntity();
            //通过HTTP实体工具类,转换响应体数据
            String responseString = EntityUtils.toString(entity, "utf-8");


            return responseString;


        } catch (IOException e) {
            throw  new RuntimeException("网站获取句子失败");
        }
    }
}
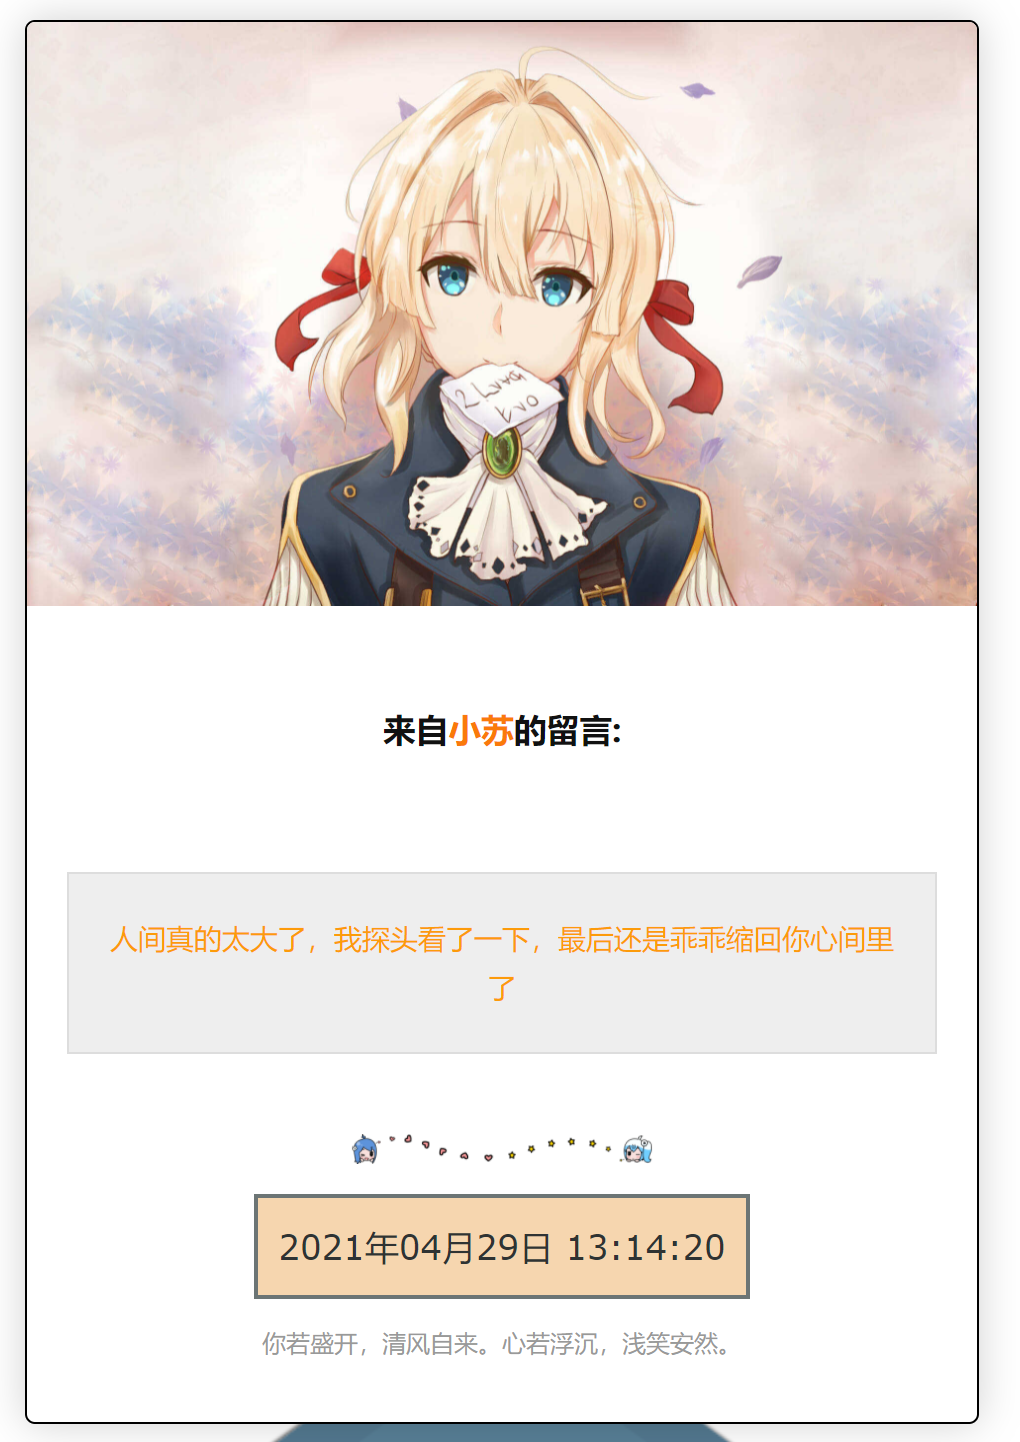
【5】模板文件放到/resources/templates/下,这里提供一个其他人写的精品模板:
<!DOCTYPE html>
<html lang="en">

<head>
    <meta http-equiv="Content-Type" content="text/html; charset=UTF-8">
    <base target="_blank"/>
    <style id="scrollbar" type="text/css">::-webkit-scrollbar {
        width: 0 !important
    }

    pre {
        white-space: pre-wrap !important;
        word-wrap: break-word !important;
        *white-space: normal !important
    }

    #letter img {
        max-width: 300px
    }</style>
    <style id="from-wrapstyle" type="text/css">#form-wrap {
        overflow: hidden;
        height: 447px;
        position: relative;
        top: 0px;
        transition: all 1s ease-in-out .3s;
        z-index: 0
    }</style>
    <style id="from-wraphoverstyle" type="text/css">#form-wrap:hover {
        height: 1300px;
        top: -200px
    }</style>
</head>
<body>
<div style="width: 530px;margin: 20px auto 0;height: 1000px;">
    <div id="form-wrap"><img src="https://cdn.jsdelivr.net/gh/Akilarlxh/Valine-Admin@v1.0/source/img/before.png"
                             alt="before"
                             style="position: absolute;bottom: 126px;left: 0px;background-repeat: no-repeat;width: 530px;height: 317px;z-index:-100">
        <div style="position: relative;overflow: visible;height: 1500px;width: 500px;margin: 0px auto;transition: all 1s ease-in-out .3s;padding-top:200px;">
            <form>
                <div style="background: white;width: 95%;max-width: 800px;margin: auto auto;border-radius: 5px;border: 1px solid;overflow: hidden;-webkit-box-shadow: 0px 0px 20px 0px rgba(0, 0, 0, 0.12);box-shadow: 0px 0px 20px 0px rgba(0, 0, 0, 0.18);">
                    <img style="width:100%;overflow: hidden;"
                         src="https://ae01.alicdn.com/kf/U5bb04af32be544c4b41206d9a42fcacfd.jpg"/>
                    <div style="padding: 5px 20px;"><br>
                        <div><h3
                                style="text-decoration: none; color: rgb(17,17,17); text-align: center;font-family: 华文新魏">
                            来自<span style="color: #fa7a0a">小苏</span>的留言:</h3>
                        </div>

                        <br>
                        <!--内容区域height:200px-->
                        <div id="letter"
                             style="overflow:auto;height:285px;width:100%;display:block;word-break: break-all;word-wrap: break-word;">
                            <div style="text-align: center; border-bottom: #ddd 1px solid;border-left: #ddd 1px solid;padding-bottom: 20px;background-color: #eee;margin: 15px 0px;padding-left: 20px;padding-right: 20px;border-top: #ddd 1px solid;border-right: #ddd 1px solid;padding-top: 20px;font-family:黑体;">
                            <span style="color: #fc9b0a;font-family: 华文新魏;" id="content" th:text="${content}">
                                <!-- 情话内容 -->
                             </span>
                        </div>

                        <div style="text-align: center;margin-top: 40px;"><img
                                src="https://ae01.alicdn.com/kf/U0968ee80fd5c4f05a02bdda9709b041eE.png" alt="hr"
                                style="width:100%; margin:5px auto 5px auto; display: block;"/><a
                                style="text-transform: uppercase;text-decoration: none;font-size: 17px;border: 2px solid #6c7575;color: #2f3333;padding: 10px;display: inline-block;margin: 10px auto 0;background-color: rgb(246, 214, 175);"
                                target="_blank" href="#" id="date" th:text="${date}">
                                    <!-- 日期 -->
                                </a>
                        </div>
                        <p style="font-size: 12px;text-align: center;color: #999;">你若盛开,清风自来。心若浮沉,浅笑安然。
                        </p>

                    </div>

                </div>
        </div>
        </form>
    </div>
    <img src="https://cdn.jsdelivr.net/gh/Akilarlxh/Valine-Admin@v1.0/source/img/after.png" alt="after"
         style="      position: absolute;bottom: -2px;left: 0;background-repeat: no-repeat;width: 530px;height: 259px;z-index:100">
</div>
</div>
</body>

</body>
</html>
【6】定时器定时执行
@Component
public class MyScheduled {
    @Autowired
    private SendMessage sendMessage;

    //@Scheduled(cron = "0/5 * * * * ?")//每隔5s
    @Scheduled(cron = "0 0 15 * * ?")//每天15点
    public void dsrw(){
        System.out.println("开始执行");
        String message = sendMessage.getOneS();
        System.out.println(message);
        //sendMessage.sendMessage("来自小苏的消息!❤",message);
        try {
            sendMessage.sendTemplateMail("来自小苏的留言!❤",message);
        } catch (MessagingException e) {
            e.printStackTrace();
        }
    }
}
这里需要注意的是:SpringBoot要想定时器执行,则在启动类上需加上注解@EnableScheduling
import org.springframework.boot.SpringApplication;
import org.springframework.boot.autoconfigure.SpringBootApplication;
import org.springframework.scheduling.annotation.EnableScheduling;

@SpringBootApplication
@EnableScheduling
public class XiaosuApplication {

    public static void main(String[] args) {
        SpringApplication.run(XiaosuApplication.class, args);
    }

}
关于cron表达式格式:
https://blog.csdn.net/m0_37179470/article/details/81271607
1.cron表达式格式:
{秒数} {分钟} {小时} {日期} {月份} {星期} {年份(可为空)}

2.cron表达式各占位符解释:
{秒数}{分钟} ==> 允许值范围: 0~59 ,不允许为空值,若值不合法,调度器将抛出SchedulerException异常
“*” 代表每隔1秒钟触发;
“,” 代表在指定的秒数触发,比如”0,15,45”代表0秒、15秒和45秒时触发任务
“-“代表在指定的范围内触发,比如”25-45”代表从25秒开始触发到45秒结束触发,每隔1秒触发1次
“/”代表触发步进(step),”/”前面的值代表初始值(““等同”0”),后面的值代表偏移量,比如”0/20”或者”/20”代表从0秒钟开始,每隔20秒钟触发1次,即0秒触发1次,20秒触发1次,40秒触发1次;”5/20”代表5秒触发1次,25秒触发1次,45秒触发1次;”10-45/20”代表在[10,45]内步进20秒命中的时间点触发,即10秒触发1次,30秒触发1次
{小时} ==> 允许值范围: 0~23 ,不允许为空值,若值不合法,调度器将抛出SchedulerException异常,占位符和秒数一样
{日期} ==> 允许值范围: 1~31 ,不允许为空值,若值不合法,调度器将抛出SchedulerException异常
{星期} ==> 允许值范围: 1~7 (SUN-SAT),1代表星期天(一星期的第一天),以此类推,7代表星期六(一星期的最后一天),不允许为空值,若值不合法,调度器将抛出SchedulerException异常
{年份} ==> 允许值范围: 1970~2099 ,允许为空,若值不合法,调度器将抛出SchedulerException异常

注意:除了{日期}和{星期}可以使用”?”来实现互斥,表达无意义的信息之外,其他占位符都要具有具体的时间含义,且依赖关系为:年->月->日期(星期)->小时->分钟->秒数

3.cron表达式的强大魅力在于灵活的横向和纵向组合以及简单的语法,用cron表达式几乎可以写出任何你想要触发的时间点与周期
经典案例:
“30 * * * * ?” 每半分钟触发任务
“30 10 * * * ?” 每小时的10分30秒触发任务
“30 10 1 * * ?” 每天1点10分30秒触发任务
“30 10 1 20 * ?” 每月20号1点10分30秒触发任务
“30 10 1 20 10 ? *” 每年10月20号1点10分30秒触发任务
“30 10 1 20 10 ? 2011” 2011年10月20号1点10分30秒触发任务
“30 10 1 ? 10 * 2011” 2011年10月每天1点10分30秒触发任务
“30 10 1 ? 10 SUN 2011” 2011年10月每周日1点10分30秒触发任务
“15,30,45 * * * * ?” 每15秒,30秒,45秒时触发任务
“15-45 * * * * ?” 15到45秒内,每秒都触发任务
“15/5 * * * * ?” 每分钟的每15秒开始触发,每隔5秒触发一次
“15-30/5 * * * * ?” 每分钟的15秒到30秒之间开始触发,每隔5秒触发一次
“0 0/3 * * * ?” 每小时的第0分0秒开始,每三分钟触发一次
“0 15 10 ? * MON-FRI” 星期一到星期五的10点15分0秒触发任务
“0 15 10 L * ?” 每个月最后一天的10点15分0秒触发任务
“0 15 10 LW * ?” 每个月最后一个工作日的10点15分0秒触发任务
“0 15 10 ? * 5L” 每个月最后一个星期四的10点15分0秒触发任务
“0 15 10 ? * 5#3” 每个月第三周的星期四的10点15分0秒触发任务
【7】测试
【8】将springBoot打包为jar包
<groupId>cn.love</groupId>
<artifactId>xiaosu</artifactId>
<version>0.0.1-SNAPSHOT</version>
<packaging>jar</packaging>
<name>xiaosu</name>
<description>Demo project for Spring Boot</description>
【9】关于将jar包作为windows服务自启动:
a. 在idea中用maven将程序打成jar,放到运行的目录中。这里我们新建一个文件夹 biaobai,将jar包放入到该文件夹
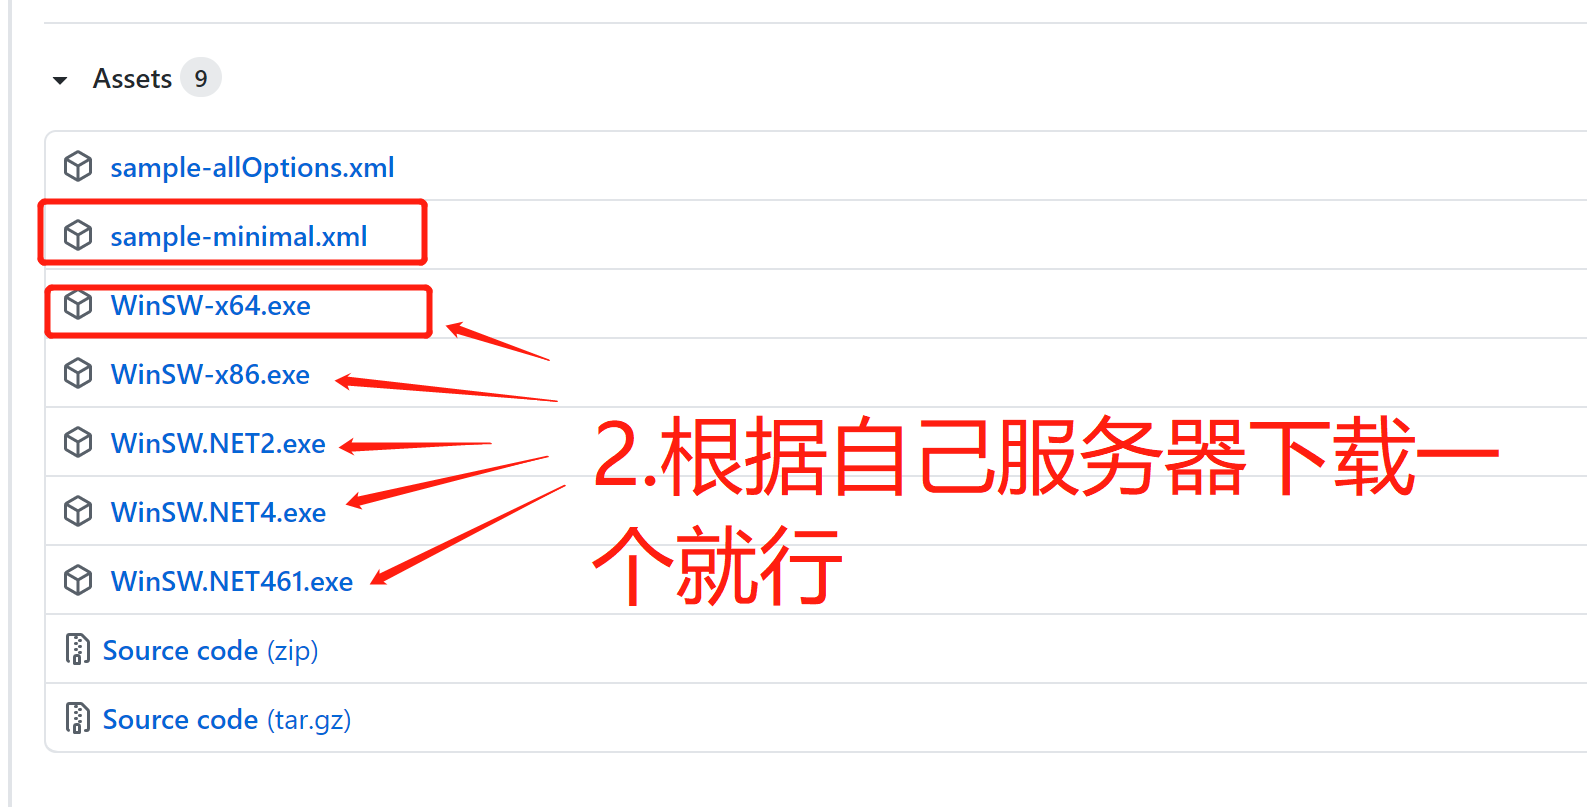
b.去github上面下载winsw: https://github.com/kohsuke/winsw/releases
c. 将下载的xml文件和exe文件拷贝到和jar包同一个目录,为了方便期间,将名字改为和jar包相同(名称最好不要有汉字),xml配置如下:
<configuration>

 <id>xiaosu</id>

 <name>xiaosu</name>

 <description>邮件服务.</description>

 <executable>java</executable>

<arguments>-jar xiaosu.jar</arguments>

 <!-- 开机启动 -->
 <startmode>Automatic</startmode>

 <!-- 日志配置 -->
 <logpath>%BASE%\log</logpath>

 <logmode>rotate</logmode>

</configuration>
d.安装exe文件:通过cmd命令进入到exe所在的文件夹下,通过命令安装exe文件
xiaosu.exe install
e.在服务中启动服务

【10】.可能遇到的问题:
exe安装后启动失败,报错版本不一致。这可能是因为我们下载的winsw版本问题,建议下载其他的winsw版本试试。
