- 安装docker
-
yum install -y yum-utils device-mapper-persistent-data lvm2
-
yum-config-manager --add-repo https://download.docker.com/linux/centos/docker-ce.repo
-
[root@localhost ~]# yum list docker-ce --showduplicates | sort -r
已加载插件:fastestmirror, langpacks
可安装的软件包
* updates: centos.ustc.edu.cn
Loading mirror speeds from cached hostfile
* extras: mirrors.aliyun.com
docker-ce.x86_64 18.06.1.ce-3.el7 docker-ce-stable
docker-ce.x86_64 18.06.0.ce-3.el7 docker-ce-stable
docker-ce.x86_64 18.03.1.ce-1.el7.centos docker-ce-stable
docker-ce.x86_64 18.03.0.ce-1.el7.centos docker-ce-stable
docker-ce.x86_64 17.12.1.ce-1.el7.centos docker-ce-stable
docker-ce.x86_64 17.12.0.ce-1.el7.centos docker-ce-stable
... -
[root@localhost ~]# yum install docker-ce-17.12.1.ce
已加载插件:fastestmirror, langpacks
Loading mirror speeds from cached hostfile
* base: centos.ustc.edu.cn
* extras: mirrors.aliyun.com
* updates: centos.ustc.edu.cn
base | 3.6 kB 00:00
docker-ce-stable | 2.9 kB 00:00
extras | 3.4 kB 00:00
updates | 3.4 kB 00:00
正在解决依赖关系
--> 正在检查事务
---> 软件包 docker-ce.x86_64.0.17.12.1.ce-1.el7.centos 将被 安装
--> 正在处理依赖关系 container-selinux >= 2.9,它被软件包 docker-ce-17.12.1.ce-1.el7.centos.x86_64 需要... - 启动Docker,命令:systemctl start docker,然后加入开机启动,如下
[root@localhost ~]# systemctl start docker
[root@localhost ~]# systemctl enable docker
Created symlink from /etc/systemd/system/multi-user.target.wants/docker.service to /usr/lib/systemd/system/docker.service.
- 验证安装是否成功(有client和service两部分表示docker安装启动都成功了)
[root@localhost ~]# docker version
Client:
Version: 17.12.1-ce
API version: 1.35
Go version: go1.9.4
Git commit: 7390fc6
Built: Tue Feb 27 22:15:20 2018
OS/Arch: linux/amd64
Server:
Engine:
Version: 17.12.1-ce
API version: 1.35 (minimum version 1.12)
Go version: go1.9.4
Git commit: 7390fc6
Built: Tue Feb 27 22:17:54 2018
OS/Arch: linux/amd64
Experimental: false
-
如何从远程主机上拷贝docker image到本地
1.以root身份在远程主机保存image到文件
docker save -o [filename] [image]
示例:
docker save -o aspnet.tar mcr.microsoft.com/dotnet/core/aspnet:3.1-buster-slim
2.修改保存文件为任何人可读
chmod a+r [filename]
3.本地主机使用scp命令拷贝远程文件到本地
scp <username>@<ip>:<file> <local path>
示例:
scp test@192.168.1.2:/home/test/aspnet.tar /home/test
输入后会提示输入密码
4.本地从文件加载到docker image仓储
docker load<[filename]
示例
docker load<aspnet.tar
5. 使用docker images命令查看已导入的image
docker images
- 安装prometheus
- 安装 Prometheus Server
docker run -d -p 9090:9090 \
-v /root/prometheus.yml:/etc/prometheus/prometheus.yml \
--name prometheus \
--net=host \
prom/prometheus
global:
  scrape_interval:     15s # Set the scrape interval to every 15 seconds. Default is every 1 minute.
  evaluation_interval: 15s # Evaluate rules every 15 seconds. The default is every 1 minute.
alerting:
  alertmanagers:
  - static_configs:
    - targets:
      # - alertmanager:9093
      #
rule_files:
  # - "first_rules.yml"
  # - "second_rules.yml"


scrape_configs:
  # The job name is added as a label `job=<job_name>` to any timeseries scraped from this config.
     - job_name: 'prometheus'
       static_configs:
       - targets: ['localhost:9090','localhost:9100','localhost:8080','192.168.28.18:8080','192.168.28.18:9100','192.168.28.19:8080','192.168.28.19:9100']
docker run -d  \
-v "/proc:/host/proc" \
-v "/sys:/host/sys" \
-v "/:/rootfs" \
--net=host \
prom/node-exporter \
--path.procfs /host/proc \
--path.sysfs /host/sys \
--collector.filesystem.ignored-mount-points "^/(sys|proc|dev|host|etc)($|/)"
Exporter
Prometheus 有很多现成的 Exporter,完整列表请参考 https://prometheus.io/docs/instrumenting/exporters/
安装altermanager
docker run -d -p 9090:9090 -v /etc/prometheus/prometheus.yml:/etc/prometheus/prometheus.yml -v /etc/prometheus/rules/node_exporter_rule.yml:/etc/prometheus/rules/node_exporter_rule.yml -v /etc/prometheus/rules/jmx_exporter_rule.yml:/etc/prometheus/rules/jmx_exporter_rule.yml --name prometheus --net=host prom/prometheus
docker run -d -p 9093:9093 -v /etc/prometheus/alertmanager.yml:/etc/alertmanager/alertmanager.yml -v /etc/prometheus/wechat.tmpl:/etc/alertmanager/wechat.tmpl --name alertmanager prom/alertmanager
-
grafana安装
先普通启动,然后把配置文件导出来,修改配置文件,挂载到etc下
## 普通启动,挂载数据盘
docker run  -d --name grafana -p 3000:3000   -v /data/grafana:/var/lib/grafana  grafana/grafana

## 复制出配置文件
docker cp grafan:/etc/grafana/grafana.ini /data/grafana-data/etc/
## 修改配置文件,比如加上域名,比如修改端口为80,比如。。。


## kill重启
docker kill grafana
docker rm grafana
docker run --user root  -d --name grafana -p 3000:3000  -v /data/grafana-data/etc:/etc/grafana/ -v /data/grafana-data/grafana:/var/lib/grafana  grafana/grafana


docker run --user root  -d --name grafana -p 3000:3000  -v /data/opt/monitor/grafana-data/etc:/etc/grafana/ -v /data/opt/monitor/grafana-data/grafana:/var/lib/grafana  grafana/grafana
-
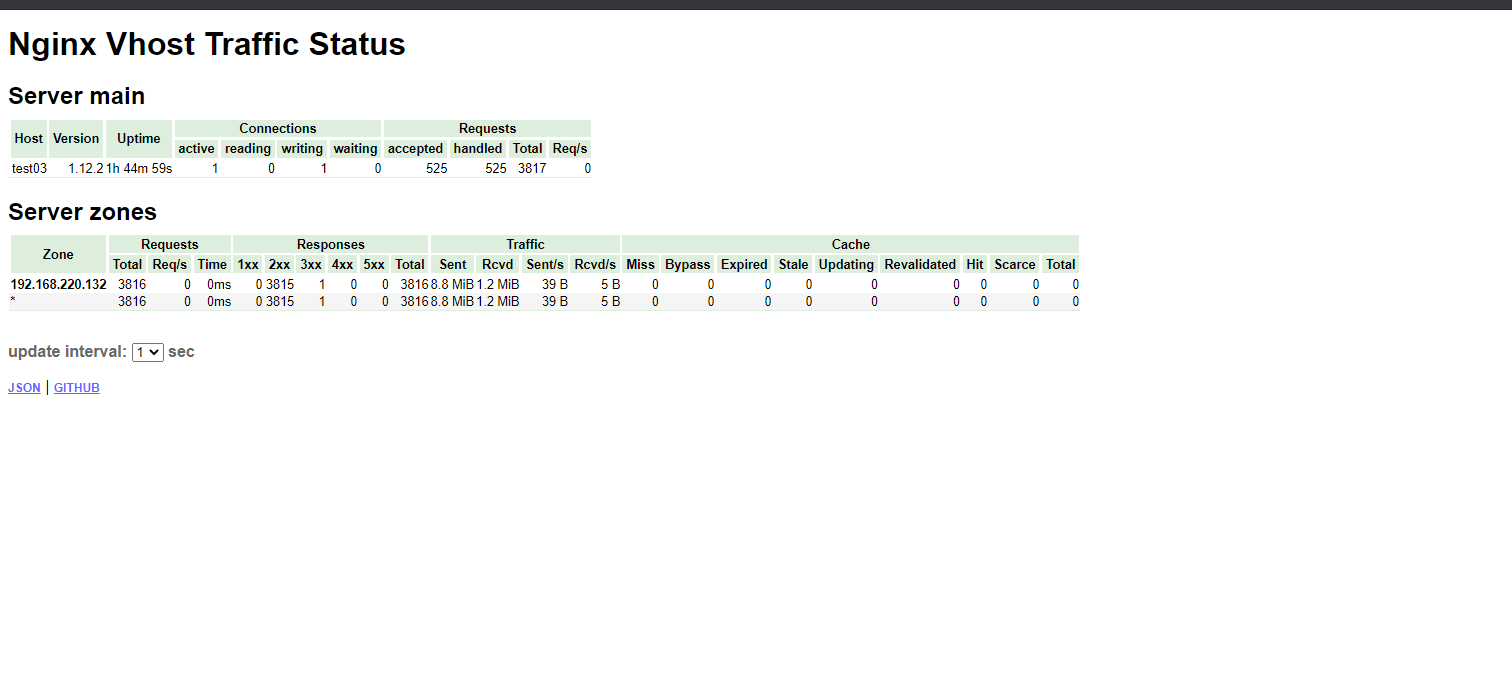
nginx监控
下载
wget http://nginx.org/download/nginx-1.20.1.tar.gz
wget https://github.com/vozlt/nginx-module-vts/archive/refs/tags/v0.2.0.tar.gz
解压
tar -xzvf nginx-1.20.1.tar.gz
tar -xzvf v0.2.0.tar.gz && mv nginx-module-vts-0.1.12 nginx-1.20.1/
备份现有的nginx文件
cp -r /etc/nginx /etc/nginx_bak
cp /usr/sbin/nginx /usr/sbin/nginx_bak
安装依赖
yum -y install perl-ExtUtils-Embed readline-devel zlib-devel pam-devel libxml2-devel libxslt-devel openldap-devel python-devel gcc-c++   openssl-devel cmakepcre-develnanowget  gcc gcc-c++ ncurses-devel per
yum install gd gd-devel
yum install gperftools

编译
./configure --prefix=/usr/share/nginx --sbin-path=/usr/sbin/nginx --modules-path=/usr/lib64/nginx/modules --conf-path=/etc/nginx/nginx.conf --error-log-path=/var/log/nginx/error.log --http-log-path=/var/log/nginx/access.log --http-client-body-temp-path=/var/lib/nginx/tmp/client_body --http-proxy-temp-path=/var/lib/nginx/tmp/proxy --http-fastcgi-temp-path=/var/lib/nginx/tmp/fastcgi --http-uwsgi-temp-path=/var/lib/nginx/tmp/uwsgi --http-scgi-temp-path=/var/lib/nginx/tmp/scgi --pid-path=/run/nginx.pid --lock-path=/run/lock/subsys/nginx --user=nginx --group=nginx --with-compat --with-debug --with-file-aio --with-google_perftools_module --with-http_addition_module --with-http_auth_request_module --with-http_dav_module --with-http_degradation_module --with-http_flv_module --with-http_gunzip_module --with-http_gzip_static_module --with-http_image_filter_module=dynamic --with-http_mp4_module --with-http_perl_module=dynamic --with-http_random_index_module --with-http_realip_module --with-http_secure_link_module --with-http_slice_module --with-http_ssl_module --with-http_stub_status_module --with-http_sub_module --with-http_v2_module --with-http_xslt_module=dynamic --with-mail=dynamic --with-mail_ssl_module --with-pcre --with-pcre-jit --with-stream=dynamic --with-stream_ssl_module --with-stream_ssl_preread_module --with-threads --with-cc-opt='-O2 -g -pipe -Wall -Wp,-D_FORTIFY_SOURCE=2 -fexceptions -fstack-protector-strong --param=ssp-buffer-size=4 -grecord-gcc-switches -specs=/usr/lib/rpm/redhat/redhat-hardened-cc1 -m64 -mtune=generic' --with-ld-opt='-Wl,-z,relro -specs=/usr/lib/rpm/redhat/redhat-hardened-ld -Wl,-E' --add-module=nginx-module-vts-0.2.0
上面完成后,继续输入:make -j8
禁止:千万不要继续输入“make install”,以免现在的nginx出现问题
以上完成后,会在objs目录下生成一个nginx文件,先验证:
./nginx -t
./nginx -V
以上成功后:
systemctl stop nginx
cp objs/nginx /usr/sbin/
systemctl start nginx
nginx -s reload
nginx 配置
http {

    vhost_traffic_status_zone;(添加)
    vhost_traffic_status_filter_by_host on;


location /status {
            vhost_traffic_status_display;
            vhost_traffic_status_display_format html;
        }
nginx -s reload
浏览器访问:
http://ip:port/status