树莓派鼓捣记 - 设置 wifi
树莓派是自带有无线网卡的,所以可以连接 wifi。
本文的树莓派系统环境是 Ubuntu Server 20.04,其他 Linux 系统都大同小异。
ssh 进入树莓派。
1.第一步设置时区#
sudo tzselect

# 选择4 Aisa

# 然后选择9 China

# 接着选择1 Beijing Time

# 最后选择1 确认

sudo cp /usr/share/zoneinfo/Asia/Shanghai  /etc/localtime
设置完成后执行 date -R 看时间是否准确。
2.设置 wifi#
cd /etc/netplan/
sudo vim 50-cloud-init.yaml
打开后应该会有以下内容:
# This file is generated from information provided by the datasource.  Changes
# to it will not persist across an instance reboot.  To disable cloud-init's
# network configuration capabilities, write a file
# /etc/cloud/cloud.cfg.d/99-disable-network-config.cfg with the following:
# network: {config: disabled}
network:
    ethernets:
        eth0:
            dhcp4: true
            optional: true
    version: 2
现在需要加一个wifi的配置,示例如下:
# This file is generated from information provided by the datasource.  Changes
# to it will not persist across an instance reboot.  To disable cloud-init's
# network configuration capabilities, write a file
# /etc/cloud/cloud.cfg.d/99-disable-network-config.cfg with the following:
# network: {config: disabled}
network:
    ethernets:
        eth0:
            dhcp4: true
            optional: true
    wifis:
        wlan0:
            dhcp4: true
            access-points:
                <wifi名字>:
                    password: "<wifi密码>"
    version: 2
编辑完成后保存,然后执行命令
sudo netplan --debug apply
3.检查设置
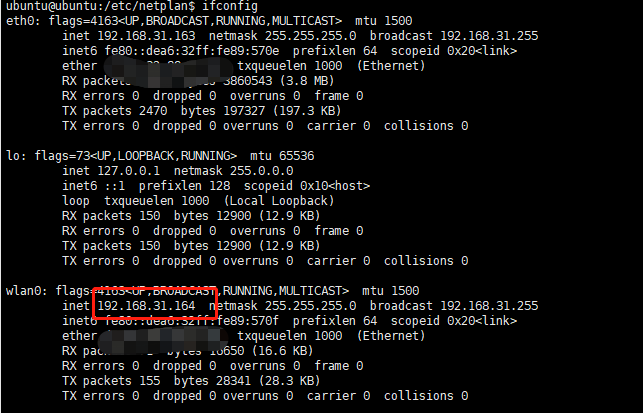
执行命令 ifconfig 检查是否有网卡 wlan0 的信息,并且获取到了ip,最后通过这个ip进行 ssh 连接,如果连接成功,那就没有问题了。
作者:晓晨Master(李志强)
出处:https://www.cnblogs.com/stulzq/p/13951431.html
版权:本作品采用「署名-非商业性使用-相同方式共享 4.0 国际」许可协议进行许可。
目前学习.NET Core 最好的教程 .NET Core 官方教程 ASP.NET Core 官方教程
分类:
树莓派


【推荐】国内首个AI IDE,深度理解中文开发场景,立即下载体验Trae
【推荐】编程新体验,更懂你的AI,立即体验豆包MarsCode编程助手
【推荐】抖音旗下AI助手豆包,你的智能百科全书,全免费不限次数
【推荐】轻量又高性能的 SSH 工具 IShell:AI 加持,快人一步
· 基于Microsoft.Extensions.AI核心库实现RAG应用
· Linux系列:如何用heaptrack跟踪.NET程序的非托管内存泄露
· 开发者必知的日志记录最佳实践
· SQL Server 2025 AI相关能力初探
· Linux系列:如何用 C#调用 C方法造成内存泄露
· 震惊!C++程序真的从main开始吗?99%的程序员都答错了
· 【硬核科普】Trae如何「偷看」你的代码?零基础破解AI编程运行原理
· 单元测试从入门到精通
· 上周热点回顾(3.3-3.9)
· winform 绘制太阳,地球,月球 运作规律