SpringBoot 读取 nc 文件转为 Json 数据
NC 文件全称是 Network Common Data Format,也叫做 NetCDF 文件,即网络通用数据格式,这种文件格式一开始是专门用于气象学数据的存储,现在已经发展演变为很多数据采集软件的文件生成格式了。
由于最近项目中解析 NC 文件比较频繁,所以就进行一下简单的总结。本篇博客介绍如何使用 SpringBoot 从 NC 文件中读取数据,转换为 json 存储到文件中。由于目前我接触到的 nc 文件都比较小,因此这里就一次性把数据都读取出来进行存储了。对于大文件可以采用分段读取存储,网上资料比较多,这里就不再介绍了。
一、搭建工程
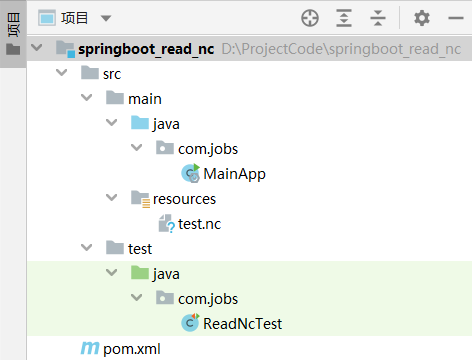
新建一个名称为 springboot_read_nc 的工程,结构如下所示:

测试使用的 test.nc 文件,就放在工程中的 resources 目录下面了
首先看一下 pom 文件中引入的依赖包,具体如下:
<?xml version="1.0" encoding="UTF-8"?> <project xmlns="http://maven.apache.org/POM/4.0.0" xmlns:xsi="http://www.w3.org/2001/XMLSchema-instance" xsi:schemaLocation="http://maven.apache.org/POM/4.0.0 http://maven.apache.org/xsd/maven-4.0.0.xsd"> <modelVersion>4.0.0</modelVersion> <groupId>com.jobs</groupId> <artifactId>springboot_read_nc</artifactId> <version>1.0</version> <parent> <groupId>org.springframework.boot</groupId> <artifactId>spring-boot-starter-parent</artifactId> <version>2.4.5</version> </parent> <properties> <maven.compiler.source>8</maven.compiler.source> <maven.compiler.target>8</maven.compiler.target> </properties> <dependencies> <dependency> <groupId>org.springframework.boot</groupId> <artifactId>spring-boot-starter</artifactId> </dependency> <dependency> <groupId>org.springframework.boot</groupId> <artifactId>spring-boot-starter-test</artifactId> </dependency> <!--引入 netcdf 依赖包--> <dependency> <groupId>edu.ucar</groupId> <artifactId>netcdf4</artifactId> <version>4.5.5</version> </dependency> <!--引入 gson 依赖包--> <dependency> <groupId>com.google.code.gson</groupId> <artifactId>gson</artifactId> <version>2.8.8</version> </dependency> </dependencies> </project>
由于不需要提供对外接口,因此这里只引入了 spring-boot-starter 就可以
为了能够读取 nc 文件,我们需要引入 netcdf4 依赖包,为了能够将数组转换为 json ,这里引入了 gson 依赖包
二、查看 nc 文件
为了解析出 NC 文件中的数据,首先我们必须知道 nc 文件中到底提供了哪些变量。
可以使用 PanoplyWin 工具打开 nc 文件,这个是 java 开发的工具,大概几十兆,我这边就不提供了,可以自行到网上查找和下载。
本篇博客的 nc 文件,使用 PanoplyWin 工具打开之后,能够看到如下 3 个变量:

本篇博客的 demo 会针对这 3 个变量,解析读取文件数据,生成 3 个 json 文件
三、代码展示
解析代码写在了测试类 ReadNcTest 中,具体细节如下:
package com.jobs; import com.google.gson.Gson; import org.junit.jupiter.api.Test; import org.springframework.beans.factory.annotation.Value; import org.springframework.boot.test.context.SpringBootTest; import org.springframework.core.io.Resource; import ucar.nc2.NetcdfFile; import ucar.nc2.Variable; import java.io.FileWriter; import java.util.ArrayList; import java.util.Arrays; import java.util.List; @SpringBootTest public class ReadNcTest { //从当前项目中的 resources 目录下寻找 test.nc 文件 @Value("classpath:test.nc") private Resource resource; @Test void readNcToJson() throws Exception { //获取 nc 文件的路径 String url = resource.getURL().getPath(); //转成 json 后存放的目录 //注意:无论 windows 还是 linux 下的路径,都统一使用 / 进行分割 String destDir = "d:/"; //使用 PanoplyWin 工具,打开 nc 文件,可以看到里面有 3 个变量 List<String> datalist = new ArrayList<>(Arrays.asList("longitude", "latitude", "rho")); //针对 3 个变量的数据,分别生成 json 文件 exportJson(url, destDir, datalist); } private void exportJson(String ncFileFullPath, String destDir, List<String> dataItem) { // 打开 NetCDF 文件 try (NetcdfFile ncFile = NetcdfFile.open(ncFileFullPath)) { //遍历nc文件中的每个变量,输出json数据 for (String it : dataItem) { // 读取其中的变量 Variable var = ncFile.findVariable(it); // 获取变量的维度 int[] shape = var.getShape(); int[] origin = new int[shape.length]; // 读取变量的值 Object data = var.read(origin, shape).get1DJavaArray(var.getDataType().getPrimitiveClassType()); // 使用 Gson 将数据转换为 JSON 格式 Gson gson = new Gson(); String json = gson.toJson(data); // 输出 JSON 数据到控制台 //System.out.println(json); String jsonfile = destDir + (destDir.endsWith("/") ? "" : "/") + it + ".json"; // 将 JSON 数据写入到文件 try (FileWriter writer = new FileWriter(jsonfile)) { writer.write(json); } } } catch (Exception e) { e.printStackTrace(); } } }
以上代码的注释写的很详细,相信能够很容易看懂,由于 nc 文件属于公司受保护的数据,所以我这边不能提供,大家可以使用自己的 nc 文件进行验证。
本篇博客的源代码下载地址为:https://files.cnblogs.com/files/blogs/699532/springboot_read_nc.zip


【推荐】编程新体验,更懂你的AI,立即体验豆包MarsCode编程助手
【推荐】博客园携手 AI 驱动开发工具商 Chat2DB 推出联合终身会员
【推荐】抖音旗下AI助手豆包,你的智能百科全书,全免费不限次数
【推荐】轻量又高性能的 SSH 工具 IShell:AI 加持,快人一步